Building an Echo Bot Agent in CSharp
Learn how to build an Echo Bot Agent using the Microsoft 365 Agents SDK with .NET and C#. This tutorial will guide you through creating a simple bot that echoes back user messages, providing a foundation for more complex bot development.
Prerequisites
- .NET SDK 8.0+
- Visual Studio 2022
- Microsoft 365 Agents Toolkit for Visual Studio
- A Microsoft 365 account (for testing)
- Basic knowledge of C#
1. Create a New C# Project
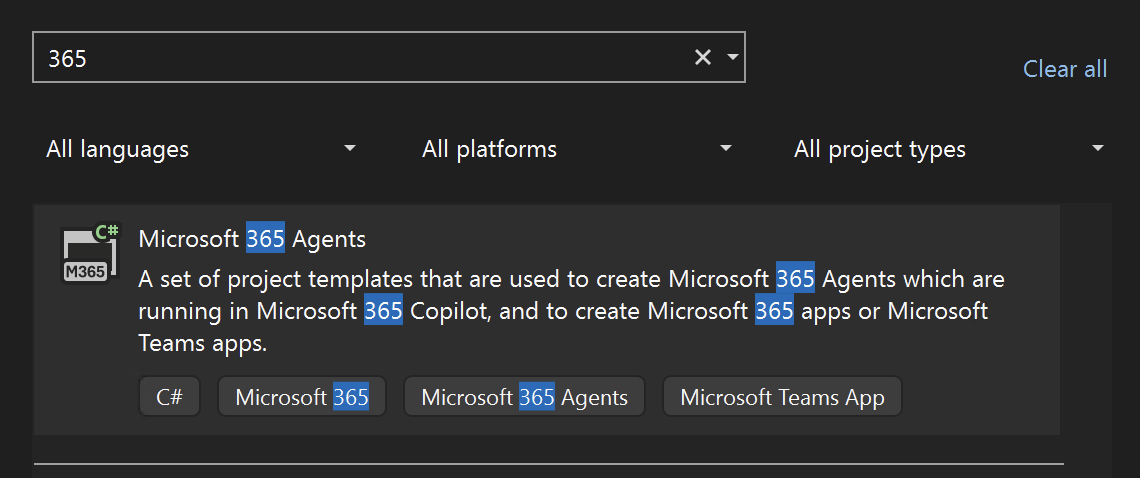
Open Visual Studio and click on Create a new project.

Search for 365 and select Microsoft 365 Agent template. Click Next.
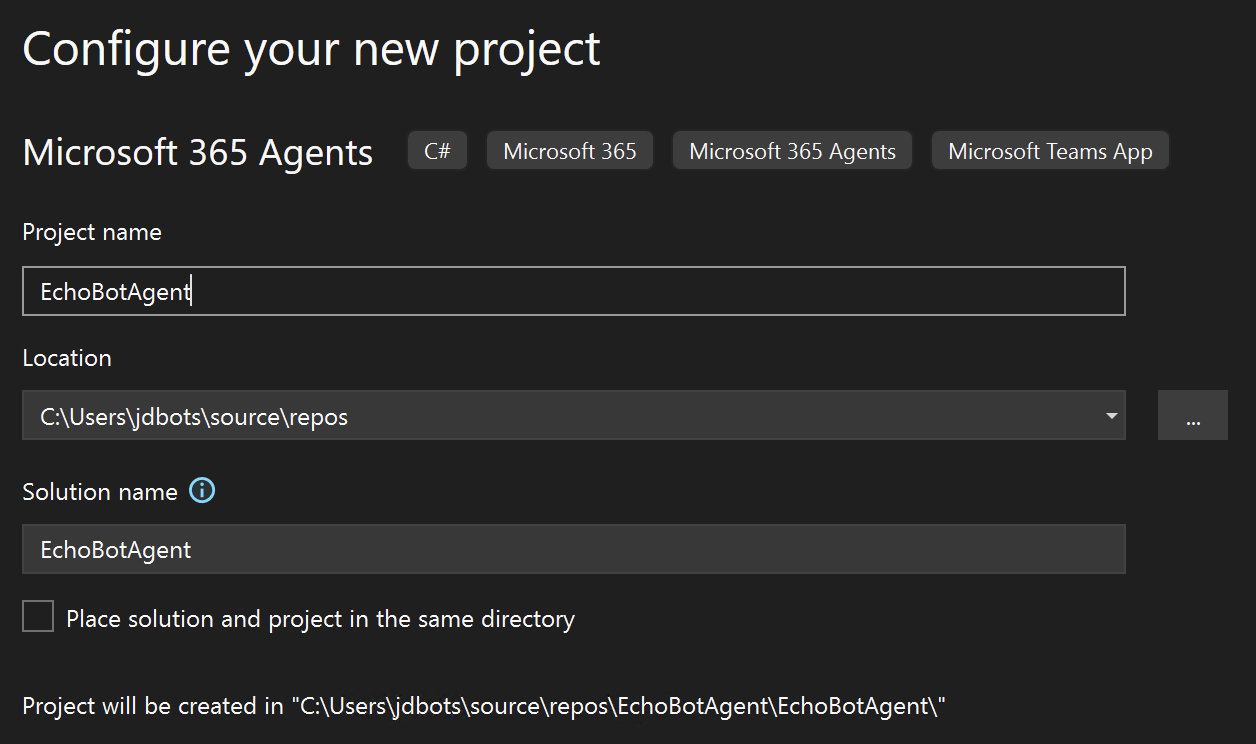
Name your project (e.g., EchoBotAgent), choose a location, and click Create.
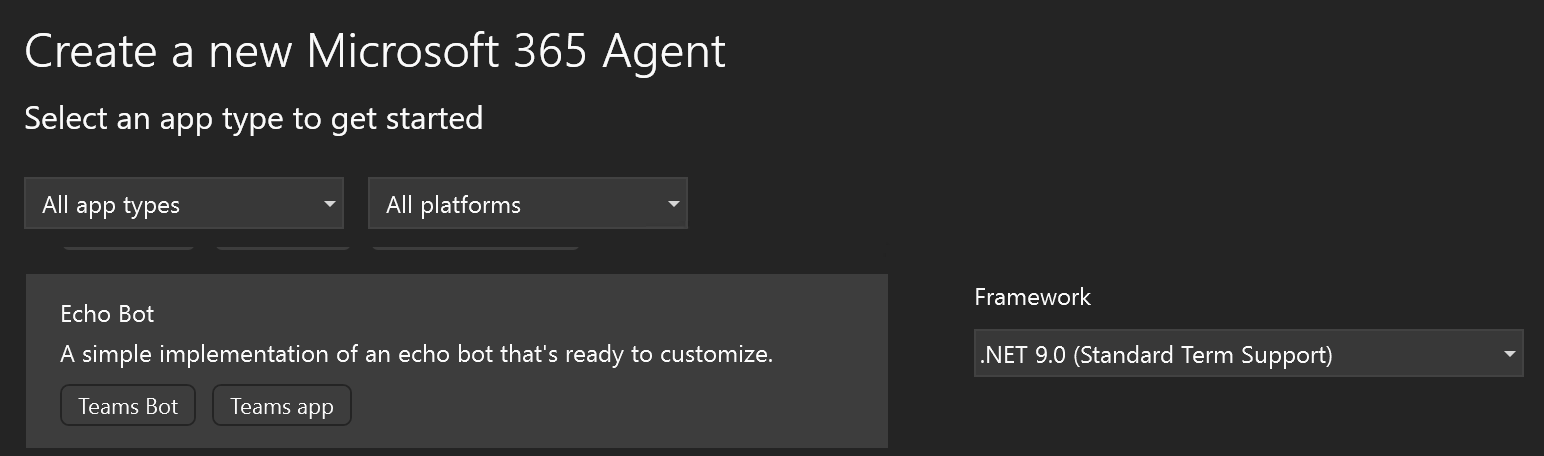
Scroll down to select the Echo Bot template, also choose the .NET version (e.g., .NET 8.0 or later) then click Create.
This will create a new Microsoft 365 Agent project with the necessary files and dependencies.
2. Understand the Project Structure
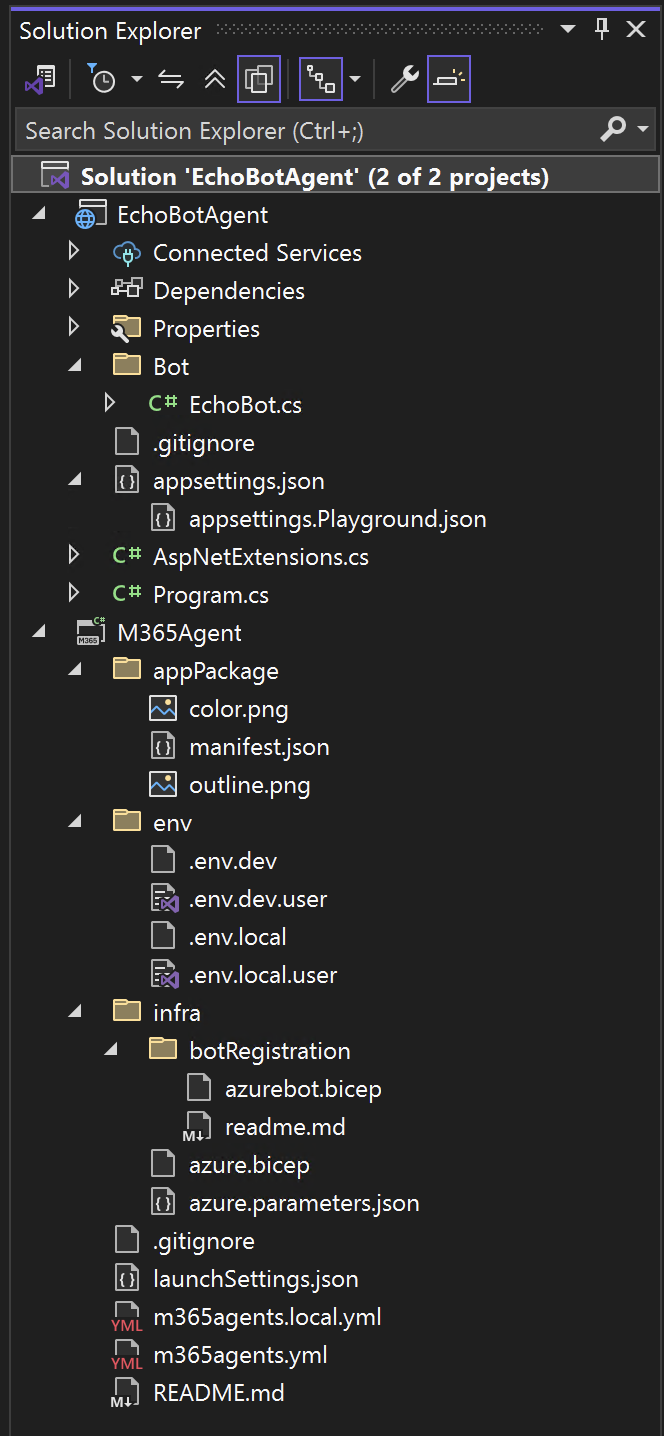
Your solution will have the following structure:
Solution 'EchoBotAgent' (2 of 2 projects)
├── EchoBotAgent/
│   ├── Connected Services
│   ├── Dependencies
│   ├── Properties
│   ├── Bot/
│   │   ├── EchoBot.cs
│   │   └── .gitignore
│   ├── appsettings.json
│   ├── appsettings.Playground.json
│   ├── AspNetExtensions.cs
│   └── Program.cs
└── M365Agent/
    ├── appPackage/
    │   ├── color.png
    │   ├── manifest.json
    │   └── outline.png
    ├── env/
    │   ├── .env.dev
    │   ├── .env.dev.user
    │   ├── .env.local
    │   └── .env.local.user
    └── infra/
        ├── botRegistration/
        │   ├── azurebot.bicep
        │   └── readme.md
        ├── azure.bicep
        ├── azure.parameters.json
        ├── .gitignore
        ├── launchSettings.json
        ├── m365agents.local.yml
        ├── m365agents.yml
        └── README.md
Key Components:
EchoBotAgent Project:
EchoBot.cs: Contains the main bot logic and message handlersProgram.cs: Entry point and bot configuration setupappsettings.json: Application configuration settingsappsettings.Playground.json: Development/testing configurationAspNetExtensions.cs: Custom ASP.NET Core extensions
M365Agent Project:
appPackage/: Contains the Microsoft 365 app manifest and iconsmanifest.json: Defines the bot's capabilities and configurationcolor.png&outline.png: Bot icons for different display contexts
env/: Environment configuration files for different deployment stagesinfra/: Infrastructure as Code (Bicep) files for Azure deploymentbotRegistration/: Azure Bot Service registration templatesazure.bicep: Main infrastructure templatem365agents.yml: Microsoft 365 Agents configuration
3. Understanding the Echo Bot Code
The main bot logic is implemented in the EchoBot.cs file. Let's examine the key components:
using Microsoft.Agents.Builder;
using Microsoft.Agents.Builder.App;
using Microsoft.Agents.Builder.State;
using Microsoft.Agents.Core.Models;

namespace EchoBotAgent.Bot;

public class EchoBot : AgentApplication
{
    public EchoBot(AgentApplicationOptions options) : base(options)
    {
        OnConversationUpdate(ConversationUpdateEvents.MembersAdded, WelcomeMessageAsync);

        // Listen for ANY message to be received. MUST BE AFTER ANY OTHER MESSAGE HANDLERS
        OnActivity(ActivityTypes.Message, OnMessageAsync);
    }

    protected async Task WelcomeMessageAsync(ITurnContext turnContext, ITurnState turnState, CancellationToken cancellationToken)
    {
        foreach (ChannelAccount member in turnContext.Activity.MembersAdded)
        {
            if (member.Id != turnContext.Activity.Recipient.Id)
            {
                await turnContext.SendActivityAsync(MessageFactory.Text("Hello and Welcome!"), cancellationToken);
            }
        }
    }

    protected async Task OnMessageAsync(ITurnContext turnContext, ITurnState turnState, CancellationToken cancellationToken)
    {
        await turnContext.SendActivityAsync($"You said: {turnContext.Activity.Text}", cancellationToken: cancellationToken);
    }
}
How the Echo Bot Works:
This echo bot has two main behaviors:
Welcoming New Members:
OnConversationUpdate(ConversationUpdateEvents.MembersAdded, WelcomeMessageAsync);
When someone joins the chat, the bot automatically greets them with a welcome message.
Echoing Messages:
OnActivity(ActivityTypes.Message, OnMessageAsync);
When anyone sends a message, the bot repeats it back with "You said:" in front.
Welcome Message Handler:
protected async Task WelcomeMessageAsync(ITurnContext turnContext, ITurnState turnState, CancellationToken cancellationToken)
{
    foreach (ChannelAccount member in turnContext.Activity.MembersAdded)
    {
        if (member.Id != turnContext.Activity.Recipient.Id)
        {
            await turnContext.SendActivityAsync(MessageFactory.Text("Hello and Welcome!"), cancellationToken);
        }
    }
}
This method checks each new member and sends "Hello and Welcome!" to them. It skips sending the message to itself when the bot joins.
Echo Message Handler:
protected async Task OnMessageAsync(ITurnContext turnContext, ITurnState turnState, CancellationToken cancellationToken)
{
    await turnContext.SendActivityAsync($"You said: {turnContext.Activity.Text}", cancellationToken: cancellationToken);
}
This method takes whatever message was sent and replies with "You said:" followed by the exact same text.
4. Run and Test Your Bot
Run your bot locally using Visual Studio:
- In Visual Studio, click Debug menu → Start Without Debugging (or press
Ctrl+F5) - Alternatively, you can use the command line:
dotnet run
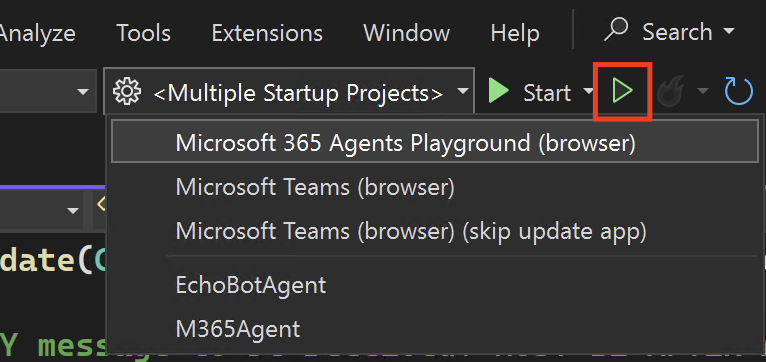
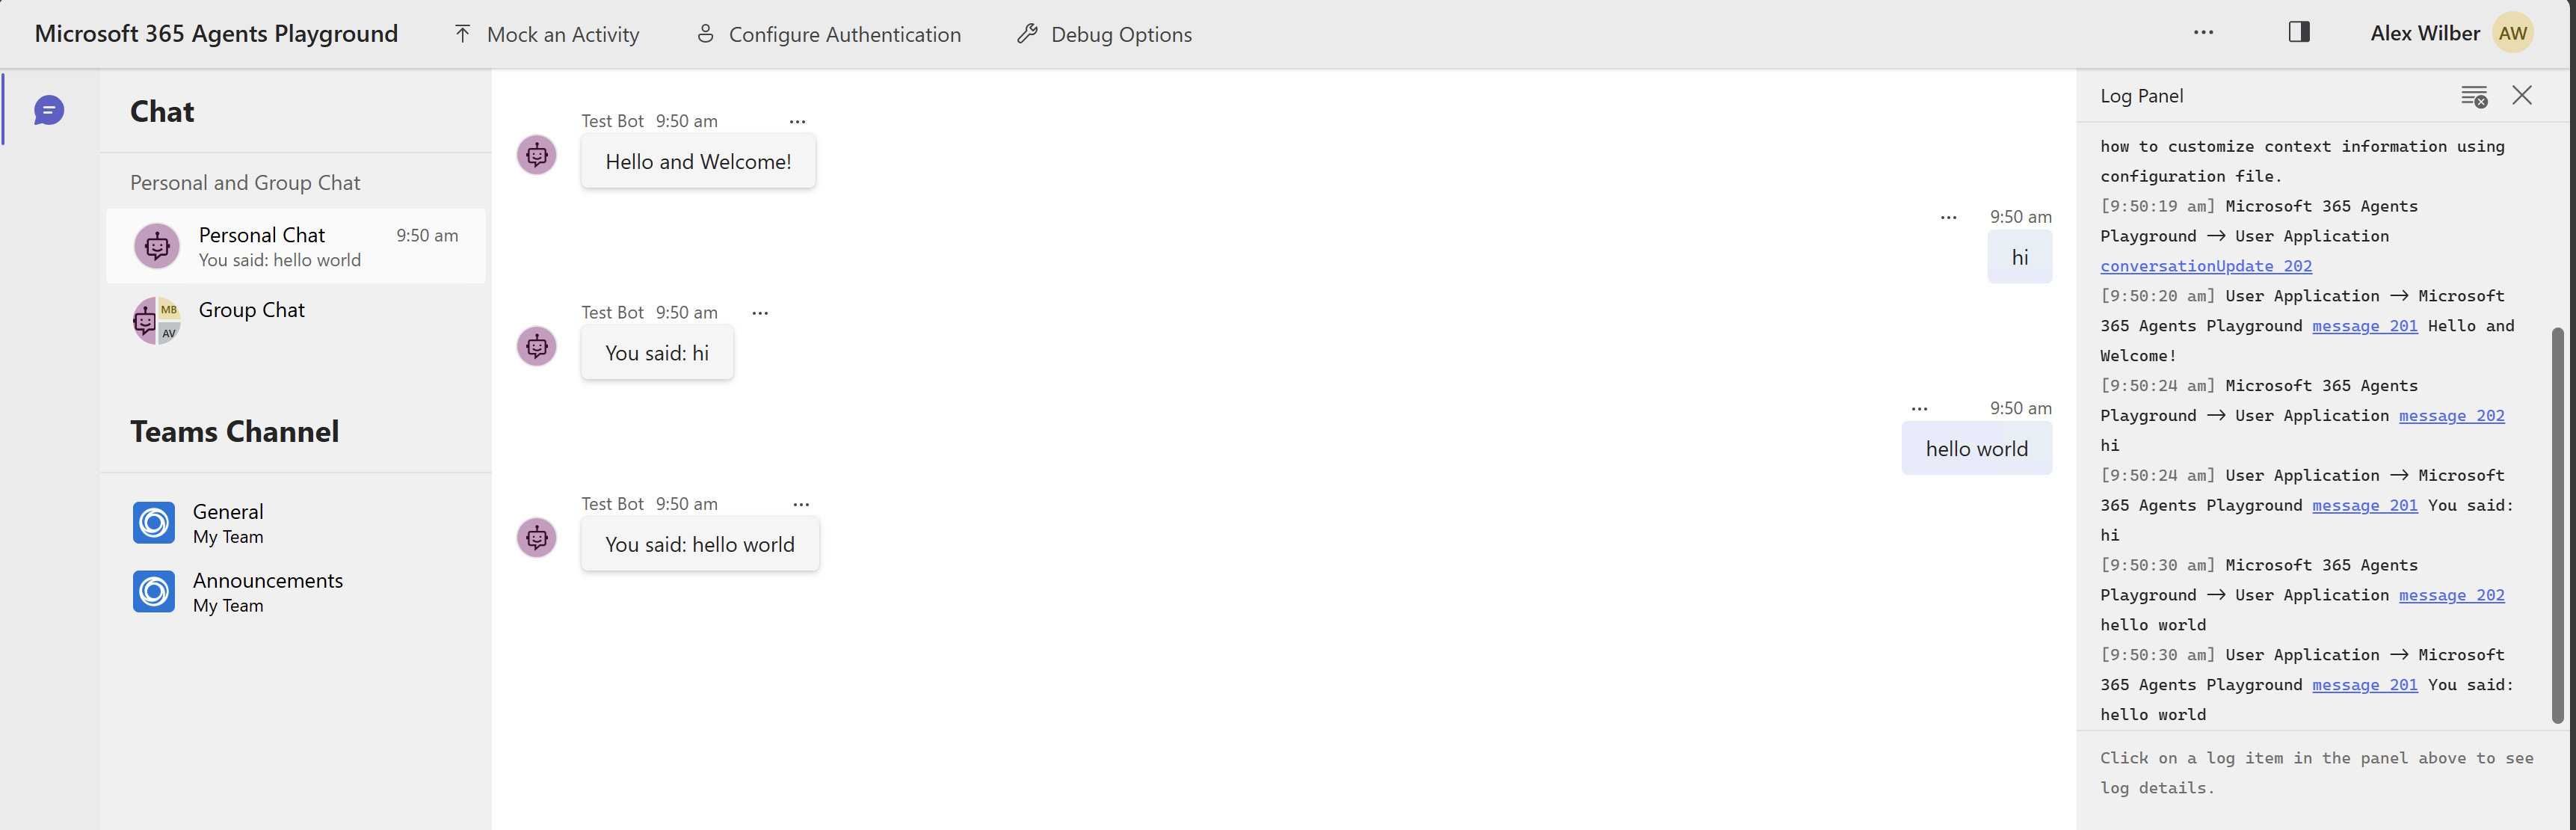
Recommended is to test the bot using Microsoft 365 Agents Playground (browser). It is already selected by default unless you want to test on Microsoft Teams client.
Test your bot using the Microsoft 365 Agents Playground. When you send a message, the bot will reply with the same text prefixed by "You said: ".
🎥 Detailed Video
Next Steps
- Explore more features in the Microsoft 365 Agents SDK documentation
- Add authentication, adaptive cards, or integrate with other Microsoft 365 services
Happy coding! If you have questions, leave a comment below or check out the official docs for more advanced scenarios