Self-Host Dewiride Analytics on Ubuntu Server — Part 2: Close the Ports Docker Opened Behind Your Firewall

Your firewall says Default: deny (incoming). Your database is answering the internet anyway. This part shows the port scan that proves it on a real server, explains the iptables chain order that causes it, and fixes it with a Compose override file — not by fighting the firewall.
This is Part 2 of a 6-part series.
- Part 1: Run the Stack with Docker Compose
- Part 2: Close the Ports Docker Opened Behind Your Firewall (you are here)
- Part 3: Custom Domain and Free HTTPS with Caddy
- Part 4: Claim the Install and Add Your First Website
- Part 5: Read the Dashboard — Humans, Bots and Engagement
- Part 6: Backups, Updates and Day-2 Operations
The Problem You Cannot See From the Server
At the end of Part 1 the stack was running and docker compose ps looked like this:
api          127.0.0.1:8080->8080/tcp
clickhouse   0.0.0.0:8123->8123/tcp, 0.0.0.0:9000->9000/tcp
postgres     0.0.0.0:5432->5432/tcp
web          0.0.0.0:3000->3000/tcp
Three of those say 0.0.0.0, which means every network address this machine has — including the public one. One says 127.0.0.1, which means the machine's own loopback and nothing else.
That difference is not cosmetic. 0.0.0.0 is a database listening to the internet.
"But UFW is on," you reasonably think, "and it only allows 22, 80 and 443." So did I. Let us check from somewhere that is not the server.
Proof: Scan It From Outside
Run this from your own computer, not from the server — the whole point is to see the machine the way a stranger sees it. Replace the address with your server's.
for p in 22 80 443 3000 5432 8123 9000; do
  printf "port %-5s : " "$p"
  nc -z -G 4 SERVER_IP "$p" 2>/dev/null && echo "OPEN" || echo "closed/filtered"
done
nc is netcat. -z means "just check whether it connects, send nothing", and -G 4 gives up after four seconds.
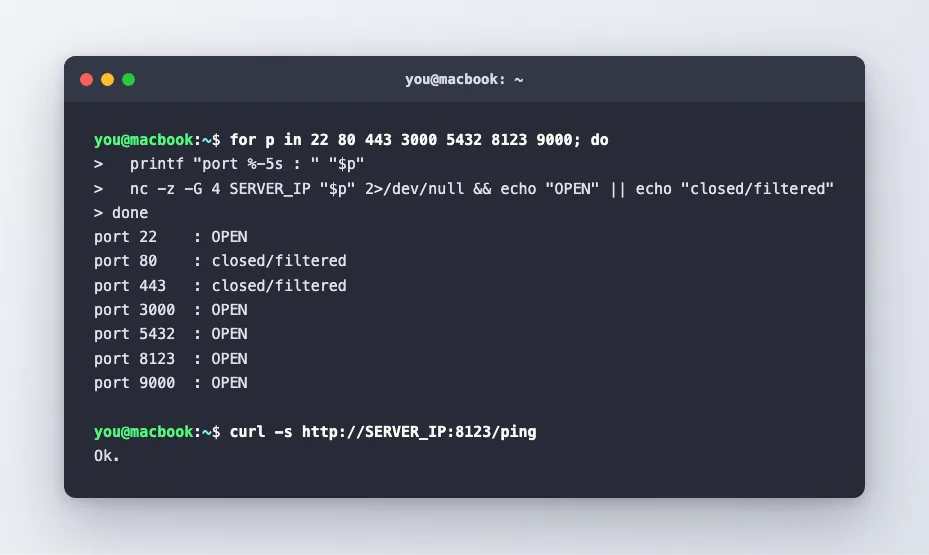
port 22    : OPEN
port 80    : closed/filtered
port 443   : closed/filtered
port 3000  : OPEN
port 5432  : OPEN
port 8123  : OPEN
port 9000  : OPEN
Look carefully at that, because it is stranger than a plain failure.
Ports 80 and 443 are closed — and UFW allows those. They are closed simply because nothing is listening on them yet. So the firewall is working; it is not misconfigured, and it has not silently died.
And yet 3000, 5432, 8123 and 9000 — none of which UFW allows — are wide open.
It gets worse. ClickHouse's HTTP interface answers a health probe with no credentials at all:
curl -s http://SERVER_IP:8123/ping
Ok.
That is a real analytics database, on a real public IP, confirming its own existence to anyone who asks. The password still protects the data — but you have just told every scanner on the internet exactly what you are running and which version, and you are one weak password or one unpatched release away from a much worse day.
If you followed Part 1 and stopped there, your server is in this state right now. Finish this part before you do anything else. It takes about ten minutes.
Why the Firewall Did Not Help
This is not a bug, and it is not UFW failing. It is two pieces of software with different ideas about who owns the packet filter, and Docker getting there first.
To show it safely — without exposing a database again — start a throwaway web server on a port nothing uses:
docker run -d --rm --name ufw-demo -p 8099:80 nginx:alpine
Now ask UFW what it thinks:
sudo ufw status
Status: active

To                         Action      From
--                         ------      ----
OpenSSH                    ALLOW       Anywhere
80/tcp                     ALLOW       Anywhere
443/tcp                    ALLOW       Anywhere
No mention of 8099. Now try it from your laptop:
curl -sI http://SERVER_IP:8099/
HTTP/1.1 200 OK
Server: nginx/1.31.3
Content-Type: text/html
A web server the firewall never agreed to, answering the internet.
The chain order that explains it
sudo iptables -L FORWARD -n --line-numbers
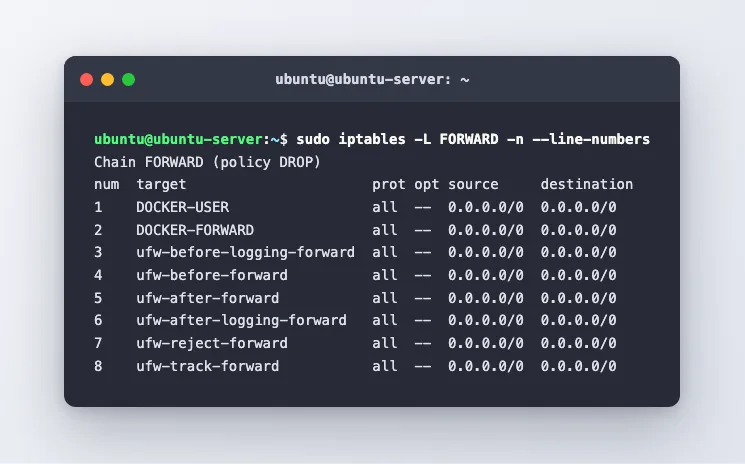
Chain FORWARD (policy DROP)
num  target                      prot opt source     destination
1    DOCKER-USER                 all  --  0.0.0.0/0  0.0.0.0/0
2    DOCKER-FORWARD              all  --  0.0.0.0/0  0.0.0.0/0
3    ufw-before-logging-forward  all  --  0.0.0.0/0  0.0.0.0/0
4    ufw-before-forward          all  --  0.0.0.0/0  0.0.0.0/0
5    ufw-after-forward           all  --  0.0.0.0/0  0.0.0.0/0
There it is, in one screen. Docker's chains are at positions 1 and 2. UFW's do not start until position 3. Rules are evaluated top to bottom and stop at the first match, so a packet Docker accepts never reaches a UFW rule at all.
Two more details complete the picture:
sudo iptables -t nat -L DOCKER -n
sudo iptables -t filter -L DOCKER -n
DNAT   tcp -- 0.0.0.0/0  0.0.0.0/0   tcp dpt:8099 to:172.17.0.2:80
ACCEPT tcp -- 0.0.0.0/0  172.17.0.2  tcp dpt:80
The first line rewrites the destination before any filtering happens, turning a packet addressed to your server into a packet addressed to the container. That reclassifies it from input traffic (destined for this machine) into forwarded traffic (passing through it) — and UFW's allow/deny rules that you wrote are input rules. They were never going to be consulted.
The second line then accepts it from 0.0.0.0/0 — anywhere at all.
Clean up the demonstration:
docker stop ufw-demo
The container was started with --rm, so stopping it removes it.
The Fix: Do Not Publish What Nothing Needs
You could fight this by writing rules into the DOCKER-USER chain, which is the one hook Docker leaves for you at position 1. We will come back to that. But the better fix is to notice that three of those four ports never needed publishing in the first place.
Containers in a Compose project share a private network and find each other by service name. The engine reaches PostgreSQL at postgres:5432 and ClickHouse at clickhouse:8123 over that network, which does not involve the host's ports at all. Publishing them to the host is a convenience for a developer who wants to point a database tool at their laptop — and this is not a laptop.
So: publish nothing, except the one thing that must be reachable, and bind even that to loopback.
The compose.yaml in the repository says as much in its own opening comment — "sized for a laptop". It is not wrong; it is written for the machine most people first run it on. Moving to a server is what this file is for.
Step 1: Write a production override
Do not edit compose.yaml. Editing a tracked file means every future git pull is a merge conflict. Compose is designed to be layered instead: a second file whose values are merged over the first.
cd ~/dewiride-analytics
nano compose.prod.yaml
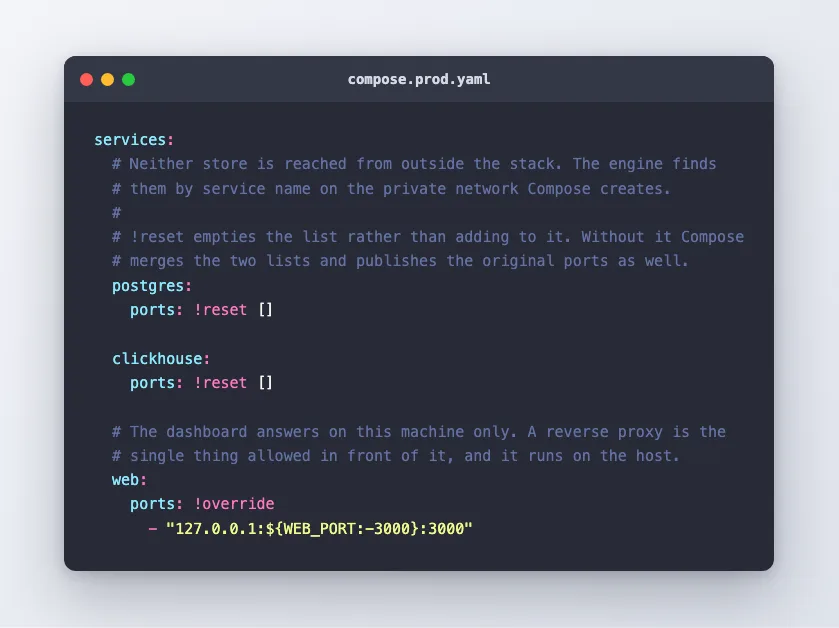
# What changes when this stack stops being a laptop and becomes a server on the internet.
#
# Compose merges this file over compose.yaml. Nothing here adds a service: every entry replaces
# one setting on a service the main file already describes.

services:
  # Neither store is reached from outside the stack. The engine finds them by service name on the
  # private network Compose creates, which is where they were always meant to be answered.
  #
  # !reset empties the list rather than adding to it. Without it Compose merges the two lists and
  # publishes the original ports as well, which is the opposite of what this file is for.
  postgres:
    ports: !reset []

  clickhouse:
    ports: !reset []

  # The dashboard answers on this machine only. A reverse proxy is the single thing allowed in
  # front of it, and in Part 3 that proxy runs on the host.
  web:
    ports: !override
      - "127.0.0.1:${WEB_PORT:-3000}:3000"
!reset and !override are the whole trick, and they are easy to get wrong.
By default Compose merges lists rather than replacing them. Write ports: ["127.0.0.1:5432:5432"] in an override file and you get both bindings — the original 0.0.0.0 one and your new one — which achieves exactly nothing while looking like it worked. !reset [] empties the list. !override replaces it with what follows.
Both tags need Compose v2.24 or newer. Part 1 installed v5.5.0, so you are fine.
Step 2: Tell Compose to use both files
You could type -f compose.yaml -f compose.prod.yaml on every command forever, and forget it exactly once. Instead, put it in .env:
echo "COMPOSE_FILE=compose.yaml:compose.prod.yaml" >> .env
COMPOSE_FILE is read by the docker compose command itself, not by the containers. From now on a plain docker compose up uses both files, in that order, and there is nothing to remember.
Check the merge before applying it:
docker compose config | grep -A3 "published"
docker compose config prints the fully merged configuration without starting anything. If the postgres and clickhouse services still show published ports, your override is not being read — check the COMPOSE_FILE line for typos.
Step 3: Apply it
docker compose up -d --wait
Compose notices that three containers now have different port settings, recreates those three, and leaves the rest alone. Your data is in volumes and is untouched.
docker compose ps --format "table {{.Service}}\t{{.Status}}\t{{.Ports}}"
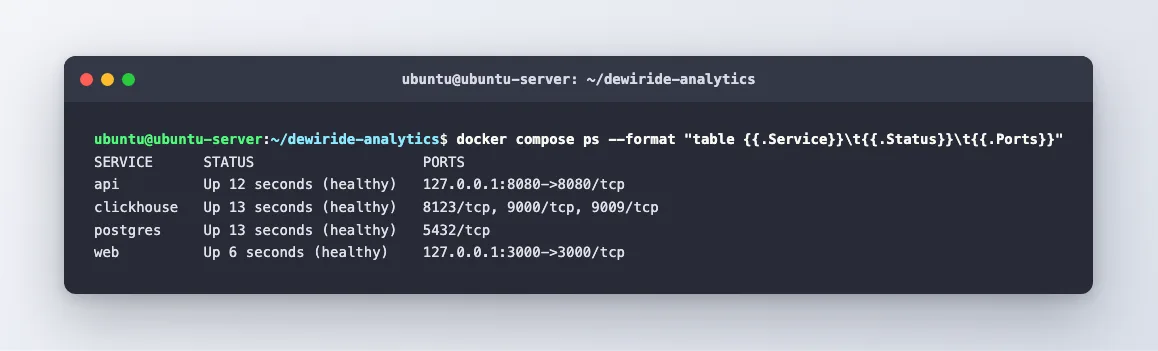
SERVICE      STATUS                    PORTS
api          Up 12 seconds (healthy)   127.0.0.1:8080->8080/tcp
clickhouse   Up 13 seconds (healthy)   8123/tcp, 9000/tcp, 9009/tcp
postgres     Up 13 seconds (healthy)   5432/tcp
web          Up 6 seconds (healthy)    127.0.0.1:3000->3000/tcp
Compare that with the output at the top of this page. postgres now says 5432/tcp with no address in front of it — meaning the container listens on that port internally and the host publishes nothing. Same for ClickHouse. The dashboard is on loopback.
Step 4: Scan again
From your laptop, exactly the same command as before:
port 22    : OPEN
port 80    : closed/filtered
port 443   : closed/filtered
port 3000  : closed/filtered
port 5432  : closed/filtered
port 8123  : closed/filtered
port 9000  : closed/filtered
curl -s -m 8 http://SERVER_IP:8123/ping || echo "(no answer)"
(no answer)
One port open on the entire machine, and it is SSH. That is what a server running four services should look like from outside.
So How Do You Look at the Dashboard Now?
The dashboard is on 127.0.0.1:3000, which your browser cannot reach. Part 3 gives it a real domain. Until then, the correct tool is an SSH tunnel, and it is worth knowing regardless.
Run this on your own computer and leave it running:
ssh -N -L 3300:127.0.0.1:3000 username@server_ip
-L 3300:127.0.0.1:3000— "listen on port 3300 on my machine, and forward anything arriving there to127.0.0.1:3000as seen from the server."-N— do not run a shell; this connection exists only to carry the tunnel.
Now open http://localhost:3300 in your browser.
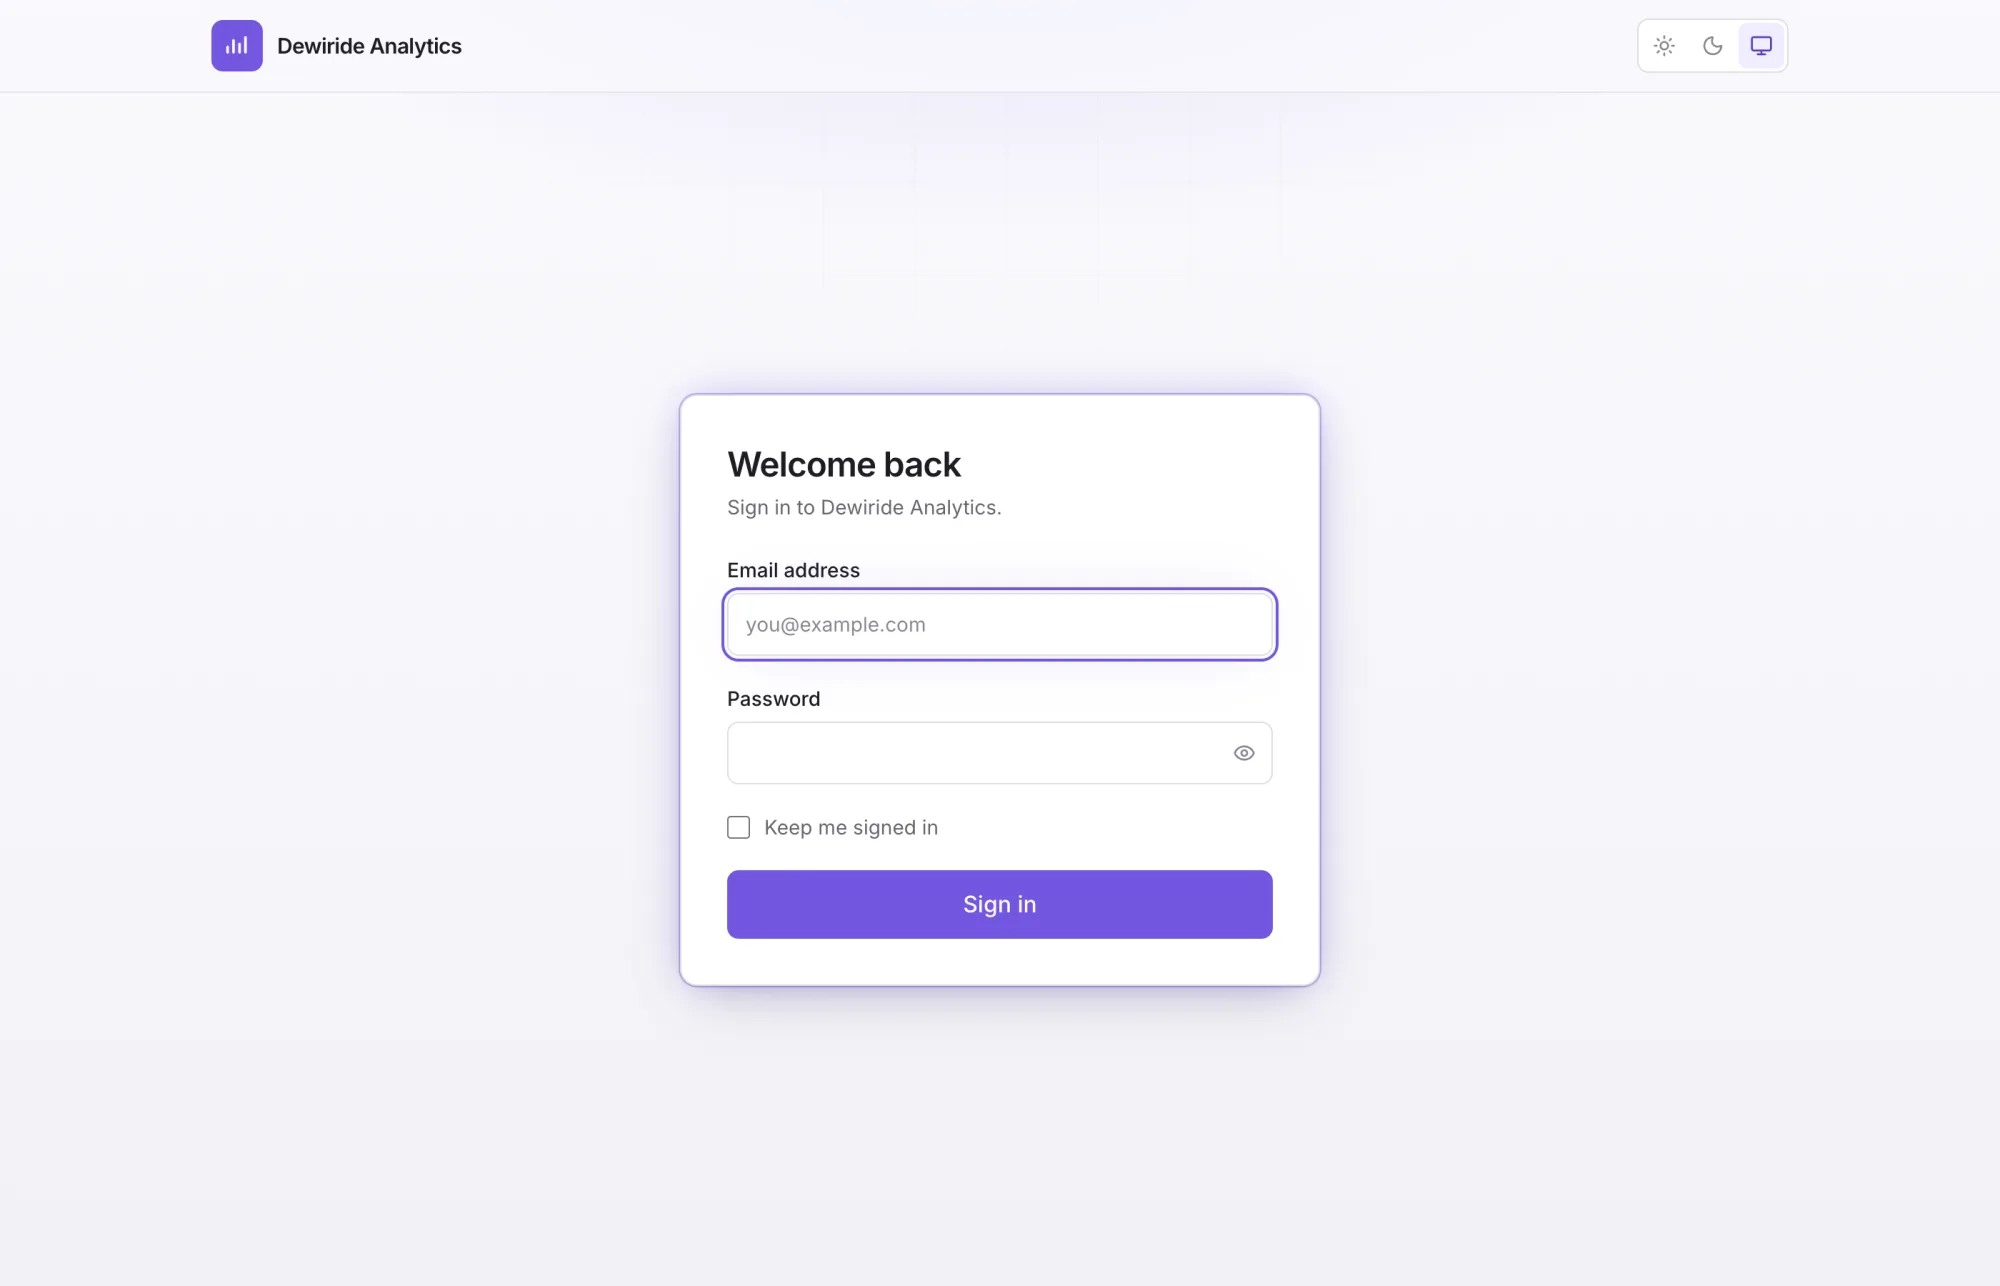
The dashboard appears, over an encrypted connection, with nothing published to the internet to make it happen. Press Ctrl+C in that terminal to close the tunnel when you are done.
If port 3300 is busy on your machine, pick another — -L 4300:127.0.0.1:3000 and browse to localhost:4300. The left-hand number is yours to choose; the right-hand pair describes the server and must stay 127.0.0.1:3000.
What About DOCKER-USER and ufw-docker?
Two other approaches come up whenever this is discussed, and both are legitimate. Here is the honest comparison.
| Approach | How it works | Why we did not use it |
|---|---|---|
Bind to 127.0.0.1 (this guide) | The port is never published to a public address, so no rule is needed | Nothing to bypass. Works identically on every host, and survives a Docker upgrade |
Rules in DOCKER-USER | Docker leaves that chain at position 1 and never touches it, so your rules run first | Correct, but it is a rule you must write, keep, and remember when adding services. A mistake fails open |
ufw-docker helper script | A third-party script that generates DOCKER-USER rules from UFW-style commands | Convenient, but a third-party dependency in your firewall's path, and still a deny-list |
DOCKER-USER is genuinely the right tool when a container must be reachable from elsewhere but only from certain addresses — a database replica, say. For a stack where the only public surface is a web dashboard, not publishing the port is simpler and cannot be got wrong.
The principle underneath: a closed port needs no firewall rule. Prefer arrangements where the dangerous thing does not exist over arrangements where it exists and is guarded.
Common Mistakes
| Mistake | What happens | Fix |
|---|---|---|
Adding ports: in the override without !reset | Compose merges the lists — the 0.0.0.0 binding is still there | Use ports: !reset [] or ports: !override [...] |
Editing compose.yaml directly | Every git pull is now a merge conflict | Put changes in compose.prod.yaml and leave the tracked file alone |
Forgetting COMPOSE_FILE | Commands silently use only compose.yaml, and the override does nothing | Add it to .env, then confirm with docker compose config |
| Testing from the server itself | curl localhost:8123 works even when the port is closed to the world, so everything looks fine | Always scan from a different machine |
| Assuming UFW covers Docker | Databases exposed for months without anyone noticing | Scan from outside after every change that touches ports |
Using docker run -p out of habit | Publishes to 0.0.0.0 again, bypassing all of this | Write -p 127.0.0.1:8099:80 when you mean loopback |
Troubleshooting
| Symptom | Likely cause | What to do |
|---|---|---|
| Override appears to do nothing | COMPOSE_FILE not set, or a typo in the filename | docker compose config shows exactly which files were merged |
services.postgres.ports: unknown tag !reset | Compose is older than v2.24 | docker compose version. Upgrade the plugin |
Ports still open after up -d | Compose did not recreate the containers | docker compose up -d --force-recreate |
| Dashboard unreachable and the tunnel errors | Something already uses that port on your own machine | Choose a different left-hand port for -L |
bind: address already in use on the server | Another process holds 3000 | Change WEB_PORT in .env |
| The engine cannot reach the databases after the change | You removed the wrong thing | The engine uses the internal network, so postgres:5432 must still work. docker compose logs api will say |
FAQ
Is this a Docker bug?
No, and it is documented behaviour. Docker manages its own iptables rules because it has to — it creates networks and containers dynamically, and cannot wait for an administrator to add rules. The surprise is only that most firewall tutorials never mention it.
Does iptables=false in the Docker daemon config fix it?
It stops Docker writing rules, and it also stops container networking working until you write every rule yourself. That is a real option for people who manage their own packet filter. It is not a good first move.
Was my database actually compromised?
Probably not — the password still applied. But you cannot know, and internet-wide scanners find a new open port in minutes, not days. If it was exposed for any length of time, rotate both passwords: change them in .env, then docker compose down --volumes and start fresh, accepting that this deletes measured data. There is no way to change a database password without either an admin session or a rebuild.
Should I close port 22 too? Not unless you have another way in. Do harden it: use SSH keys and disable password authentication, and consider moving it off port 22 to quieten the logs.
What if I genuinely need to reach PostgreSQL from my laptop?
Tunnel it, exactly as with the dashboard: ssh -N -L 5433:127.0.0.1:5432 username@server_ip, then point your database tool at localhost:5433. That works even with nothing published, because SSH connects from inside the server — and it is encrypted, authenticated, and leaves no port open.
Does this apply to other Compose stacks?
Every one of them. Any docker run -p or ports: entry without an address in front publishes to 0.0.0.0. It is worth scanning any server you already run.
Conclusion
Your firewall was never broken. It was simply never asked, because Docker's rules sit two positions ahead of it in the chain and rewrite the packet's destination before filtering begins.
The fix was not to fight that. It was to stop publishing three ports that only ever needed to exist on a private network, and to bind the fourth to loopback — so there is nothing for a rule to guard.
The dashboard is now safely unreachable, which is a slightly awkward kind of success. Part 3 gives it a real address and a padlock.
← Previous: Part 1: Run the Stack with Docker Compose Next: Part 3: Custom Domain and Free HTTPS with Caddy →
