Self-Host Dewiride Analytics on Ubuntu Server — Part 1: Run the Stack with Docker Compose

Learn how to run Dewiride Analytics on your own Ubuntu Server — an open-source web analytics engine that tells you which of your visitors were actually people. This part covers the firewall, the repository, the two passwords you must set yourself, and the single command that brings four containers up and waits until every one of them is genuinely healthy.
This is Part 1 of a 6-part series.
- Part 1: Run the Stack with Docker Compose (you are here)
- Part 2: Close the Ports Docker Opened Behind Your Firewall
- Part 3: Custom Domain and Free HTTPS with Caddy
- Part 4: Claim the Install and Add Your First Website
- Part 5: Read the Dashboard — Humans, Bots and Engagement
- Part 6: Backups, Updates and Day-2 Operations
Introduction
Most analytics products count requests and call the total "visitors". A growing share of that total is not a person at all — search crawlers, AI training and retrieval agents, uptime monitors, scrapers, and security scanners probing your site for a way in.
Dewiride Analytics is built the other way round. For every visit it tries to answer who or what generated this traffic, why was it classified that way, and should it count as genuine human engagement — and it shows you the reasons in plain sentences rather than a score.
It is AGPL-3.0 free software, and self-hosting is not a crippled tier: the full detection engine, every screen, and unlimited websites, traffic and retention are yours. What you give up by running it yourself is nothing except the running of it.
That last part is what this series is about.
Every command in this series was run on a real, freshly installed Ubuntu 26.04 LTS server on the public internet, and every screenshot is the actual result. The versions you will see are Docker 29.7.2, Docker Compose v5.5.0, PostgreSQL 18, ClickHouse 26.3, .NET 10 and Next.js 16.3.1. The same steps work on Ubuntu 24.04 LTS and 22.04 LTS.
What You Will Build
By the end of the whole series you will have a working analytics installation on a domain of your own, with a padlock, collecting traffic from a real website, backed up, and updatable.
By the end of this part you will have:
- Ubuntu updated, and a firewall switched on with only the ports you actually want.
- The Dewiride Analytics source on the server, at a known version.
- Two strong passwords generated by the machine rather than chosen by you.
- Four containers running side by side — a control-plane database, a telemetry store, the engine, and the dashboard.
- One command that returns only when all four are genuinely ready to use.
At this stage the product is running but has no domain, no certificate, and — as we will discover in Part 2 — rather more of itself exposed to the internet than you would like. Both are fixed before the series is over.
What It Costs
The software is free and always will be. What you pay for is a server.
I ran this on a VPS with 6 vCPUs, 11 GB of RAM and a 193 GB disk. That is far more machine than the stack needs. With all four containers up and no traffic at all, the whole box was using 1.2 GB of RAM, and the images plus data came to about 2.4 GB of disk.
I have not tested it on a smaller machine, so I will not tell you a minimum I have not measured. What I will say is that the heaviest moment is the first build, not day-to-day running — two compilers run at once — so if your server is small, that is where it will hurt.
There is no free tier here, and no hosted account to fall back on. A VPS with 4 GB of RAM is the sort of thing that costs a few dollars a month at most providers.
Prerequisites
Before you start you need:
- An Ubuntu Server — 26.04 LTS, 24.04 LTS or 22.04 LTS all work.
- Docker Engine and the Docker Compose plugin installed, and the ability to run
dockerwithout typingsudo. If you have not done that, follow our guide on how to install Docker on Ubuntu Server first and come back here. It takes about five minutes. - SSH access with an account that can use
sudo. If you have not set up key-based login yet, disable password authentication and use SSH keys — this machine is about to be on the internet properly. - A domain name you control. You do not need it until Part 3, but it is worth pointing the record early so DNS has time to settle.
- About 6 GB of free disk space, most of which is build cache you can reclaim later.
Step 1: Connect to Your Server
From your own computer (replace username and server_ip with your own):
ssh username@server_ip
Everything from here on happens on the server unless the code block says otherwise.
Step 2: Update Ubuntu
sudo apt update && sudo apt upgrade -y
apt update refreshes the list of what is available; apt upgrade installs the newer versions. On a brand-new server this is usually a few dozen packages and a couple of minutes. Doing it first means that when something breaks later, "the machine was out of date" is already ruled out.
Step 3: Check Docker Is Ready
docker --version
docker compose version
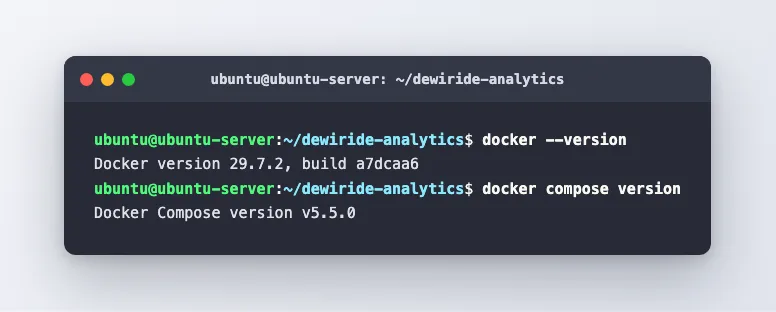
Docker version 29.7.2, build a7dcaa6
Docker Compose version v5.5.0
Two version numbers and no error means you are ready. If you get permission denied while trying to connect to the Docker daemon socket, your user is not in the docker group yet — that is Step 7 of the Docker installation guide, and you need to log out and back in after fixing it.
Step 4: Turn the Firewall On First
Do this before you start anything, not after.
Ubuntu ships with UFW — the Uncomplicated Firewall — which is a friendly front end to the kernel's packet filter. By default it is off, meaning every port on your machine answers the whole internet.
sudo ufw allow OpenSSH
sudo ufw allow 80/tcp
sudo ufw allow 443/tcp
sudo ufw --force enable
Read those four lines in order. The first keeps SSH working — allow it before you enable the firewall, or you will lock yourself out of your own server, and there is no undo over a connection you just severed. The next two open the ordinary web ports, which nothing is using yet but Caddy will need in Part 3. The last switches the whole thing on.
--force skips the "are you sure, this may disrupt existing ssh connections" prompt. It is safe here precisely because you allowed OpenSSH first.
Check it:
sudo ufw status verbose
Status: active
Logging: on (low)
Default: deny (incoming), allow (outgoing), deny (routed)
New profiles: skip

To                         Action      From
--                         ------      ----
22/tcp (OpenSSH)           ALLOW IN    Anywhere
80/tcp                     ALLOW IN    Anywhere
443/tcp                    ALLOW IN    Anywhere
Default: deny (incoming) is the line that matters. Anything not listed is refused.
Hold on to that sentence. In Part 2 we are going to prove it is not true of everything on this machine, and the reason will surprise you.
Step 5: Get the Code
git clone https://github.com/Dewiride-Open-Source/Dewiride-Analytics.git ~/dewiride-analytics
cd ~/dewiride-analytics
git clone copies the repository onto your machine. Giving it a path at the end puts it somewhere predictable — ~/dewiride-analytics — rather than in whatever folder you happened to be standing in.
Confirm what you got:
git log --oneline -1
Note that commit down somewhere. When you come to upgrade in Part 6, "which version was I on?" is a question you will want an answer to.
Step 6: Set the Two Passwords
The project ships an example settings file. Copy it:
cp .env.example .env
chmod 600 .env
chmod 600 means only you can read or write it. Other accounts on the server cannot open it at all.
Now open .env and you will find this near the top:
POSTGRES_USER=dewiride
POSTGRES_PASSWORD=
POSTGRES_DB=dewiride_analytics
Those two password fields are deliberately empty, and the stack refuses to start until you fill them. That is not an oversight — a working default password is a default password somebody eventually ships to production.
Rather than inventing passwords, let the machine do it:
sed -i "s|^POSTGRES_PASSWORD=.*|POSTGRES_PASSWORD=$(openssl rand -hex 24)|" .env
sed -i "s|^CLICKHOUSE_PASSWORD=.*|CLICKHOUSE_PASSWORD=$(openssl rand -hex 24)|" .env
openssl rand -hex 24 produces 24 random bytes written as 48 hexadecimal characters. sed -i edits the file in place, replacing the line that starts with each name.
Why hex and not something friendlier? Both passwords end up inside connection strings that use semicolons as separators, and one of them travels in an HTTP URL. Hexadecimal has no characters that mean anything special in either place, so it cannot break the string it is embedded in. It is a small thing that saves a genuinely baffling afternoon.
Check your work without printing the secrets:
sed -E "s/(PASSWORD=).*/\1********/" .env | grep -v '^#'
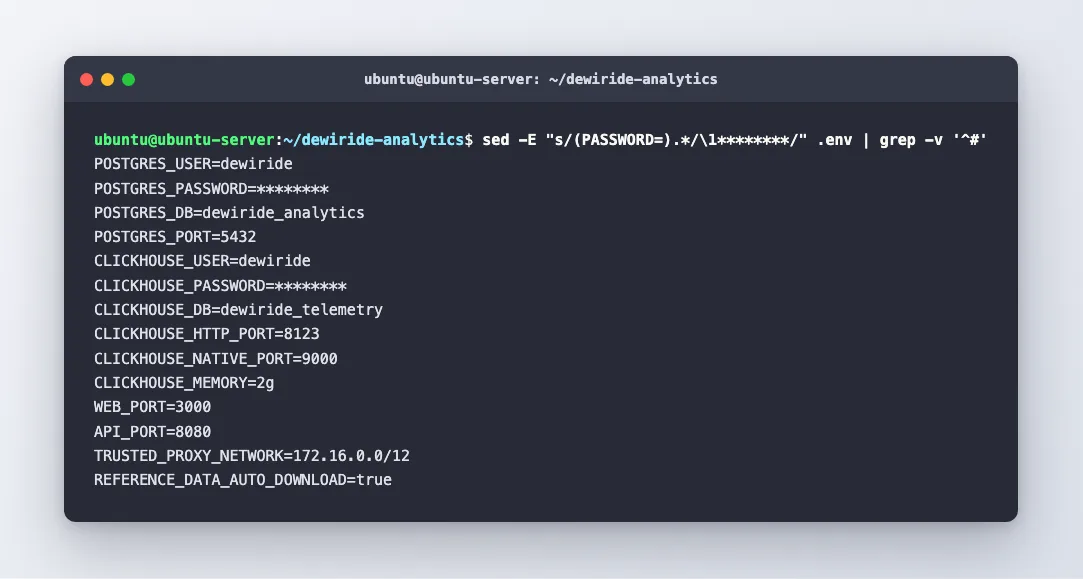
You should see a value after POSTGRES_PASSWORD= and after CLICKHOUSE_PASSWORD=. Everything else in that file has a sensible default and can be left alone for now.
Never commit .env to a Git repository, and never paste it into a support thread. It is the key to both databases. The project already lists it in .gitignore, and it must stay there.
Step 7: Start Everything
One command:
docker compose up --wait
The first run builds two images from source — the .NET engine and the Next.js dashboard — and pulls two more. On the machine described above the whole thing, build included, took 2 minutes 16 seconds. Later starts take seconds.
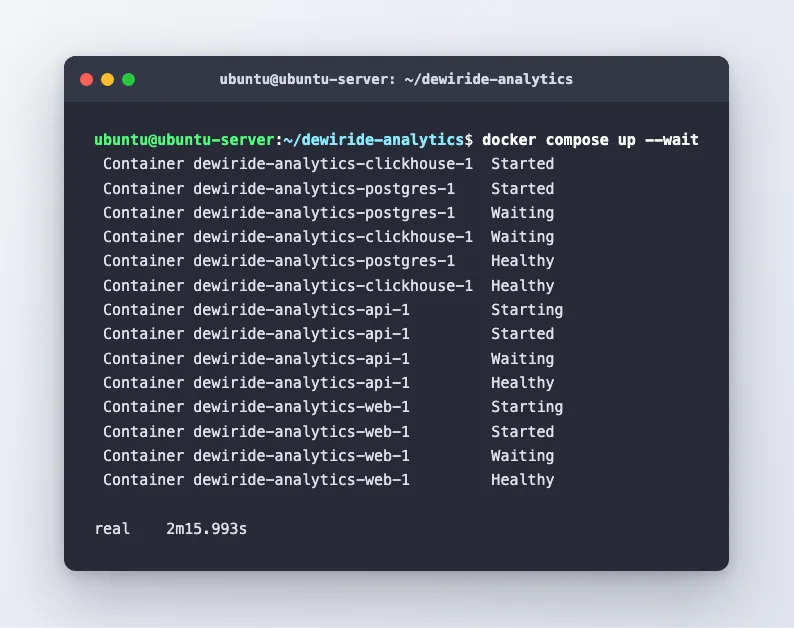
The --wait flag is the interesting part, and it is worth understanding rather than copying.
Without it, docker compose up -d returns as soon as the containers have been started — which tells you almost nothing, because a database that has been started is typically not yet a database that answers questions. With --wait, Compose returns only once every service reports healthy, so a successful exit genuinely means the product is usable.
Read the last few lines from the bottom up and you can watch the dependency rules doing their job:
clickhouse-1 Healthyandpostgres-1 Healthy— both stores are answering.api-1 Starting— only now does the engine start. It applies database schema changes as it comes up, and against a database still creating itself that fails rather than waits.api-1 Healthy— the engine has finished its migrations and is ready.web-1 Starting— and only now the dashboard, whose every screen begins by asking the engine a question.
That ordering is not luck. It is depends_on: condition: service_healthy in the compose file, and it removes the single most common class of first-boot failure.
Step 8: Check All Four Services Are Healthy
docker compose ps
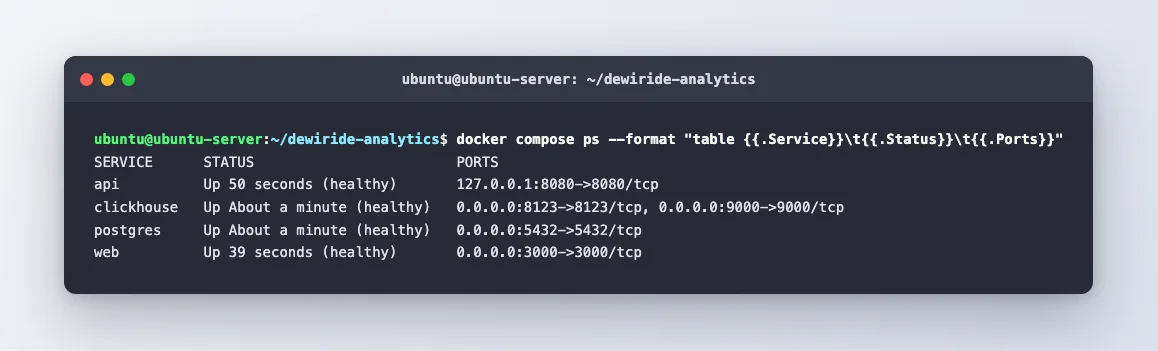
SERVICE      STATUS                    PORTS
api          Up 50 seconds (healthy)   127.0.0.1:8080->8080/tcp
clickhouse   Up About a minute (healthy)   0.0.0.0:8123->8123/tcp, 0.0.0.0:9000->9000/tcp
postgres     Up About a minute (healthy)   0.0.0.0:5432->5432/tcp
web          Up 39 seconds (healthy)   0.0.0.0:3000->3000/tcp
Four rows, every one of them saying (healthy). That word is not decoration — it means a health check written for that specific piece of software is passing right now.
Look at the PORTS column, though, and compare the first row with the other three. api says 127.0.0.1:8080. The rest say 0.0.0.0. Hold that thought; it is the whole of Part 2.
What the Four Containers Actually Do
| Service | Image | What it is for |
|---|---|---|
postgres | postgres:18-alpine | Accounts, organisations, websites, settings and the job queue — records that get updated and where relationships matter |
clickhouse | clickhouse/clickhouse-server:26.3-alpine | The traffic itself: written constantly, never edited, and queried by scanning columns across long date ranges |
api | built from backend/Dockerfile | The engine — collection, the dashboard's data, accounts, and the classification that decides what each visit was |
web | built from frontend/Dockerfile | The dashboard you look at, plus the tracker script it hands to the websites you measure |
Two databases, deliberately. PostgreSQL is good at records that change and refer to each other. ClickHouse is good at billions of rows that never change and get aggregated by the million. Neither is good at the other's job, and using one for both is how analytics products end up slow.
The engine is not reachable from outside the machine at all — 127.0.0.1:8080 binds only to the server's own loopback address. Everything a browser sends reaches it through the dashboard container, which forwards it on. That single-address arrangement is why sign-in works without any cross-origin configuration to get wrong.
Step 9: Confirm the Engine Is Answering
curl -s http://127.0.0.1:8080/health/ready
Healthy
That endpoint is deliberately a readiness check, not a liveness one. It passes only once both stores are reachable and their schema changes have been applied — which is the moment the product genuinely becomes usable, rather than the moment the process started.
You can also watch what happened on first boot:
docker compose logs api | grep -i "migration\|reference"
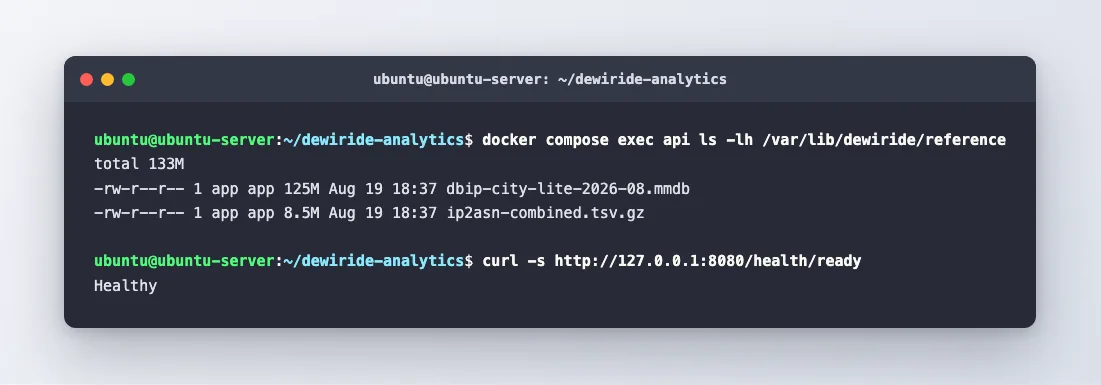
Two things are worth spotting in there. The first is the schema being created — five ClickHouse migrations, applied automatically, no manual step. The second is a download starting in the background:
Applied ClickHouse migration 5 (operated_controls).
ClickHouse schema is up to date across 5 migration(s).
Start processing HTTP request GET https://download.db-ip.com/free/dbip-city-lite-2026-08.mmdb.gz
That is the data that turns a visitor's address into a country, a town and a network operator. It is about 130 MB, it is republished monthly, and it is fetched after startup rather than shipped inside the image — so nothing waits on it, upgrading the engine does not mean downloading it again, and a server with no route to the internet still counts traffic perfectly well and simply reports every country as not known.
Before You Walk Away
You now have a working analytics engine. You also have four ports published on a machine that is on the public internet, and — this is the uncomfortable part — the firewall you switched on in Step 4 is not protecting three of them.
We prove that with a real port scan in Part 2 and fix it in about five lines. It takes ten minutes.
If you are stopping here for the day, stop the stack first:
docker compose down
That leaves your data untouched in Docker volumes and brings everything back with docker compose up --wait when you return. It is one command, and it is the responsible way to pause.
Common Mistakes
| Mistake | What happens | Fix |
|---|---|---|
| Enabling UFW before allowing OpenSSH | Your SSH session dies mid-command and you cannot get back in | Always sudo ufw allow OpenSSH first. If you are locked out, use your provider's web console |
| Leaving the two passwords blank | The stack refuses to start with set POSTGRES_PASSWORD in .env | That message is doing its job. Set both |
Using a password with ; or @ in it | Baffling connection errors that look like the database is down | Use openssl rand -hex 24. Hex is safe inside connection strings and URLs |
docker compose up -d without --wait | The command returns while services are still starting, and the dashboard errors if you rush to it | Use --wait so a successful exit means genuinely ready |
Running docker compose from the wrong folder | no configuration file provided | cd ~/dewiride-analytics first — Compose reads the file in the current directory |
Committing .env | Both database passwords are now public, permanently | It is in .gitignore already. Leave it there |
Troubleshooting
| Symptom | Likely cause | What to do |
|---|---|---|
permission denied ... docker daemon socket | Your user is not in the docker group, or you have not logged out since being added | sudo usermod -aG docker $USER, then disconnect and reconnect |
set POSTGRES_PASSWORD in .env | One of the two passwords is still empty | Re-run the two sed commands in Step 6 |
| Build fails partway with no clear error | The machine ran out of memory during the first build | Build one image at a time: docker compose build api then docker compose build web |
clickhouse never becomes healthy | Its start-up check needs about 20 seconds; a slow disk needs more | docker compose logs clickhouse. Genuine failures name the setting or file involved |
api restarts repeatedly | It cannot reach a store, or a migration failed | docker compose logs api. Almost always a password mismatch between .env and an already-created volume |
| Changed a password and now nothing connects | The databases kept the original password inside their volumes | Either restore the old value, or wipe and start over: docker compose down --volumes (this deletes all measured data) |
port is already allocated | Something else on the server uses 3000, 5432, 8123 or 9000 | Change the matching *_PORT value in .env |
FAQ
Do I need to know .NET or Node.js to run this? No. Both are compiled inside containers during the build. Nothing is installed on your server except Docker.
Is the self-hosted version limited compared to a paid one? No. The full detection engine, every screen, and unlimited websites, traffic and retention are in the free AGPL version. The commercial edition adds the running of it, plus analysis that only exists because it sees many customers' traffic at once — which no single installation could produce for itself anyway.
Does it set cookies or need a consent banner? It does not set cookies for tracking, and it collects no form contents, no keystrokes and no session recordings. Raw addresses are dropped after 72 hours and the key used to recognise a returning reader is rotated daily. Whether that removes your obligation to ask consent is a question for your lawyer and your jurisdiction, not for a blog post.
Why does it download 130 MB after starting?
That is the DB-IP city database and the IP-to-network-operator table, which turn addresses into countries, towns and networks. Shipping them inside the image would mean re-downloading them on every upgrade, and would make the image unusable offline anyway. Set REFERENCE_DATA_AUTO_DOWNLOAD=false in .env if your server has no internet access — everything else works identically.
Can I run this on the same server as my website? Yes, if the ports do not clash and there is memory for both. Whether you should is a different question: an analytics engine that goes down whenever your website goes down cannot tell you why your website went down.
How much traffic can this handle?
More than a small server's worth. ClickHouse is built for exactly this shape of data. The realistic limit on a 4 GB machine is the memory ceiling you give ClickHouse in .env, not the row count.
Conclusion
Four containers, one command, and a health check that means what it says. You now have a real analytics engine running on your own machine, with the schema created, the reference data downloading, and nothing installed on the server except Docker.
It also has four ports open to the internet, three of which your firewall is quietly ignoring. That is next.
Next: Part 2: Close the Ports Docker Opened Behind Your Firewall →
