Build an Overtime Timesheet App in Power Apps — Part 8: Build the Approval Flow for Teams and Outlook

An overtime entry now waits for a decision, and this part builds the flow that gets one. Every pending entry goes to its department's approvers in Teams and Outlook, or to the person's manager when nobody else approves for that department. The answer is saved on the entry, approves or rejects it in SharePoint, and is emailed to the person who logged it.
This is Part 8 of a 20-part series.
- Part 1: Plan the App and Set Up the Demo Organization
- Part 2: Create the SharePoint Site and Lists
- Part 3: Keep Overtime Private with SharePoint Permissions
- Part 4: Create the Solution, Environment Variables and Canvas App
- Part 5: Build the Home Screen
- Part 6: Build the Log Overtime Screen
- Part 7: Build the My Overtime Screen
- Part 8: Build the Approval Flow for Teams and Outlook (you are here)
- Part 9: Show Approvers What's Waiting (coming soon)
- Part 10: Build the Departments Screen (coming soon)
- Part 11: Build the Reports Screen (coming soon)
- Part 12: Import the Old Excel Timesheet (coming soon)
- Part 13: Create the Monthly Payroll Workbook with Office Scripts (coming soon)
- Part 14: Build the Power BI Overtime Report (coming soon)
- Part 15: Share the App and Add It to Microsoft Teams (coming soon)
- Part 16: Test Every Role and Department (coming soon)
- Part 17: Build a Setup Flow That Creates the Lists (coming soon)
- Part 18: Run the Solution Checker and Export the Solutions (coming soon)
- Part 19: Install the App in a New Environment (coming soon)
- Part 20: Recap, Production Checklist and Next Steps (coming soon)
In Part 7, the status badges were set by hand. This part builds Overtime Approval, an automated cloud flow in the app's solution, and tries it as the demo organization's approvers in Teams, Outlook and Power Automate. Each generic task has its own guide; this part gives the values for this app, and why.
What You'll Build
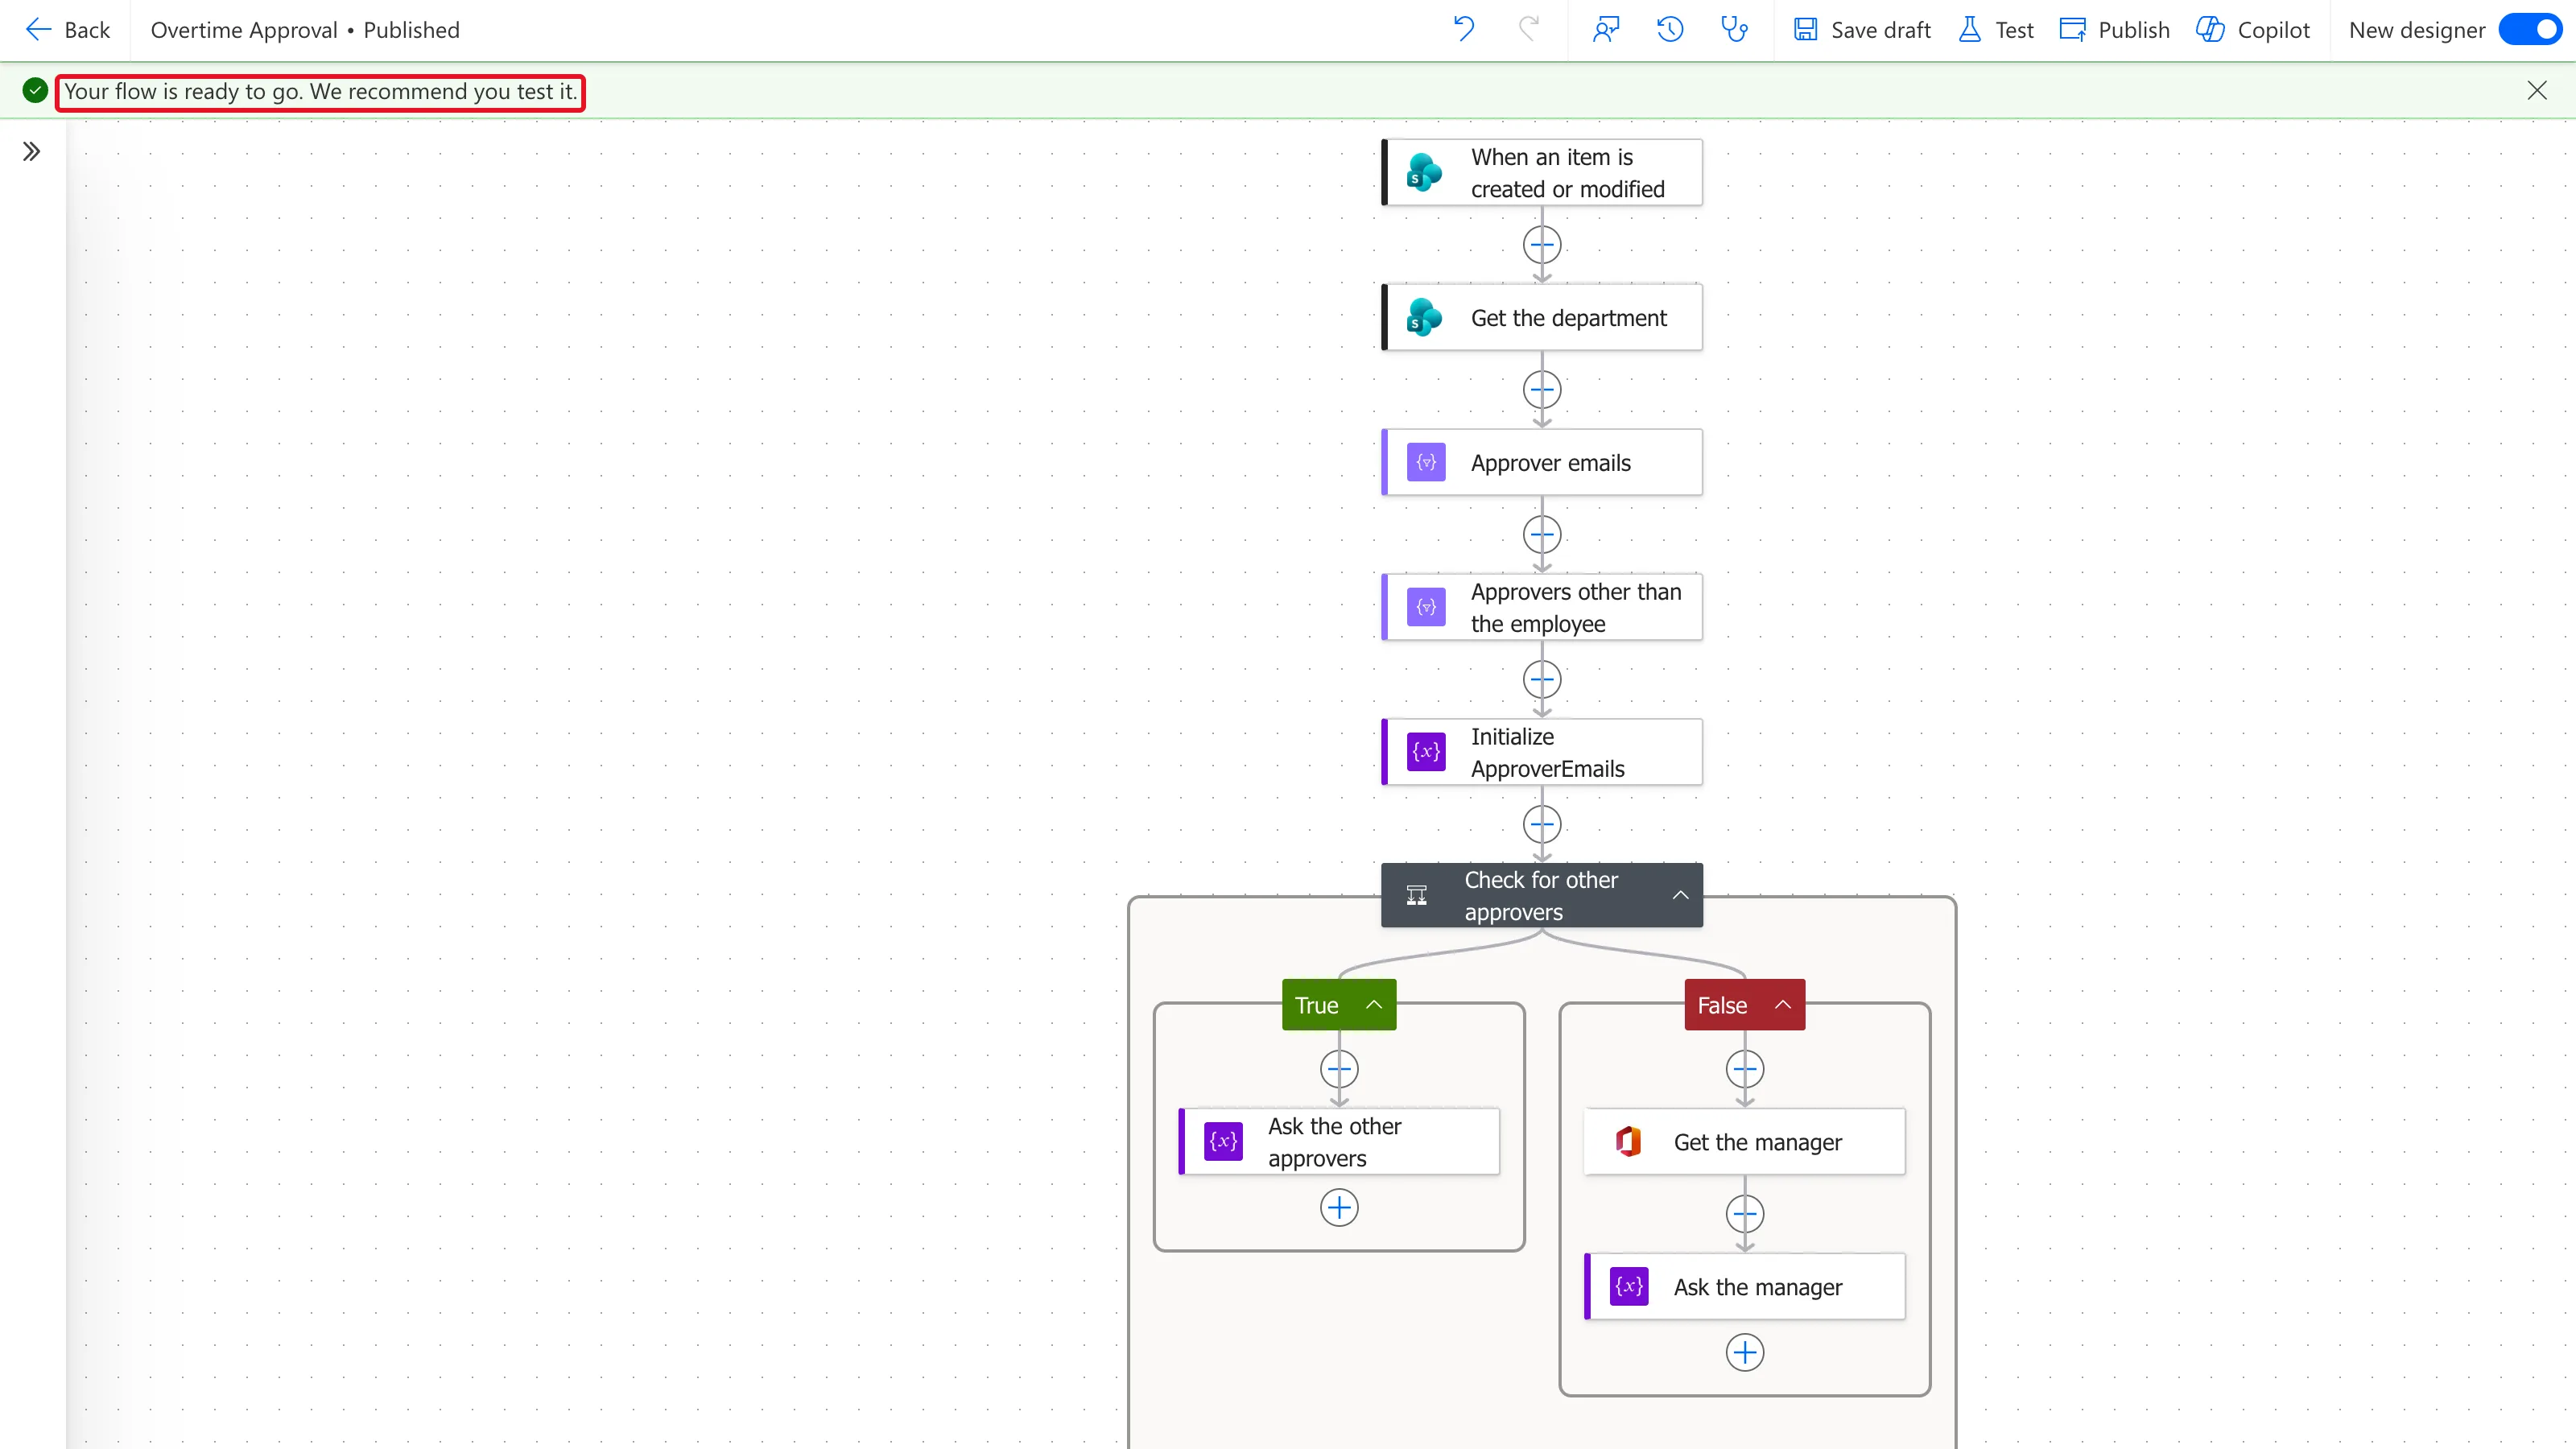
The finished flow, action by action:
When an item is created or modified      OvertimeEntries, only when Status is Pending
├─ Get the department                    Get item: the entry's department
├─ Approver emails                       Select: each approver's email
├─ Approvers other than the employee     Filter array: leaves out the employee
├─ Initialize ApproverEmails             Initialize variable: who to ask
├─ Check for other approvers             Condition: anyone left?
│  ├─ True:  Ask the other approvers     Set variable: their emails
│  └─ False: Get the manager             Get manager (V2)
│            Ask the manager             Set variable: the manager's email
├─ Time zone                             Compose: GMT Standard Time
├─ Shift date                            Compose: Saturday 07/11/2026
├─ Shift times                           Compose: 08:00 to 12:00
├─ Hours worked out                      Compose: 3.75
├─ Ask for approval                      Start and wait for an approval
├─ Get the entry now                     Get item: the entry after the answer
└─ Check the entry is unchanged          Condition: same version?
   ├─ True:  Record the decision         Update item
   │         Set the approval status     Set content approval status
   │         Tell the employee           Send an email (V2)
   └─ False: Stop: the entry changed     Terminate: Cancelled
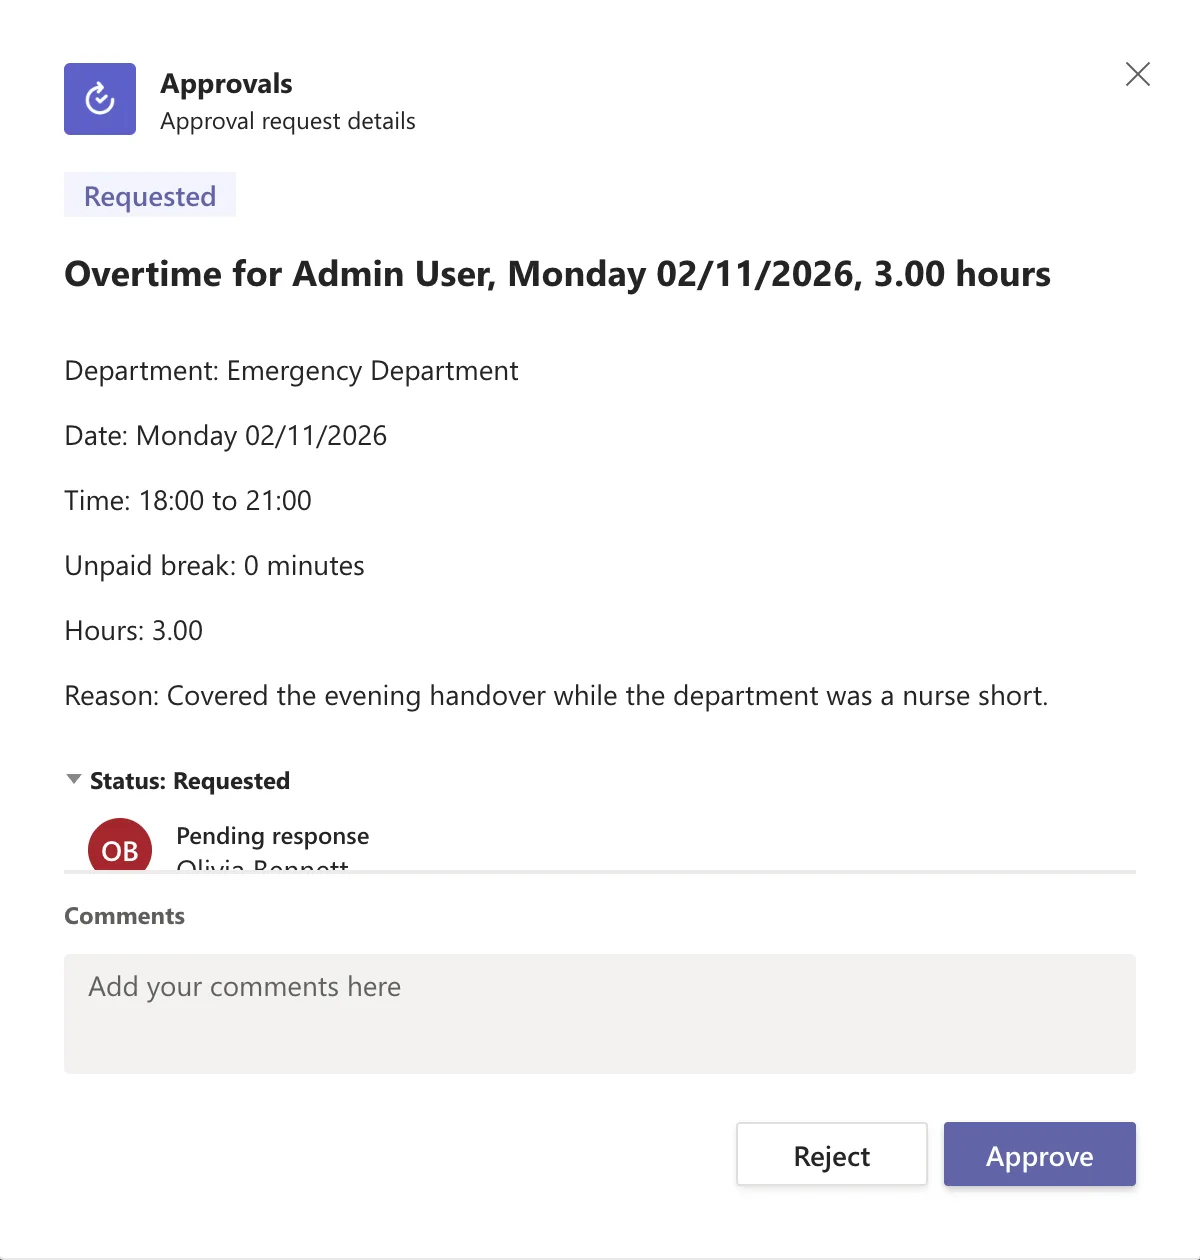
What an approver gets, here in the Approvals app in Microsoft Teams:
How the Flow Works
The decisions behind the actions:
- It starts in SharePoint, not in the app. The trigger is SharePoint's When an item is created or modified on OvertimeEntries, so an entry changed in SharePoint goes for approval just like one saved in the app. It isn't instant: in my tests, each run started within about a minute of the save. Microsoft's SharePoint guidance says In most cases, if there's a single change in the list or library, the flow run may occur within minutes after that change.
- Only pending entries. A trigger condition starts the flow only when Status is Pending. The flow sets Status to Approved or Rejected, so its own update doesn't start it again. In the tests, eight saves started eight runs, and the flow's own updates started none.
- The department's approvers, but never the employee. The approvers come from the Departments list of Part 2. The person who logged the entry is left out, and when nobody is left, the request goes to their manager in Microsoft Entra. Daniel Brooks approves Radiology, so his own Radiology overtime goes to his manager.
- The first answer decides. Any one of a department's approvers can decide, in the Teams Approvals app, from the Outlook email, or in Power Automate.
- The flow works the hours out again from the start and finish times and the break, shows them in the request, and saves them with the decision, as Part 2 planned. Hours changed by hand in SharePoint don't survive the approval.
- An answer counts only for the entry it was about. After the approval, the flow reads the entry again. If it changed while the request waited, the run stops, and the request for the newer version decides.
- Two records of the decision. The Status column, which the app reads, and SharePoint's Approval Status, from the content approval in Part 3, which staff can't change. The flow sets both, with its owner's connection.
- The employee is told by email: the decision, who made it and their comment.
Prerequisites
- Part 7 completed, with the Overtime Timesheet solution and its environment variables from Part 4.
- The site's owner as the flow's maker. The flow approves entries with its maker's SharePoint connection, so that account needs approval rights on the list. Staff don't have them (Part 3).
- The demo organization from Part 1, with each department's approvers in the Departments list: Olivia Bennett for the Emergency Department, Daniel Brooks for Radiology.
- The guides this part relies on. Each step says which one to follow:
- The flow: How to Create an Automated Cloud Flow in a Solution in Power Automate, How to Create a Connection Reference in a Solution in Power Apps, How to Check a Flow for Errors with Flow Checker in Power Automate and How to Save a Draft and Publish a Flow in Power Automate
- The trigger: How to Run a Flow When a SharePoint Item Is Created or Modified in Power Automate, How to Use Environment Variables in a Power Automate Flow and How to Add a Trigger Condition in Power Automate
- The approvers: How to Get a SharePoint List Item by ID in Power Automate, How to Pick One Field from Each Item with Select in Power Automate, How to Filter an Array in Power Automate, How to Use Variables in Power Automate, How to Add a Condition in Power Automate, How to Count the Items in an Array in Power Automate with length(), How to Join an Array into Text in Power Automate and How to Get a User's Manager in Power Automate
- The request: How to Use the Compose Action in Power Automate, How to Add an Expression in Power Automate, How to Convert UTC to Local Time in Power Automate with convertFromUtc, How to Work Out the Hours Between Two Times in Power Automate, How to Format a Number with Two Decimal Places in Power Automate and How to Send an Approval Request in Power Automate
- Answering: How to Approve a Request in the Microsoft Teams Approvals App, How to Approve a Request from an Outlook Email and How to Respond to Approvals in Power Automate
- The decision: How to Check an Item Hasn't Changed During an Approval in Power Automate, How to Get the First Item of an Array in Power Automate, How to Use the if() Function in Power Automate, How to Update a SharePoint List Item in Power Automate, How to Approve or Reject a SharePoint Item in Power Automate, How to Send an Email in Power Automate and How to Stop a Flow Run with Terminate in Power Automate
- Checking: How to See a Flow's Run History in Power Automate and How to See the Version History of a SharePoint List Item
Step 1: Create the Flow in the Solution
In the Overtime Timesheet solution, select New > Automation > Cloud flow > Automated. Name the flow Overtime Approval, choose SharePoint's When an item is created or modified, and select Create (How to Create an Automated Cloud Flow in a Solution in Power Automate).
It opened in the classic designer. I chose the site and the OvertimeEntries list in the trigger and selected Save, which said Should at least contain one trigger and one action: a flow can't be saved with only its trigger (Fixed: "Should at least contain one trigger and one action" When Saving a Flow in Power Automate). The first action, Get the department, is in Step 4; with it, Save worked.
The classic designer there has no New designer toggle, so I opened the flow from My flows and selected Edit, which opens it in the new designer, with Save draft and Publish. The flow stays in the solution.
Step 2: Use the Solution's Own Connection References
Each action's pane ends with the line Connected to and the name of a connection reference: the part of a solution that says which connection a flow uses. On my environment, the trigger said it was connected to a SharePoint reference from another solution, and Overtime Timesheet had no connection references at all. Power Automate reuses an existing reference before it creates one, and a reference outside the solution doesn't move with it (Fixed: A Flow in a Solution Uses Another Solution's Connection Reference in Power Automate).
- In the solution, create a SharePoint connection reference, Overtime Timesheet SharePoint, with the maker's SharePoint connection (How to Create a Connection Reference in a Solution in Power Apps).
- In the trigger and in each SharePoint action you add, read the Connected to line, and when it names another reference, select Change connection reference and choose Overtime Timesheet SharePoint. Until the trigger and every SharePoint action used it, each new SharePoint action got the other reference again.
The first time you add an Approvals, Office 365 Users or Office 365 Outlook action, the designer asks you to create a connection, and it adds a connection reference for it to the solution. At the end, the solution had four:
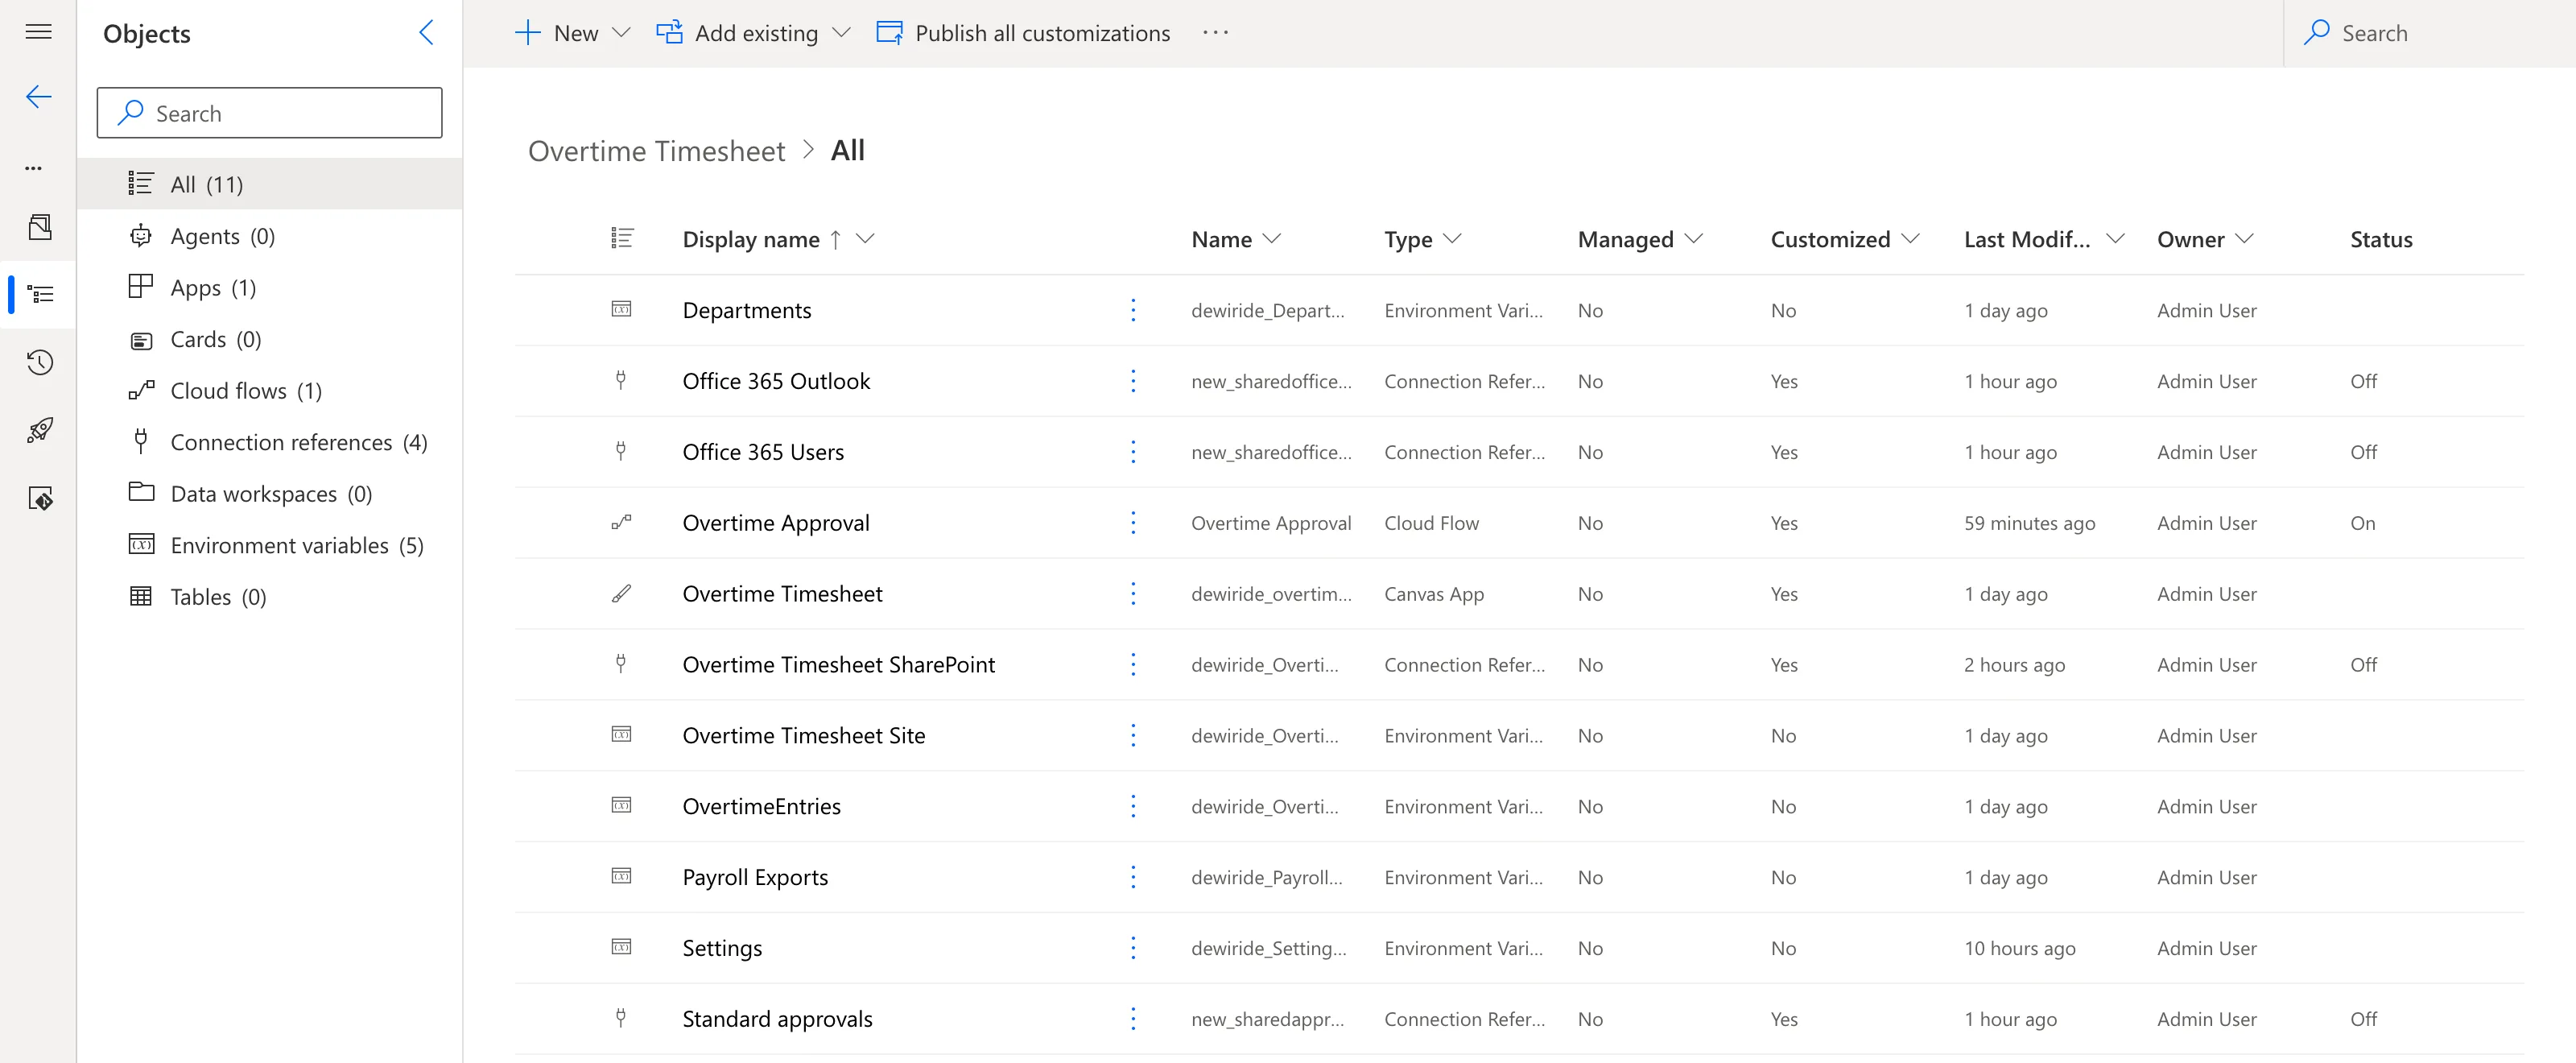
The three the designer created have names that start with new_ in the solution, not the publisher's dewiride_, like the one I created. The flow works with them all the same.
Step 3: Start the Flow Only for Pending Entries
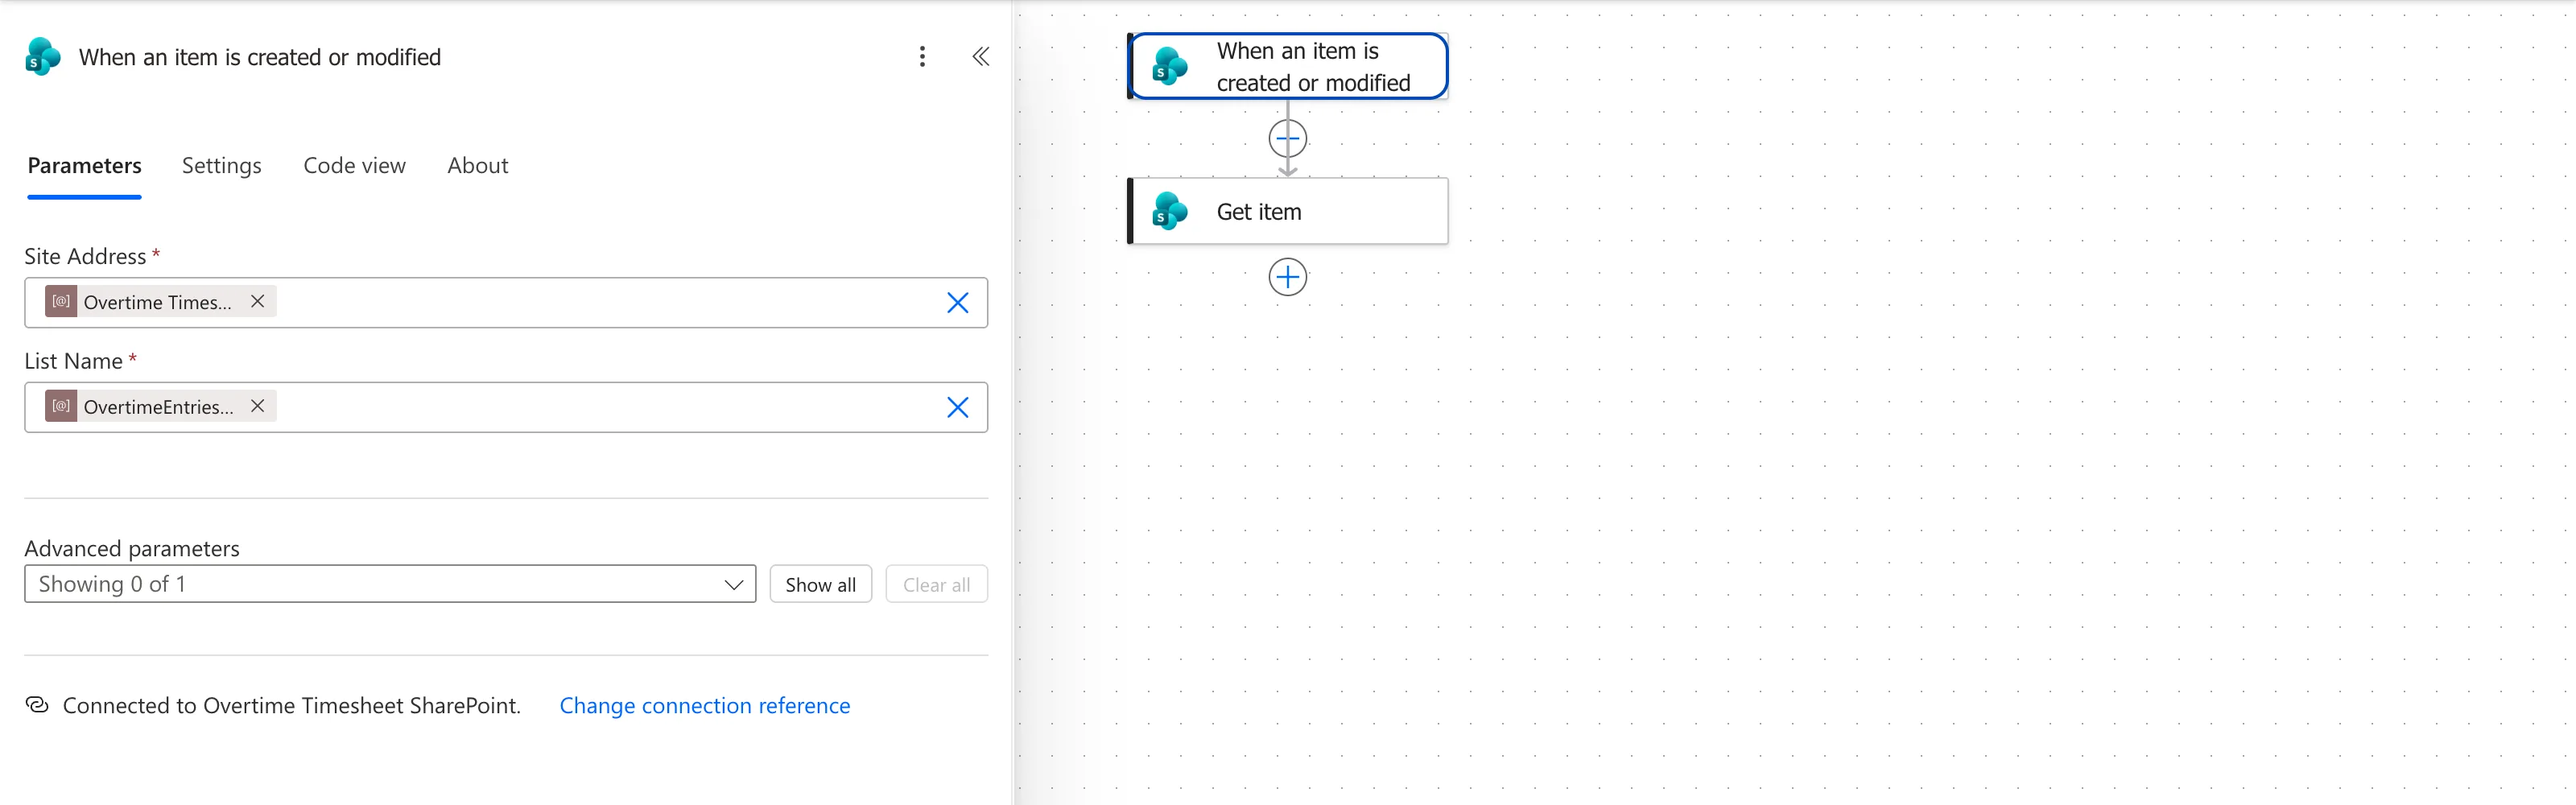
The site and the list. In the trigger, set Site Address to the Overtime Timesheet Site environment variable and List Name to OvertimeEntries. They're in the dynamic content list under Parameters (How to Use Environment Variables in a Power Automate Flow). Every SharePoint action in the flow uses them the same way, so the flow follows the solution to another environment:
The trigger condition. On the trigger's Settings tab, under Trigger conditions, select Add and enter (How to Add a Trigger Condition in Power Automate):
@equals(triggerOutputs()?['body/Status/Value'], 'Pending')
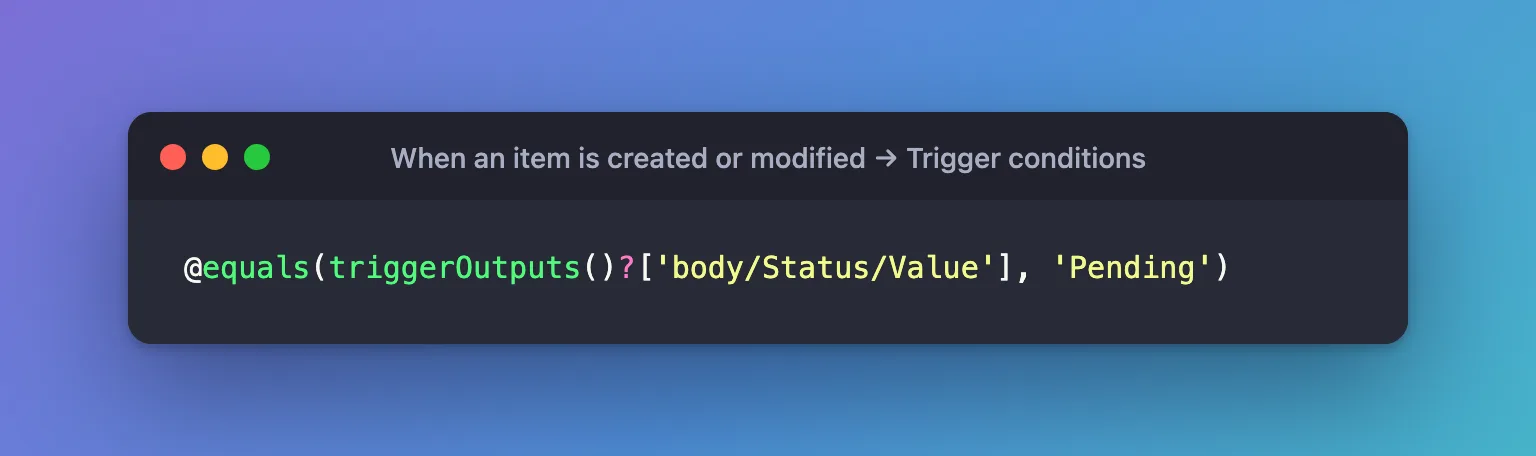
Status is a Choice column, so the condition reads its Value. A trigger condition starts with @, and when it's false, the flow doesn't run and nothing is added to its run history. That's what stops the loop Microsoft's guidance on infinite loops warns about: Cloud flows can trigger themselves, creating an infinite loop. Leave Split on on, as it is, so each changed entry gets its own run.
Step 4: Find the Department's Approvers
Three actions, after the trigger:
| Action | Name | Settings |
|---|---|---|
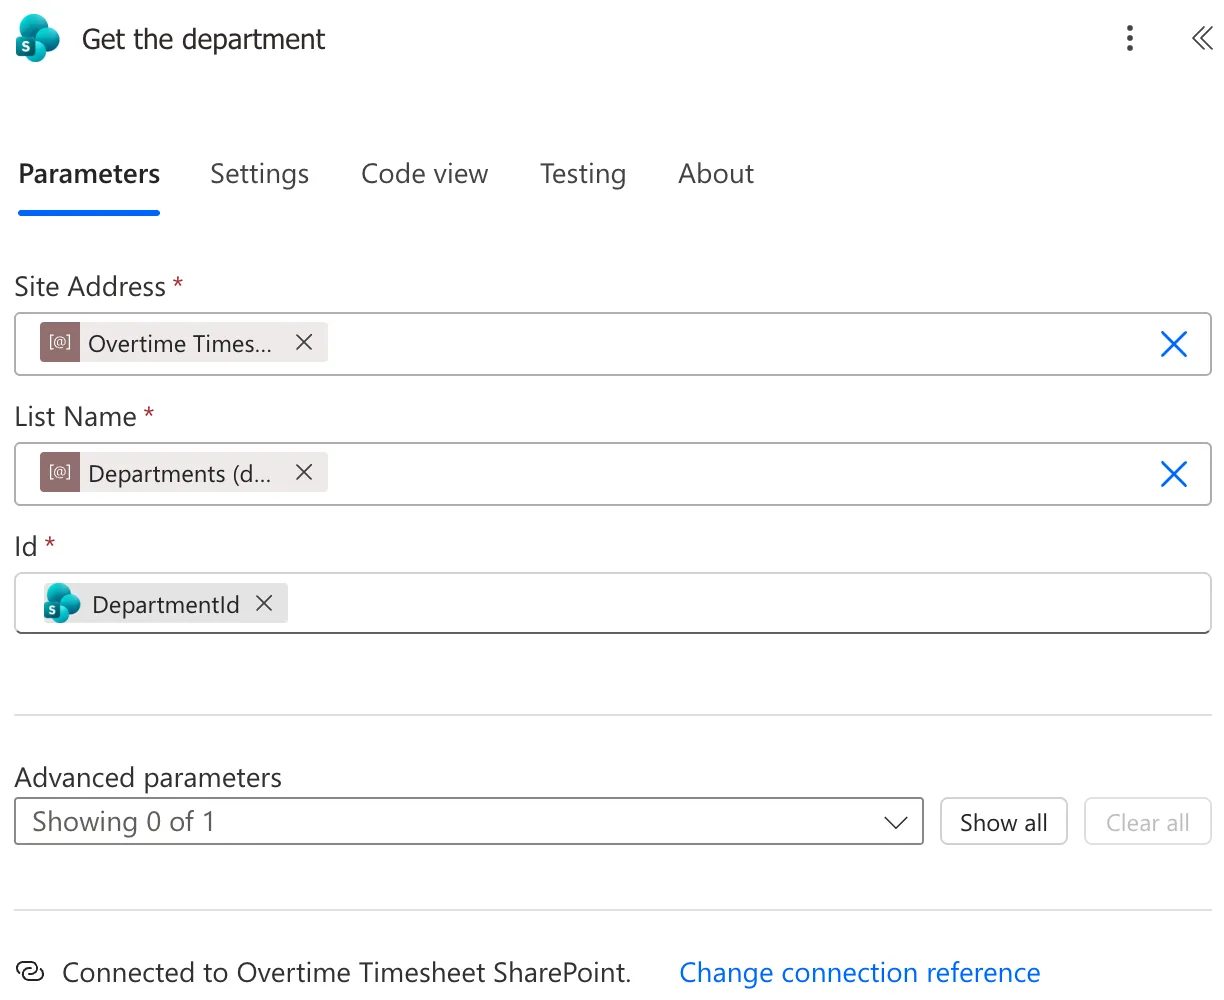
| SharePoint Get item (guide) | Get the department | Site Address Overtime Timesheet Site, List Name Departments, Id the trigger's DepartmentId |
| Select (guide) | Approver emails | From the Approvers of Get the department; Map, in text mode, the Approvers Email token |
| Filter array (guide) | Approvers other than the employee | From the Output of Approver emails; the condition below, in advanced mode |
Approvers is a Person column with several people, and Select turns it into a list of their emails. The Approvers Email token is this expression:
item()?['Email']
Filter array keeps every email that isn't the email of the person who created the entry. Both sides go through toLower, so capital letters don't matter:
@not(equals(toLower(item()), toLower(triggerOutputs()?['body/Author/Email'])))
The Get the department action:
Step 5: Choose Who to Ask
The approval goes to the emails in one variable, which the flow fills in one of two ways.
The variable. Add Initialize variable, Initialize ApproverEmails: Name ApproverEmails, Type String, no value (How to Use Variables in Power Automate). It goes before the condition, because a variable can't be initialized inside one.
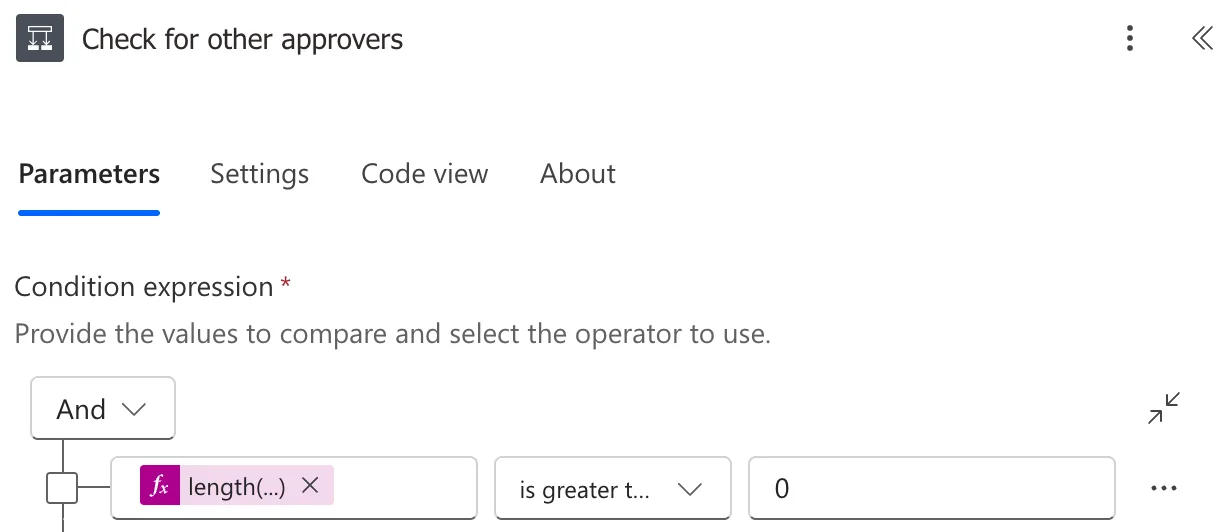
The condition. Add a Condition, Check for other approvers, that checks whether the filter left anyone (How to Add a Condition in Power Automate and How to Count the Items in an Array in Power Automate with length()): this expression is greater than 0.
length(body('Approvers_other_than_the_employee'))
True: ask them. Add Set variable, Ask the other approvers, with Name ApproverEmails and this Value. Assigned to takes several people separated by semicolons (How to Join an Array into Text in Power Automate):
join(body('Approvers_other_than_the_employee'), ';')
False: ask the manager. Add the Office 365 Users action Get manager (V2), Get the manager, with User (UPN) set to the trigger's Created By Email. Then Set variable, Ask the manager, with the manager's email, the Mail token of Get the manager (How to Get a User's Manager in Power Automate):
outputs('Get_the_manager')?['body/mail']
The condition, with its comparison:
:::warning No apostrophes or question marks in action names
Expressions refer to an action by its name, with underscores for spaces, such as outputs('Get_the_manager'). My first names for three of this flow's actions were Get the employee's manager, Anyone left to approve? and Unchanged while waiting?. The designer accepted them, and publishing rejected them, in Step 10.
:::
Step 6: Work Out the Date, Times and Hours
The request shows the shift in UK time, with the hours the flow works out. Four Compose actions (How to Use the Compose Action in Power Automate), each holding a value the later actions use:
| Name | Inputs | Example |
|---|---|---|
Time zone | GMT Standard Time | |
Shift date | The first expression below | Saturday 07/11/2026 |
Shift times | The second expression below | 08:00 to 12:00 |
Hours worked out | The third expression below | 3.75 |
Dates and times. SharePoint gives the flow its date and time columns in UTC, and convertFromUtc() turns them into the time zone's local time, formatted. GMT Standard Time is the Windows name for UK time, which is an hour ahead of UTC in summer (How to Convert UTC to Local Time in Power Automate with convertFromUtc):
convertFromUtc(triggerOutputs()?['body/StartTime'], outputs('Time_zone'), 'dddd dd/MM/yyyy')
Shift times adds the next day when a shift ends on the day after it starts:
concat(convertFromUtc(triggerOutputs()?['body/StartTime'], outputs('Time_zone'), 'HH:mm'), ' to ', convertFromUtc(triggerOutputs()?['body/EndTime'], outputs('Time_zone'), 'HH:mm'), if(equals(convertFromUtc(triggerOutputs()?['body/StartTime'], outputs('Time_zone'), 'yyyy-MM-dd'), convertFromUtc(triggerOutputs()?['body/EndTime'], outputs('Time_zone'), 'yyyy-MM-dd')), '', ' the next day'))
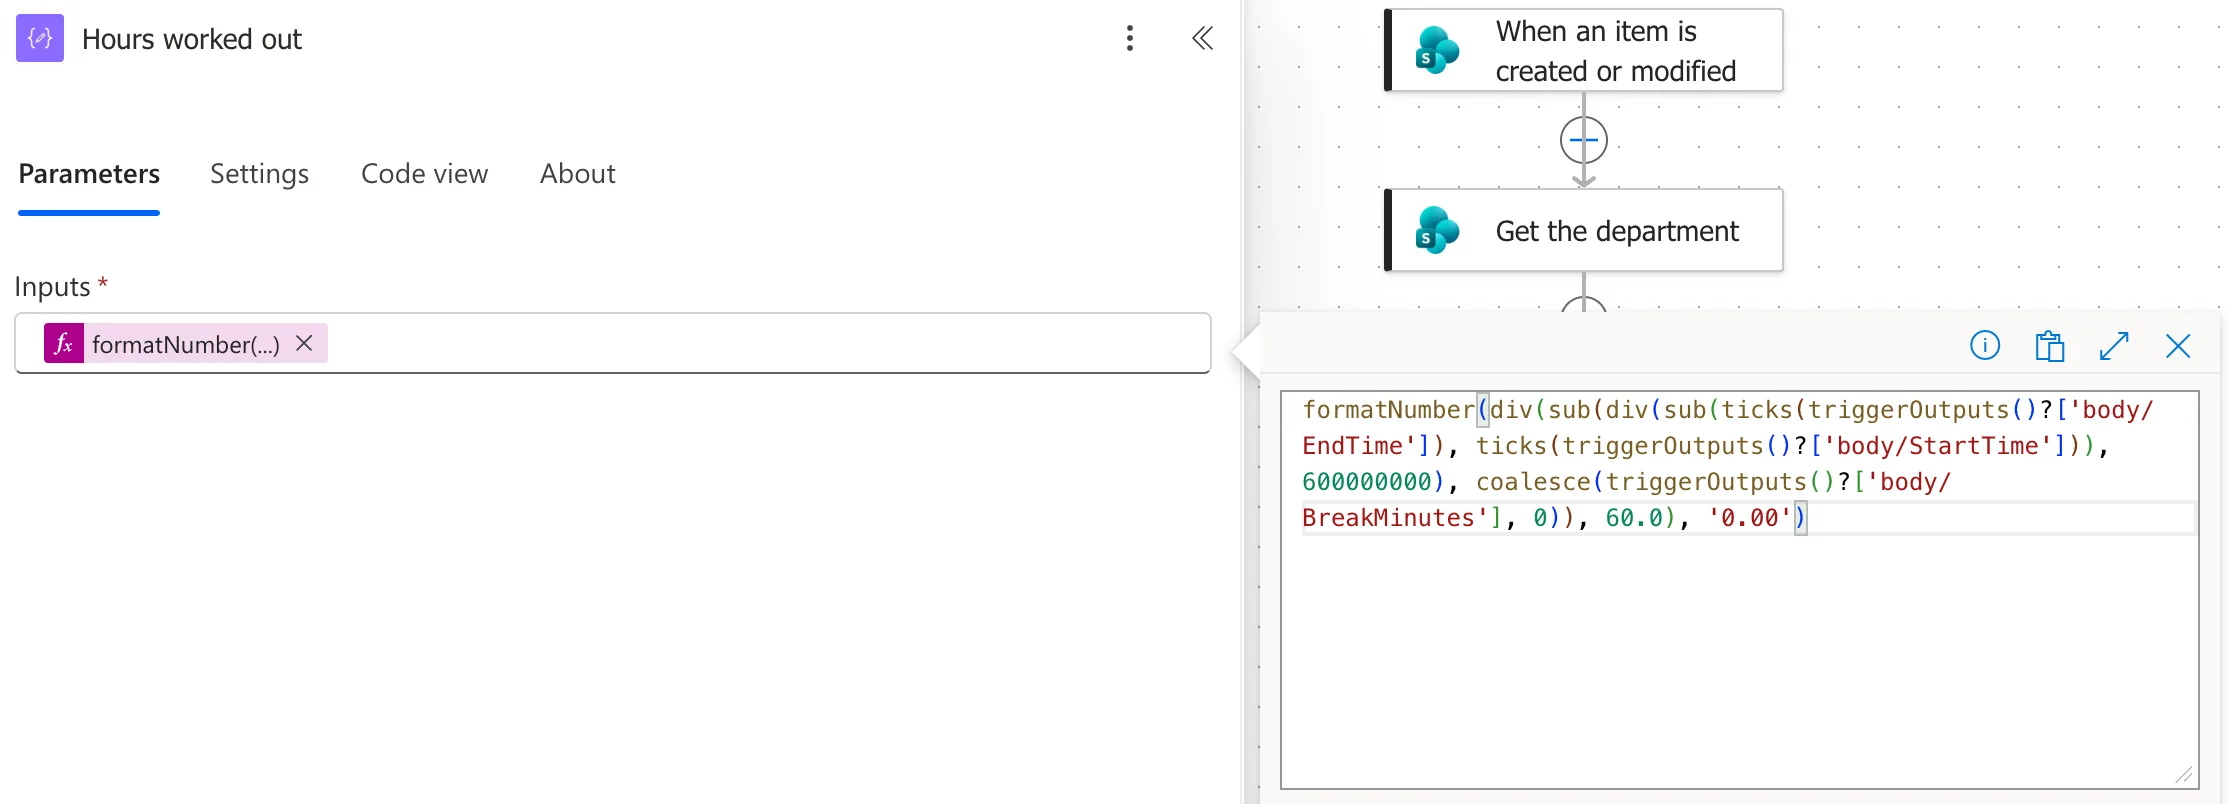
The hours. To get a number, the expression subtracts the times' ticks: the minutes between the start and finish, less the unpaid break, divided by 60.0, as text with two decimals (How to Work Out the Hours Between Two Times in Power Automate and How to Format a Number with Two Decimal Places in Power Automate). Both times are in UTC, so the difference is the time that really passed, on the nights the clocks change too:
formatNumber(div(sub(div(sub(ticks(triggerOutputs()?['body/EndTime']), ticks(triggerOutputs()?['body/StartTime'])), 600000000), coalesce(triggerOutputs()?['body/BreakMinutes'], 0)), 60.0), '0.00')
Step 7: Ask for Approval
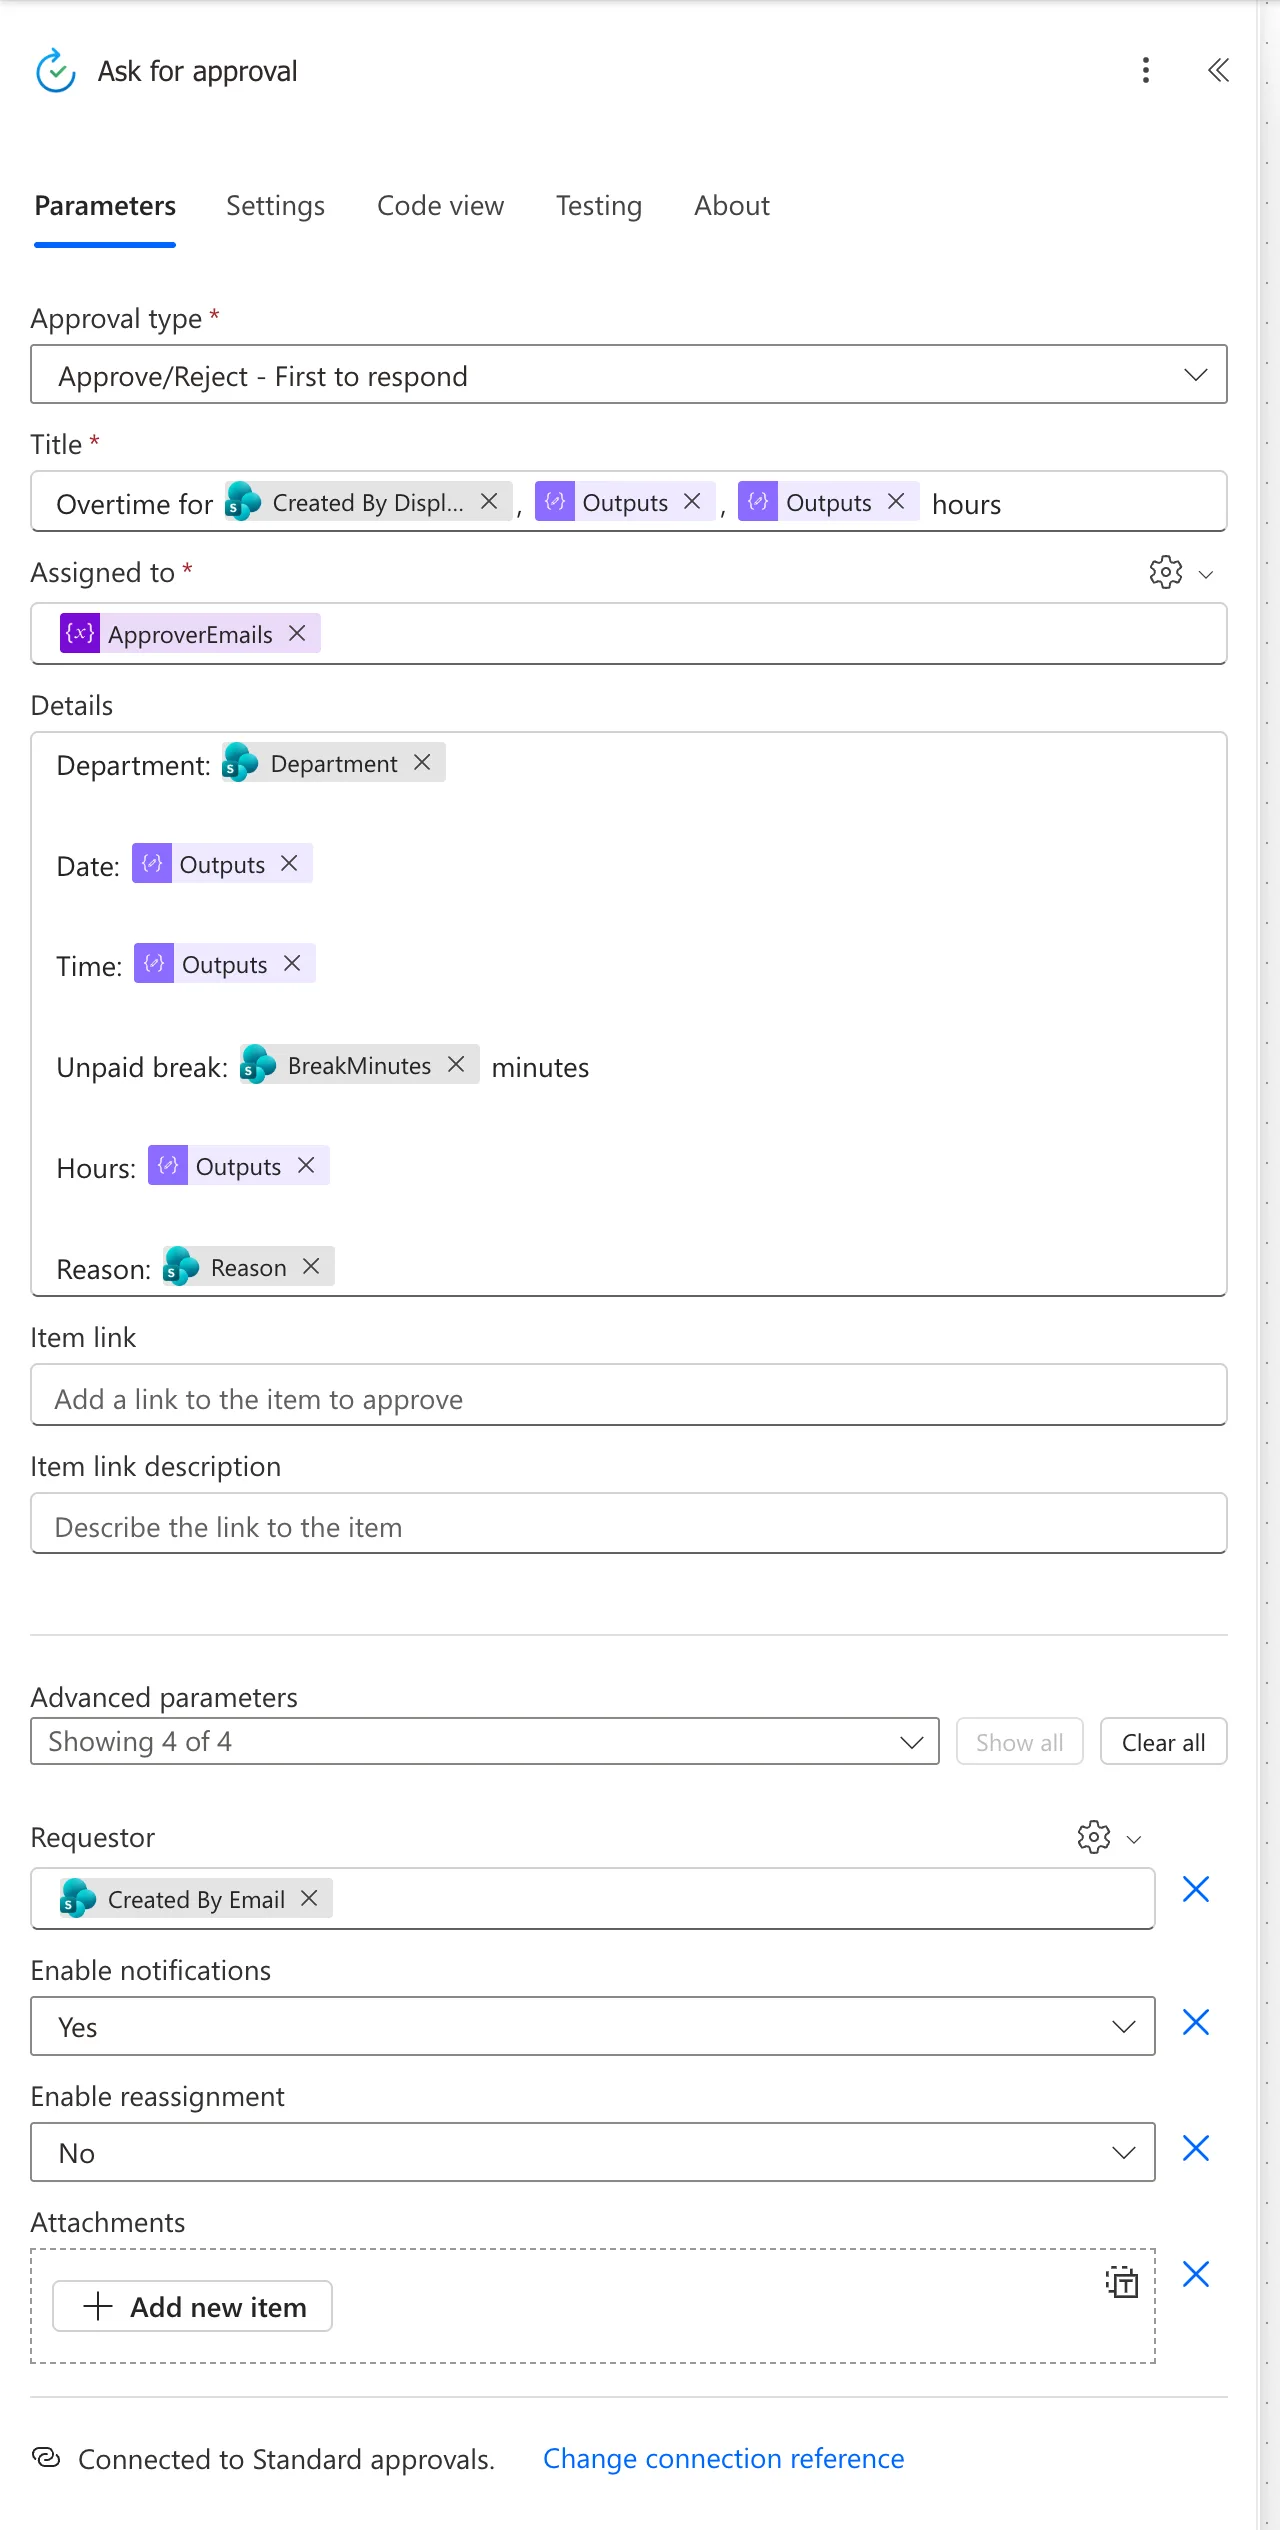
Add Start and wait for an approval from Standard approvals, Ask for approval (How to Send an Approval Request in Power Automate):
| Setting | Value |
|---|---|
| Approval type | Approve/Reject - First to respond |
| Title | The first block below |
| Assigned to | The ApproverEmails variable: select the gear next to the box, then Use dynamic content |
| Details | The second block below |
| Requestor | The trigger's Created By Email |
| Enable notifications | Yes, so approvers get an email |
| Enable reassignment | No, so only the department's approvers decide |
Overtime for @{triggerBody()?['Author/DisplayName']}, @{outputs('Shift_date')}, @{outputs('Hours_worked_out')} hours
Department: @{outputs('Get_the_department')?['body/Department']}

Date: @{outputs('Shift_date')}

Time: @{outputs('Shift_times')}

Unpaid break: @{triggerBody()?['BreakMinutes']} minutes

Hours: @{outputs('Hours_worked_out')}

Reason: @{triggerBody()?['Reason']}
The Details box says Markdown supported, but Microsoft says Markdown isn't supported in the Teams Approvals app, so the details are plain lines with an empty line between them. They showed as separate lines in Teams and in Outlook.
Step 8: Check the Entry Hasn't Changed
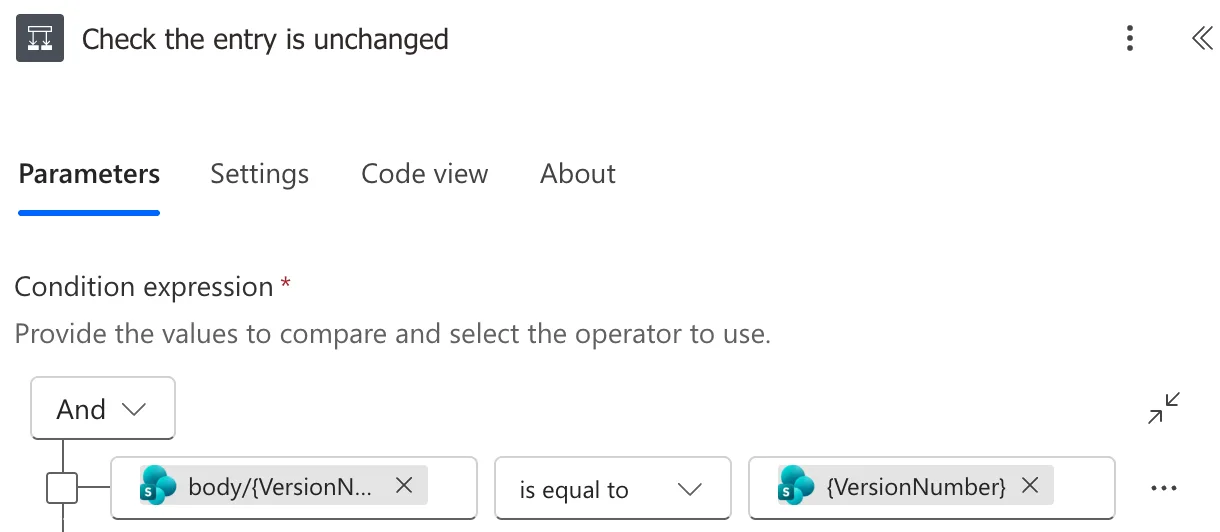
The flow waits at Ask for approval until someone answers, which can take hours, and the entry can change in the meantime. Each save starts a new run with a new request, so an answer to an old request mustn't decide the new version (How to Check an Item Hasn't Changed During an Approval in Power Automate):
- Add a SharePoint Get item,
Get the entry now, on OvertimeEntries with the trigger's ID. - Add a Condition,
Check the entry is unchanged, comparing the entry's version number now with the version that started the run:
| Left | Operator | Right |
|---|---|---|
outputs('Get_the_entry_now')?['body/{VersionNumber}'] | is equal to | triggerBody()?['{VersionNumber}'] |
Step 9: Save the Decision and Tell the Employee
The condition's True branch has three actions.
Record the decision. A SharePoint Update item on OvertimeEntries with the trigger's ID (How to Update a SharePoint List Item in Power Automate). Update item needs a value for every required column, so the required columns get the trigger's own values, and these columns get the decision (How to Get the First Item of an Array in Power Automate and How to Use the if() Function in Power Automate):
| Column | Value |
|---|---|
| Hours | float(outputs('Hours_worked_out')) |
| Status Value | if(equals(outputs('Ask_for_approval')?['body/outcome'], 'Approve'), 'Approved', 'Rejected') |
| ApproverComment | first(outputs('Ask_for_approval')?['body/responses'])?['comments'] |
| DecisionBy | first(outputs('Ask_for_approval')?['body/responses'])?['responder']?['displayName'] |
| DecisionOn | The Completion date of Ask for approval |
Hours worked out is text, so float() turns it into a number for the Hours column.
Set the approval status. A SharePoint Set content approval status (How to Approve or Reject a SharePoint Item in Power Automate):
| Setting | Value |
|---|---|
| Site Address | The Overtime Timesheet Site variable |
| Library Name | The OvertimeEntries variable |
| Id | The trigger's ID |
| Action | if(equals(outputs('Ask_for_approval')?['body/outcome'], 'Approve'), 'Approve', 'Reject') |
| Comments | first(outputs('Ask_for_approval')?['body/responses'])?['comments'] |
| ETag | outputs('Record_the_decision')?['body/@odata.etag'] |
It comes after Record the decision because, with content approval on, every edit sets the approval status back to Pending, the flow's own update included. The ETag from that update is the version it just wrote. My first run, Olivia's in Step 11, ran before I added the ETag, and SharePoint took the approval without one; every run after it used the ETag.
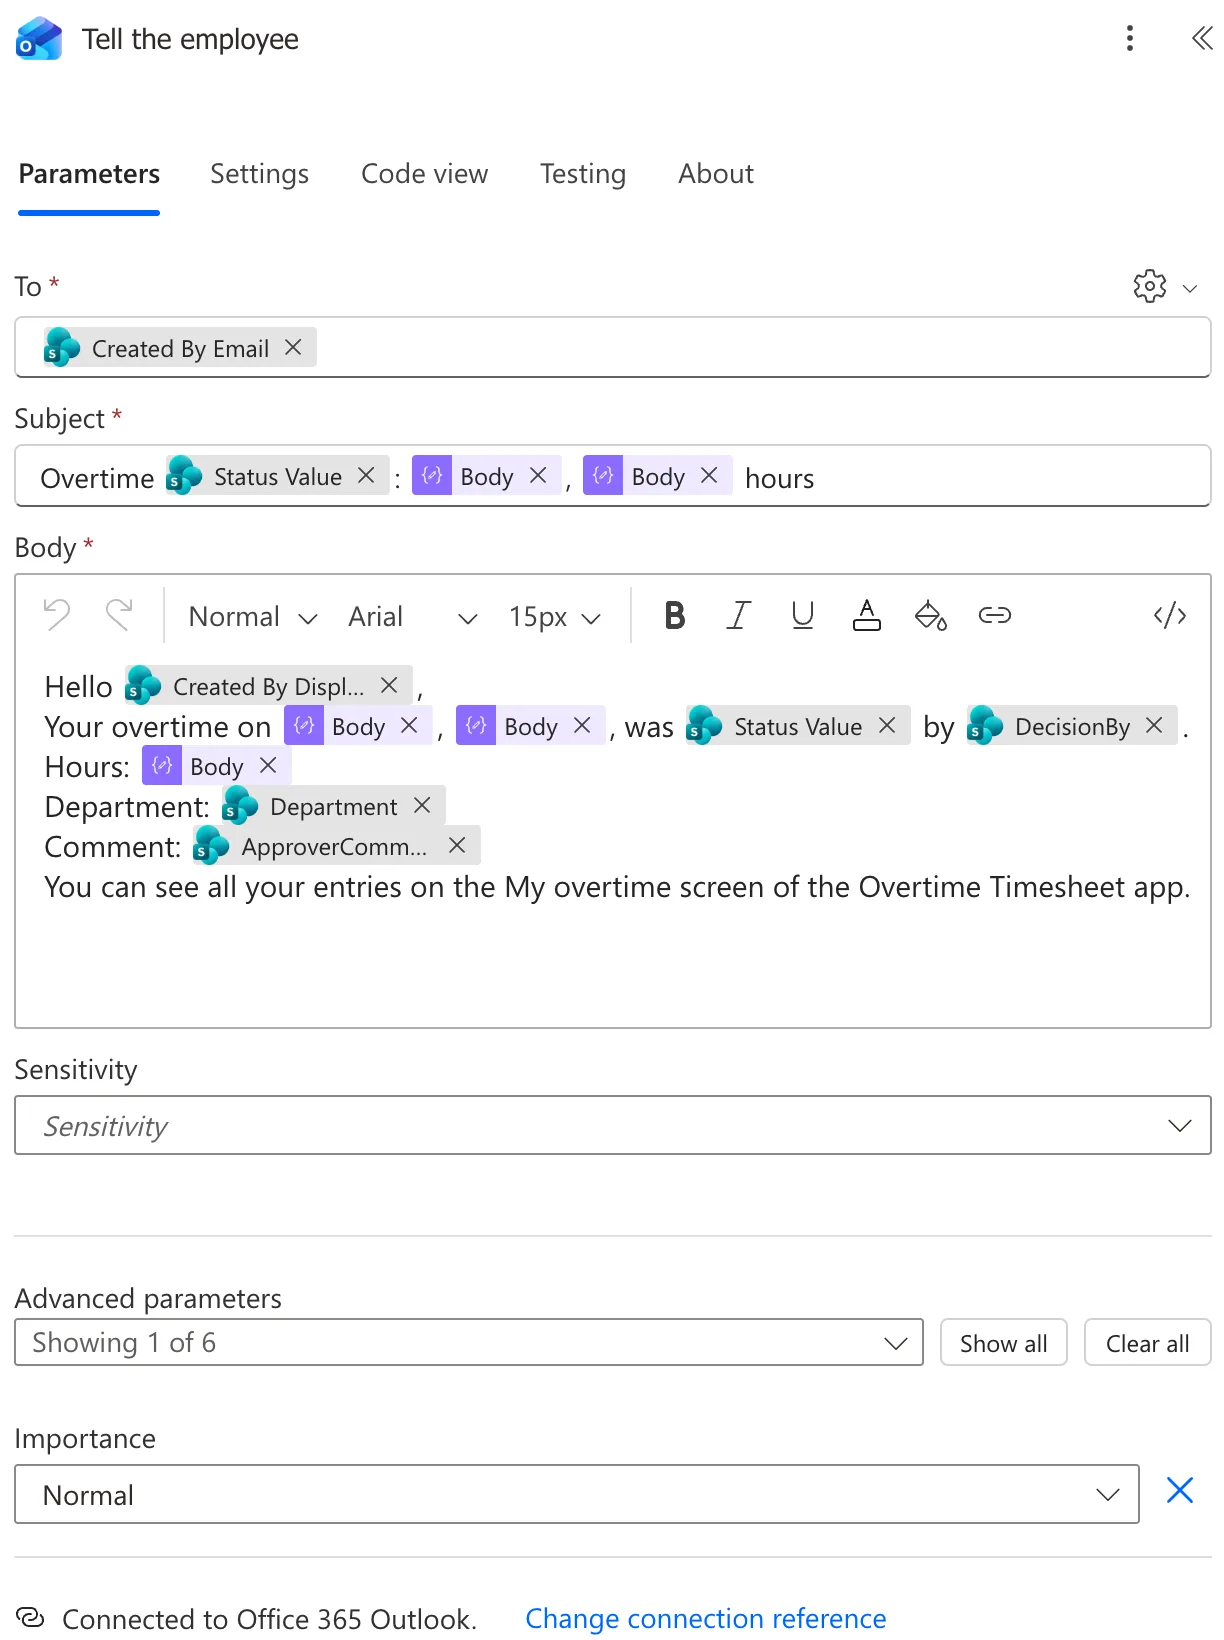
Tell the employee. An Office 365 Outlook Send an email (V2), with a connection named Overtime Timesheet Outlook (How to Send an Email in Power Automate). To is the trigger's Created By Email, and the subject and body use the flow's values:
Overtime @{outputs('Record_the_decision')?['body/Status/Value']}: @{outputs('Shift_date')}, @{outputs('Hours_worked_out')} hours
Hello [Created By DisplayName],
Your overtime on [Shift date], [Shift times], was [Status Value] by [DecisionBy].
Hours: [Hours worked out]
Department: [Department]
Comment: [ApproverComment]
You can see all your entries on the My overtime screen of the Overtime Timesheet app.
The email comes from the mailbox of the connection's account, here the maker's.
The False branch. Add Terminate, Stop: the entry changed, with Status set to Cancelled (How to Stop a Flow Run with Terminate in Power Automate). The run ends there, records nothing and sends nothing; the newer request decides.
Step 10: Save, Check and Publish
Select Save draft, then Flow checker (How to Check a Flow for Errors with Flow Checker in Power Automate). It listed no errors and no warnings. A draft doesn't run, so select Publish (How to Save a Draft and Publish a Flow in Power Automate).
Publishing stopped twice, on the names from Step 5's warning, and Flow checker had found neither:
- The input parameter(s) of operation 'Ask_the_manager' contains invalid expression(s). The manager action was still Get the employee's manager, and the apostrophe broke the expression that read its output. I renamed it Get the manager and picked its Mail token again: Fixed: "The input parameter(s) of operation contains invalid expression(s)" in Power Automate.
- Flow save failed with code 'InvalidWorkflowRunActionName', for the condition Anyone left to approve?: action names can't contain
?, or<,>,%,&,\and/. I renamed both conditions, to Check for other approvers and Check the entry is unchanged: Fixed: "The provided workflow run action name has these invalid characters" (InvalidWorkflowRunActionName) in Power Automate.
The third publish worked:
From then on, every save of a pending entry started a run.
Step 11: Approve an Entry in Teams
The app isn't shared until Part 15, so in these tests the maker used the app, and Aisha Khan, Maya Patel and Daniel Brooks changed their entries in the OvertimeEntries list in SharePoint, each signed in as themselves.
Entries saved before the flow was published don't start it. The maker's November entries had been Pending since Parts 6 and 7, with no request. Saving one again started a run: I opened 2 November, in the Emergency Department, with Edit on the My Overtime screen and saved it. The run started within a minute, and the request waited for Olivia Bennett in the Approvals app in Teams; it's the request at the top of this post (How to Approve a Request in the Microsoft Teams Approvals App). She wrote Thanks for covering the handover. and selected Approve:

Step 12: Approve and Reject in Outlook
An approval. Aisha Khan corrected the reason of her 7 November entry in SharePoint. With notifications on, Olivia also got the request as an email she could answer in place (How to Approve a Request from an Outlook Email):
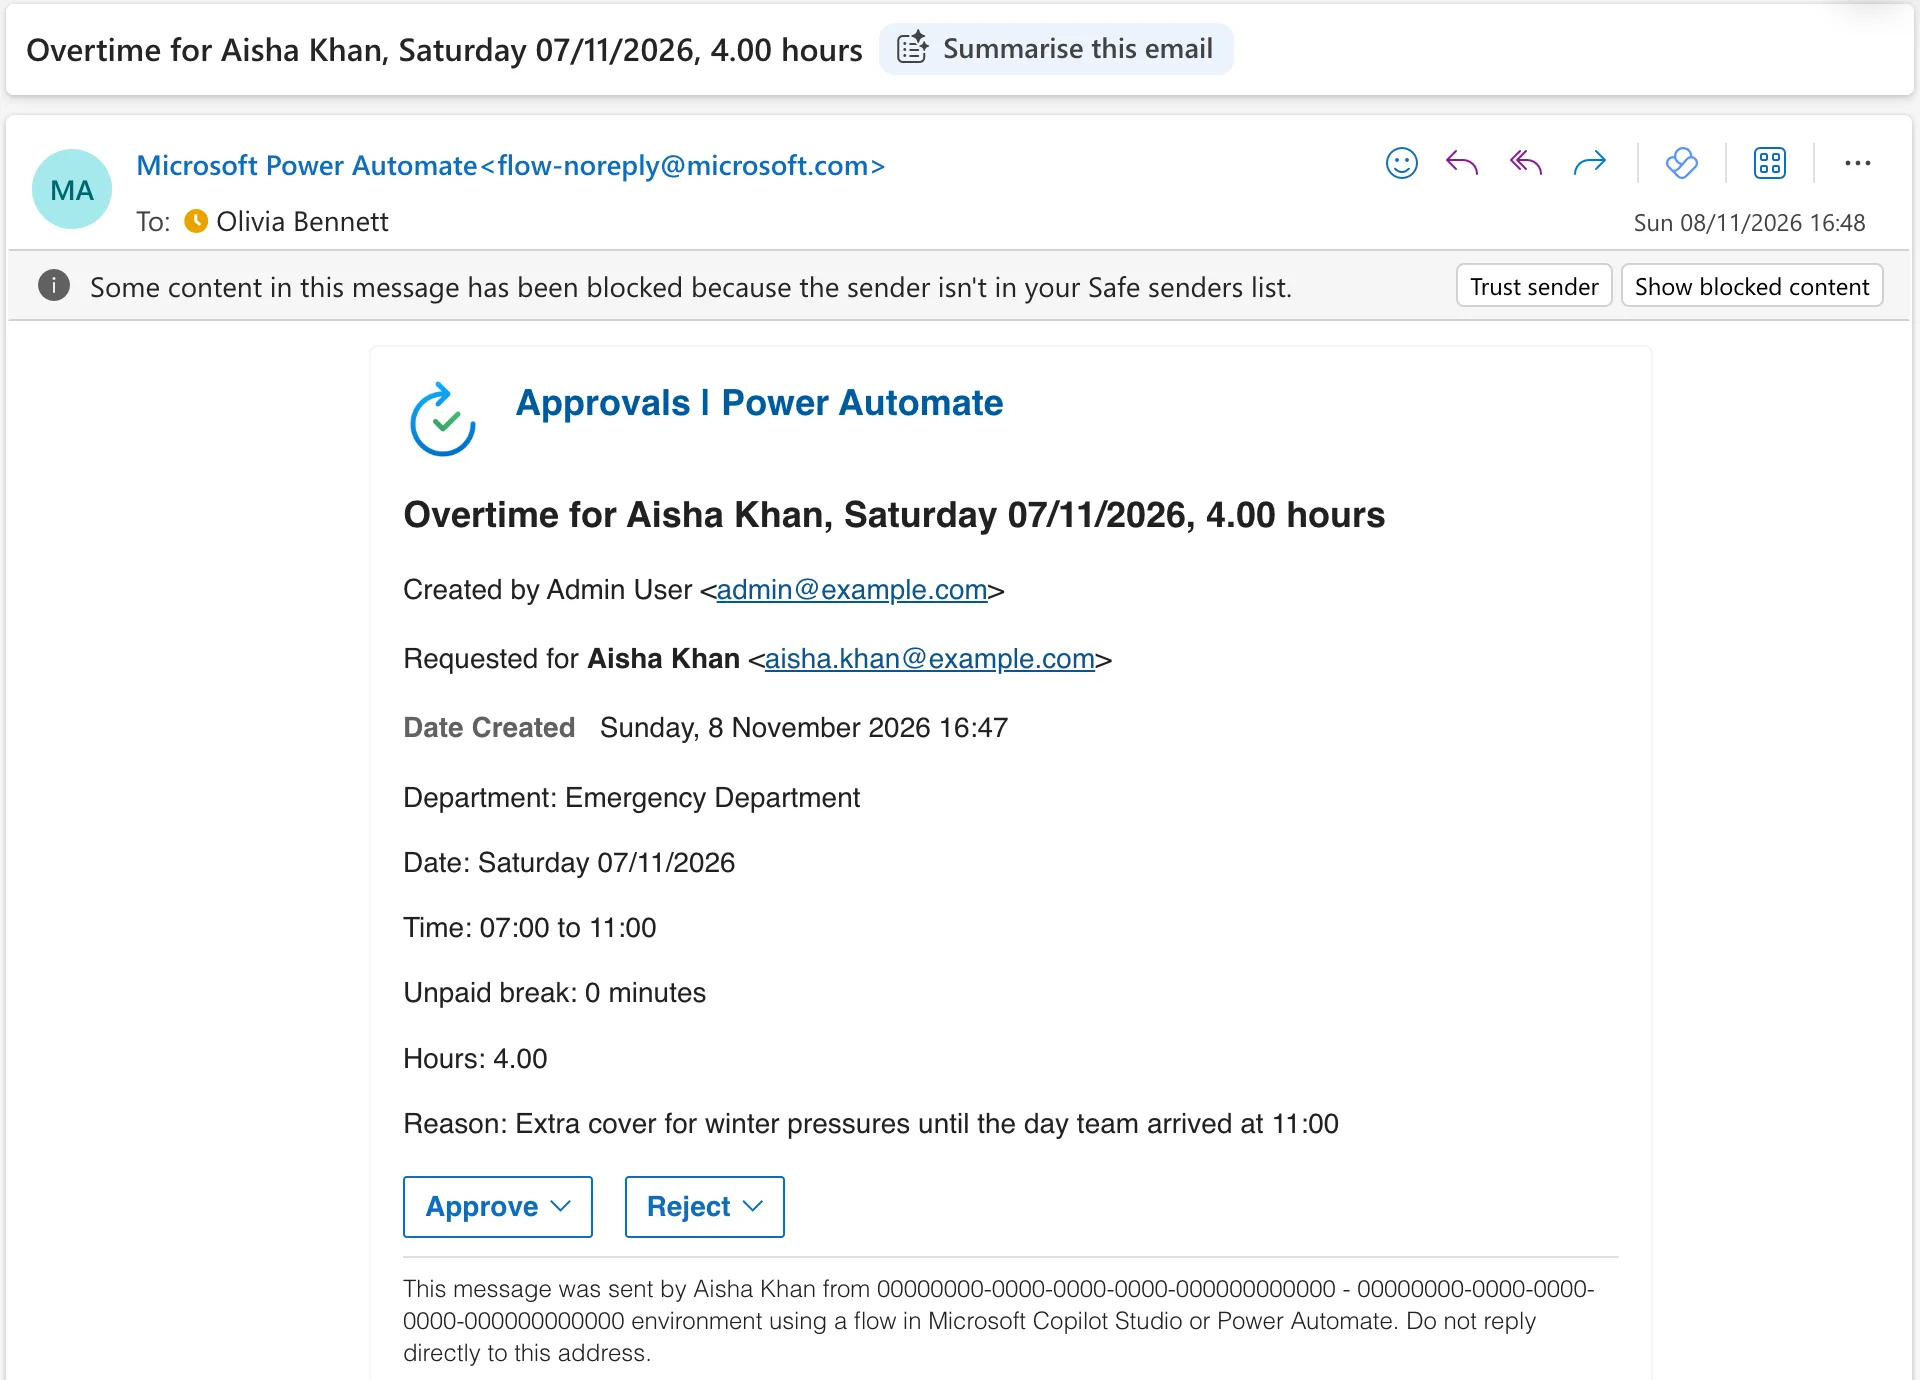
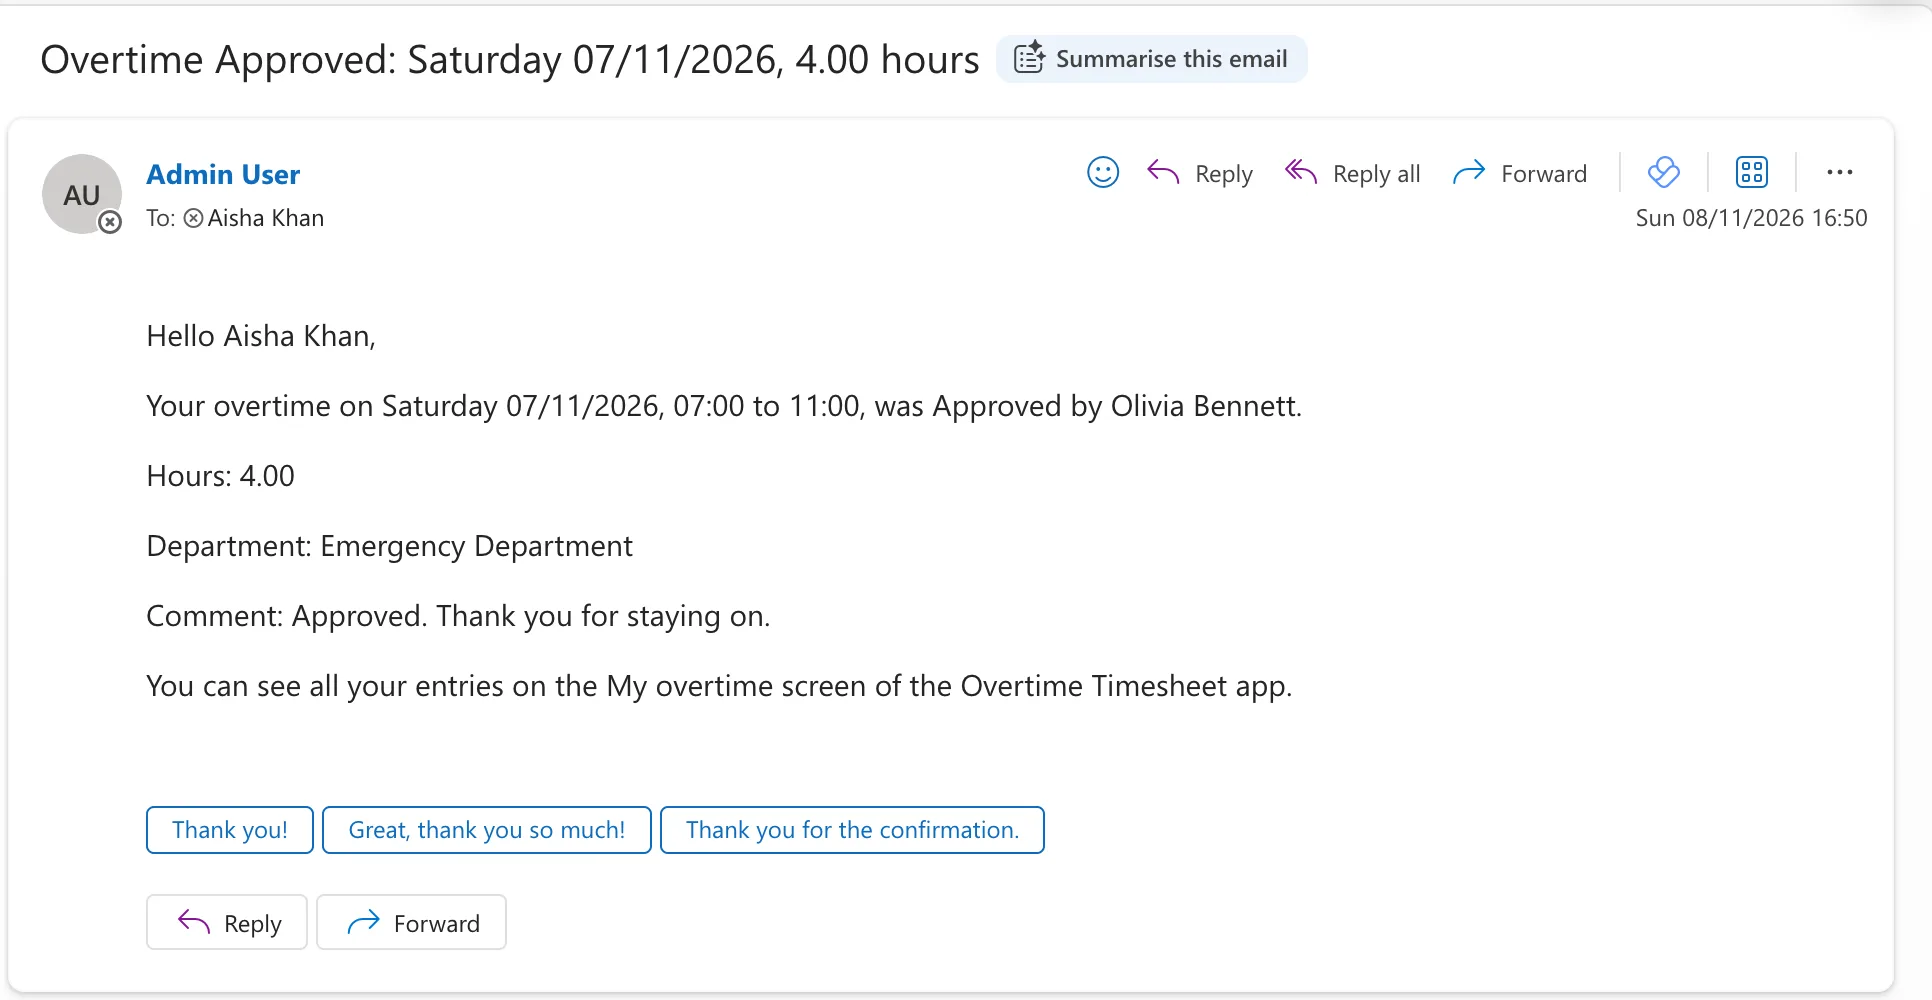
She approved it with the comment Approved. Thank you for staying on., and Aisha's email arrived a few seconds later:
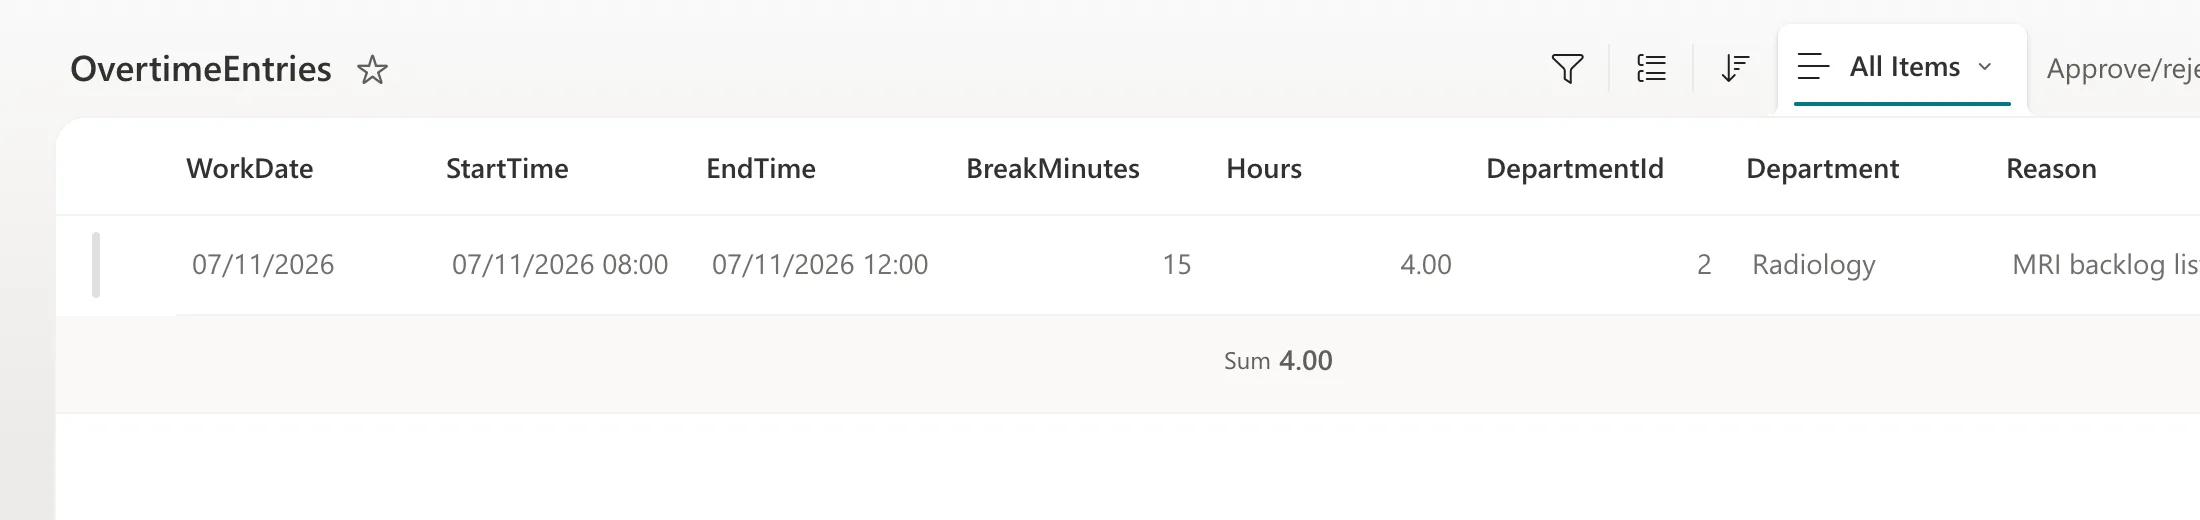
A rejection, with the hours checked. Maya Patel's 7 November entry runs from 08:00 to 12:00 with a 15-minute break: 3.75 hours. In SharePoint, she changed its Hours to 4.00:
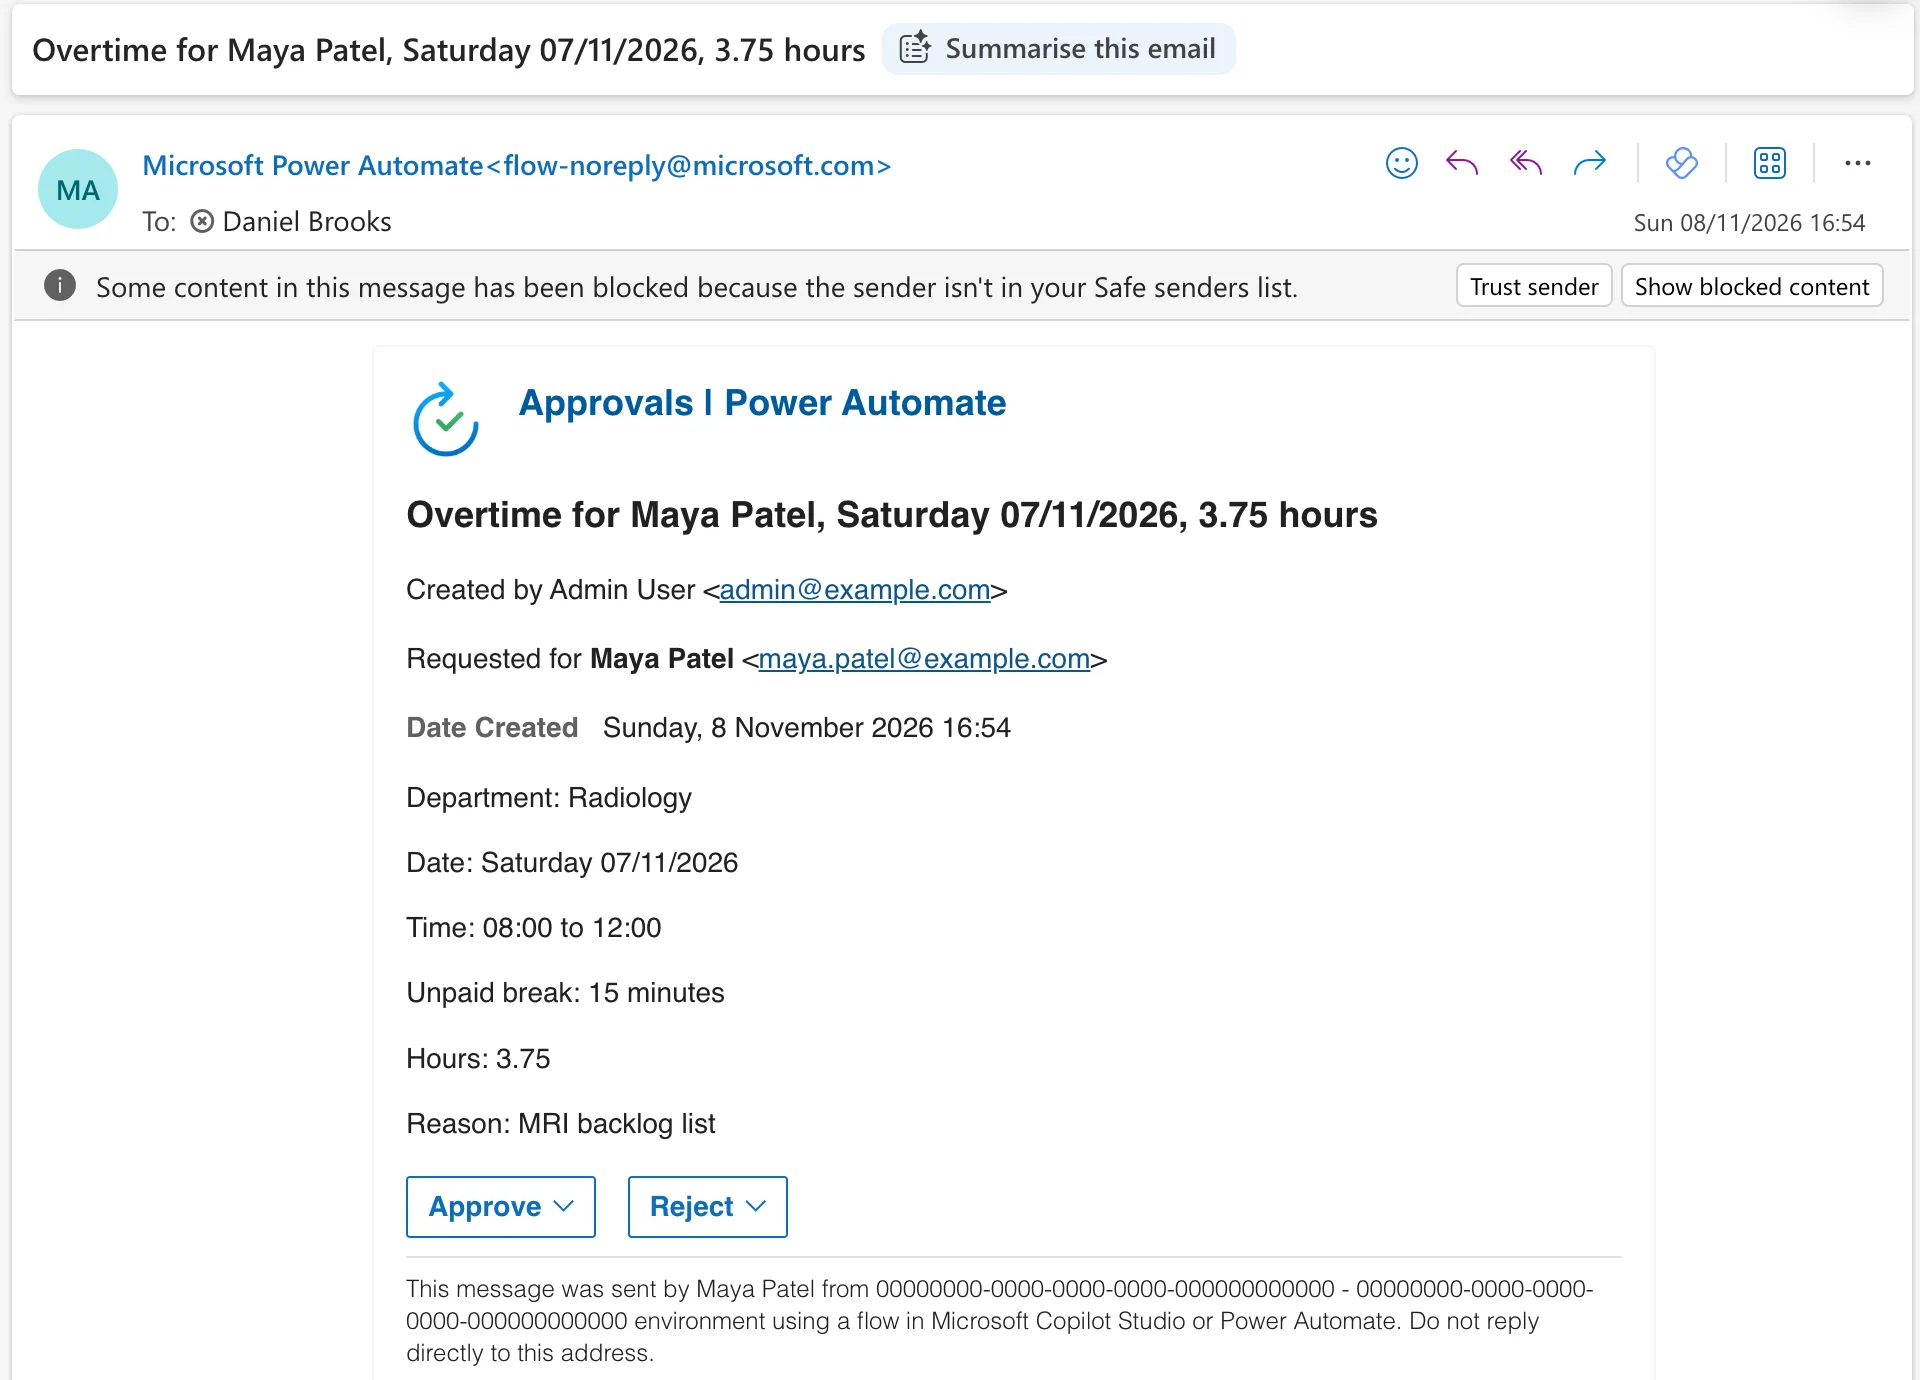
The request Daniel Brooks got said 3.75 hours, worked out from the times:
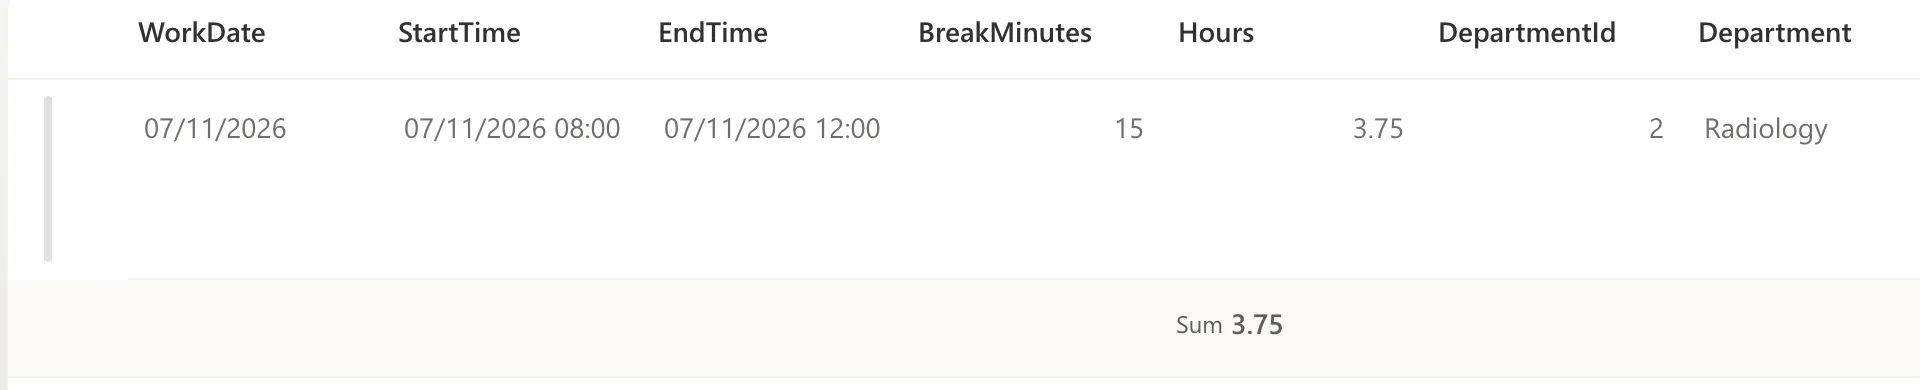
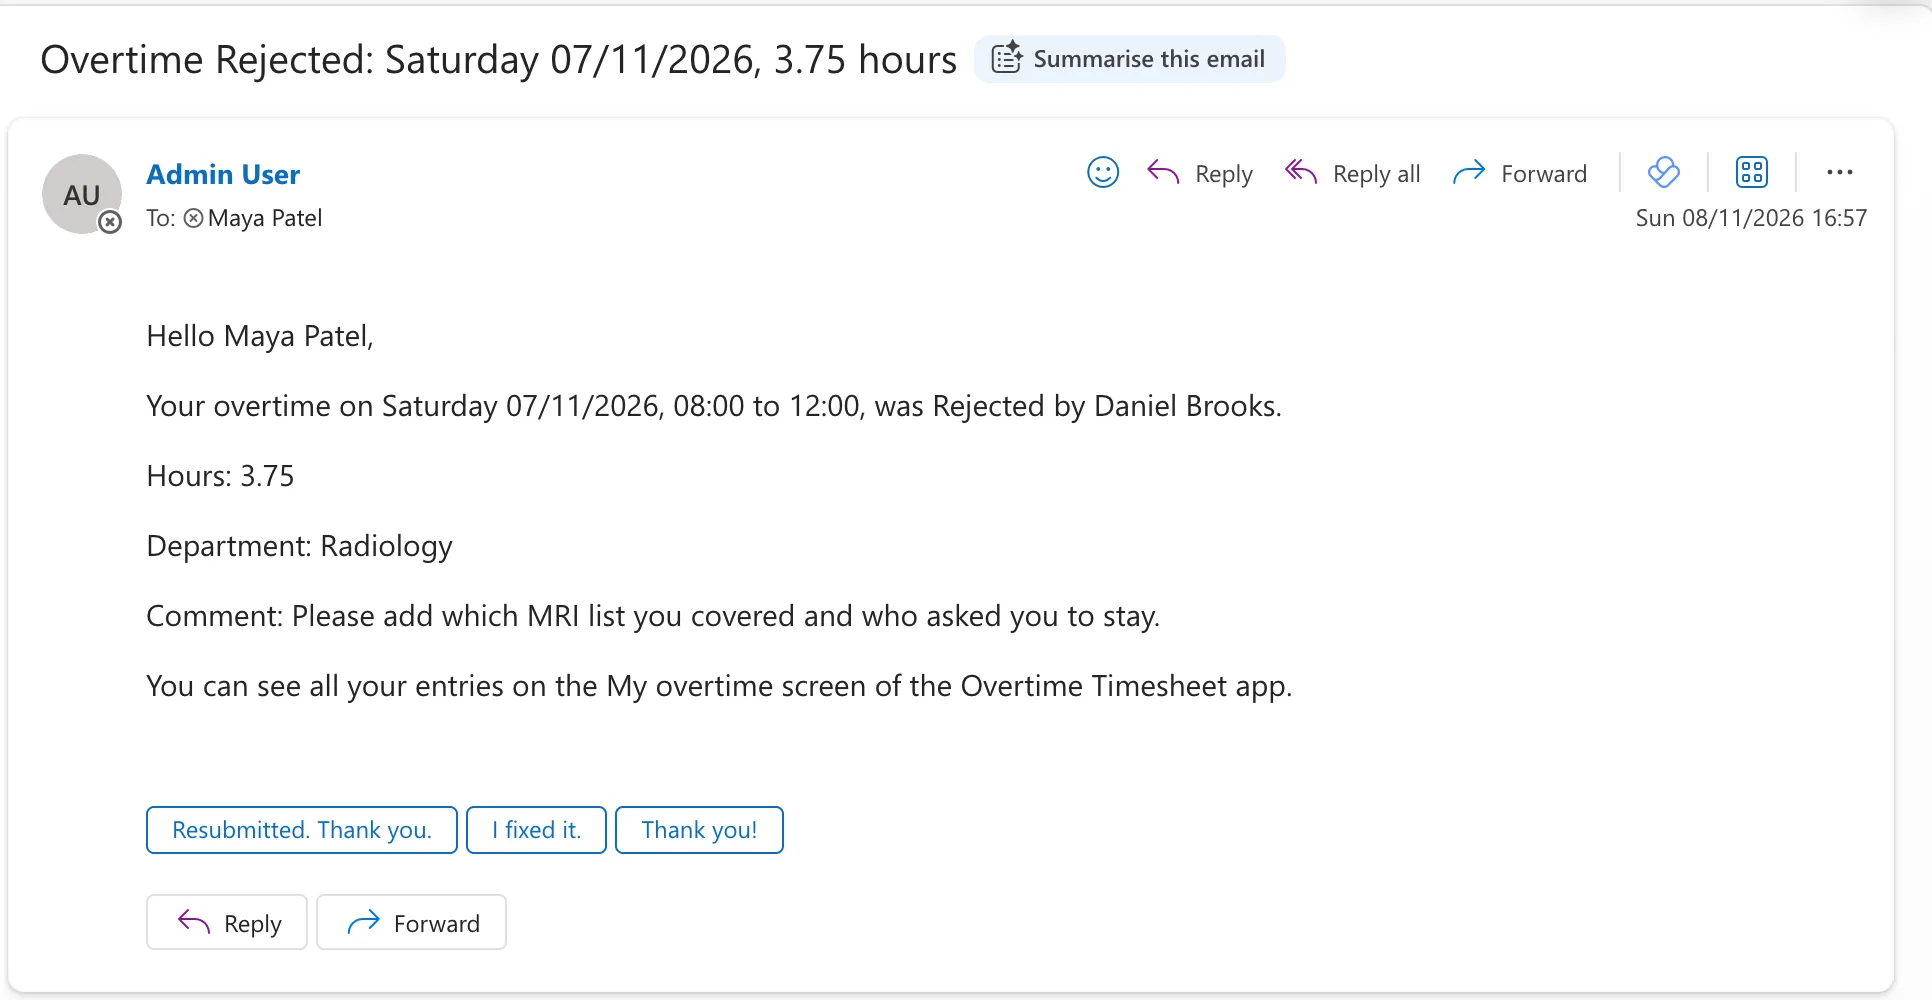
He rejected it: Please add which MRI list you covered and who asked you to stay. The flow saved the hours it worked out, and the decision in both Status and Approval Status:

And Maya's email told her why:
Step 13: Change an Entry While It Waits
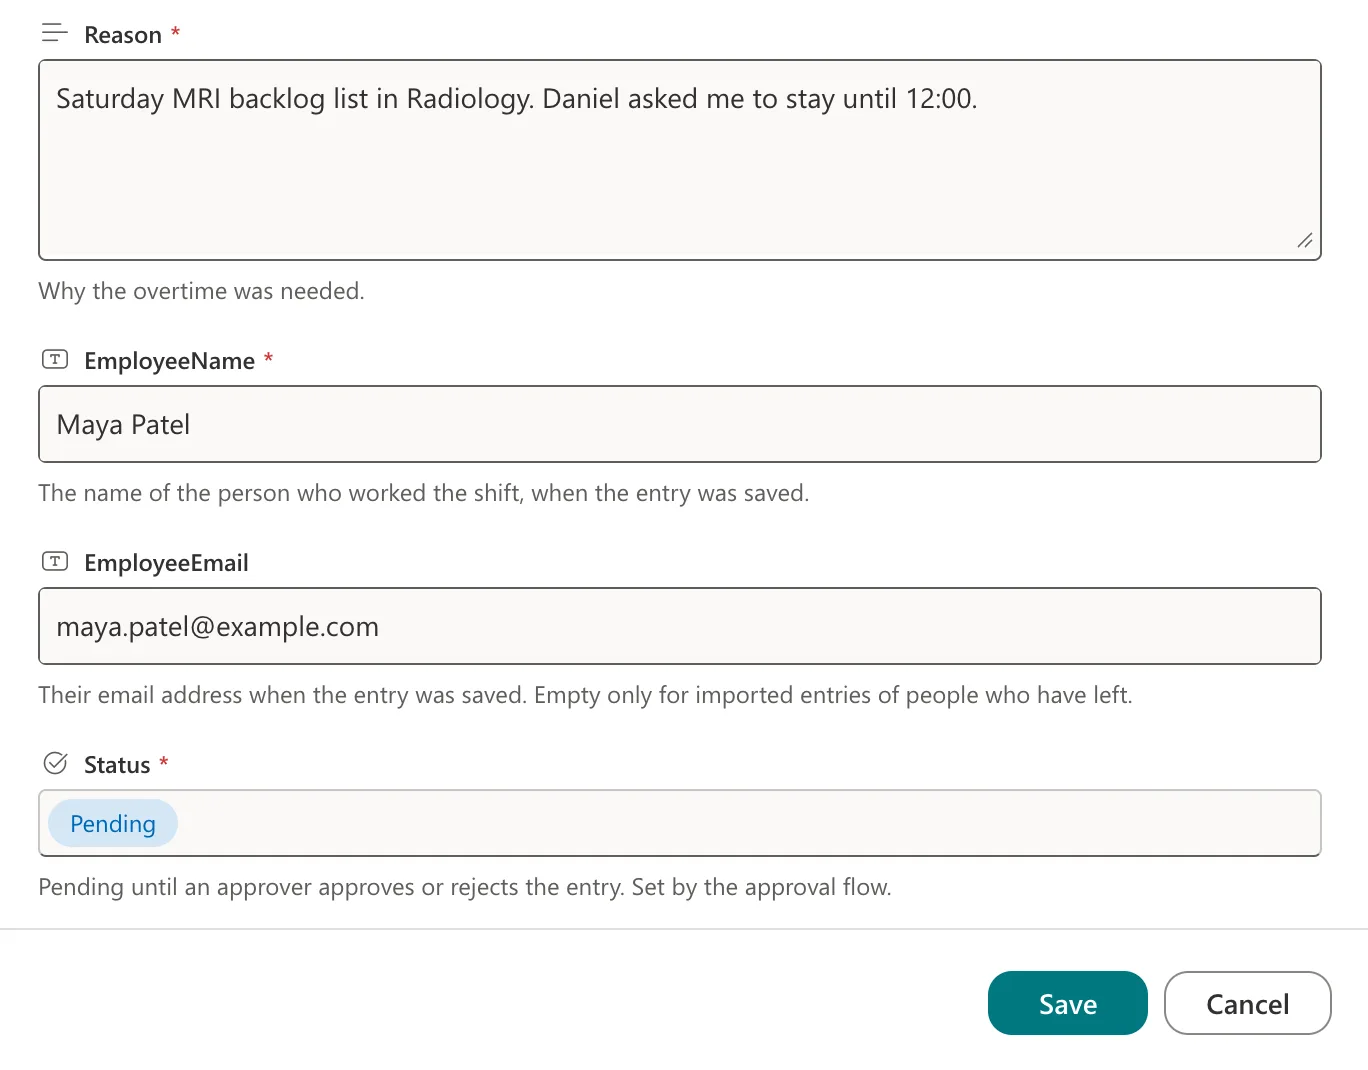
Sending an entry again from SharePoint. A rejected entry keeps its Status of Rejected when it's edited in SharePoint, so the trigger condition doesn't start the flow. To send it for approval again, set Status back to Pending in the same edit; the app does it on every save. The same goes for an approved entry edited in SharePoint, which Part 3 showed goes back to Pending in Approval Status. Maya added what Daniel asked for and set Status to Pending:
:::tip Close the Status drop-down by selecting another field While setting Status in SharePoint's edit panel, I once pressed Esc to close the drop-down, and the whole panel closed without saving. Selecting another field's label closes the drop-down and keeps the panel open. :::
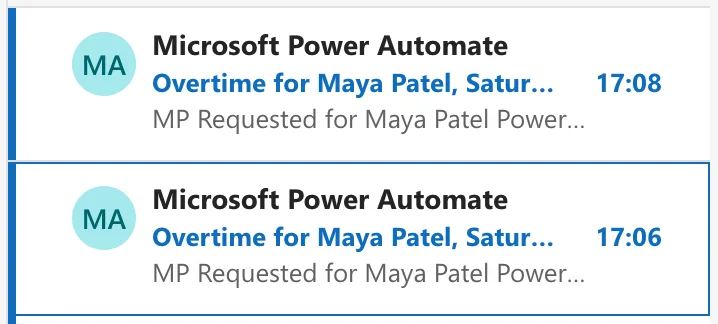
A change while the request waits. The request reached Daniel at 17:06. Before he answered, Maya edited the entry again, adding the number of scans, and a second request arrived at 17:08:
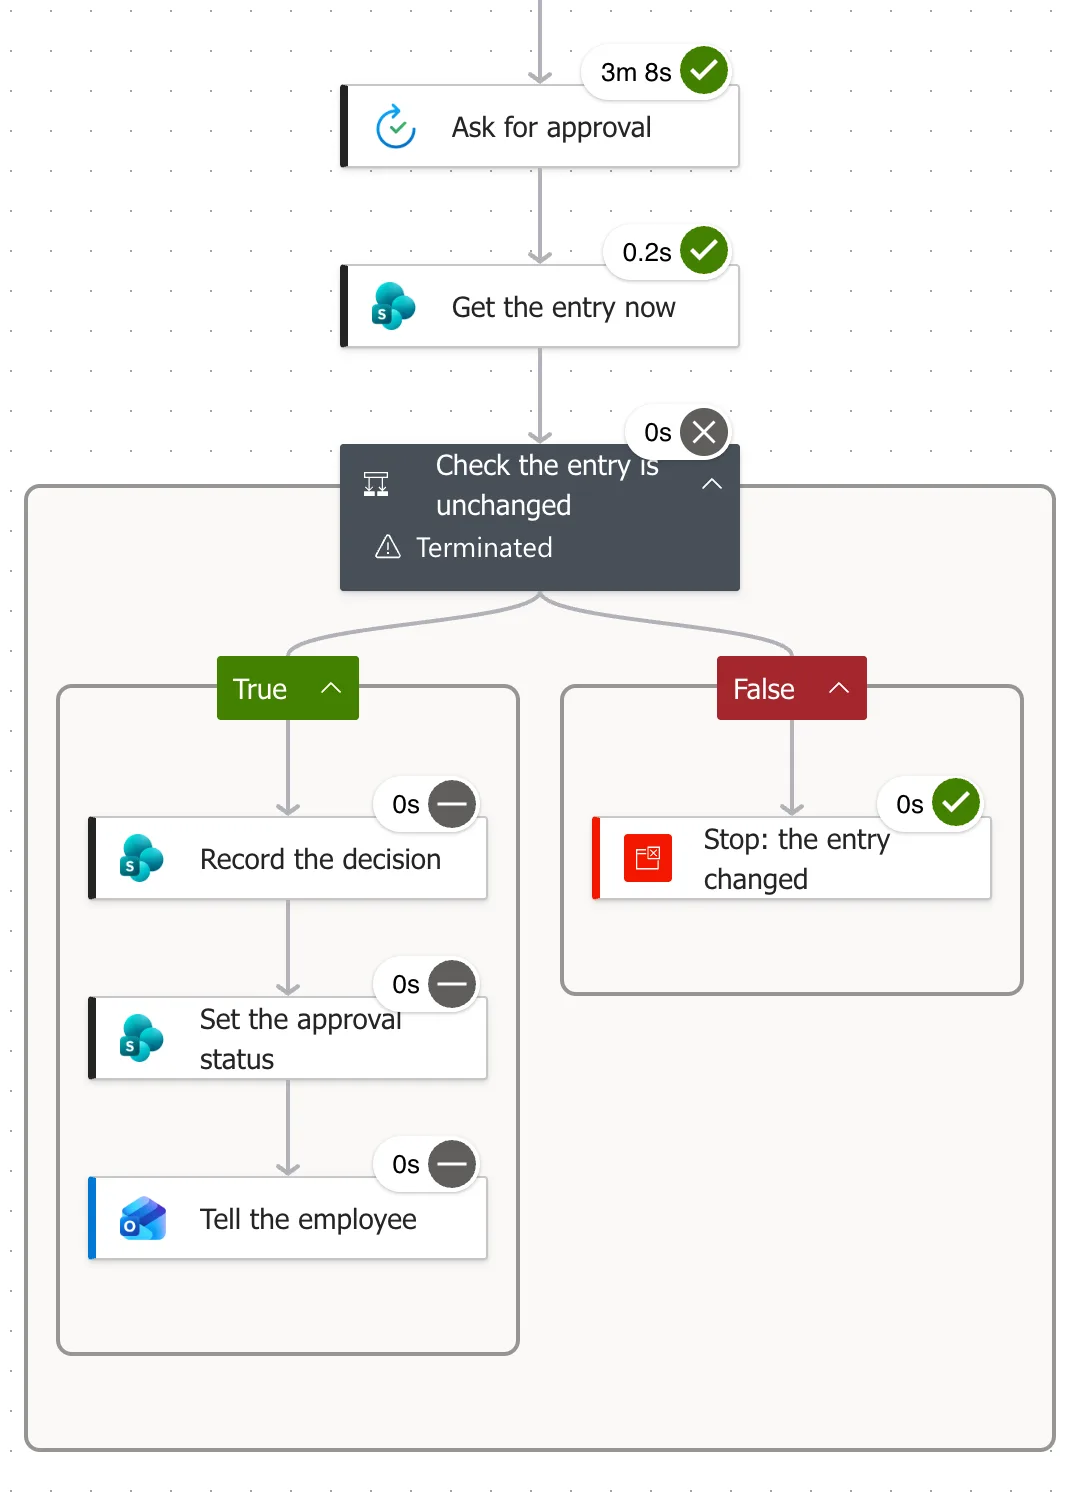
Daniel approved the older request first. Its run had started from version 4.0 of the entry, and Get the entry now read version 5.0, so it stopped at Stop: the entry changed, and nothing was recorded (How to See a Flow's Run History in Power Automate):
Then he approved the newer request, which recorded the approval:

Nothing told Daniel that his first answer was set aside: the old request showed as approved like any other. Approvers should answer the newest request for an entry.
Step 14: Send an Approver's Own Overtime to Their Manager
Daniel Brooks logged his own overtime for 5 November, 17:00 to 19:30 in Radiology, in SharePoint. He's Radiology's only approver, so Approvers other than the employee came out empty, and the run took the False branch:
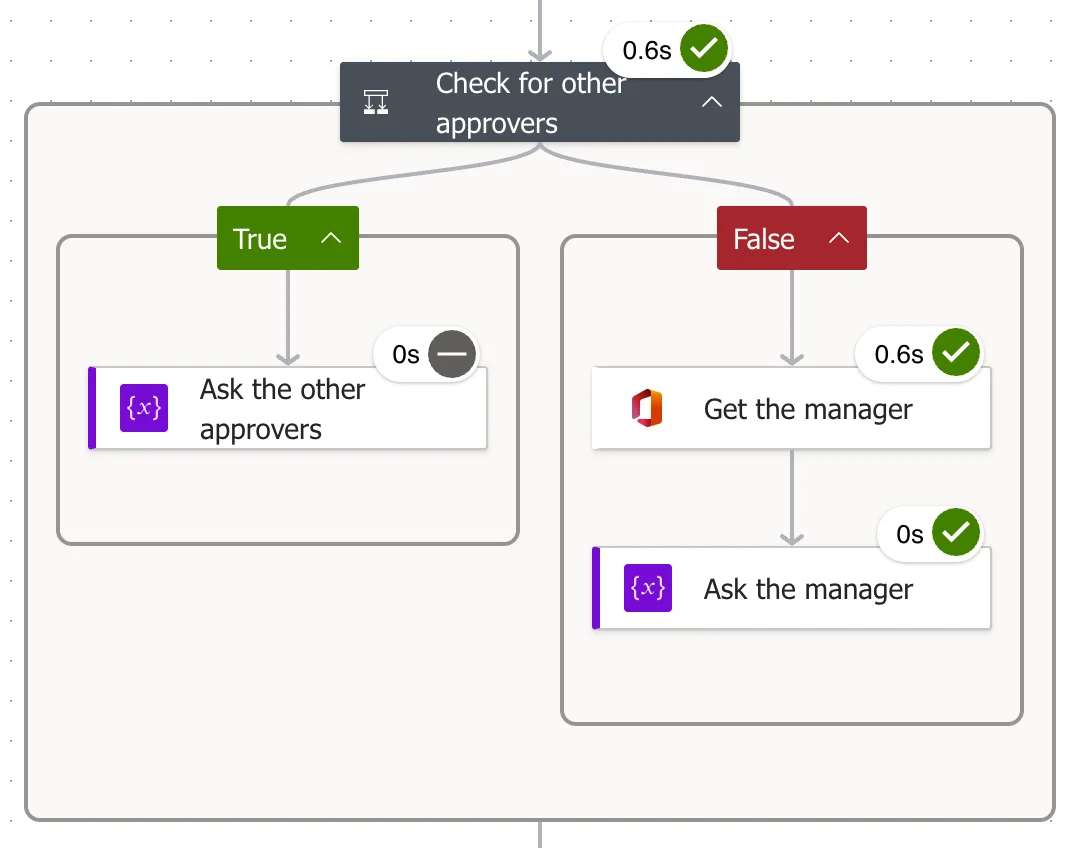
Get the manager returned Daniel's manager from Microsoft Entra, Admin User, and the request went to the maker, who answered it in Power Automate's Approvals (How to Respond to Approvals in Power Automate):
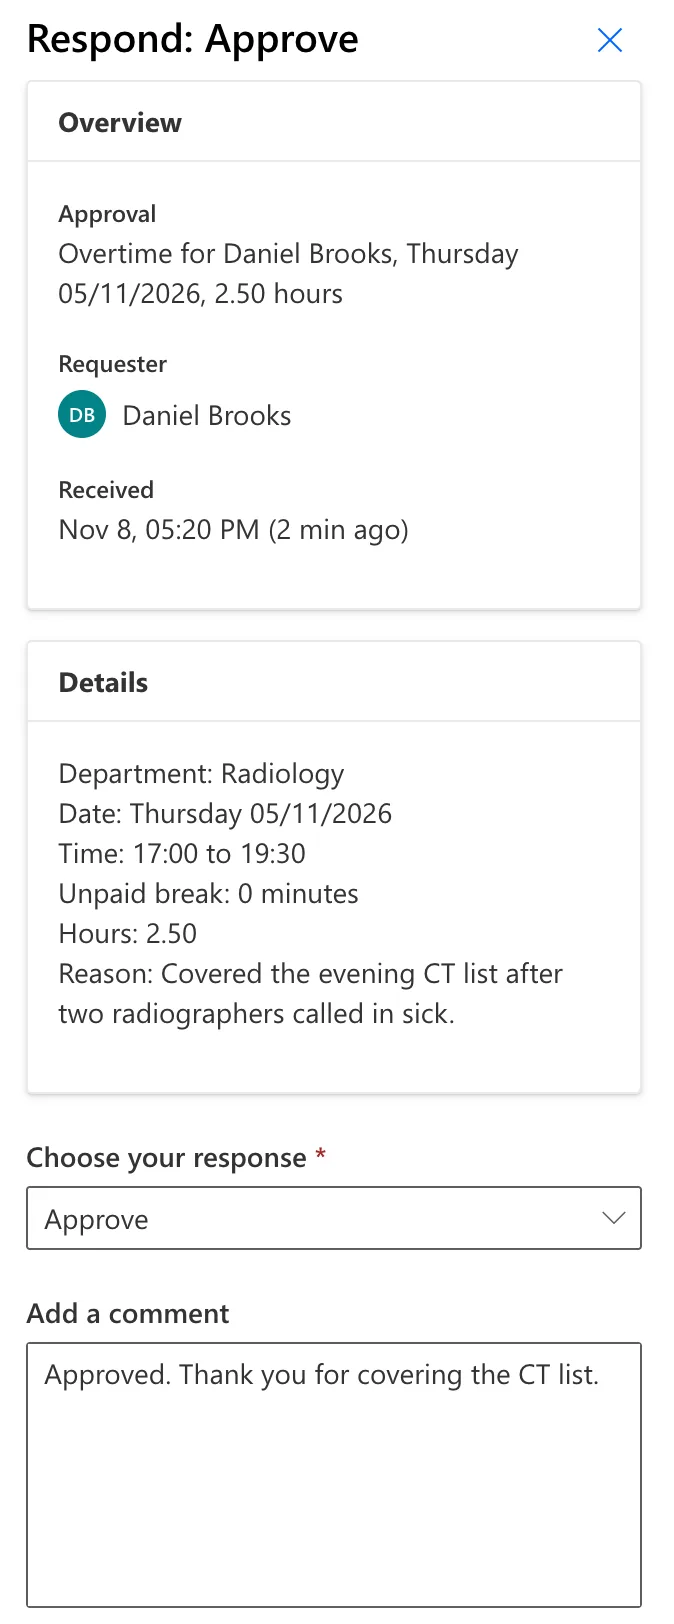
So every approver needs a manager in Microsoft Entra, as Part 1 set them. In Power Apps, the same lookup fails for a person without one: Fixed: Office365Users.ManagerV2 Failed: Resource 'manager' Does Not Exist.
Step 15: See the Decisions in the App
The maker's Radiology entries for 1 and 6 November went to Daniel when I saved them again from the app. He rejected 6 November, Please check the finish time. The CT list closed at 20:00., and then approved 1 November. Refresh on the My Overtime screen between the two showed each status the flow can set:
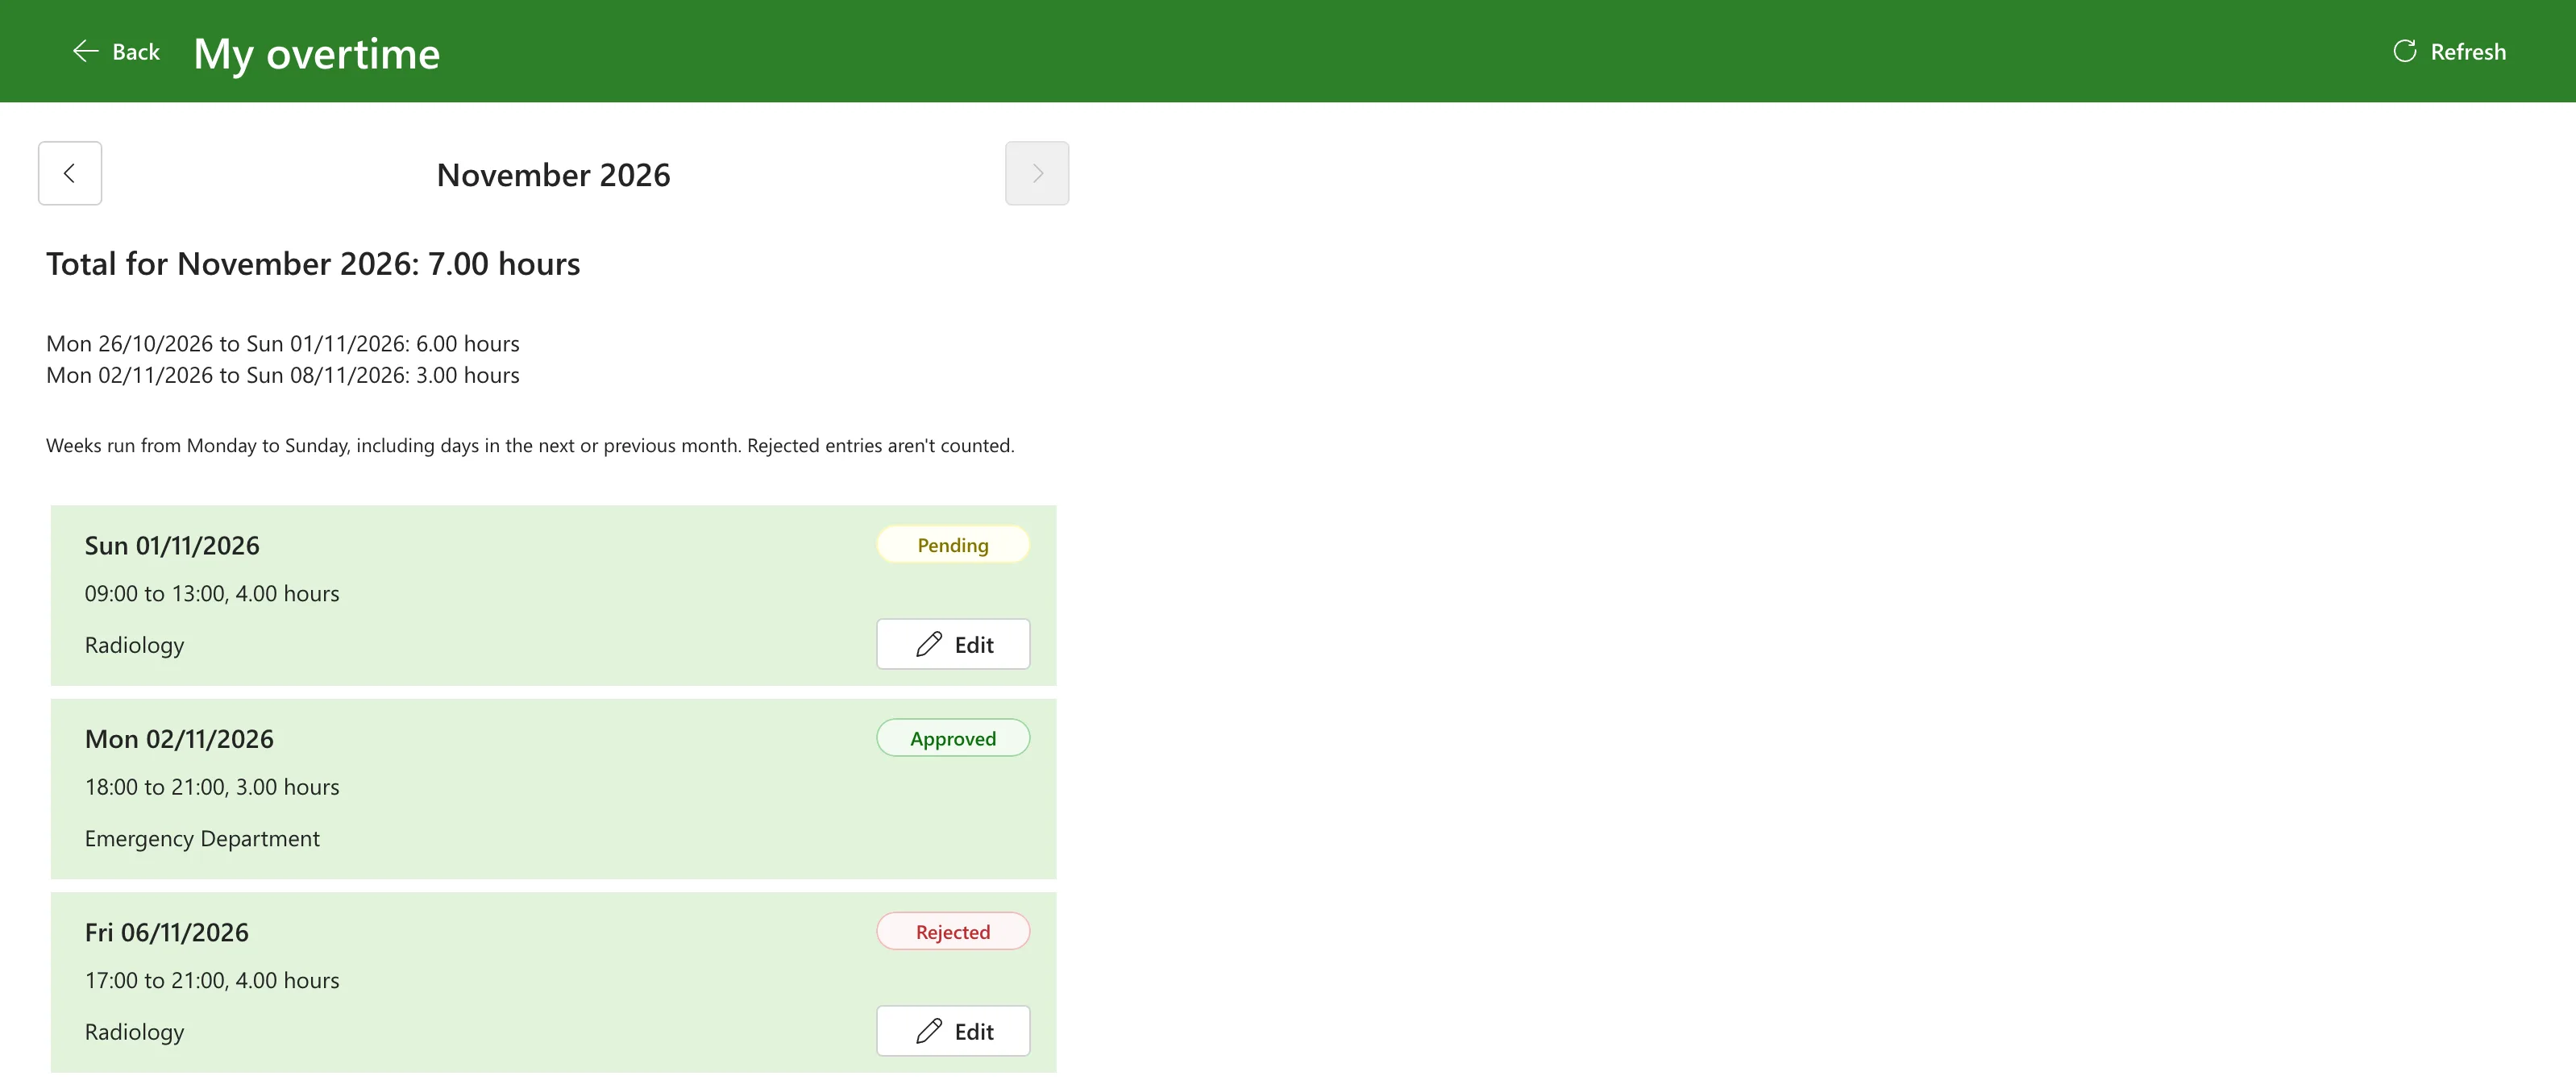
The approved entry has no Edit button, and the rejected one isn't in the totals, as Part 7 built them. Nothing in the app changed in this part: the badges read the Status the flow saves.
Common Mistakes
| Mistake | What happens | Do this instead |
|---|---|---|
| No trigger condition | The flow's own update can start it again | @equals(triggerOutputs()?['body/Status/Value'], 'Pending') |
| An apostrophe or question mark in an action name | Publishing fails | Names like Get the manager and Check for other approvers |
| Saving the decision without reading the entry again | An answer to an old request decides a newer version | Get the entry now and the version check |
| Setting the approval status before Record the decision | The update sets it back to Pending | Set it last, with the update's ETag |
| Saving the hours the entry carries | Hours changed by hand get approved | Work them out from the times |
| A SharePoint action on another solution's connection reference | The solution doesn't carry what the flow needs | Change connection reference on each one |
| Typing the variable into Assigned to | It searches for a person by that text | Gear, then Use dynamic content |
Troubleshooting
| Symptom | Likely cause | Fix |
|---|---|---|
| No request for an entry | It was saved before the flow was published, or its Status isn't Pending | Save it again with Status Pending |
| The request comes a minute or more after the save | The trigger isn't instant | Wait a few minutes before checking |
| Publishing fails with invalid expression(s) | An apostrophe in the name of an action an expression reads | Rename it and pick its token again |
| Publishing fails with InvalidWorkflowRunActionName | A ? or another listed symbol in an action name | Rename the action |
| A run shows Canceled | The entry changed while its request waited | Expected: the newer request decides |
| A reopened condition shows an extra empty row | The designer shows one; Code view has only the real comparison | Leave it |
| Get the manager fails | The person may have no manager in Microsoft Entra | Set their manager |
| An entry edited in SharePoint never goes for approval | Its Status is still Approved or Rejected | Set Status to Pending in the same edit |
FAQ
Why do the requests say "Created by Admin User"?
Approvals always show the flow's creator. Microsoft's connector reference says The creator of the flow will always be shown in the Approval details (email content and all clients). This is to prevent spoofing of approval sender identities. In production, create the flow and its Outlook connection with an account meant for the app, so requests and emails show that account rather than a person.
What happens if nobody answers?
The run waits, within a limit. Microsoft's limits page says After 30 days, any pending steps time out, and its approvals known issues say An approval flow can wait for 28 days. The flow records nothing until someone answers, so the entry stays Pending; saving it again sends a new request.
Can staff approve their own overtime?
Not through the flow: it leaves the person who logged the entry out of the request, and asks their manager when nobody else is left. Not in SharePoint either: approving needs Approve Items, which staff don't have (Part 3). They can edit their own entry's Status column, which is why Part 3 says not to trust it on its own; Approval Status is the record they can't change.
Why both Status and Approval Status?
The app and its filters read Status, an ordinary Choice column. Approval Status is SharePoint's own record of the decision, and only people with approval rights can change it. The flow writes the same decision to both.
Does this need premium licenses?
No. SharePoint, Approvals, Office 365 Users and Office 365 Outlook are standard connectors, and the flow's details page says This flow runs on owner's plan.
Conclusion
Each overtime entry now gets a decision:
- Overtime Approval, an automated cloud flow in the app's solution, with the solution's own connection references and its SharePoint values from environment variables;
- a trigger condition that starts it only for pending entries, so its own updates don't start it again;
- requests to the department's approvers, leaving out the person who logged the entry, or to their manager when nobody else is left;
- the date, times and hours worked out again, in UK time, for the request and the record;
- answers in Teams, Outlook or Power Automate, with the first one deciding;
- a check that the entry hasn't changed, so an old answer never decides a newer version;
- the decision saved in Status and in SharePoint's Approval Status, and an email to the employee.
Approvers find each request in Teams and Outlook. Part 9 gives them a screen in the app with everything waiting for them.
Additional Resources
- Create a solution-aware cloud flow: flows in solutions.
- Customize triggers with conditions: trigger conditions.
- Get started with approvals and Send an approval to multiple people: the approval action.
- SharePoint connector: Get item, Update item and Set content approval status.
- Use a connection reference in a solution: how flows pick their references.
- Reference guide for functions in expressions: every function in this flow.
← Previous: Part 7: Build the My Overtime Screen Next → Part 9: Show Approvers What's Waiting (coming soon)
