Build an Overtime Timesheet App in Power Apps — Part 7: Build the My Overtime Screen

People can log their overtime; this screen shows them what they've logged. It lists a month of their entries with a status badge on each, adds up the month and each Monday-to-Sunday week, moves between months, and lets them correct an entry until it's approved, by opening it on the Log Overtime screen.
This is Part 7 of a 20-part series.
- Part 1: Plan the App and Set Up the Demo Organization
- Part 2: Create the SharePoint Site and Lists
- Part 3: Keep Overtime Private with SharePoint Permissions
- Part 4: Create the Solution, Environment Variables and Canvas App
- Part 5: Build the Home Screen
- Part 6: Build the Log Overtime Screen
- Part 7: Build the My Overtime Screen (you are here)
- Part 8: Build the Approval Flow for Teams and Outlook
- Part 9: Show Approvers What's Waiting (coming soon)
- Part 10: Build the Departments Screen (coming soon)
- Part 11: Build the Reports Screen (coming soon)
- Part 12: Import the Old Excel Timesheet (coming soon)
- Part 13: Create the Monthly Payroll Workbook with Office Scripts (coming soon)
- Part 14: Build the Power BI Overtime Report (coming soon)
- Part 15: Share the App and Add It to Microsoft Teams (coming soon)
- Part 16: Test Every Role and Department (coming soon)
- Part 17: Build a Setup Flow That Creates the Lists (coming soon)
- Part 18: Run the Solution Checker and Export the Solutions (coming soon)
- Part 19: Install the App in a New Environment (coming soon)
- Part 20: Recap, Production Checklist and Next Steps (coming soon)
Part 6 built the Log Overtime screen, which adds a shift. This part builds the screen behind the Home screen's My overtime tile, and gives the Log Overtime screen an edit mode, so the same form corrects an entry. Each generic task has its own guide; this part gives the values for this app, and why.
What You'll Build
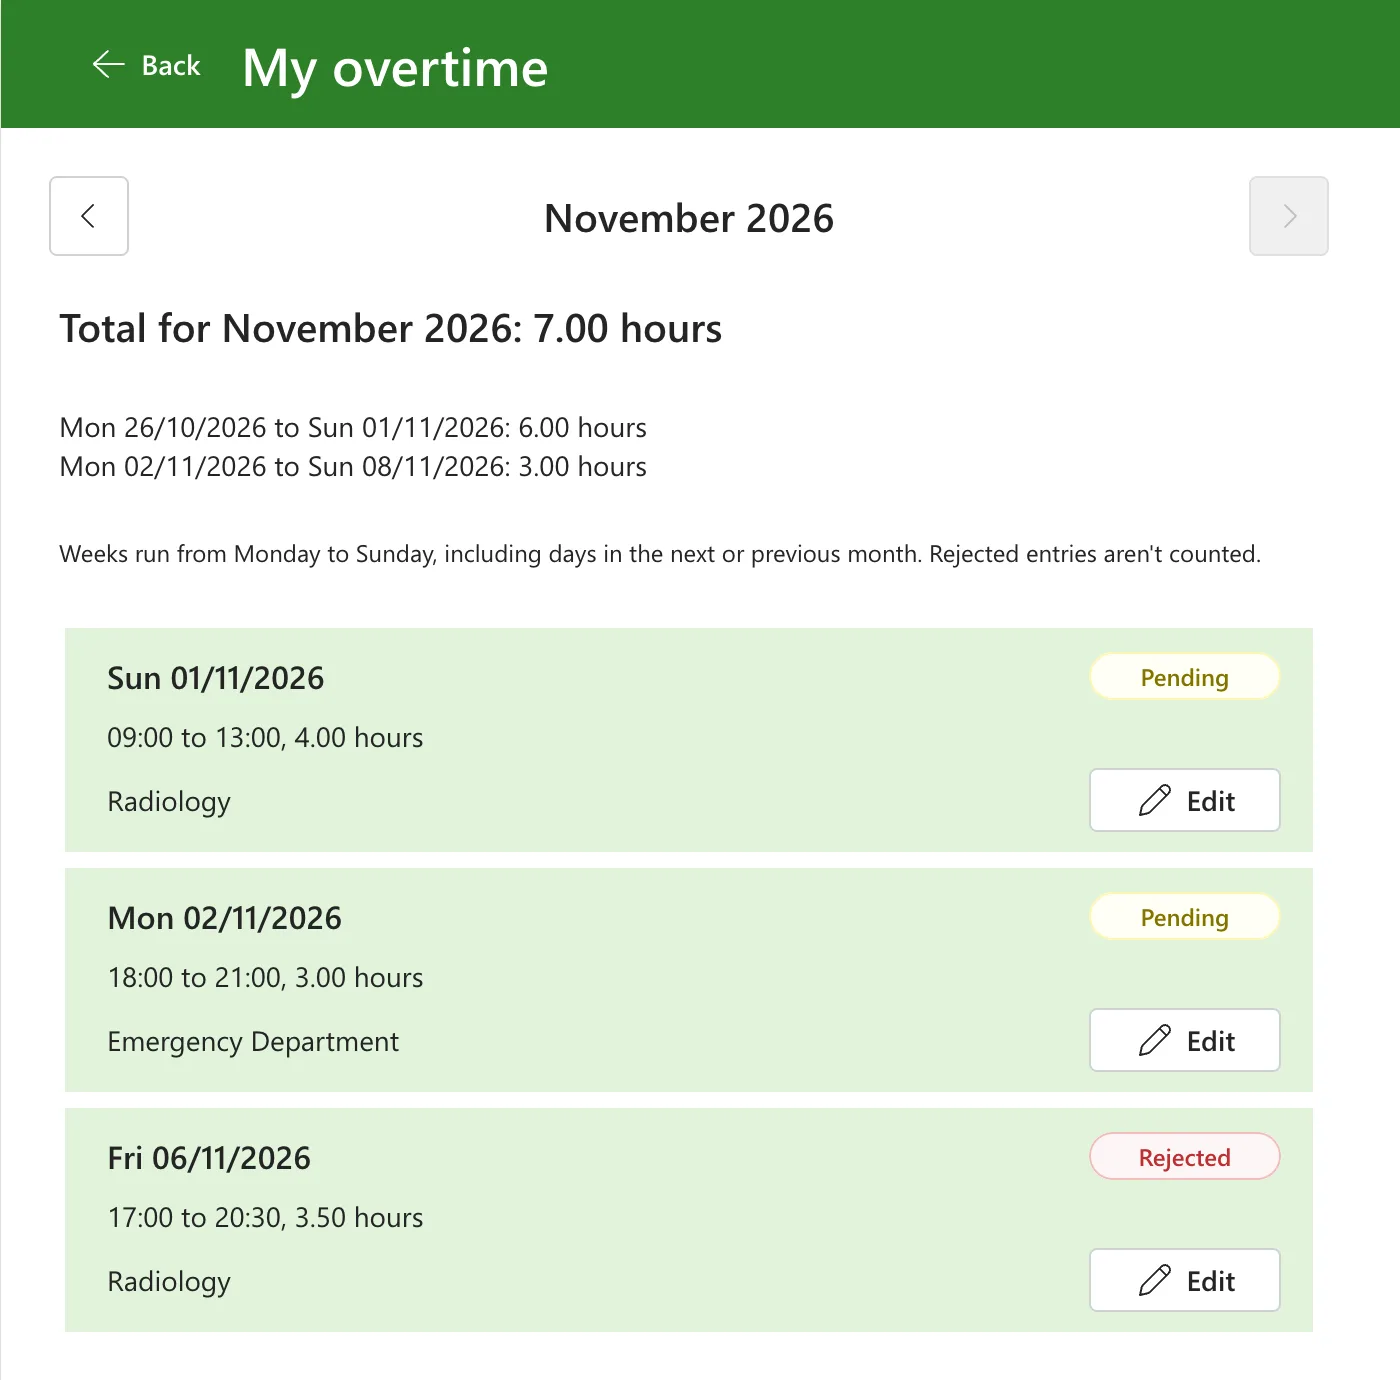
The finished screen for November 2026, with one entry rejected:
How the Screen Works
The decisions behind the formulas:
- One month at a time, starting with this one. Buttons move to the previous and next month. The next-month button stops at the current month, because overtime is logged after it's worked.
- Only the person's own entries. Staff can only open their own entries in SharePoint anyway (Part 3). The screen also filters on their email, which keeps the query small, and keeps the maker, who owns the list and can read every entry, to their own.
- SharePoint finds the rows; the app adds them up. SharePoint can filter by person and by date, but Sum and GroupBy can't be delegated to it. The screen loads the rows it needs with a filter SharePoint can run, keeps them in context variables, and works out the totals from those.
- Full weeks. A week runs from Monday to Sunday, as the date picker in Part 6 does. The first and last weeks of a month take in days of the months around it, so the screen loads those days too: the weekly totals count them, and the month's total doesn't.
- Rejected entries aren't counted in either total. They stay in the list with their badge, so people can correct them and send them again.
- Edit until approved. Each entry that isn't approved has an Edit button, which opens it on the Log Overtime screen. Saving a change sends it back for approval.
Prerequisites
- Part 6 completed: the Log Overtime screen and the functions in App.Formulas.
- The guides this part relies on. Each step says which one to follow:
- Screen and layout: How to Add a New Screen in Power Apps, How to Copy and Paste Controls Between Screens in Power Apps, How to Add a Horizontal Container in Power Apps, How to Add a Vertical Container in Power Apps and How to Add a Text Control in Power Apps
- The header: How to Add a Refresh Button to a Screen in Power Apps and How to Show Only the Icon on a Button on Phones in Power Apps
- Dates: Weekday, the Monday of a week, the first day of the month, the last day of the month, the month name and year, the day name of a date and How to Add Previous and Next Month Buttons in Power Apps
- Loading the data: How to Run a Formula When a Screen Opens in Power Apps with OnVisible, How to Use the Select Function in Power Apps, How to Use Context Variables in Power Apps with UpdateContext, How to Use the With Function in Power Apps, How to Filter a SharePoint List Between Two Dates in Power Apps and How to Add a Loading Spinner in Power Apps
- Totals: How to Add Up a Column in Power Apps with Sum, How to Group Records in Power Apps with GroupBy, How to Total Each Group in Power Apps with GroupBy and Sum and How to Join Table Values into Text in Power Apps with Concat
- The list of entries: How to Add a Vertical Gallery in Power Apps and Connect It to a SharePoint List, How to Use ThisItem in a Power Apps Gallery, How to Add a Badge Control in Power Apps, How to Show That a Shift Ends the Next Day in Power Apps and How to Show a Message When a Gallery Is Empty in Power Apps
- Editing: How to Use One Screen to Add and Edit Items in Power Apps, How to Exclude the Item Being Edited from a LookUp in Power Apps and How to Stop Editing an Item Once It's Approved in Power Apps
- SharePoint views: How to Group Items in a SharePoint List View and How to Show Column Totals in a SharePoint List View
Step 1: Add the MondayOf Function
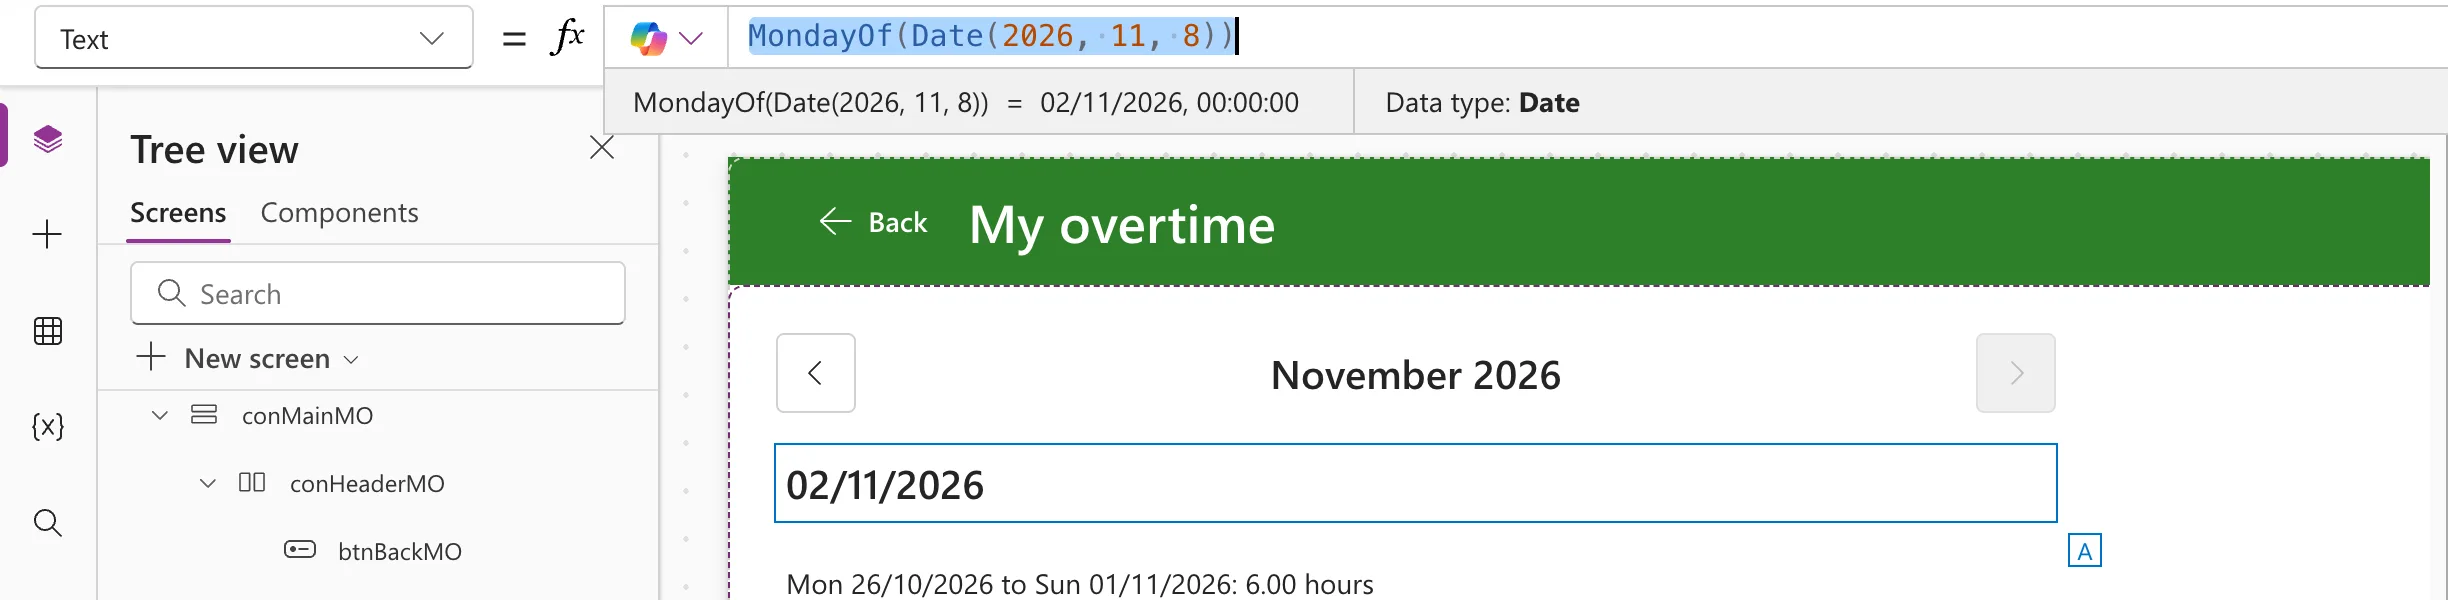
The weekly totals need the Monday each entry's week starts on, and the screen needs the Mondays around the month it shows. One function in App.Formulas, after Part 6's, works it out for any date (How to Find the Monday of a Week in Power Apps):
MondayOf(AnyDate: Date): Date = DateAdd(AnyDate, 1 - Weekday(AnyDate, StartOfWeek.Monday), TimeUnit.Days);
Weekday(AnyDate, StartOfWeek.Monday) numbers the days from 1 for Monday to 7 for Sunday (How to Get the Day of the Week in Power Apps with Weekday), so a Sunday goes back six days and a Monday stays where it is. For Sunday 8 November 2026, it gave Monday 2 November:
Step 2: Add the Screen and Its Header
Add a Blank screen (How to Add a New Screen in Power Apps) and rename it My Overtime Screen. Controls on this screen end in MO:
My Overtime Screen
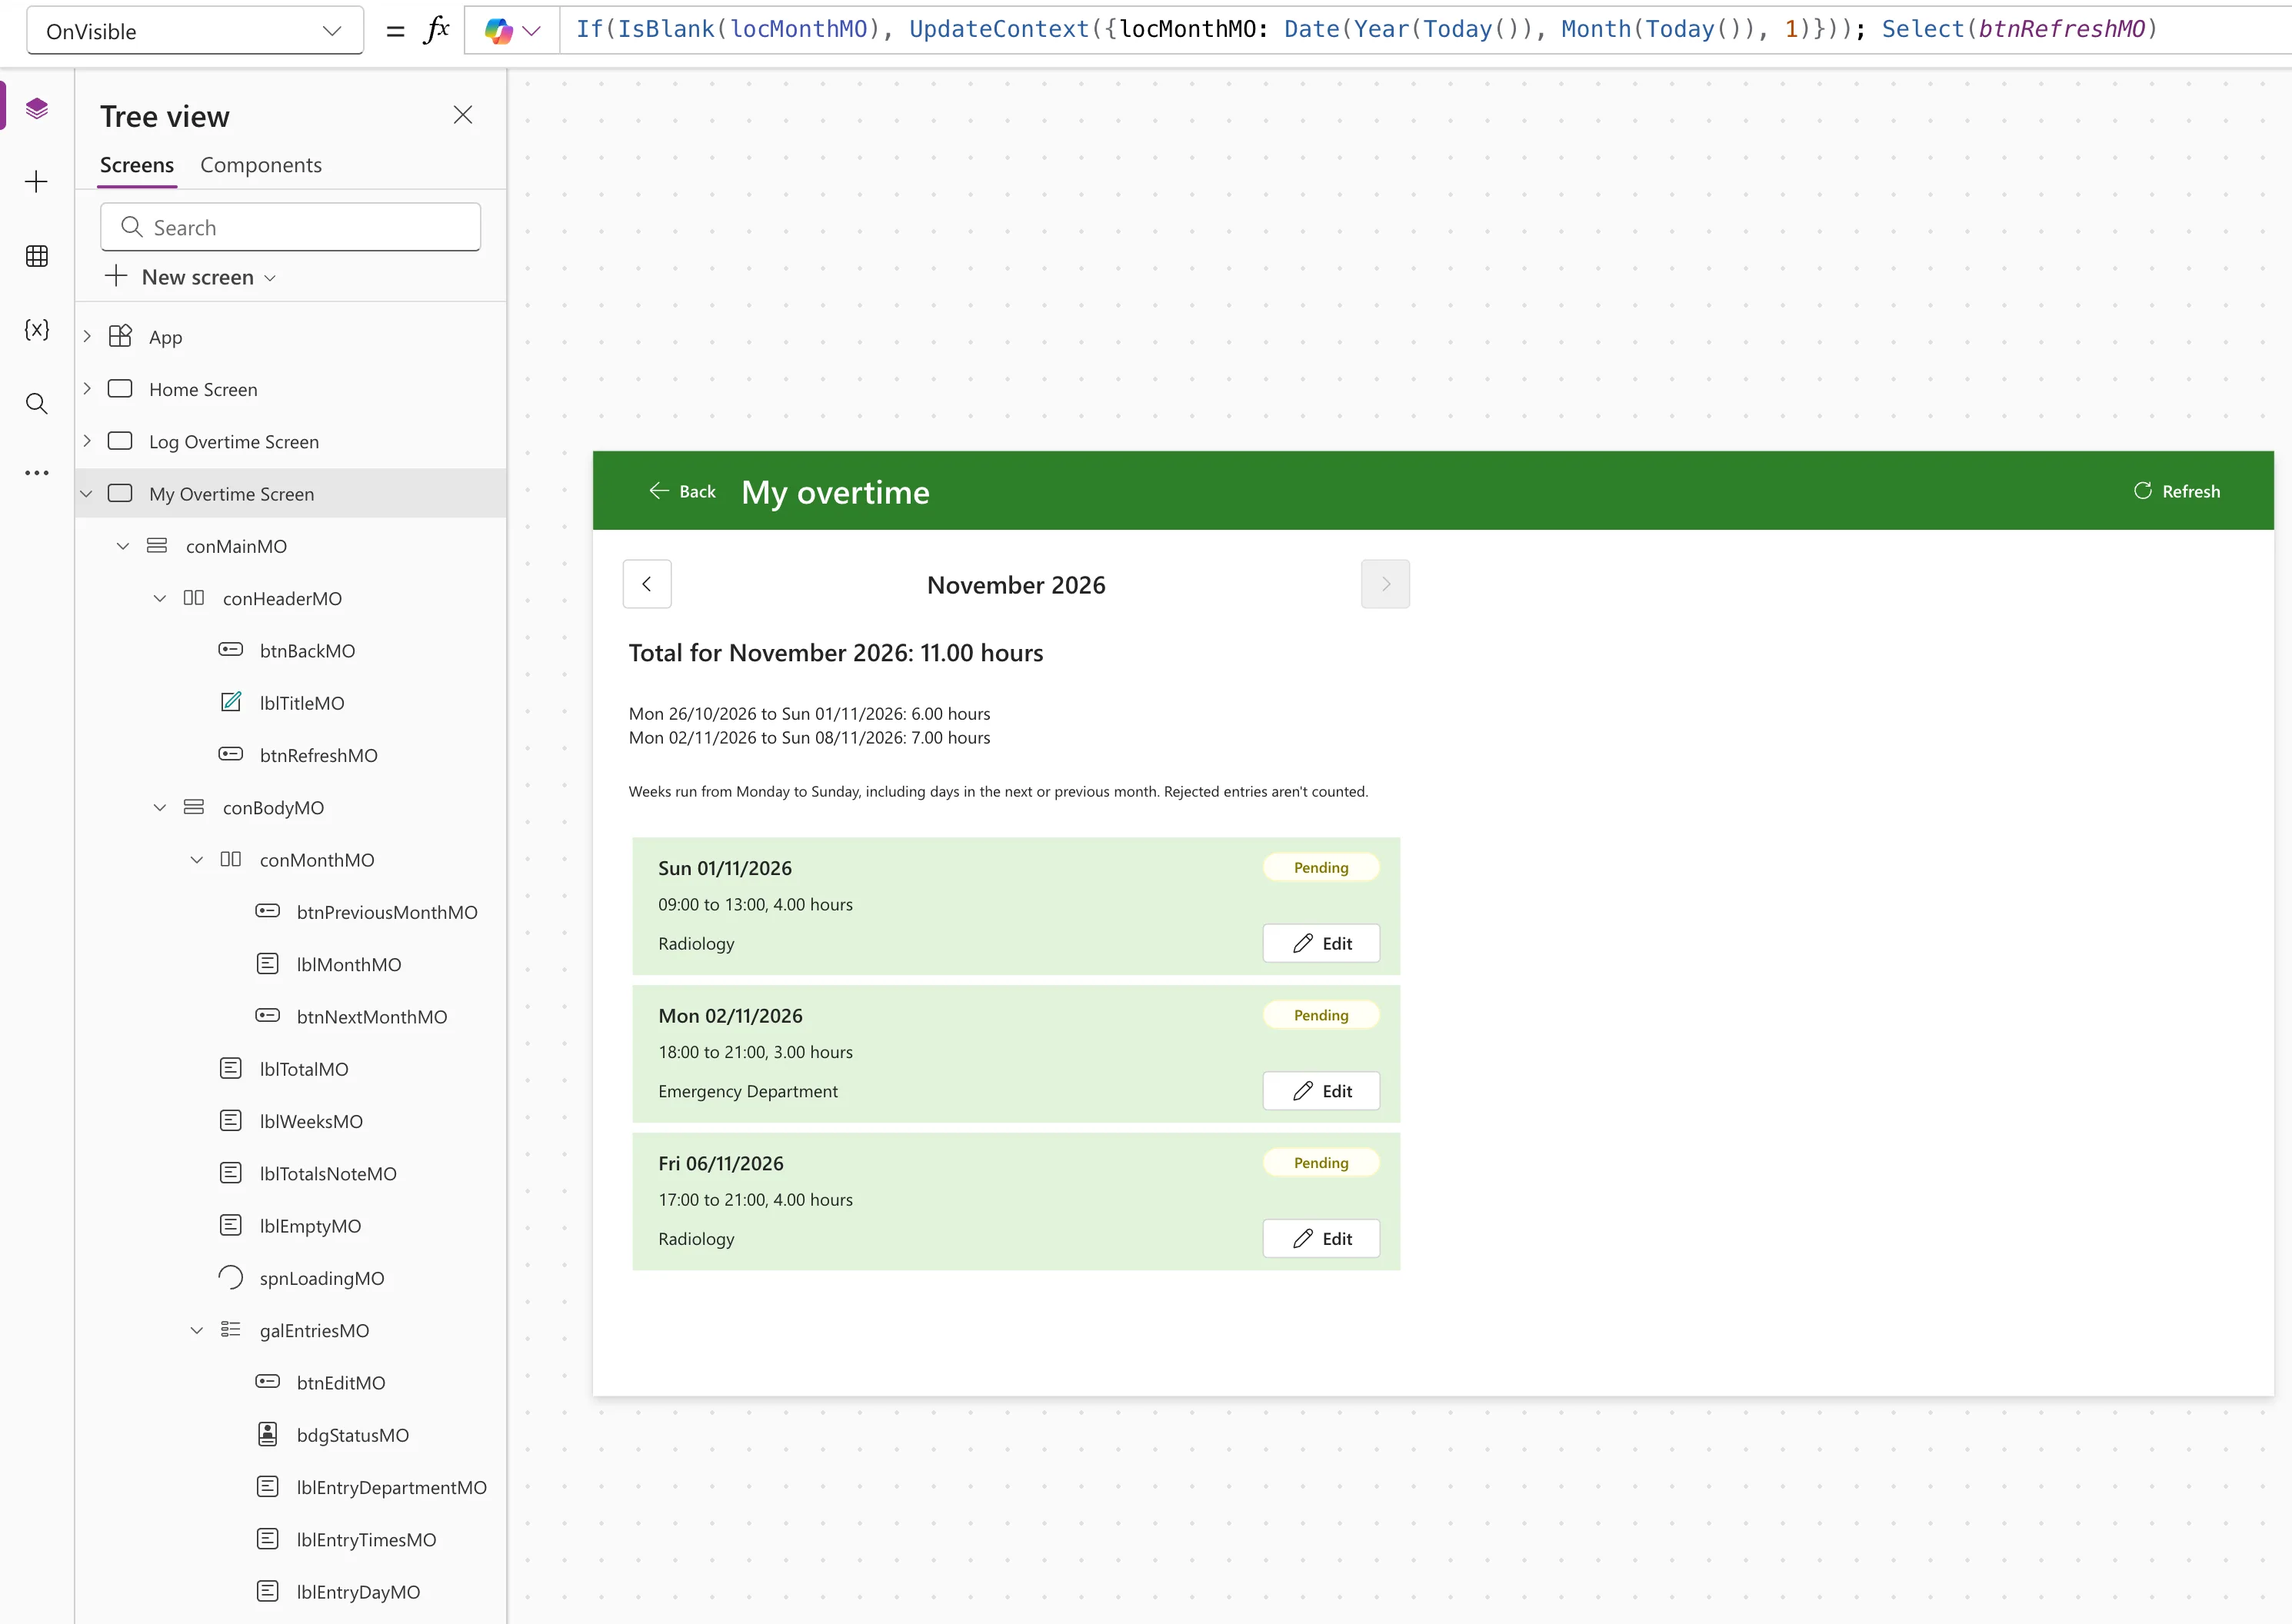
└─ conMainMO                  vertical: fills the screen
   ├─ conHeaderMO             horizontal: copied from the Log Overtime screen
   │  ├─ btnBackMO
   │  ├─ lblTitleMO
   │  └─ btnRefreshMO         loads the month
   └─ conBodyMO               vertical: scrolling
      ├─ conMonthMO           btnPreviousMonthMO, lblMonthMO, btnNextMonthMO
      ├─ lblTotalMO           the month's total
      ├─ lblWeeksMO           the weekly totals
      ├─ lblTotalsNoteMO
      ├─ lblEmptyMO           shown when the month has no entries
      ├─ spnLoadingMO         shown while loading
      └─ galEntriesMO         one row per entry
         ├─ lblEntryDayMO
         ├─ lblEntryTimesMO
         ├─ lblEntryDepartmentMO
         ├─ bdgStatusMO
         └─ btnEditMO
The main container. Insert a vertical container, conMainMO, with the same settings as the Log Overtime screen's: X, Y 0; Width Parent.Width; Height Parent.Height; Align (horizontal) Stretch; Padding 0; Drop shadow None; Border radius 0.
The header. Copy conHeaderLO on the Log Overtime screen and paste it into conMainMO (How to Copy and Paste Controls Between Screens in Power Apps). Rename the copies conHeaderMO, btnBackMO and lblTitleMO, and set the title's Text to "My overtime". The Back button keeps its Back().
The Refresh button. Insert a button into conHeaderMO; it goes in at the end, after the title. Name it btnRefreshMO (How to Add a Refresh Button to a Screen in Power Apps):
| Property | Value |
|---|---|
| Text | "Refresh" |
| Icon | "ArrowClockwise" |
| Height | 40 |
| Layout | If(App.ActiveScreen.Size = ScreenSize.Small, ButtonLayout.IconOnly, ButtonLayout.IconBefore) |
| Width | If(App.ActiveScreen.Size = ScreenSize.Small, 40, 112) |
| AccessibleLabel, Tooltip | "Refresh this screen" |
On a phone it shows only its icon, so the title has room: How to Show Only the Icon on a Button on Phones in Power Apps. Its OnSelect loads the month, in Step 4.
The body. Insert a vertical container into conMainMO after the header, conBodyMO: Flexible height On; Align (horizontal) Start; Gap 16; Padding 24; Vertical overflow Scroll; Drop shadow None; Border radius 0.
Step 3: Add the Month Bar
The screen keeps the first day of the month it shows in a context variable, locMonthMO. Two buttons move it a month at a time, with the month's name between them: How to Add Previous and Next Month Buttons in Power Apps.
Insert a horizontal container into conBodyMO, conMonthMO (How to Add a Horizontal Container in Power Apps):
| Setting | Value |
|---|---|
| Flexible height | Off; Height 40 |
| Width | Min(640, Parent.Width - 48) |
| Align in container | Start |
| Align (vertical) | Center |
| Gap | 8 |
| Padding, Drop shadow, Border radius | 0, None, 0 |
Min(640, Parent.Width - 48) keeps the screen's content 640 pixels wide on a large screen, and the full width on a phone, less the body's padding. The totals and the list use the same width.
Inside it, add two buttons with a Text control between them:
| Property | btnPreviousMonthMO | lblMonthMO | btnNextMonthMO |
|---|---|---|---|
| Text | "Previous month" | Text(locMonthMO, "mmmm yyyy") | "Next month" |
| Icon | "ChevronLeft" | "ChevronRight" | |
| Layout | ButtonLayout.IconOnly | ButtonLayout.IconOnly | |
| Appearance | Secondary | Secondary | |
| Size | 20, Semibold, centered | ||
| Width, Height | 40, 40 | Flexible width On, Height 40 | 40, 40 |
| AccessibleLabel | "Previous month" | Self.Text | "Next month" |
| Tooltip | "Previous month" | "Next month" |
The label shows the month as November 2026 (How to Show the Month Name and Year in Power Apps). The buttons show only their arrows, so their AccessibleLabel and Tooltip say what they do. Each one moves locMonthMO and then runs the Refresh button's formula, which loads the new month (How to Use the Select Function in Power Apps):
UpdateContext({locMonthMO: DateAdd(locMonthMO, -1, TimeUnit.Months)});
Select(btnRefreshMO)
UpdateContext({locMonthMO: DateAdd(locMonthMO, 1, TimeUnit.Months)});
Select(btnRefreshMO)
locMonthMO is always the 1st, and a month added to the 1st is the 1st of the next month. The next-month button is disabled on the current month, whose first day is Date(Year(Today()), Month(Today()), 1) (How to Get the First Day of the Month in Power Apps):
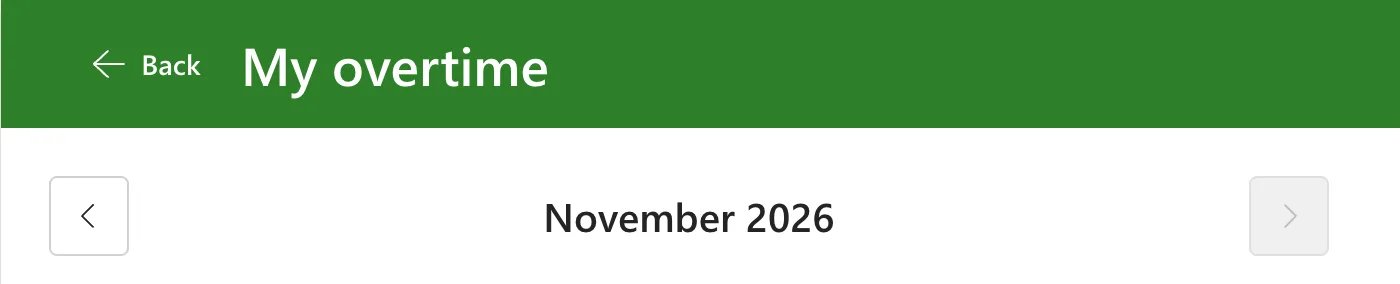
If(locMonthMO < Date(Year(Today()), Month(Today()), 1), DisplayMode.Edit, DisplayMode.Disabled)
In Preview, on November 2026, the next-month button is greyed out:
Step 4: Load the Month's Entries
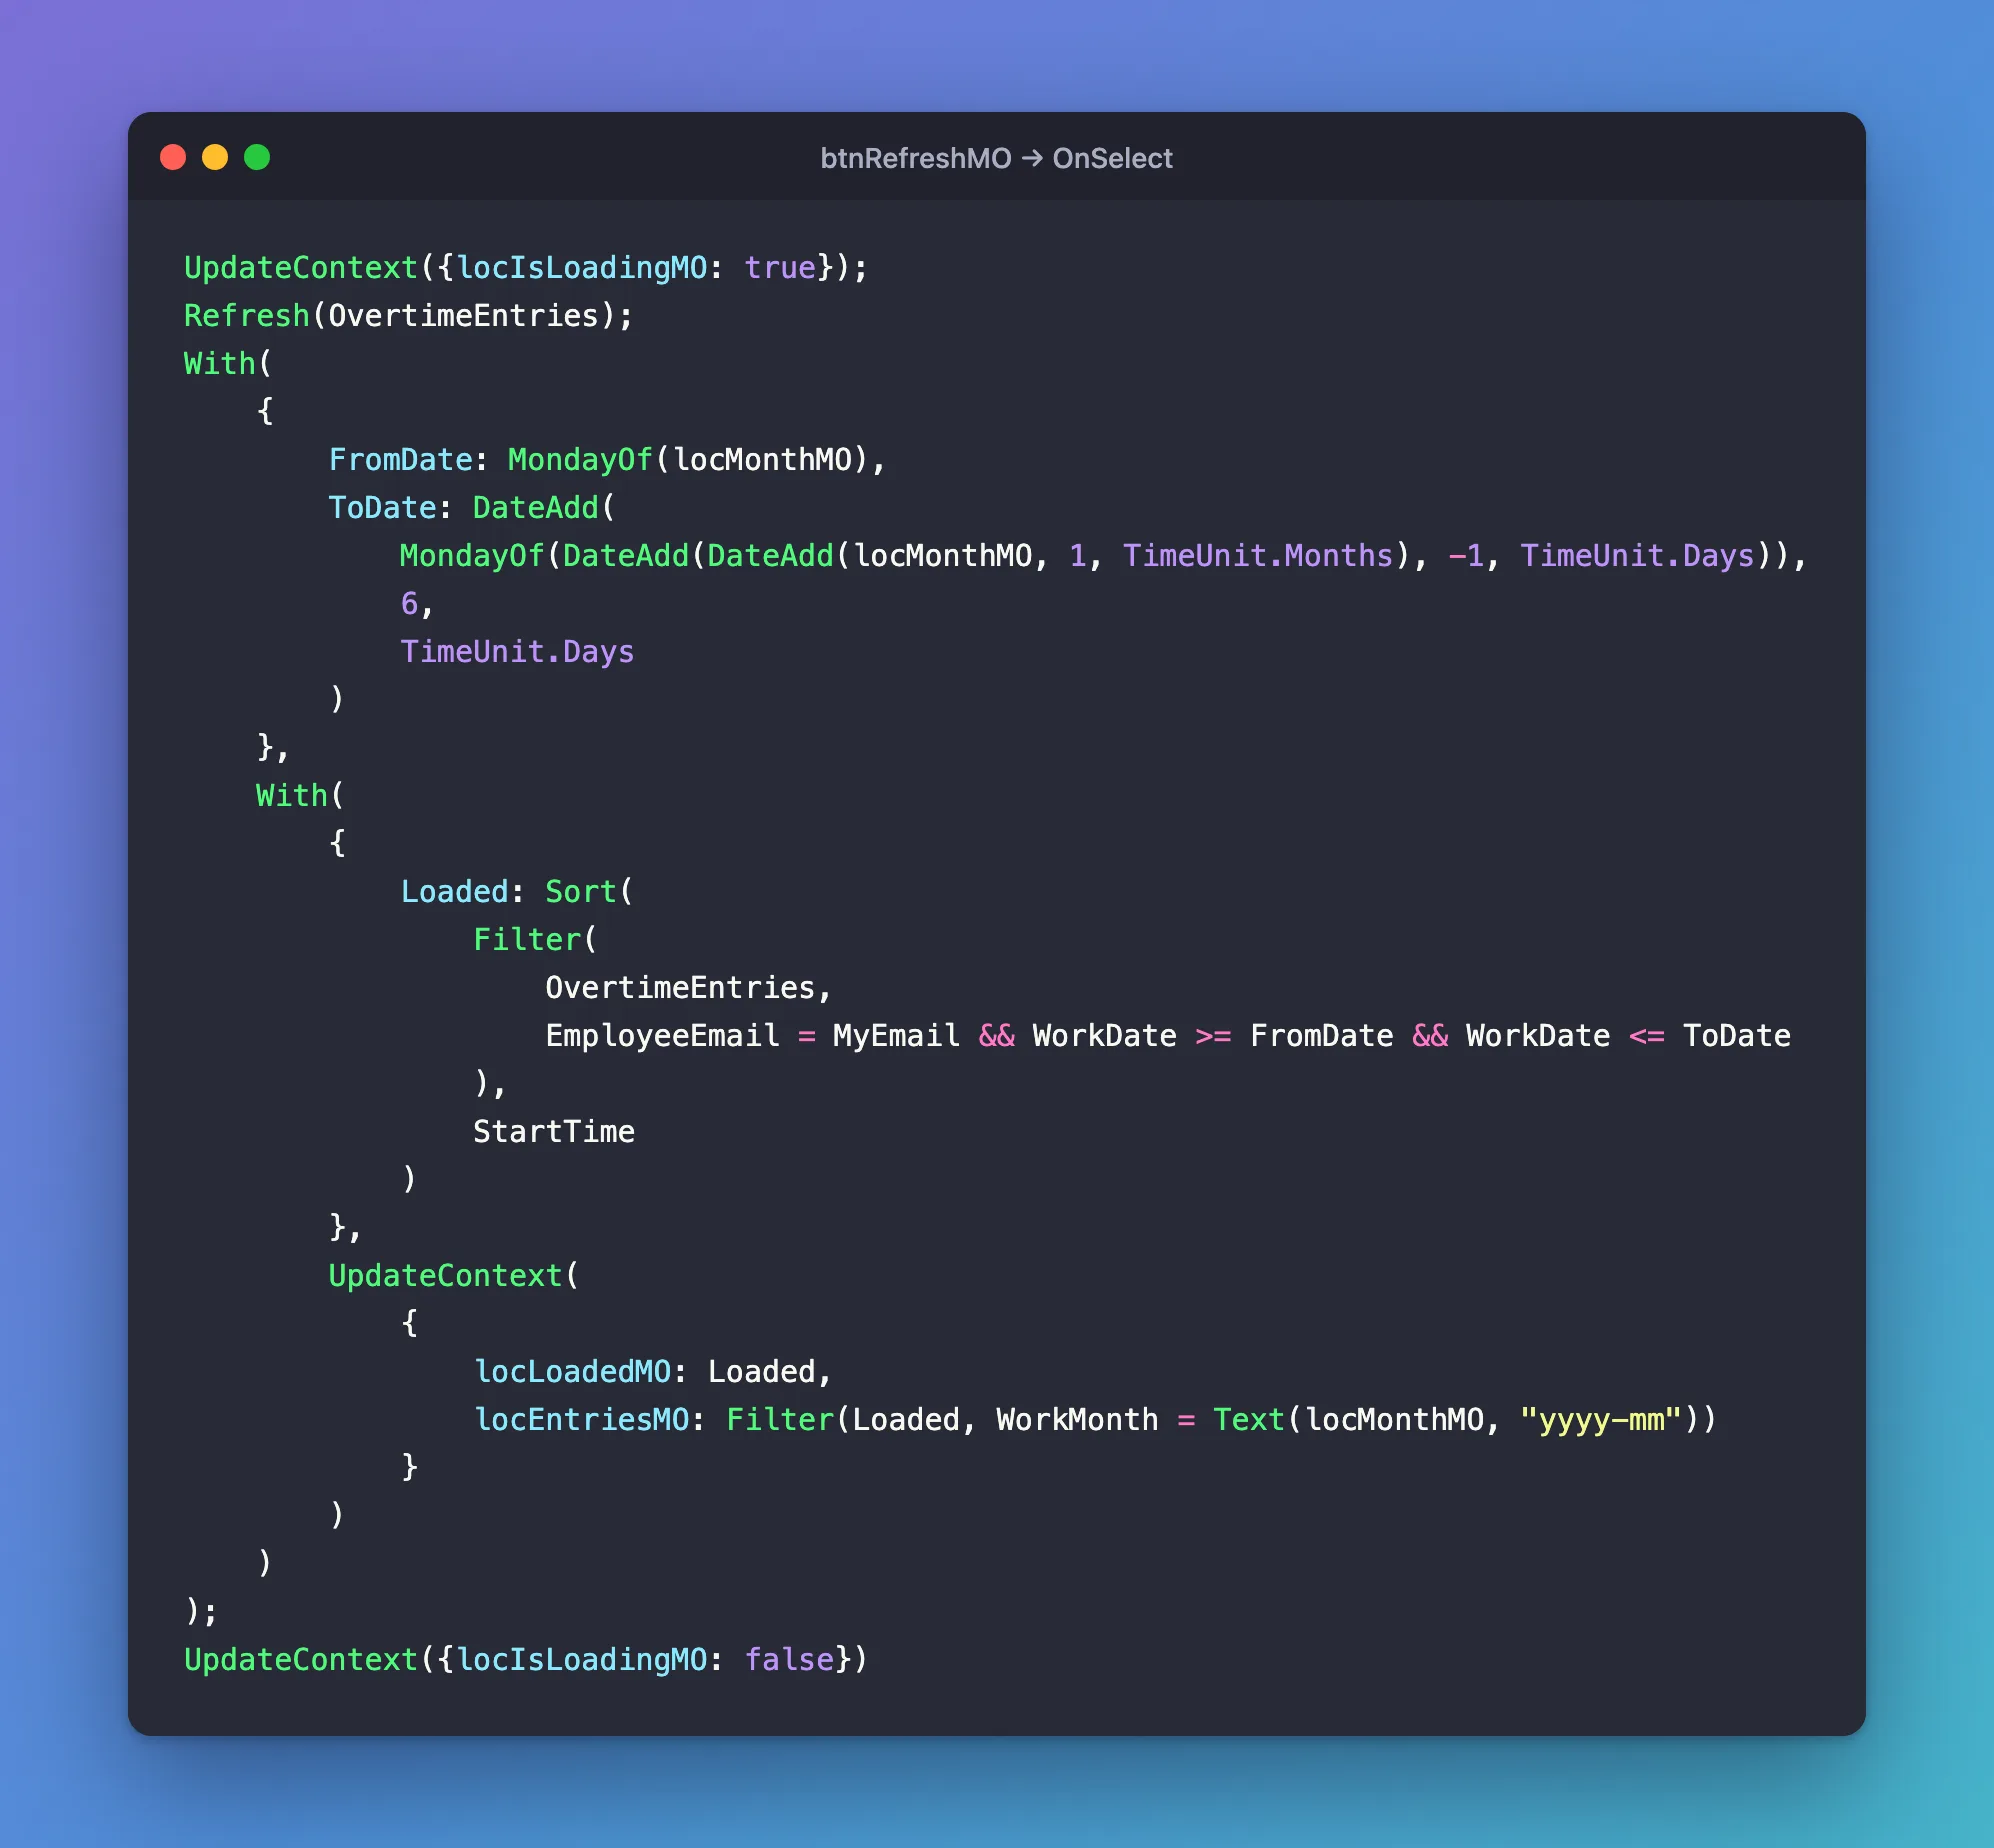
The Refresh button's OnSelect loads the entries, and the screen's OnVisible selects the button. The same formula then runs when the screen opens, when the month changes and when someone selects Refresh:
UpdateContext({locIsLoadingMO: true});
Refresh(OvertimeEntries);
With(
    {
        FromDate: MondayOf(locMonthMO),
        ToDate: DateAdd(
            MondayOf(DateAdd(DateAdd(locMonthMO, 1, TimeUnit.Months), -1, TimeUnit.Days)),
            6,
            TimeUnit.Days
        )
    },
    With(
        {
            Loaded: Sort(
                Filter(
                    OvertimeEntries,
                    EmployeeEmail = MyEmail && WorkDate >= FromDate && WorkDate <= ToDate
                ),
                StartTime
            )
        },
        UpdateContext(
            {
                locLoadedMO: Loaded,
                locEntriesMO: Filter(Loaded, WorkMonth = Text(locMonthMO, "yyyy-mm"))
            }
        )
    )
);
UpdateContext({locIsLoadingMO: false})
locIsLoadingMOis true while the entries load, so the screen can show a spinner instead of half-loaded totals (Step 7).- Refresh gets the list's latest data, so an entry changed somewhere else shows up too (How to Refresh Data in Power Apps with the Refresh Function).
- FromDate is the Monday of the week the 1st is in. ToDate is the Sunday of the week the last day is in: the last day is the 1st of the next month less a day (How to Get the Last Day of the Month in Power Apps), and its week ends six days after its Monday. For November 2026, that's Monday 26 October to Sunday 6 December.
- Filter asks SharePoint for this person's entries between the two dates.
=on a text column,>=and<=on a date column and&&can all be delegated, so SharePoint runs the whole query, however long the list grows (How to Filter a SharePoint List Between Two Dates in Power Apps). - Sort puts the entries in the order they were worked (How to Sort a Table in Power Apps with Sort).
- The rows go into two context variables:
locLoadedMO, the full weeks, for the weekly totals, andlocEntriesMO, only the month's, for the list and the month's total. WorkMonth is the month as text, such as 2026-11, which Part 6's Save writes.
Microsoft's delegation overview explains why the totals can then use Sum and GroupBy: tables kept by With, UpdateContext or Set are a static in-memory list of records, so functions that can't be delegated work on all of them, with no delegation warning.
Then select the screen and set its OnVisible (How to Run a Formula When a Screen Opens in Power Apps with OnVisible):
If(
    IsBlank(locMonthMO),
    UpdateContext({locMonthMO: Date(Year(Today()), Month(Today()), 1)})
);
Select(btnRefreshMO)
The first time the screen opens, locMonthMO is blank, so it starts on this month. After that it keeps its month: Microsoft's UpdateContext reference says a context variable holds its value until the app is closed, even when the user switches to another screen. So someone who opens an October entry and comes back is still on October, reloaded.
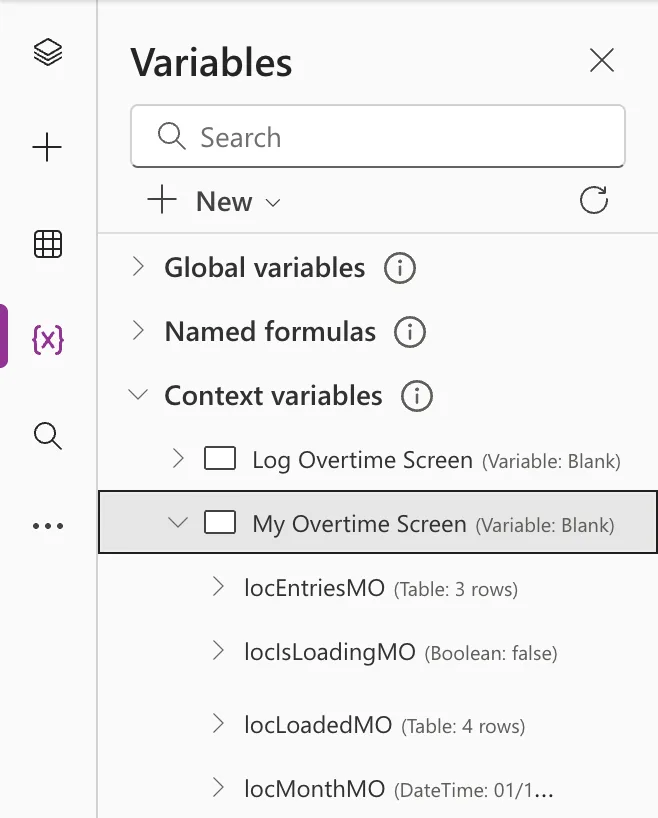
After the screen loaded November in Preview, Studio's Variables pane showed three rows in locEntriesMO and four in locLoadedMO. The fourth is 29 October, in the week that starts on Monday 26 October:
Step 5: Show the Month's Total
Under conMonthMO, insert a Text control, lblTotalMO (How to Add a Text Control in Power Apps): Size 20, Font weight Semibold, Auto height on, Width Min(640, Parent.Width - 48), Align in container Start, Visible !locIsLoadingMO and AccessibleLabel Self.Text. Its Text adds up the month's entries that aren't rejected (How to Add Up a Column in Power Apps with Sum):
$"Total for {Text(locMonthMO, "mmmm yyyy")}: {Text(Coalesce(Sum(Filter(locEntriesMO, Status.Value <> "Rejected"), Hours), 0), "0.00")} hours"
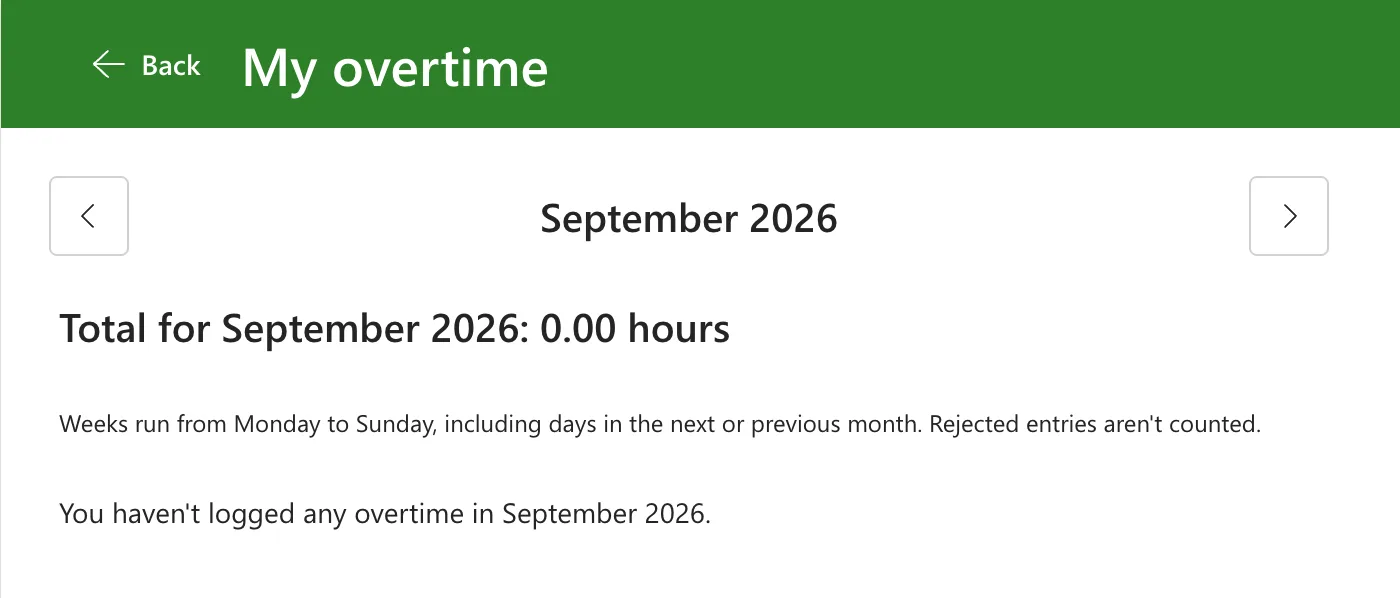
Status.Valueis the text of the Status Choice column (How to Show a SharePoint Choice Column's Value in Power Apps).Coalesce(…, 0)makes a month with nothing to add read 0.00. My first version had no Coalesce, and in a month with no entries the screen read Total for September 2026: hours, because Sum of no rows returned blank: Fixed: Sum Returns Blank Instead of 0 for an Empty Table in Power Apps.Text(…, "0.00")shows two decimal places, like the stored hours.
Step 6: Show the Weekly Totals
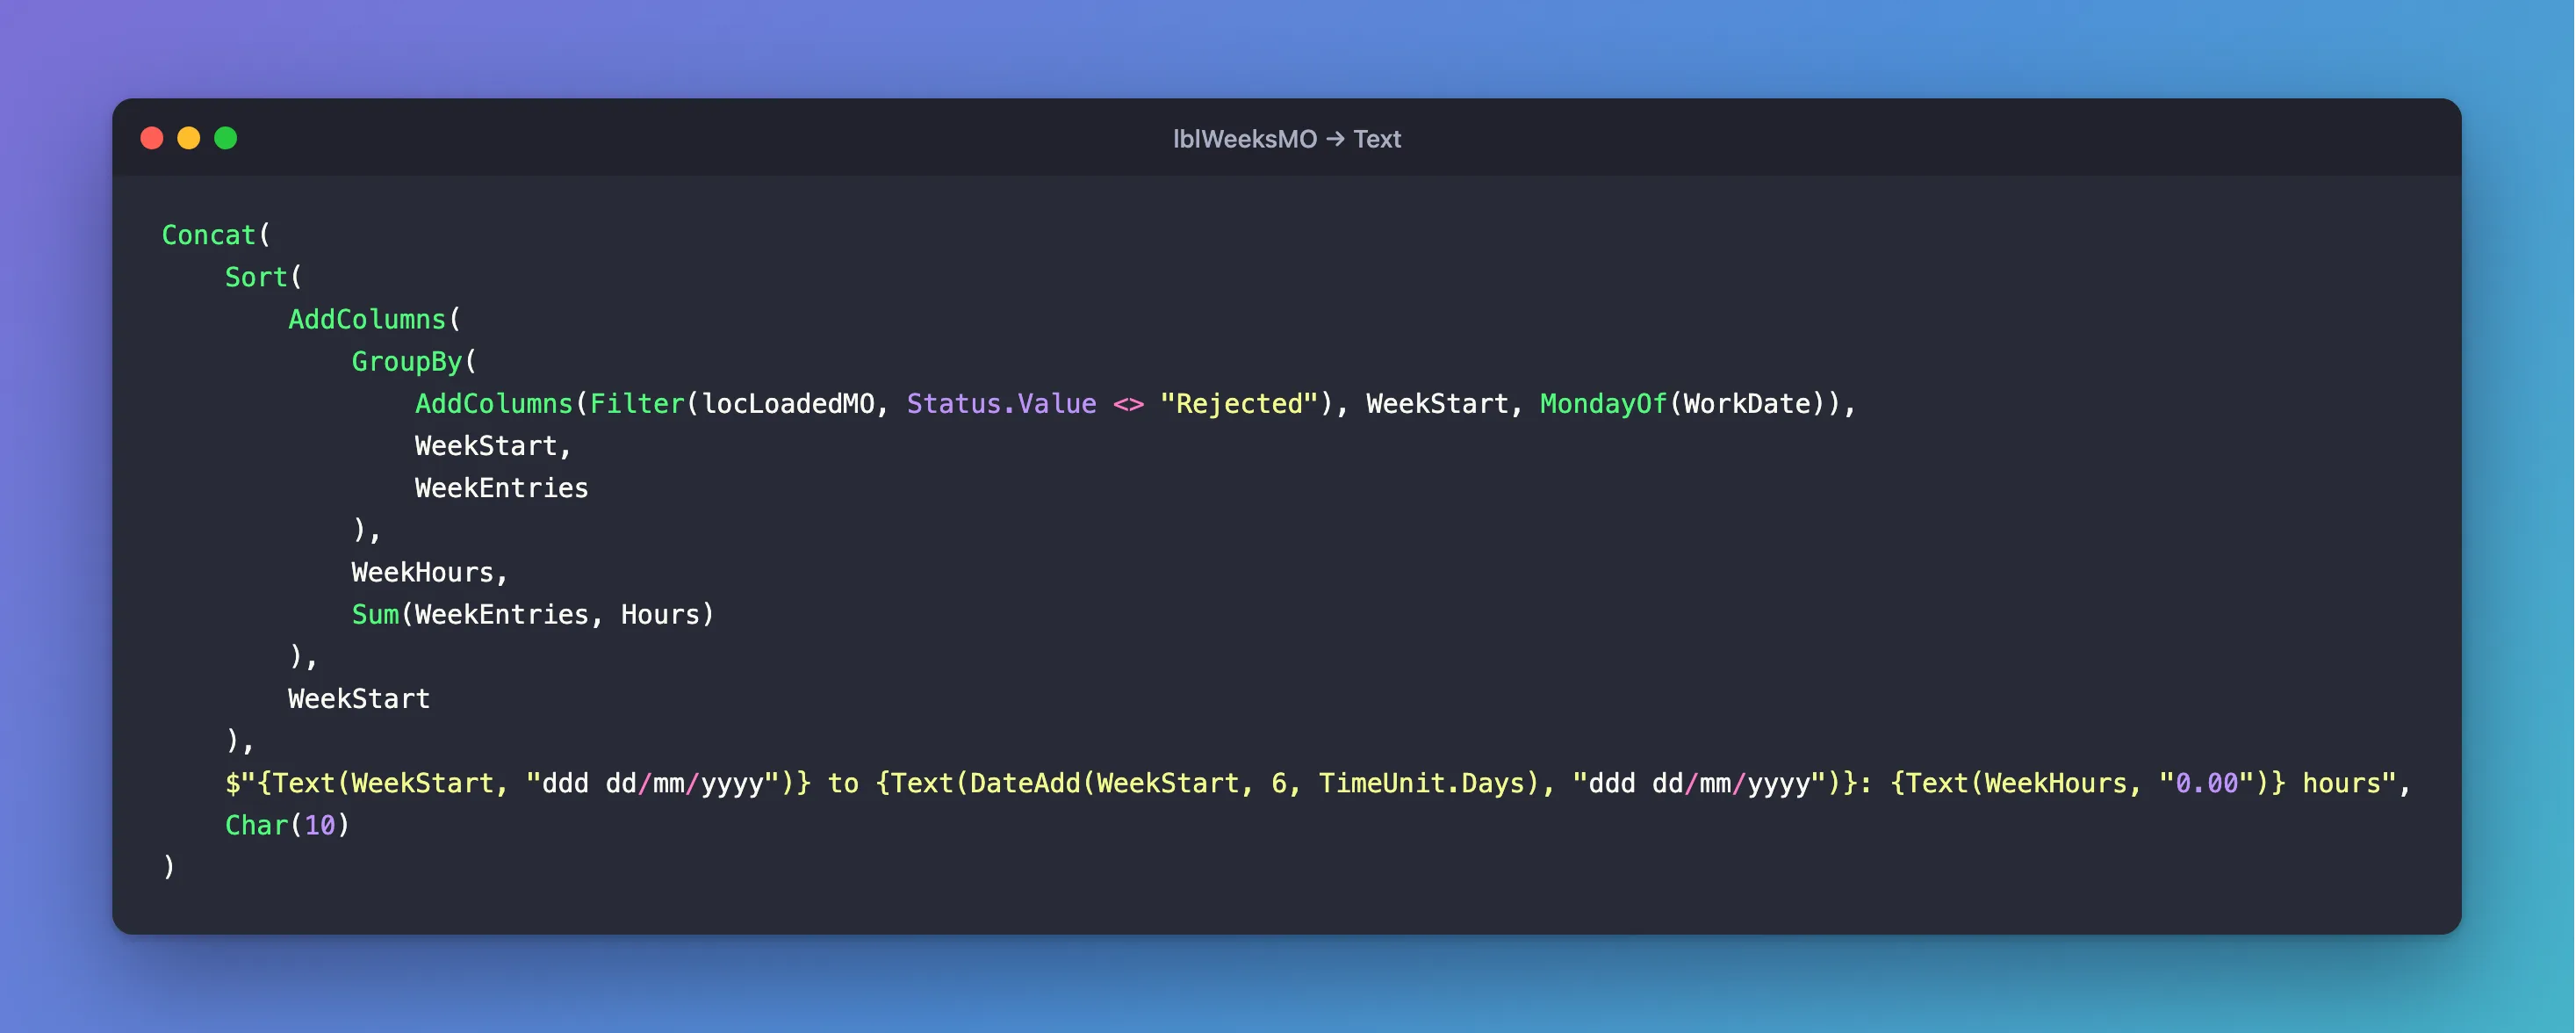
Under lblTotalMO, insert a Text control, lblWeeksMO: Size 14, Auto height on, the same Width and Align in container, AccessibleLabel Self.Text, and Visible !locIsLoadingMO && !IsEmpty(locLoadedMO). Its Text gives one line per week:
Concat(
    Sort(
        AddColumns(
            GroupBy(
                AddColumns(Filter(locLoadedMO, Status.Value <> "Rejected"), WeekStart, MondayOf(WorkDate)),
                WeekStart,
                WeekEntries
            ),
            WeekHours,
            Sum(WeekEntries, Hours)
        ),
        WeekStart
    ),
    $"{Text(WeekStart, "ddd dd/mm/yyyy")} to {Text(DateAdd(WeekStart, 6, TimeUnit.Days), "ddd dd/mm/yyyy")}: {Text(WeekHours, "0.00")} hours",
    Char(10)
)
From the inside out:
- Filter leaves out rejected entries from the full weeks the screen loaded.
- AddColumns gives each entry a
WeekStart: the Monday of its week, fromMondayOf(How to Add a Column to a Table in Power Apps with AddColumns). - GroupBy makes one row per
WeekStart, with that week's entries in a table column,WeekEntries(How to Group Records in Power Apps with GroupBy). - AddColumns adds
WeekHours, the Sum of each week's hours (How to Total Each Group in Power Apps with GroupBy and Sum). - Sort puts the weeks in date order, and Concat joins one line per week, with
Char(10), a line break, between them (How to Join Table Values into Text in Power Apps with Concat).
Each line shows the week's Monday and Sunday with their day names, such as Mon 26/10/2026 to Sun 01/11/2026: 6.00 hours (How to Show the Day Name of a Date in Power Apps). Every week has at least one entry, so its Sum is never blank.
Under it, a Text control, lblTotalsNoteMO, says what the totals count: Size 12, Auto height on, the same Width and Align in container, Visible !locIsLoadingMO, AccessibleLabel Self.Text, and this Text:
"Weeks run from Monday to Sunday, including days in the next or previous month. Rejected entries aren't counted."
Without the note, a week's total that's bigger than the month's would look like a mistake.
Step 7: Show a Spinner and the Empty Month
The spinner. Insert a Spinner into conBodyMO, spnLoadingMO, with Label "Loading your overtime...", Visible locIsLoadingMO and Align in container Start (How to Add a Loading Spinner in Power Apps). The totals and the list are hidden while it shows, by their !locIsLoadingMO.
The empty month. Insert a Text control, lblEmptyMO, with Size 14, Auto height on, the same Width and Align in container, and AccessibleLabel Self.Text (How to Show a Message When a Gallery Is Empty in Power Apps):
$"You haven't logged any overtime in {Text(locMonthMO, "mmmm yyyy")}."
!locIsLoadingMO && IsEmpty(locEntriesMO)
September 2026, which has no entries, in Preview:
Step 8: Add the List of Entries
Insert a Vertical gallery into conBodyMO. It came with sample rows and the layout Image, title, and subtitle; set Layout to Blank in its properties, and name it galEntriesMO (How to Add a Vertical Gallery in Power Apps and Connect It to a SharePoint List). Studio put it right after the month bar, so move it to the end of the body with Reorder → Move to end (How to Reorder Controls in a Container in Power Apps).
| Property | Value | Why |
|---|---|---|
| Items | locEntriesMO | The month's entries, from Step 4 |
| Flexible height | On, minimum height 240 | Fills the rest of the body |
| Width | Min(640, Parent.Width - 48) | The same width as the totals |
| Align in container | Start | |
| TemplateSize, TemplatePadding | 112, 8 | Three lines per row, with space between rows |
| TemplateFill | App.Theme.Colors.Lighter80 | A light shade of the app's green theme |
| Selectable | false | Rows aren't selected; the Edit button does the work |
| AccessibleLabel | "Your overtime entries for the month" | What screen readers announce |
| Visible | !locIsLoadingMO && !IsEmpty(locEntriesMO) | The opposite of the empty message |
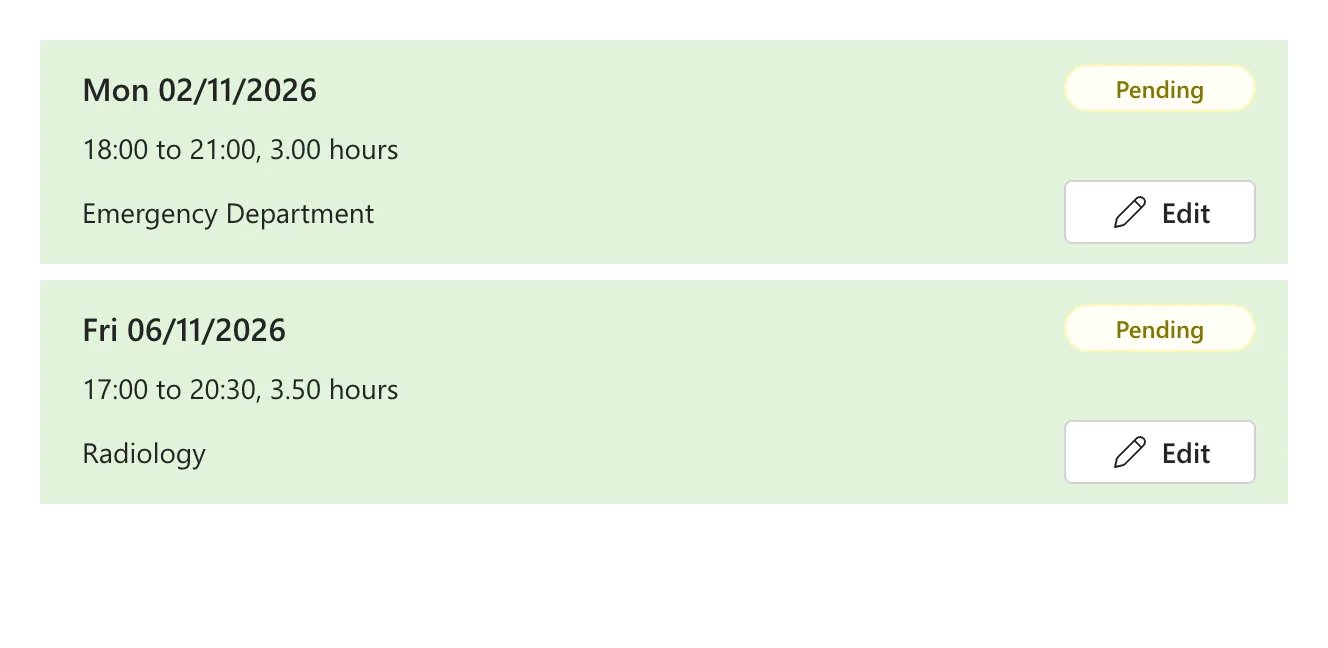
The row. Select the gallery's first row on the canvas, so new controls go into its template rather than the screen (Fixed: Control Added Outside the Gallery Instead of Inside It in Power Apps). Then insert three Text controls, a Badge and a Button. TW in the table stands for Parent.TemplateWidth, the width of the row:
| Control | X, Y | Width, Height | Text or Content |
|---|---|---|---|
lblEntryDayMO | 16, 12 | TW - 144, 24 | Text(ThisItem.WorkDate, "ddd dd/mm/yyyy") |
lblEntryTimesMO | 16, 42 | TW - 32, 24 | The times and hours, below |
lblEntryDepartmentMO | 16, 70 | TW - 144, 32 | ThisItem.Department |
bdgStatusMO | TW - Self.Width - 16, 12 | 96, 24 | ThisItem.Status.Value |
btnEditMO | TW - Self.Width - 16, 70 | 96, 32 | Step 9 |
The day is Size 16 and Semibold; the other two lines are Size 14. ThisItem is the entry the row shows (How to Use ThisItem in a Power Apps Gallery). The times line adds next day when a night shift finishes after midnight (How to Show That a Shift Ends the Next Day in Power Apps):
$"{Text(ThisItem.StartTime, "hh:mm")} to {Text(ThisItem.EndTime, "hh:mm")}{If(Day(ThisItem.EndTime) <> Day(ThisItem.WorkDate), " next day", "")}, {Text(ThisItem.Hours, "0.00")} hours"
The badge colors the status with its Intent: green for Approved, red for Rejected and yellow for Pending (How to Add a Badge Control in Power Apps and How to Use the Switch Function in Power Apps):
Switch(
    ThisItem.Status.Value,
    "Approved", BadgeIntent.Positive,
    "Rejected", BadgeIntent.Critical,
    BadgeIntent.Caution
)
Its AccessibleLabel, "Status: " & ThisItem.Status.Value, tells screen reader users what the badge is, such as Status: Pending.
The padding. My first rows showed a thin grey scroll bar at the end of the day and of the times. The modern Text control starts with a padding of 5 at the top and the bottom, which left a 24-pixel control less room than one line of text needs. Set PaddingTop and PaddingBottom to 0 on the three text controls: Fixed: Scroll Bar Appears Inside a Text Control in Power Apps. The rows on the canvas afterwards:
Step 9: Add the Edit Button
btnEditMO opens the row's entry on the Log Overtime screen, and only shows until the entry is approved (How to Stop Editing an Item Once It's Approved in Power Apps):
| Property | Value |
|---|---|
| Text | "Edit" |
| Icon | "Edit" |
| Appearance | Secondary |
| Visible | ThisItem.Status.Value <> "Approved" |
| AccessibleLabel | "Edit your entry for " & Text(ThisItem.WorkDate, "dd/mm/yyyy") |
Most rows have an Edit button, so the accessible label names the entry's date: a screen reader user hears which one they're on. OnSelect opens the Log Overtime screen with the entry's ID in a context variable there, locEntryId (How to Go to Another Screen in Power Apps with Navigate):
Navigate('Log Overtime Screen', ScreenTransition.None, {locEntryId: ThisItem.ID})
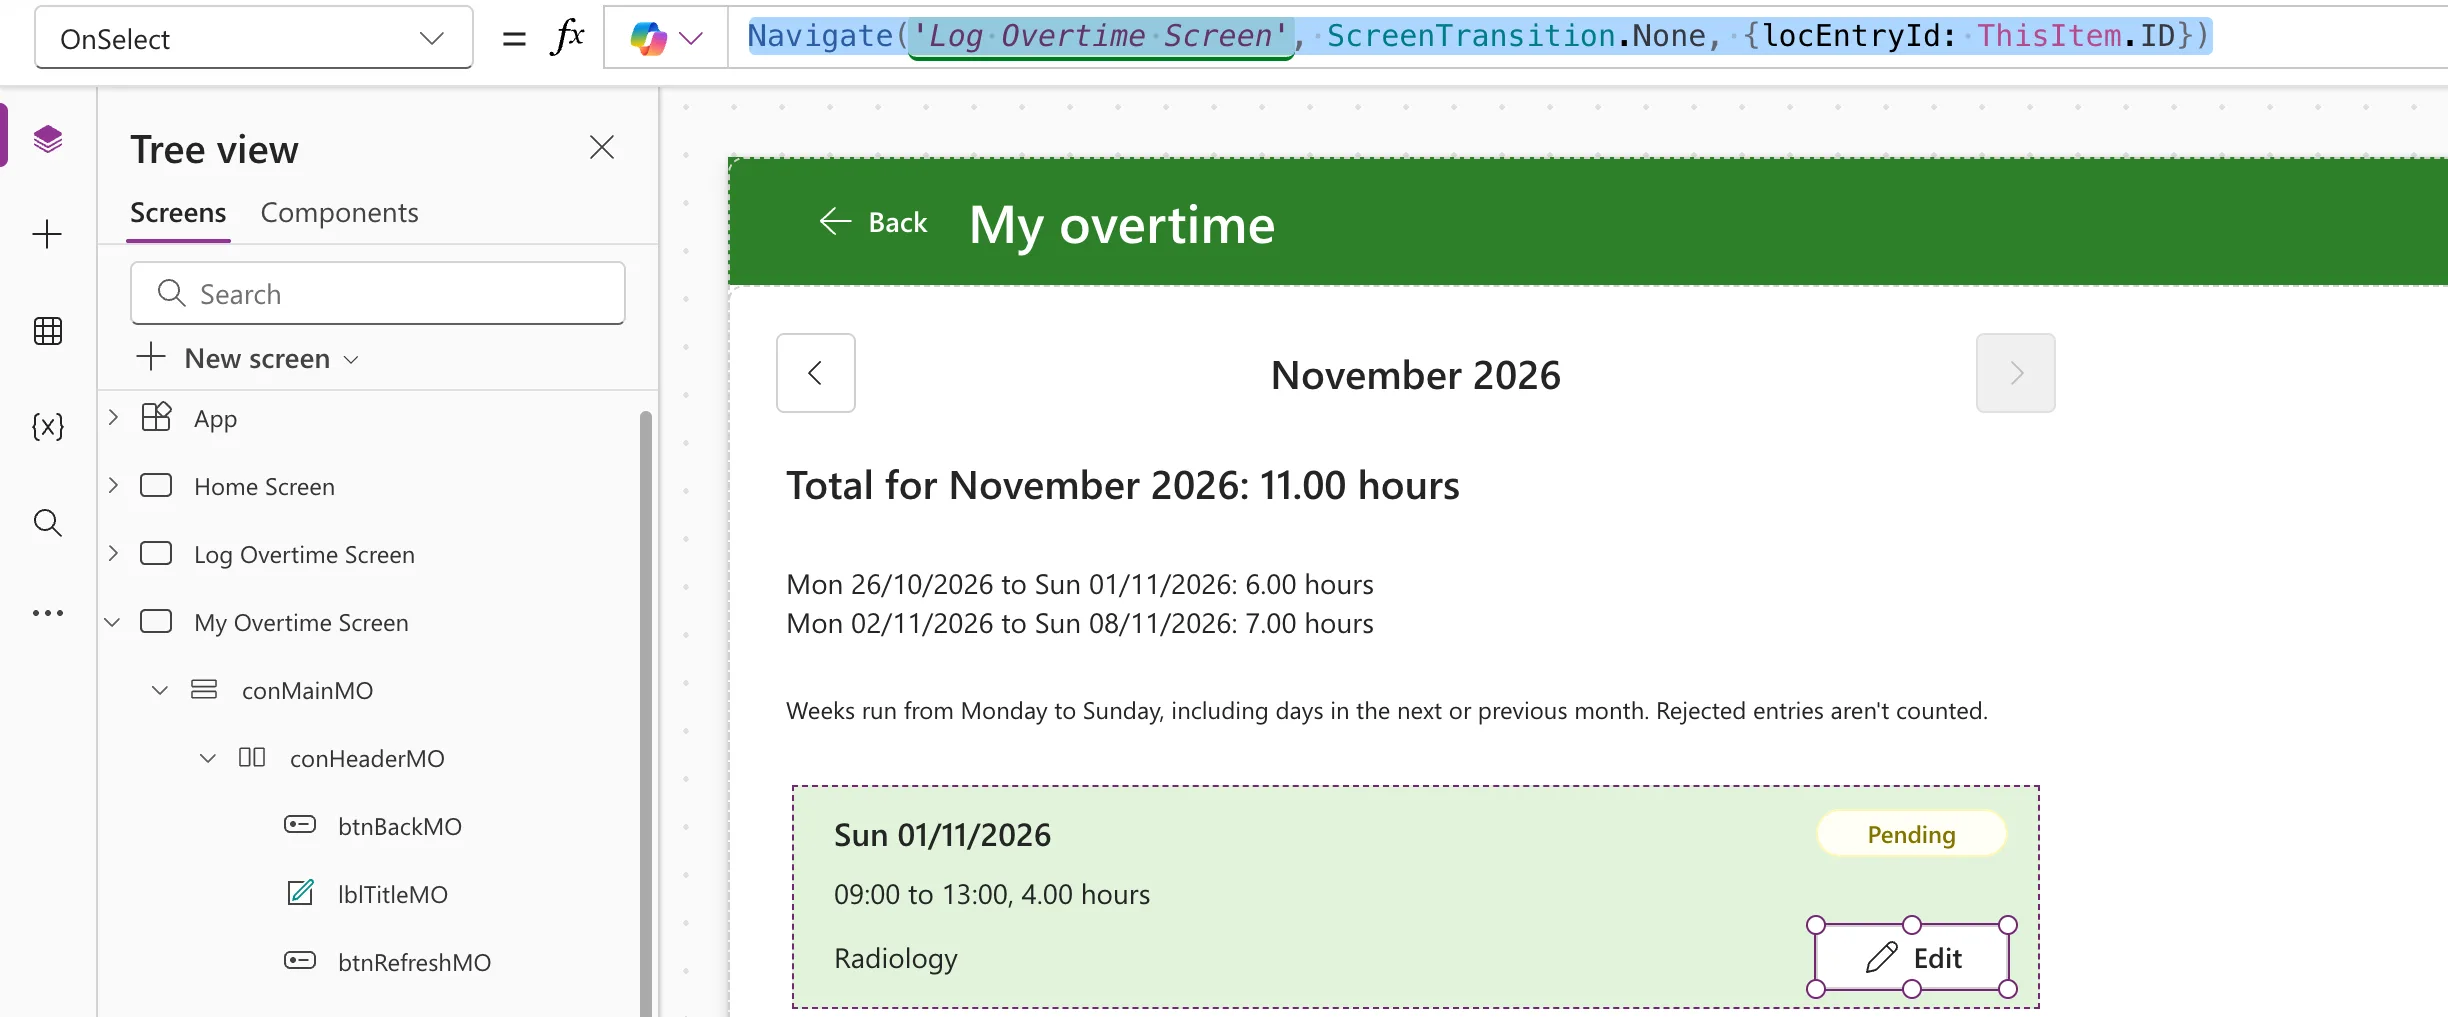
Studio can't work out formulas that use ThisItem in its preview strip, and says This formula uses scope, which is not presently supported for evaluation. The rows show the result in Preview (How to See What a Formula Returns in Power Apps Studio).
Step 10: Open the Screens from the Home Tiles
On the Home screen, set the My overtime tile's OnSelect, which Part 5 left as false:
Navigate('My Overtime Screen')
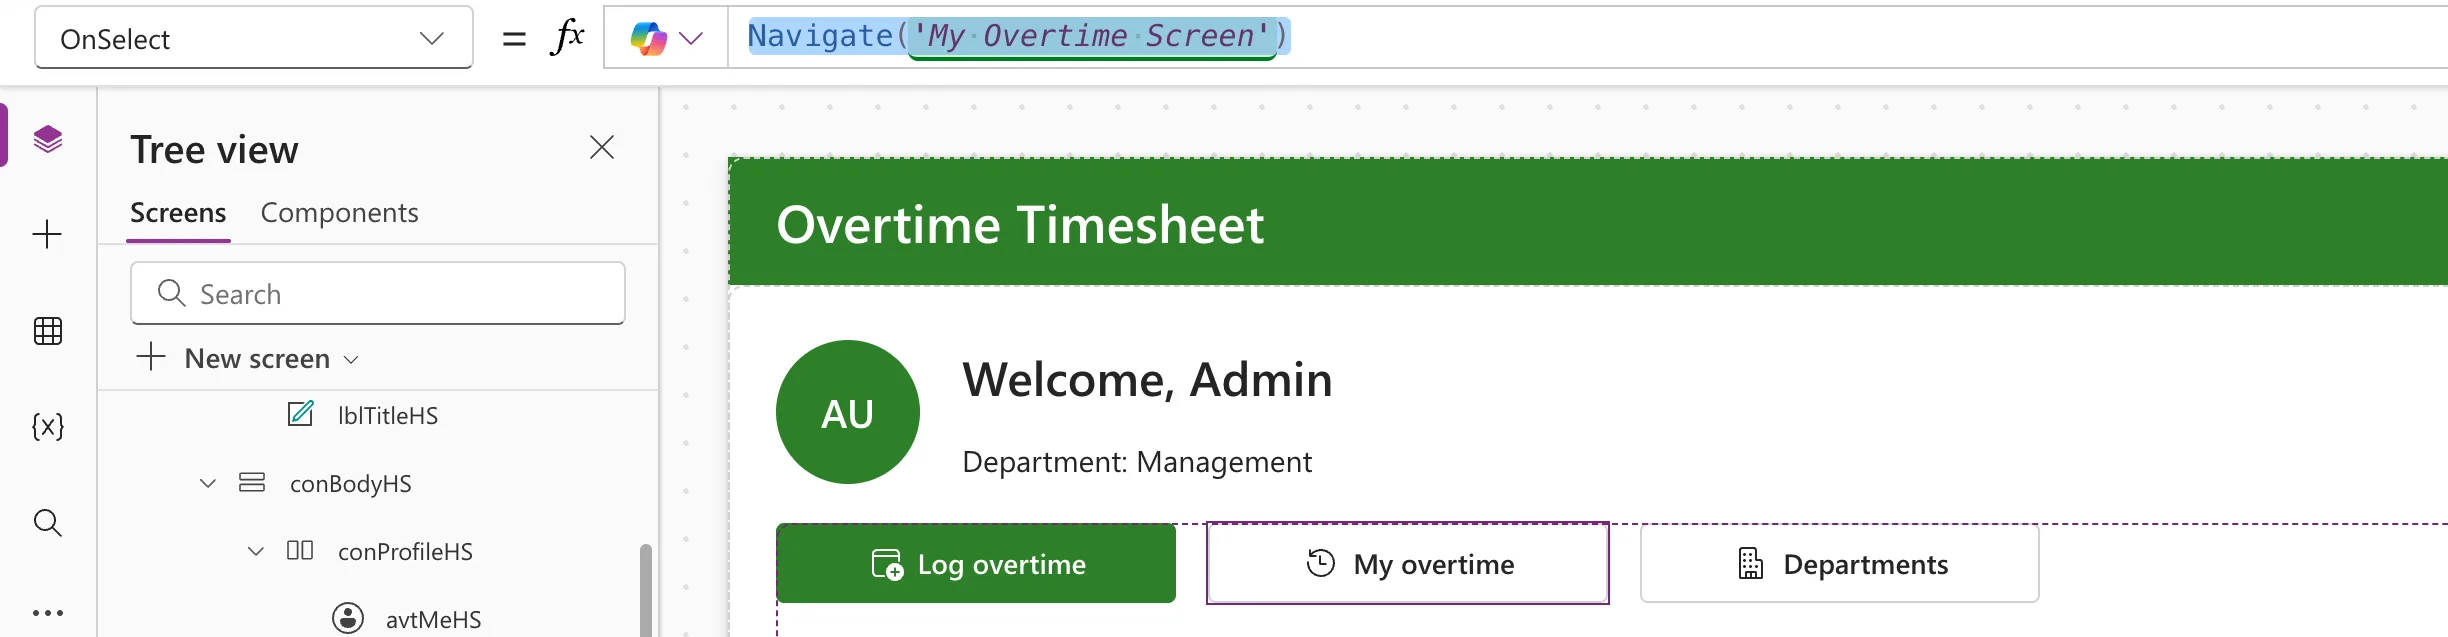
Change the Log overtime tile, which Part 6 set to Navigate('Log Overtime Screen'), so it always opens an empty form:
Navigate('Log Overtime Screen', ScreenTransition.None, {locEntryId: Blank()})
A context variable holds its value until the app is closed, so after someone edits an entry, locEntryId would still hold its ID the next time the screen opened. The blank ID tells the screen to add a new entry.
Step 11: Give the Log Overtime Screen an Edit Mode
The Log Overtime screen now opens in two ways: with an entry's ID to edit it, or with a blank ID to add one. Each formula that differs asks IsBlank(locEntryId): How to Use One Screen to Add and Edit Items in Power Apps.
Load the entry when the screen opens. Replace its OnVisible:
UpdateContext(
    {
        locIsSaving: false,
        locEntry: If(IsBlank(locEntryId), Blank(), LookUp(OvertimeEntries, ID = locEntryId))
    }
);
Reset(dpWorkDateLO);
Reset(cmbStartLO);
Reset(cmbEndLO);
Reset(numBreakLO);
Reset(cmbDepartmentLO);
Reset(txtReasonLO)

locEntry is the entry, read fresh from the list by its ID, or blank when adding (How to Find a Record in Power Apps with LookUp). ID = locEntryId is the one comparison SharePoint can delegate on its ID column. The resets then run after locEntry is set, so every field starts from its default for this entry (How to Reset a Control to Its Default Value in Power Apps with Reset).
Start each field from the entry. Each default falls back to Part 6's when there's no entry:
| Control | Property | Formula |
|---|---|---|
dpWorkDateLO | DefaultDate | Coalesce(locEntry.WorkDate, Today()) |
numBreakLO | Default | Coalesce(locEntry.BreakMinutes, 0) |
txtReasonLO | Default | locEntry.Reason |
Coalesce returns its first value that isn't blank: the entry's date when editing, and today when adding (How to Replace Blank Values in Power Apps with Coalesce).
The time pickers list the 288 times of day in TimeChoices, and an entry stores a date and time. Time(Hour(…), Minute(…), 0) takes the time of day from it, and Filter finds that time in the list. When adding, !IsBlank(locEntry) is false, so nothing is chosen, as in Part 6:
Filter(TimeChoices, !IsBlank(locEntry) && Value = Time(Hour(locEntry.StartTime), Minute(locEntry.StartTime), 0))
Filter(TimeChoices, !IsBlank(locEntry) && Value = Time(Hour(locEntry.EndTime), Minute(locEntry.EndTime), 0))
The department starts on the person's own when adding, as in Part 6, and on the entry's when editing, found by the ID the entry stores:
If(
    IsBlank(locEntry),
    Filter(Departments, IsActive = true, Department = MyDepartment),
    Filter(Departments, ID = locEntry.DepartmentId)
)
Say which mode it's in. The title:
If(IsBlank(locEntryId), "Log overtime", "Edit overtime")
The Back button. The screen now opens from the Home screen and from My Overtime, and Back() returns to whichever opened it (How to Go Back to the Previous Screen in Power Apps with Back). Change btnBackLO's AccessibleLabel from "Back to the Home screen" to "Back to the previous screen".
Step 12: Stop an Entry Overlapping Itself
My first try at editing showed this on an entry I hadn't changed: This overlaps the overtime you logged from 02/11/2026 18:00 to 02/11/2026 21:00. That was the entry itself. Part 6's overlap check looks for any of the person's entries that overlap the shift, and when editing, the entry being edited is one of them:
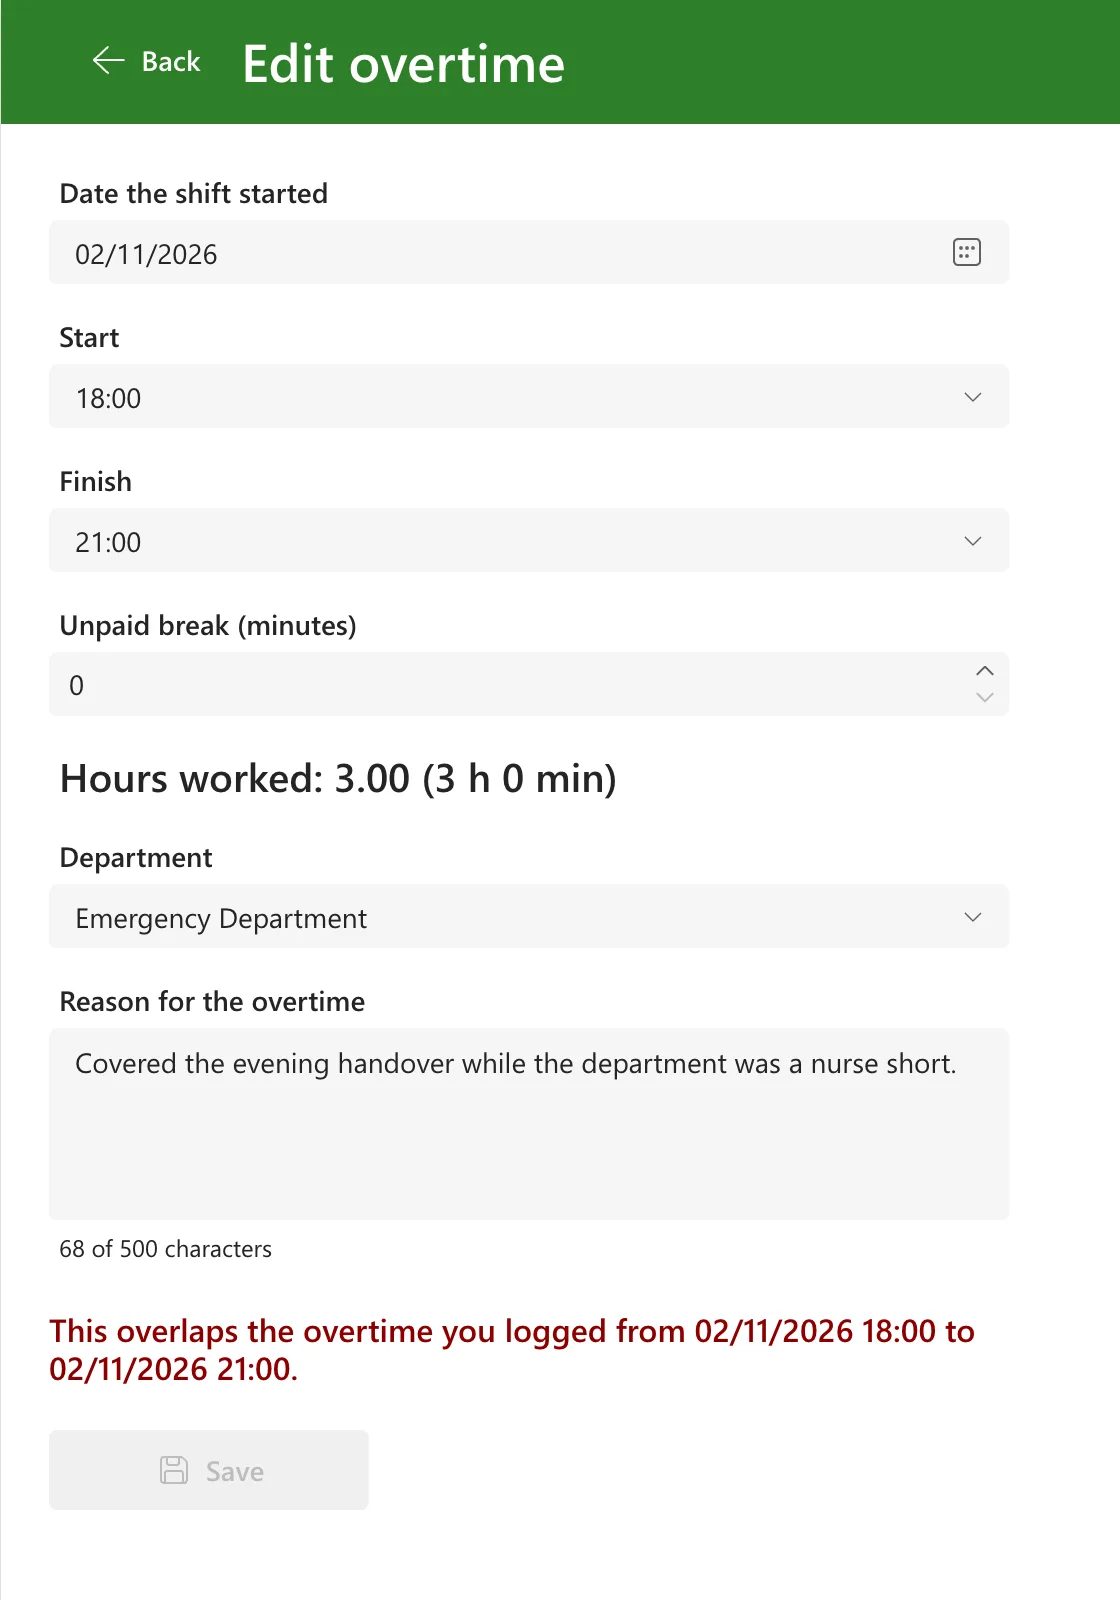
The check has to skip the entry being edited, but not with ID <> locEntryId in the SharePoint query: SharePoint only delegates = on its ID column, and the whole check would then run on the first 500 entries. Instead, Filter finds the overlapping entries in SharePoint, With holds them in memory, and a LookUp there skips the one being edited (How to Exclude the Item Being Edited from a LookUp in Power Apps).
In App.Formulas, replace ShiftProblem with this version, which takes the ID of the entry being edited:
ShiftProblem(ShiftDate: Date, StartAt: Time, EndAt: Time, BreakMins: Number, EntryId: Number): Text =
    With(
        {Starts: ShiftStart(ShiftDate, StartAt), Ends: ShiftEnd(ShiftDate, StartAt, EndAt)},
        With(
            {
                Minutes: DateDiff(Starts, Ends, TimeUnit.Minutes),
                Overlapping: Filter(OvertimeEntries, EmployeeEmail = MyEmail && StartTime < Ends && EndTime > Starts)
            },
            With(
                {Clash: LookUp(Overlapping, ID <> EntryId)},
                If(
                    EndAt = StartAt, "The start and finish times are the same.",
                    Minutes > 1440, "A shift can't be longer than 24 hours.",
                    BreakMins >= Minutes, "The break must be shorter than the shift.",
                    Ends > Now(), "This shift hasn't finished yet. Log it after it ends.",
                    !IsBlank(Clash), $"This overlaps the overtime you logged from {Text(Clash.StartTime, "dd/mm/yyyy hh:mm")} to {Text(Clash.EndTime, "dd/mm/yyyy hh:mm")}.",
                    ""
                )
            )
        )
    );
And pass the ID from the problem message, the only place that calls it:
If(
    IsBlank(cmbStartLO.Selected) || IsBlank(cmbEndLO.Selected),
    "",
    ShiftProblem(dpWorkDateLO.SelectedDate, cmbStartLO.Selected.Value, cmbEndLO.Selected.Value, numBreakLO.Value, locEntryId)
)
When adding, locEntryId is blank, and ID <> Blank() is true for every entry, so nothing is skipped. The same entry, opened for editing again:
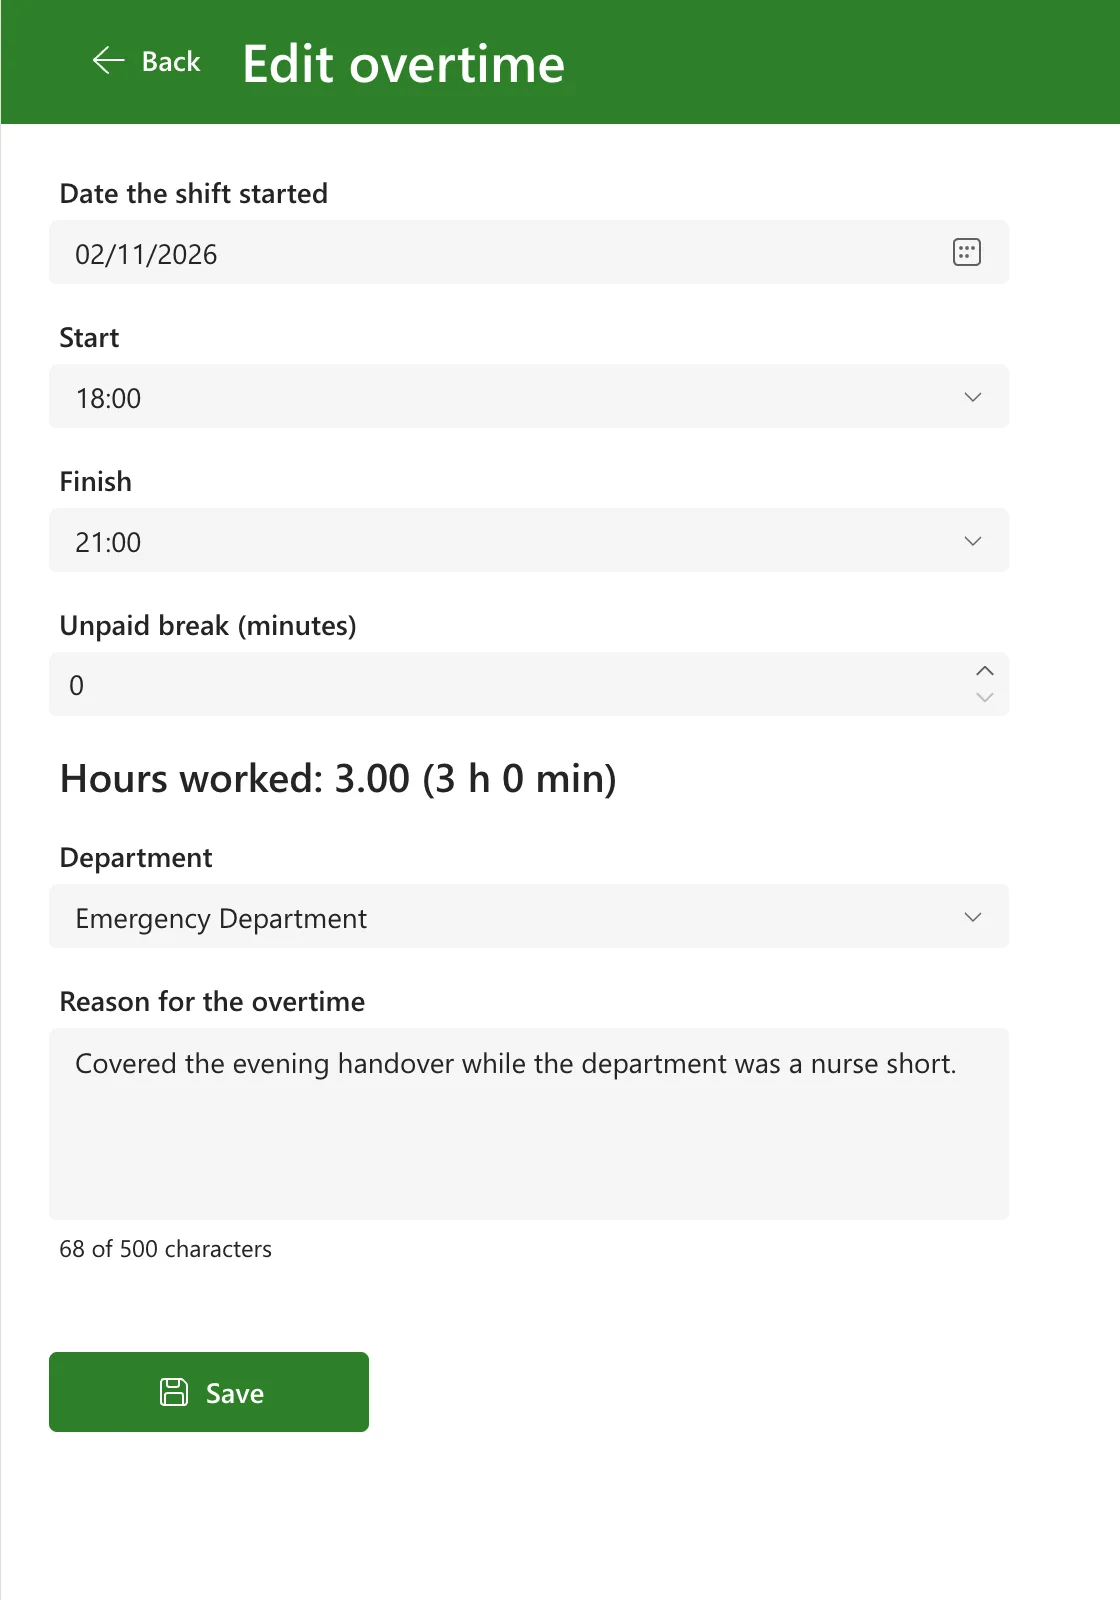
A new shift from 23:00 to 02:00 on 24 October still showed the overlap message, and the App checker listed no delegation warnings.
Step 13: Save Changes to an Entry
Patch creates an entry when its second argument is Defaults, and changes one when it's the entry's record (How to Create or Update a SharePoint List Item with Patch in Power Apps). Two things change in Part 6's Save: the record to patch, and the success message:
UpdateContext({locIsSaving: true});
With(
    {
        Starts: ShiftStart(dpWorkDateLO.SelectedDate, cmbStartLO.Selected.Value),
        Ends: ShiftEnd(dpWorkDateLO.SelectedDate, cmbStartLO.Selected.Value, cmbEndLO.Selected.Value)
    },
    IfError(
        Patch(
            OvertimeEntries,
            If(IsBlank(locEntry), Defaults(OvertimeEntries), locEntry),
            {
                WorkDate: dpWorkDateLO.SelectedDate,
                StartTime: Starts,
                EndTime: Ends,
                BreakMinutes: numBreakLO.Value,
                Hours: Round((DateDiff(Starts, Ends, TimeUnit.Minutes) - numBreakLO.Value) / 60, 2),
                DepartmentId: cmbDepartmentLO.Selected.ID,
                Department: cmbDepartmentLO.Selected.Department,
                Reason: Trim(txtReasonLO.Text),
                EmployeeName: MyProfile.displayName,
                EmployeeEmail: MyEmail,
                Status: {Value: "Pending"},
                WorkMonth: Text(dpWorkDateLO.SelectedDate, "yyyy-mm")
            }
        ),
        UpdateContext({locIsSaving: false});
        Notify("Your overtime wasn't saved. " & FirstError.Message, NotificationType.Error),
        UpdateContext({locIsSaving: false});
        Notify(
            If(IsBlank(locEntry), "Your overtime was saved. It's waiting for approval.", "Your changes were saved. The entry is waiting for approval."),
            NotificationType.Success
        );
        Back()
    )
)
Status stays {Value: "Pending"} for both, so a corrected entry goes back for approval, whatever it was before. Hours, WorkMonth and the copied names are worked out again too, since the date, times or department may have changed. The list's content approval, from Part 3, also sets a changed item's approval status back to Pending, wherever it's changed: the Edit button only keeps the app tidy, and the list protects the data.
Step 14: Try It
Select the Home screen and preview with F5, then select My overtime (How to Preview a Canvas App in Power Apps Studio). Start from the Home screen: OnVisible runs when someone goes to the screen, so a preview that starts on My Overtime has no month and no entries. I made that mistake on my first preview, which showed Total for : hours with no month name: How to Run a Formula When a Screen Opens in Power Apps with OnVisible.
To fill the screen, I logged two more of the maker's shifts with the Log Overtime screen: 29 October, 18:00 to 20:00 in the Emergency Department, and Sunday 1 November, 09:00 to 13:00 in Radiology. The approval flow comes in Part 8, so to see each badge I set two statuses by hand in the OvertimeEntries list (How to Edit an Item in a SharePoint List): the night shift of 24 October to Approved, and 6 November to Rejected. The first time, SharePoint opened Edit 2 items, because an item I'd selected earlier was still ticked. I closed it without saving and edited one item at a time.
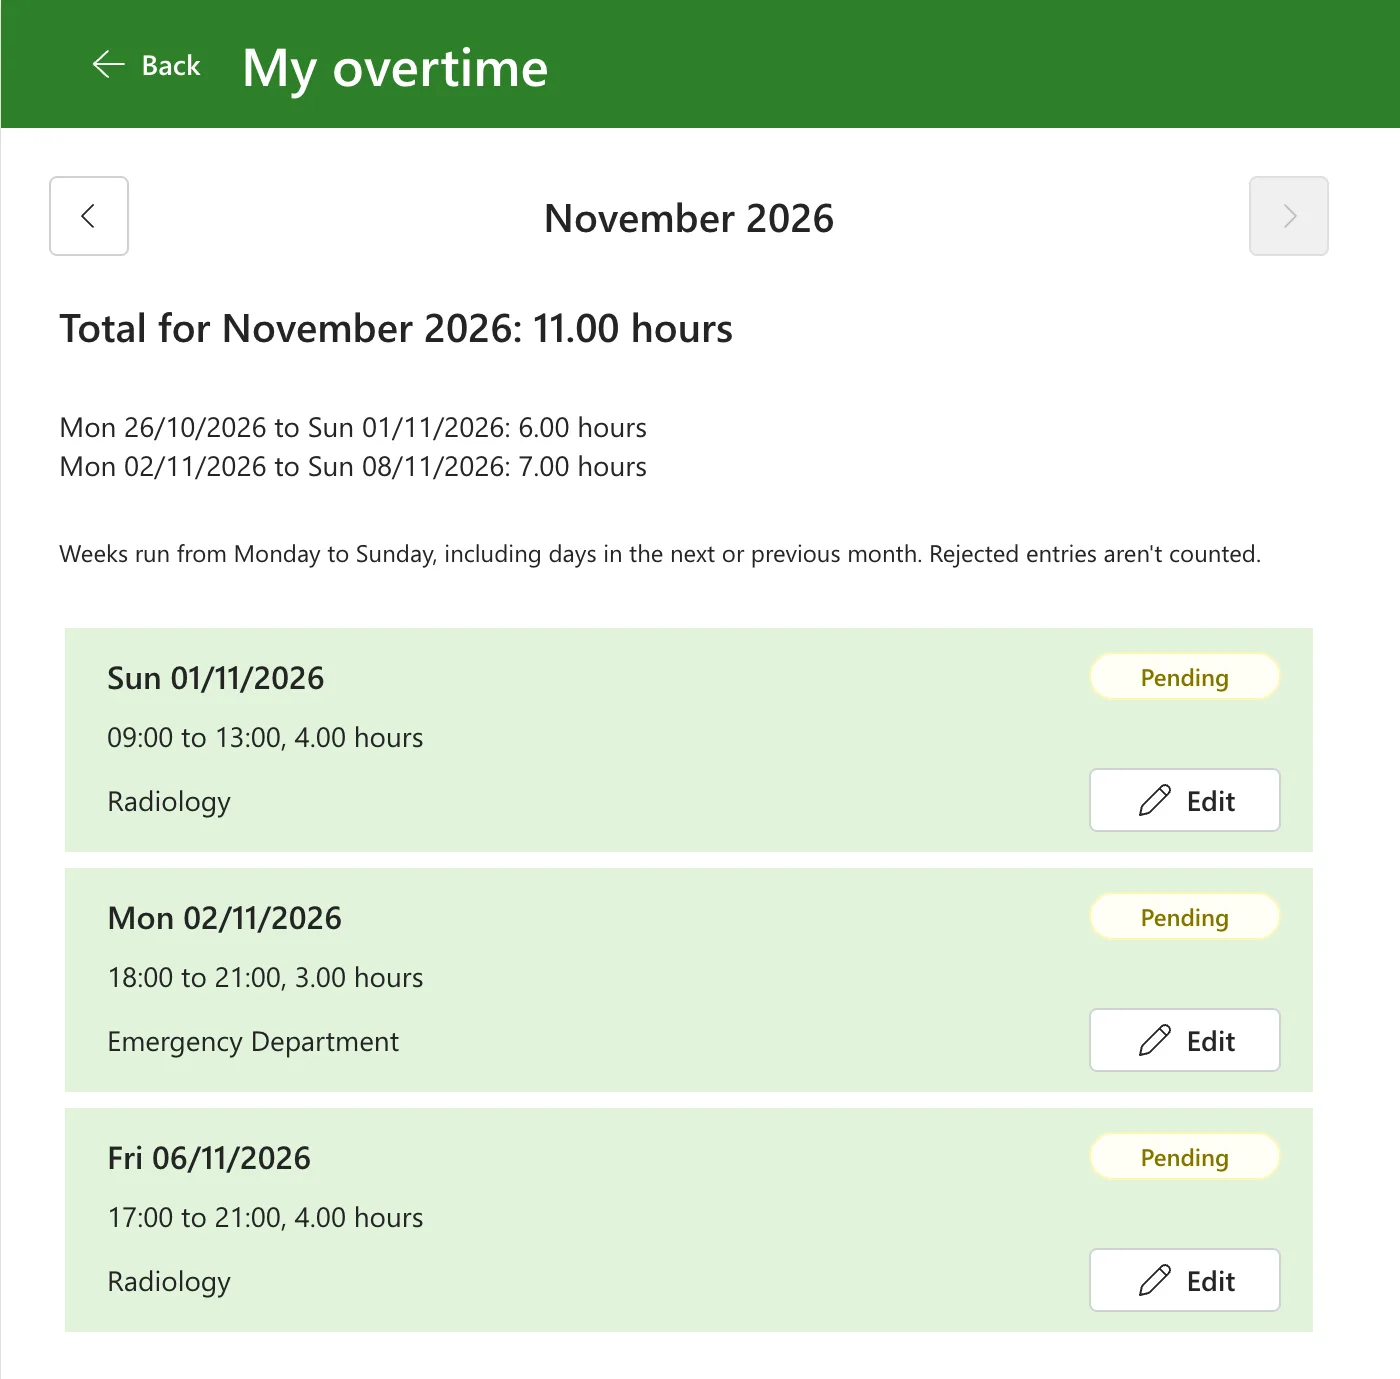
November, at the top of this post: 7.00 hours, the two pending entries, without the rejected 3.50. The first week, Monday 26 October to Sunday 1 November, has 6.00 hours: 29 October's 2.00, from October, and 1 November's 4.00. The next week has only 2 November's 3.00.
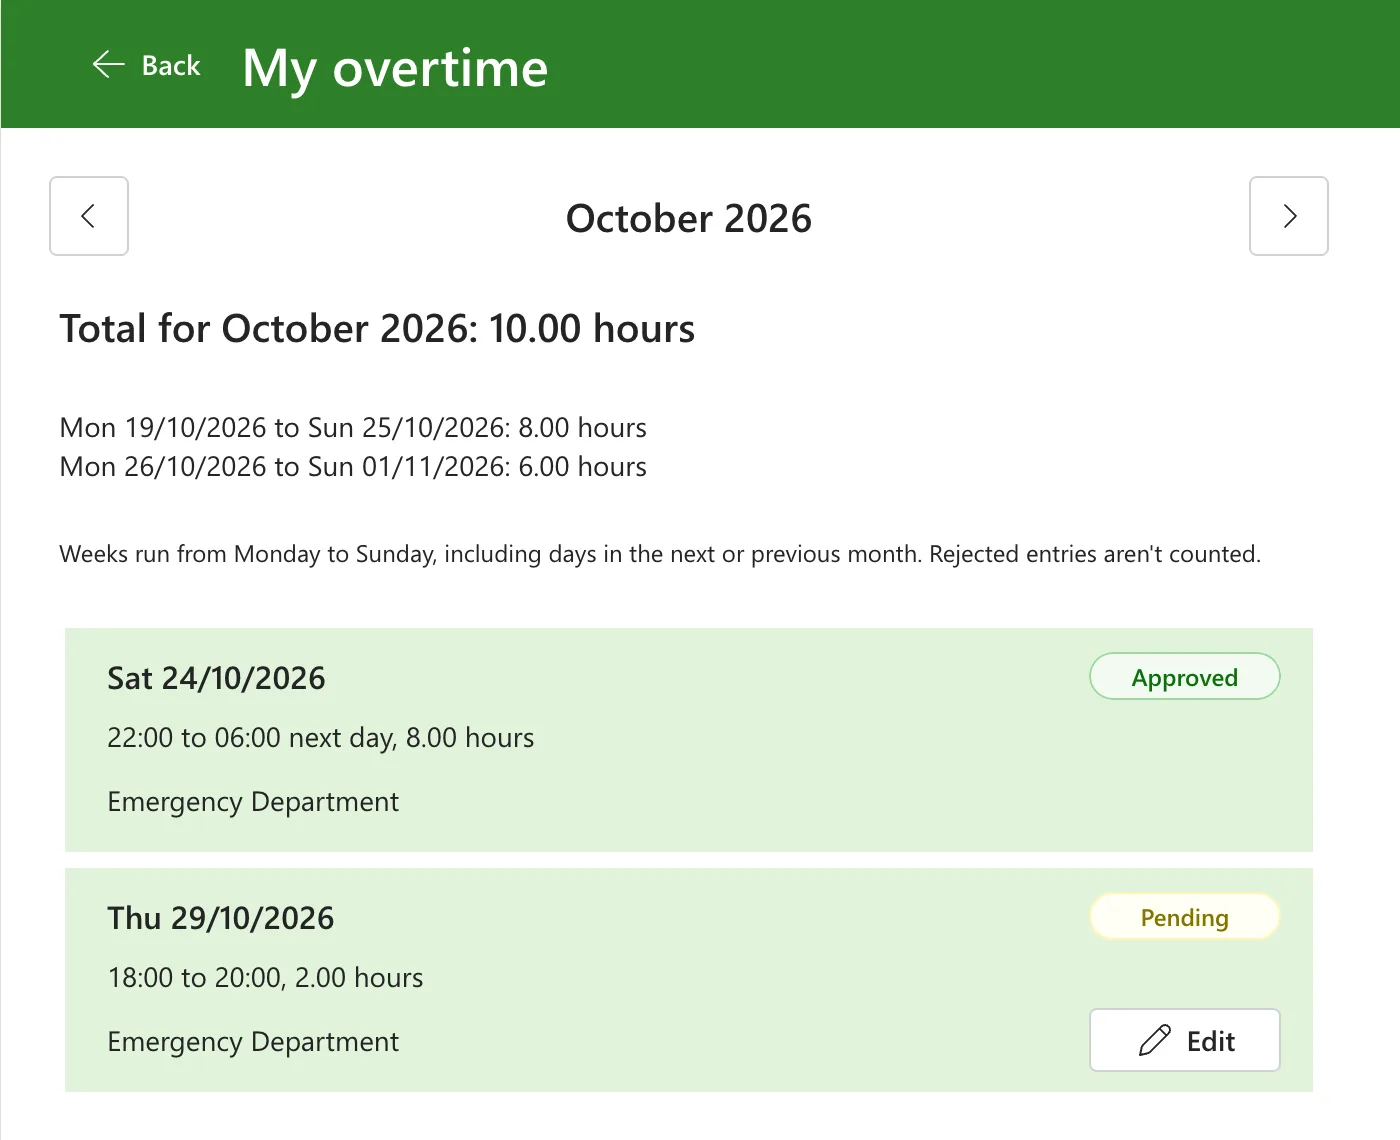
October, with the previous-month button: 10.00 hours. The approved night shift has no Edit button, and its times read 22:00 to 06:00 next day. The next-month button is enabled again:
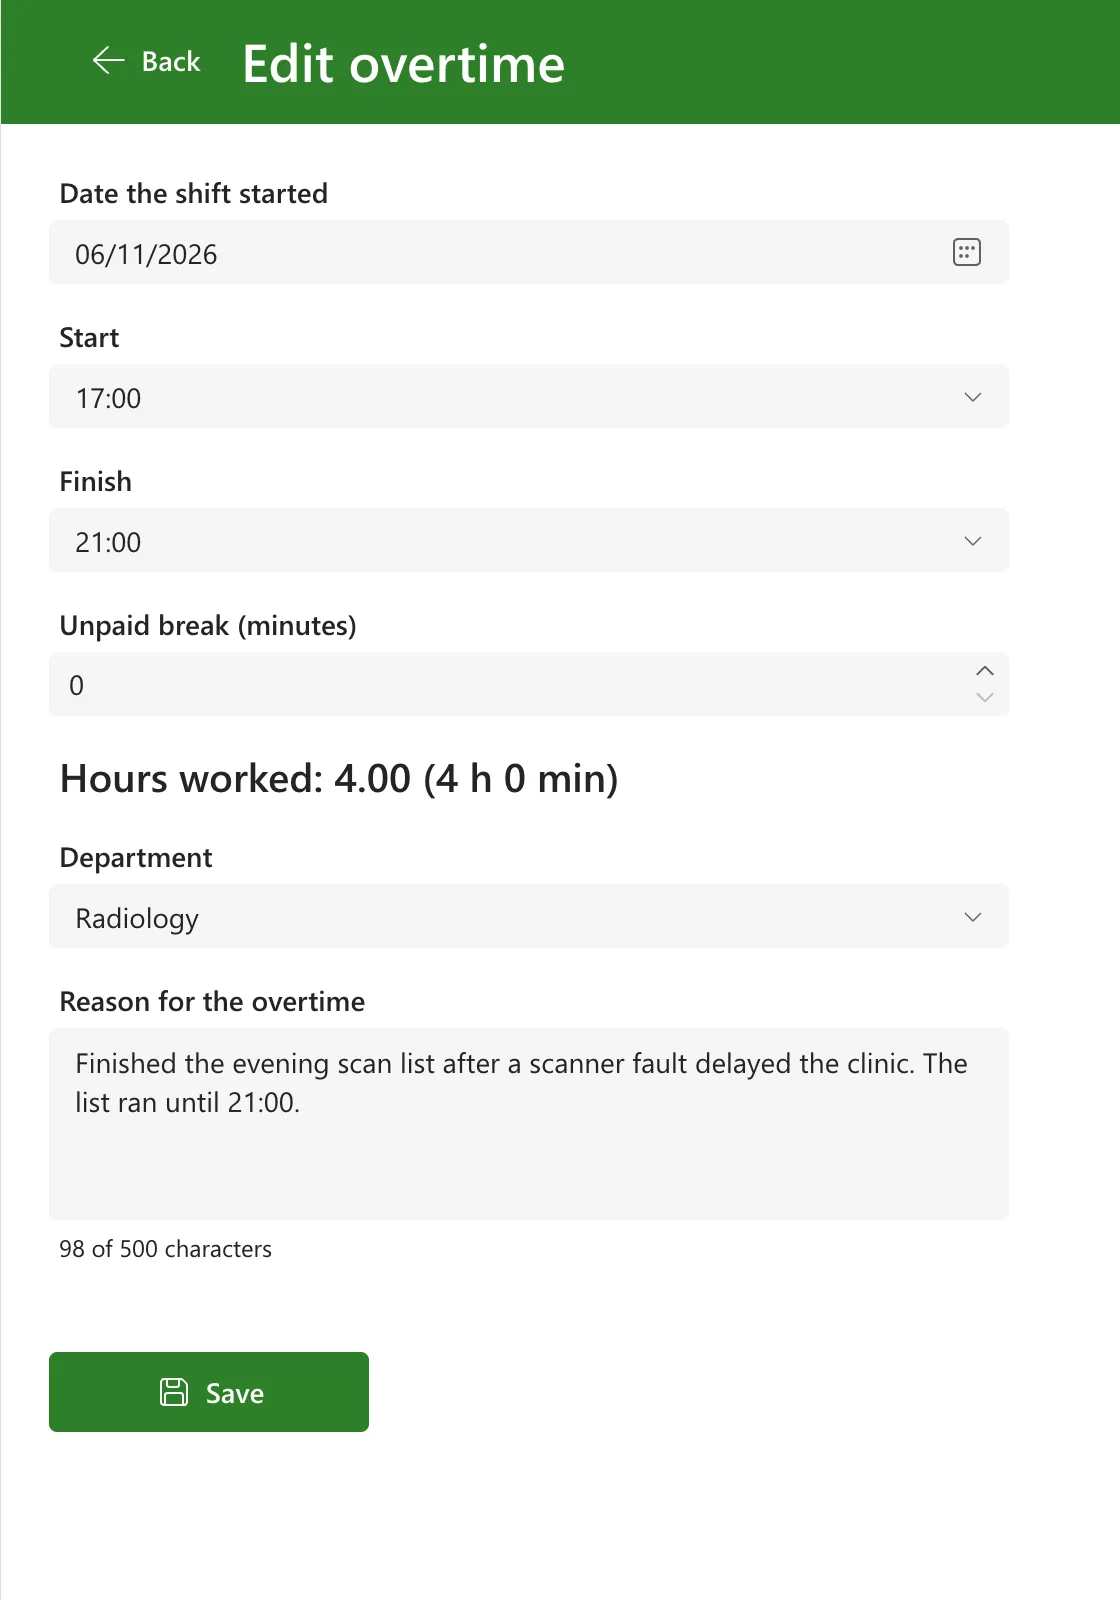
Editing the rejected entry. Back in November, Edit on 6 November opened Edit overtime with the entry loaded. I changed Finish from 20:30 to 21:00 and added The list ran until 21:00. to the reason; the hours became 4.00, with no overlap message:
Save showed Your changes were saved. The entry is waiting for approval. and went back to My Overtime, still on November: 11.00 hours, the second week 7.00, and 6 November Pending again, from 17:00 to 21:00:
Opening an October entry and selecting Back without saving returned to October, as Step 4's OnVisible intends.
Step 15: Check the Totals in SharePoint
A view of the list can show the same totals, which makes them easy to check. In OvertimeEntries, I saved a new public view, By month: grouped by WorkMonth and then by EmployeeName, with a Sum of Hours in each group (How to Group Items in a SharePoint List View and How to Show Column Totals in a SharePoint List View). The maker's November group added up to 11.00, the screen's total:
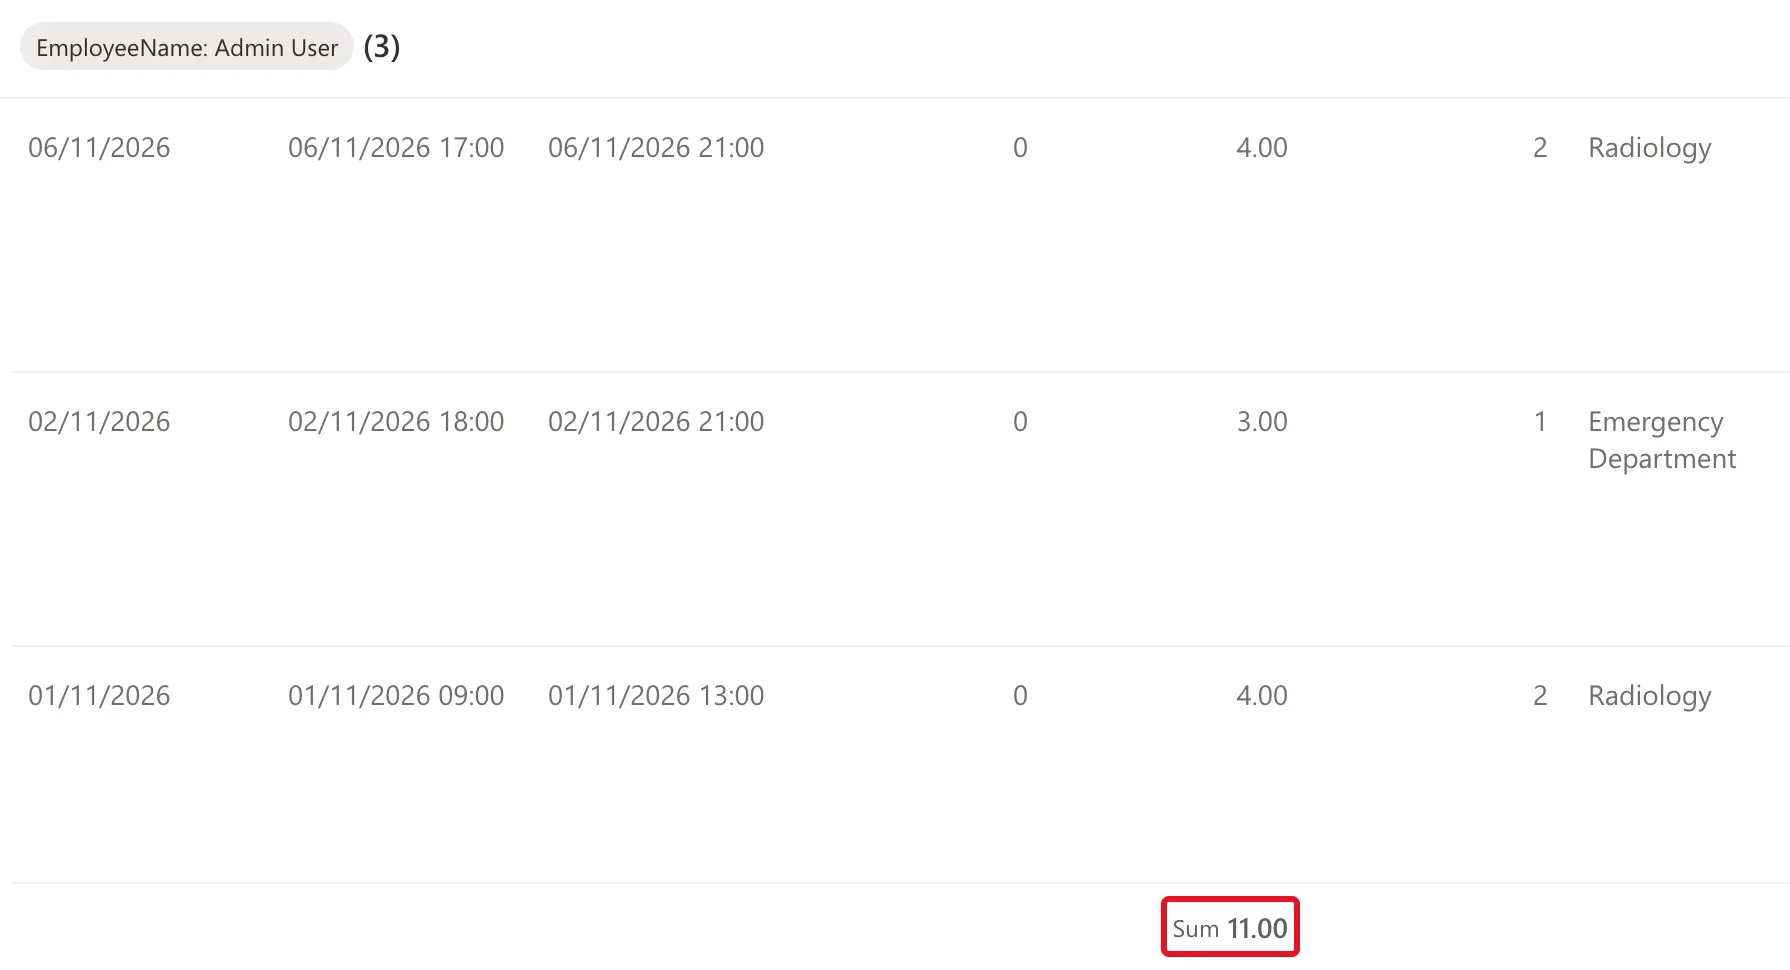
The view's sum counts every entry in the group, so it matches the app only while none of them is rejected.
Step 16: Check the Screen on a Phone
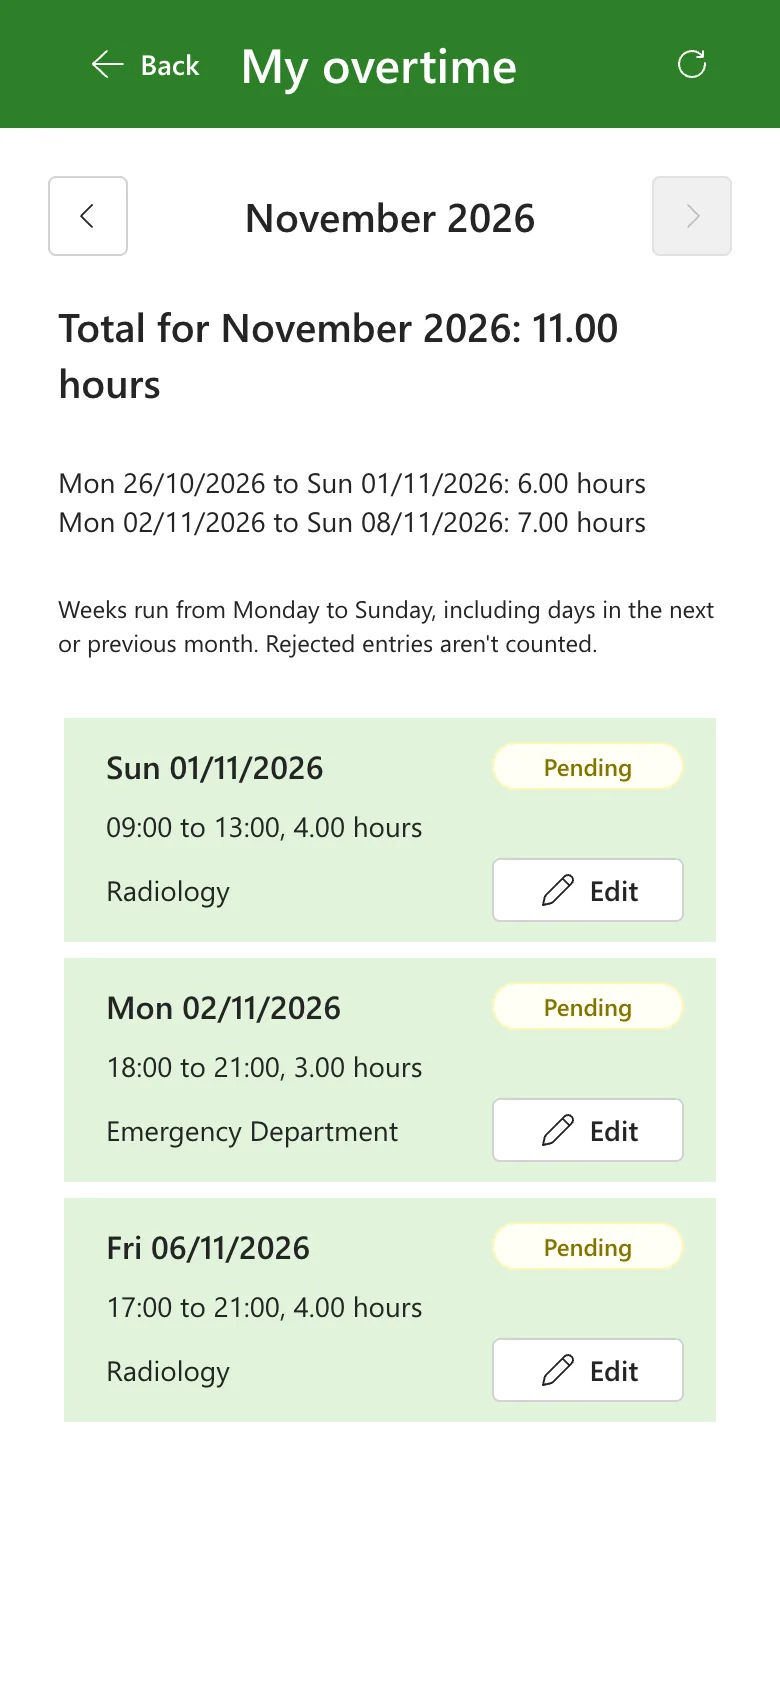
In Preview, choose Apple iPhone 12, 13, 14 (How to Test a Power Apps Canvas App on Phone and Tablet Sizes). The content takes the full width, the total wraps onto a second line, and Refresh shows only its icon:
Step 17: Run the App Checker
Open the App checker and select Accessibility. It lists six errors, the same two as in Parts 5 and 6, now for three headings: lblTitleHS, lblTitleLO and lblTitleMO:
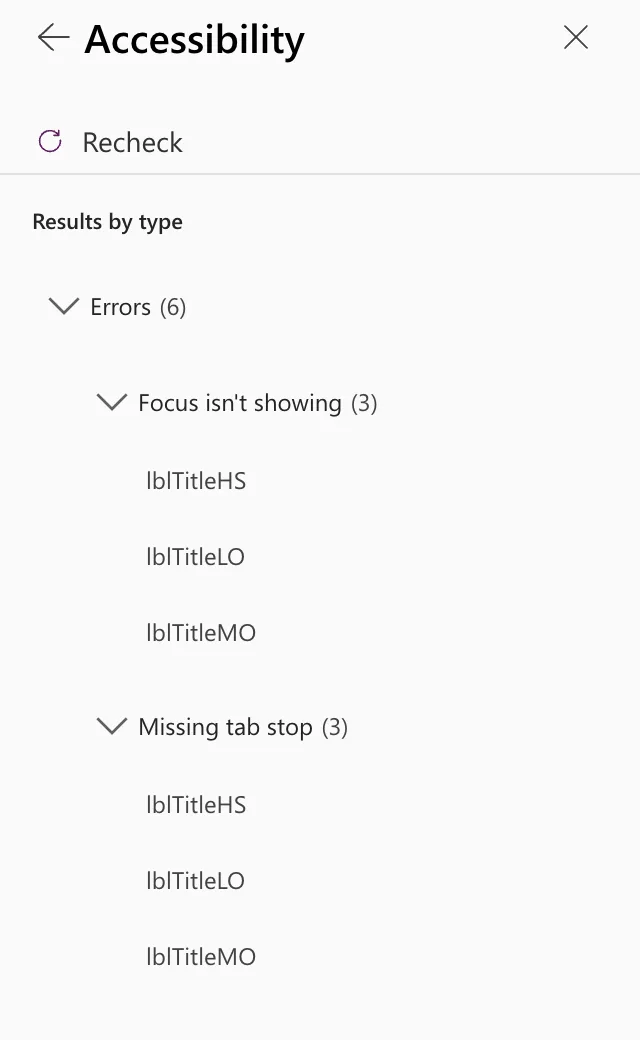
Leave them, for the reasons in Fixed: "Missing Tab Stop" in the Power Apps App Checker and Fixed: "Focus Isn't Showing" in the Power Apps App Checker. Formulas, Performance and Data source listed nothing, so none of the new formulas has a delegation warning.
Step 18: Save the App
Select Save. Don't publish yet: nobody else can open the app until Part 15 shares it. The screen's controls in the Tree view, next to the finished screen:
Common Mistakes
| Mistake | What happens | Do this instead |
|---|---|---|
Sum or GroupBy straight on the SharePoint list | Only the first 500 entries are added up, with a delegation warning | Load the rows with a delegable Filter first, as in Step 4 |
| Loading only the month's dates | The first and last weeks miss their days in the months around it | Load from the Monday before the 1st to the Sunday after the last day |
Text(Sum(...), "0.00") without Coalesce | No number in the total for a month with nothing to add | Coalesce(Sum(...), 0) |
ID <> locEntryId in the overlap check's SharePoint query | Nothing is delegated; only the first 500 entries are checked | Filter in SharePoint, skip the edited entry in memory |
Opening the Log Overtime screen from Home without locEntryId: Blank() | It opens on the last entry edited | Pass a blank ID |
| Hiding Edit as the only protection | Entries can still be changed in SharePoint | Content approval on the list, from Part 3 |
Troubleshooting
| Symptom | Likely cause | Fix |
|---|---|---|
| No month name and no entries in Preview | Preview started on My Overtime, so OnVisible didn't run | Preview from the Home screen and select My overtime |
| Total for September 2026: hours | Sum of no rows is blank | Coalesce(…, 0) around the Sum |
| A grey scroll bar at the end of a row's text | The Text control's default padding in a 24-pixel control | Padding top and bottom 0 |
| Editing an entry says it overlaps itself | The overlap check doesn't skip the entry being edited | Step 12 |
| A new entry doesn't appear | The screen loaded before it was saved | Select Refresh |
| The next-month button is greyed out | You're on the current month | Expected: overtime is logged after it's worked |
FAQ
Why can a week's total be more than the month's?
A week that starts in one month and ends in the next counts all its days, and the month's total counts only its own. The note under the weekly totals says so.
Why aren't rejected entries counted?
A rejected entry isn't overtime the department agreed to, so it isn't in the person's totals. It stays in the list with its badge, so they can correct it and send it again.
Can people see each other's overtime here?
No. The screen loads only the person's own entries, and in SharePoint, staff can only read their own anyway (Part 3).
Who sets an entry to Approved or Rejected?
Part 8's approval flow, from the decision of the department's approvers. In this part, the two statuses were set by hand in SharePoint, only to see the badges.
Does this need premium licenses?
No. The screen uses SharePoint and Office 365 Users, both standard connectors, and the app's license designation stays Standard.
Conclusion
People can now see and correct their overtime:
- a My Overtime screen with a month of the person's entries, a status badge on each, and next day on night shifts;
- the month's total and Monday-to-Sunday weekly totals, worked out in the app from rows SharePoint filtered, leaving out rejected entries and reading 0.00 for an empty month;
- previous and next month buttons that stop at the current month;
- an Edit button until an entry is approved, and an edit mode on the Log Overtime screen that loads the entry, skips it in the overlap check and sends the change back for approval;
- a By month view in SharePoint with the same totals.
Part 8 builds the approval flow: each new or changed entry goes to its department's approvers in Teams and Outlook, and their decision sets its status.
Additional Resources
- Average, Max, Min, StdevP, Sum, and VarP functions and GroupBy and Ungroup functions: the totals.
- Day, Month, Year, Hour, Minute, Second, and Weekday functions: Weekday with
StartOfWeek.Monday. - Delegation overview and Power Apps delegable functions and operations for SharePoint: what SharePoint can run.
- UpdateContext function: context variables and how long they keep their values.
- Badge modern control: Intent.
← Previous: Part 6: Build the Log Overtime Screen Next → Part 8: Build the Approval Flow for Teams and Outlook
