Build an Overtime Timesheet App in Power Apps — Part 6: Build the Log Overtime Screen

This is the screen people use most: they log a shift of overtime. They choose the day it started, the start and finish times, the unpaid break, the department and a reason. The hours are worked out as they choose, correctly across midnight and the nights the clocks change, and Save stays disabled until the entry is complete and doesn't clash with one already logged.
This is Part 6 of a 20-part series.
- Part 1: Plan the App and Set Up the Demo Organization
- Part 2: Create the SharePoint Site and Lists
- Part 3: Keep Overtime Private with SharePoint Permissions
- Part 4: Create the Solution, Environment Variables and Canvas App
- Part 5: Build the Home Screen
- Part 6: Build the Log Overtime Screen (you are here)
- Part 7: Build the My Overtime Screen
- Part 8: Build the Approval Flow for Teams and Outlook
- Part 9: Show Approvers What's Waiting (coming soon)
- Part 10: Build the Departments Screen (coming soon)
- Part 11: Build the Reports Screen (coming soon)
- Part 12: Import the Old Excel Timesheet (coming soon)
- Part 13: Create the Monthly Payroll Workbook with Office Scripts (coming soon)
- Part 14: Build the Power BI Overtime Report (coming soon)
- Part 15: Share the App and Add It to Microsoft Teams (coming soon)
- Part 16: Test Every Role and Department (coming soon)
- Part 17: Build a Setup Flow That Creates the Lists (coming soon)
- Part 18: Run the Solution Checker and Export the Solutions (coming soon)
- Part 19: Install the App in a New Environment (coming soon)
- Part 20: Recap, Production Checklist and Next Steps (coming soon)
Part 5 built the Home screen, with a Log overtime tile that didn't open anything yet. This part builds the screen behind it, and the first formulas that write to the OvertimeEntries list. Each generic task has its own guide; this part gives the values for this app, and why.
What You'll Build
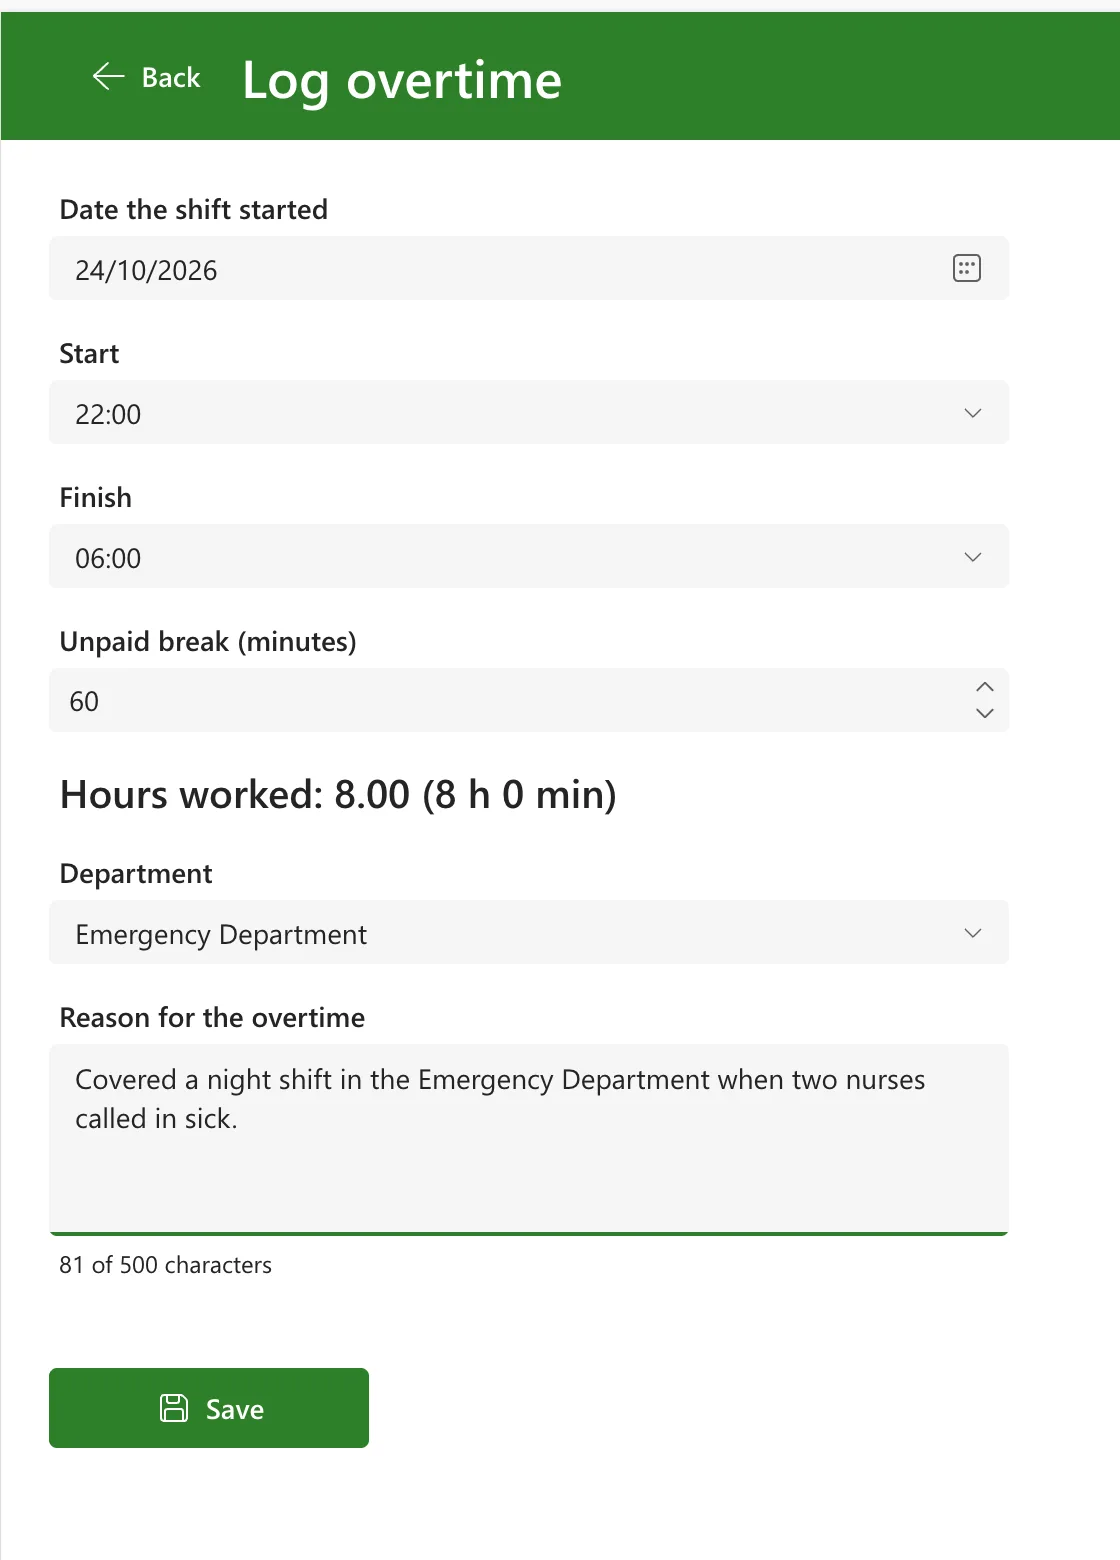
The finished screen, filled in for a night shift, ready to save:
Editing an entry comes with the My Overtime screen in Part 7, which is where people find their entries.
How the Screen Works
The decisions behind the formulas, each from the plan in Part 1:
- The date is the day the shift started. A finish time earlier than the start time means the shift finished the next day, so a night shift is one entry.
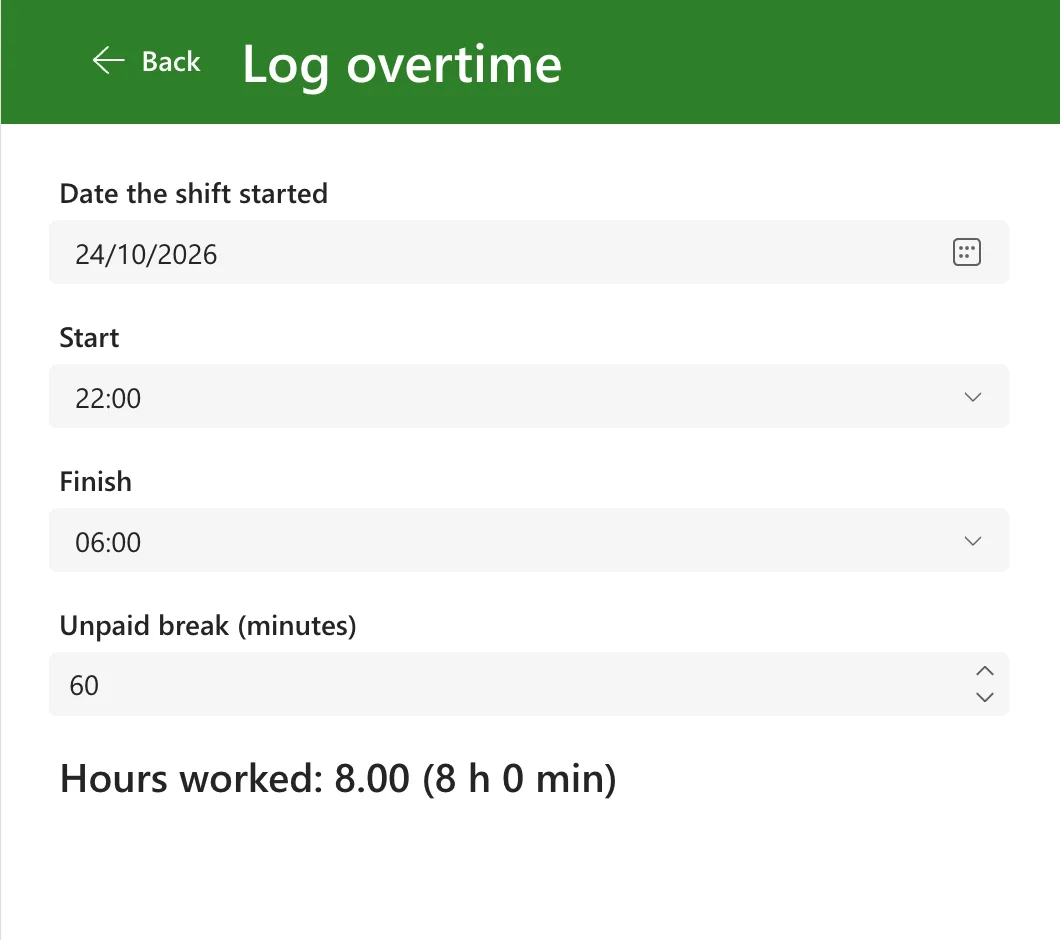
- Start and finish are real moments. The app puts each time on its date with DateTime and counts the minutes between them with DateDiff, so the two nights a year the clocks change come out right: 22:00 to 06:00 is nine hours on 24 October 2026 and seven on 28 March. The old Excel timesheet recorded an October night shift an hour short.
- Times every 5 minutes, from a list people can type into, so nobody types a time in the wrong format.
- The rules live in one place: four functions in App.Formulas, used by the hours line, the problem message and the Save button.
- The app works out the hours and stores them, as Part 2 decided, so every report adds up the same number.
- UK formats come from the app, not from each browser's language: dates as
dd/mm/yyyy, weeks starting on Monday, times ashh:mm.
Prerequisites
- Part 5 completed: the Home screen and its named formulas.
- The guides this part relies on. Each step says which one to follow:
- Screen and layout: How to Add a New Screen in Power Apps, How to Copy and Paste Controls Between Screens in Power Apps, How to Reorder Controls in a Container in Power Apps and How to Add a Vertical Container in Power Apps
- The date: How to Add a Date Picker in Power Apps, How to Show Dates as dd/mm/yyyy in a Power Apps Date Picker and How to Stop Users Picking a Future Date in a Power Apps Date Picker
- The times: How to Create a List of Numbers in Power Apps with Sequence, How to Build a Table in Power Apps with ForAll and How to Let Users Pick a Time in Power Apps
- The break: How to Add a Number Input in Power Apps
- Dates and times in formulas: Year, Month and Day, Hour and Minute, DateTime, DateAdd, DateDiff, overnight shifts and daylight saving time
- Showing the hours: Mod, Round, RoundDown and RoundUp and How to Convert Minutes to Hours and Minutes in Power Apps
- The department and reason: How to Add a Combo Box in Power Apps, How to Add a Multi-Line Text Input in Power Apps and How to Limit Text Length and Show a Character Count in Power Apps
- The rules: How to Create a User-Defined Function in Power Apps, How to Check for Overlapping Times in Power Apps and How to Validate a Form Without an Edit Form in Power Apps
- Saving: How to Save a Date and Time to a SharePoint List with Patch in Power Apps and How to Stop a Button Being Selected Twice While It Saves in Power Apps
- Moving between screens: How to Go to Another Screen in Power Apps with Navigate, How to Go Back to the Previous Screen in Power Apps with Back and How to Run a Formula When a Screen Opens in Power Apps with OnVisible
Step 1: Add the Screen and Its Header
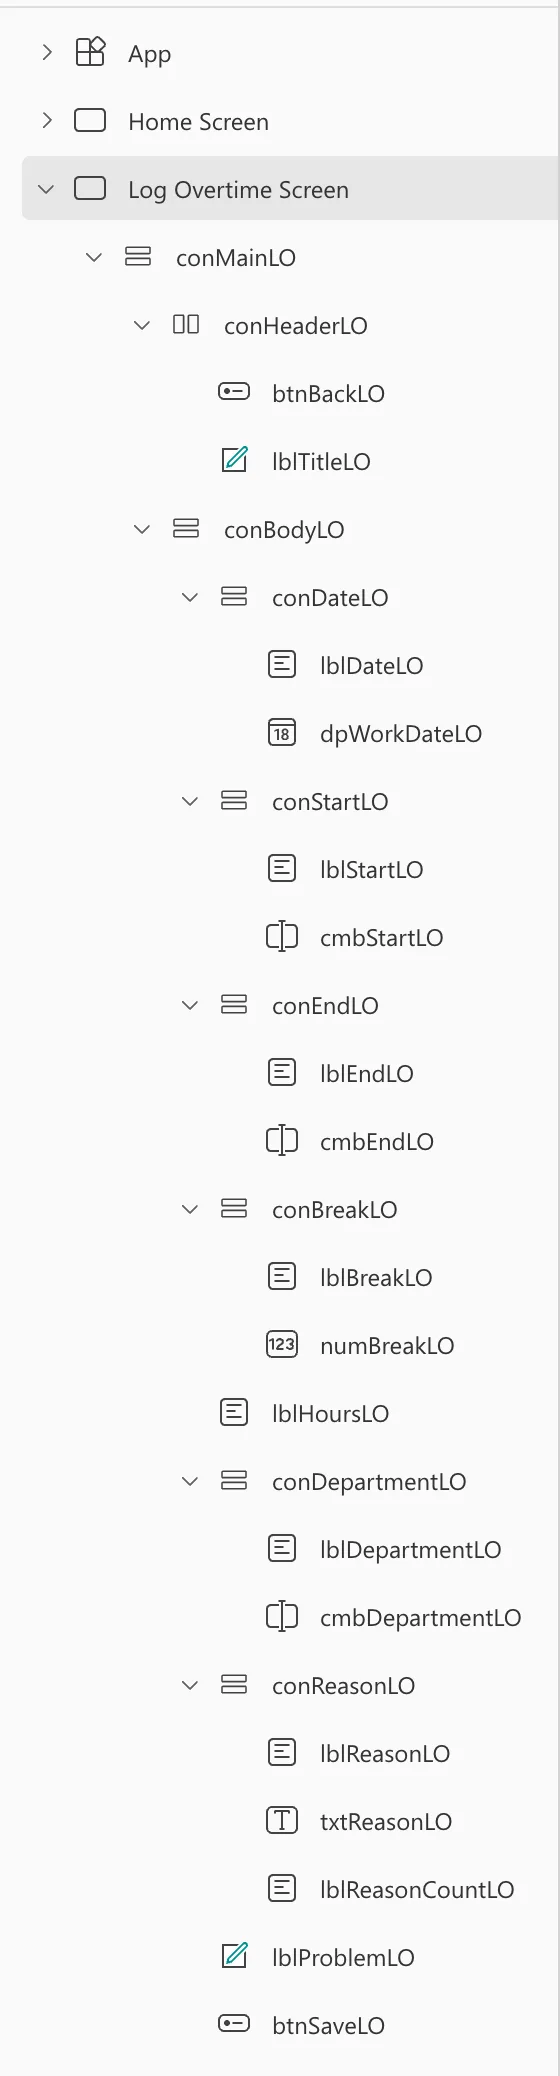
Open the app in Studio from the Overtime Timesheet solution. Add a Blank screen (How to Add a New Screen in Power Apps) and rename it Log Overtime Screen. Controls on this screen end in LO:
Log Overtime Screen
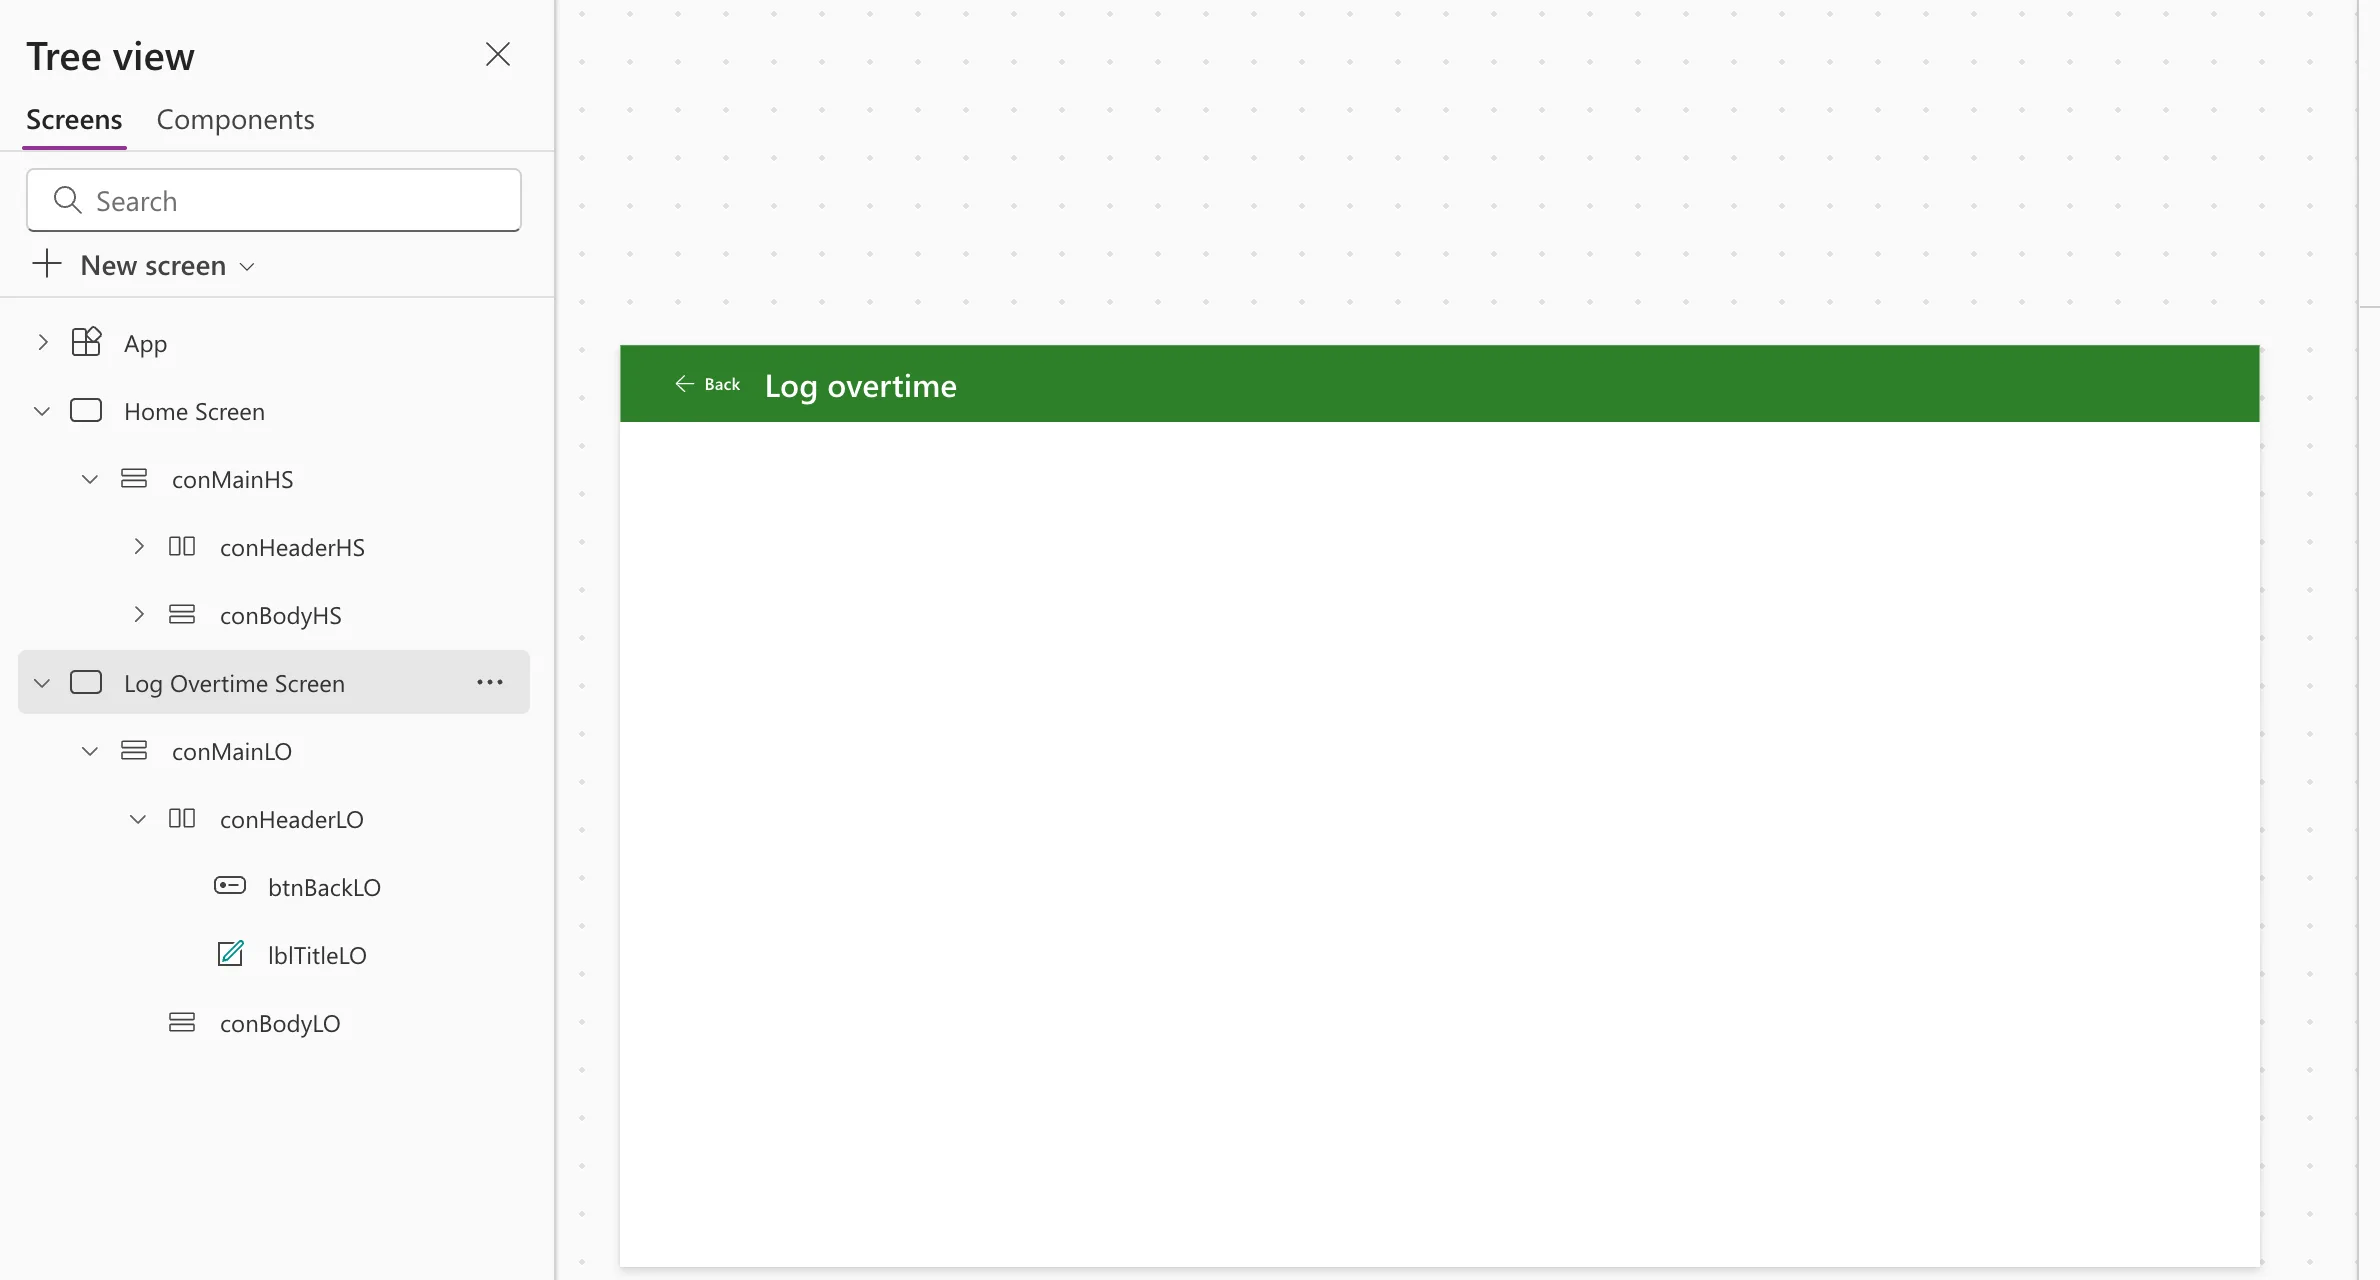
└─ conMainLO                vertical: fills the screen
   ├─ conHeaderLO           horizontal: copied from the Home screen
   │  ├─ btnBackLO
   │  └─ lblTitleLO
   └─ conBodyLO             vertical: the form, scrolling
      ├─ conDateLO          lblDateLO, dpWorkDateLO
      ├─ conStartLO         lblStartLO, cmbStartLO
      ├─ conEndLO           lblEndLO, cmbEndLO
      ├─ conBreakLO         lblBreakLO, numBreakLO
      ├─ lblHoursLO
      ├─ conDepartmentLO    lblDepartmentLO, cmbDepartmentLO
      ├─ conReasonLO        lblReasonLO, txtReasonLO, lblReasonCountLO
      ├─ lblProblemLO
      └─ btnSaveLO
The main container. Insert a vertical container, conMainLO, with the same settings as the Home screen's: X, Y 0; Width Parent.Width; Height Parent.Height; Align (horizontal) Stretch; Padding 0; Drop shadow None; Border radius 0.
The header. Copy conHeaderHS on the Home screen and paste it into conMainLO (How to Copy and Paste Controls Between Screens in Power Apps). Rename the copy conHeaderLO and its label lblTitleLO, and set the label's Text to "Log overtime". The copy keeps Role TextRole.Heading1 and TabIndex -1, so it's this screen's main heading for screen readers too.
The Back button. Insert a button into conHeaderLO, name it btnBackLO, and move it to the start with Reorder → Move to start (How to Reorder Controls in a Container in Power Apps):
| Property | Value |
|---|---|
| Text | "Back" |
| Icon | "ArrowLeft" |
| Width, Height | 96, 40 |
| OnSelect | Back() |
| AccessibleLabel | "Back to the Home screen" |
The body. Insert a vertical container into conMainLO after the header, conBodyLO: Flexible height On; Align (horizontal) Start; Gap 16; Padding 24; Vertical overflow Scroll; Drop shadow None; Border radius 0. The form scrolls when it's taller than the screen.
The screen so far:
Step 2: Add the Shift Functions to App.Formulas
Every part of the screen needs the shift's real start and finish, so they're worked out by functions in App.Formulas, after Part 5's named formulas: How to Create a User-Defined Function in Power Apps. Check first that Settings → Updates → New → New analysis engine and User defined functions is On; in this app it was.
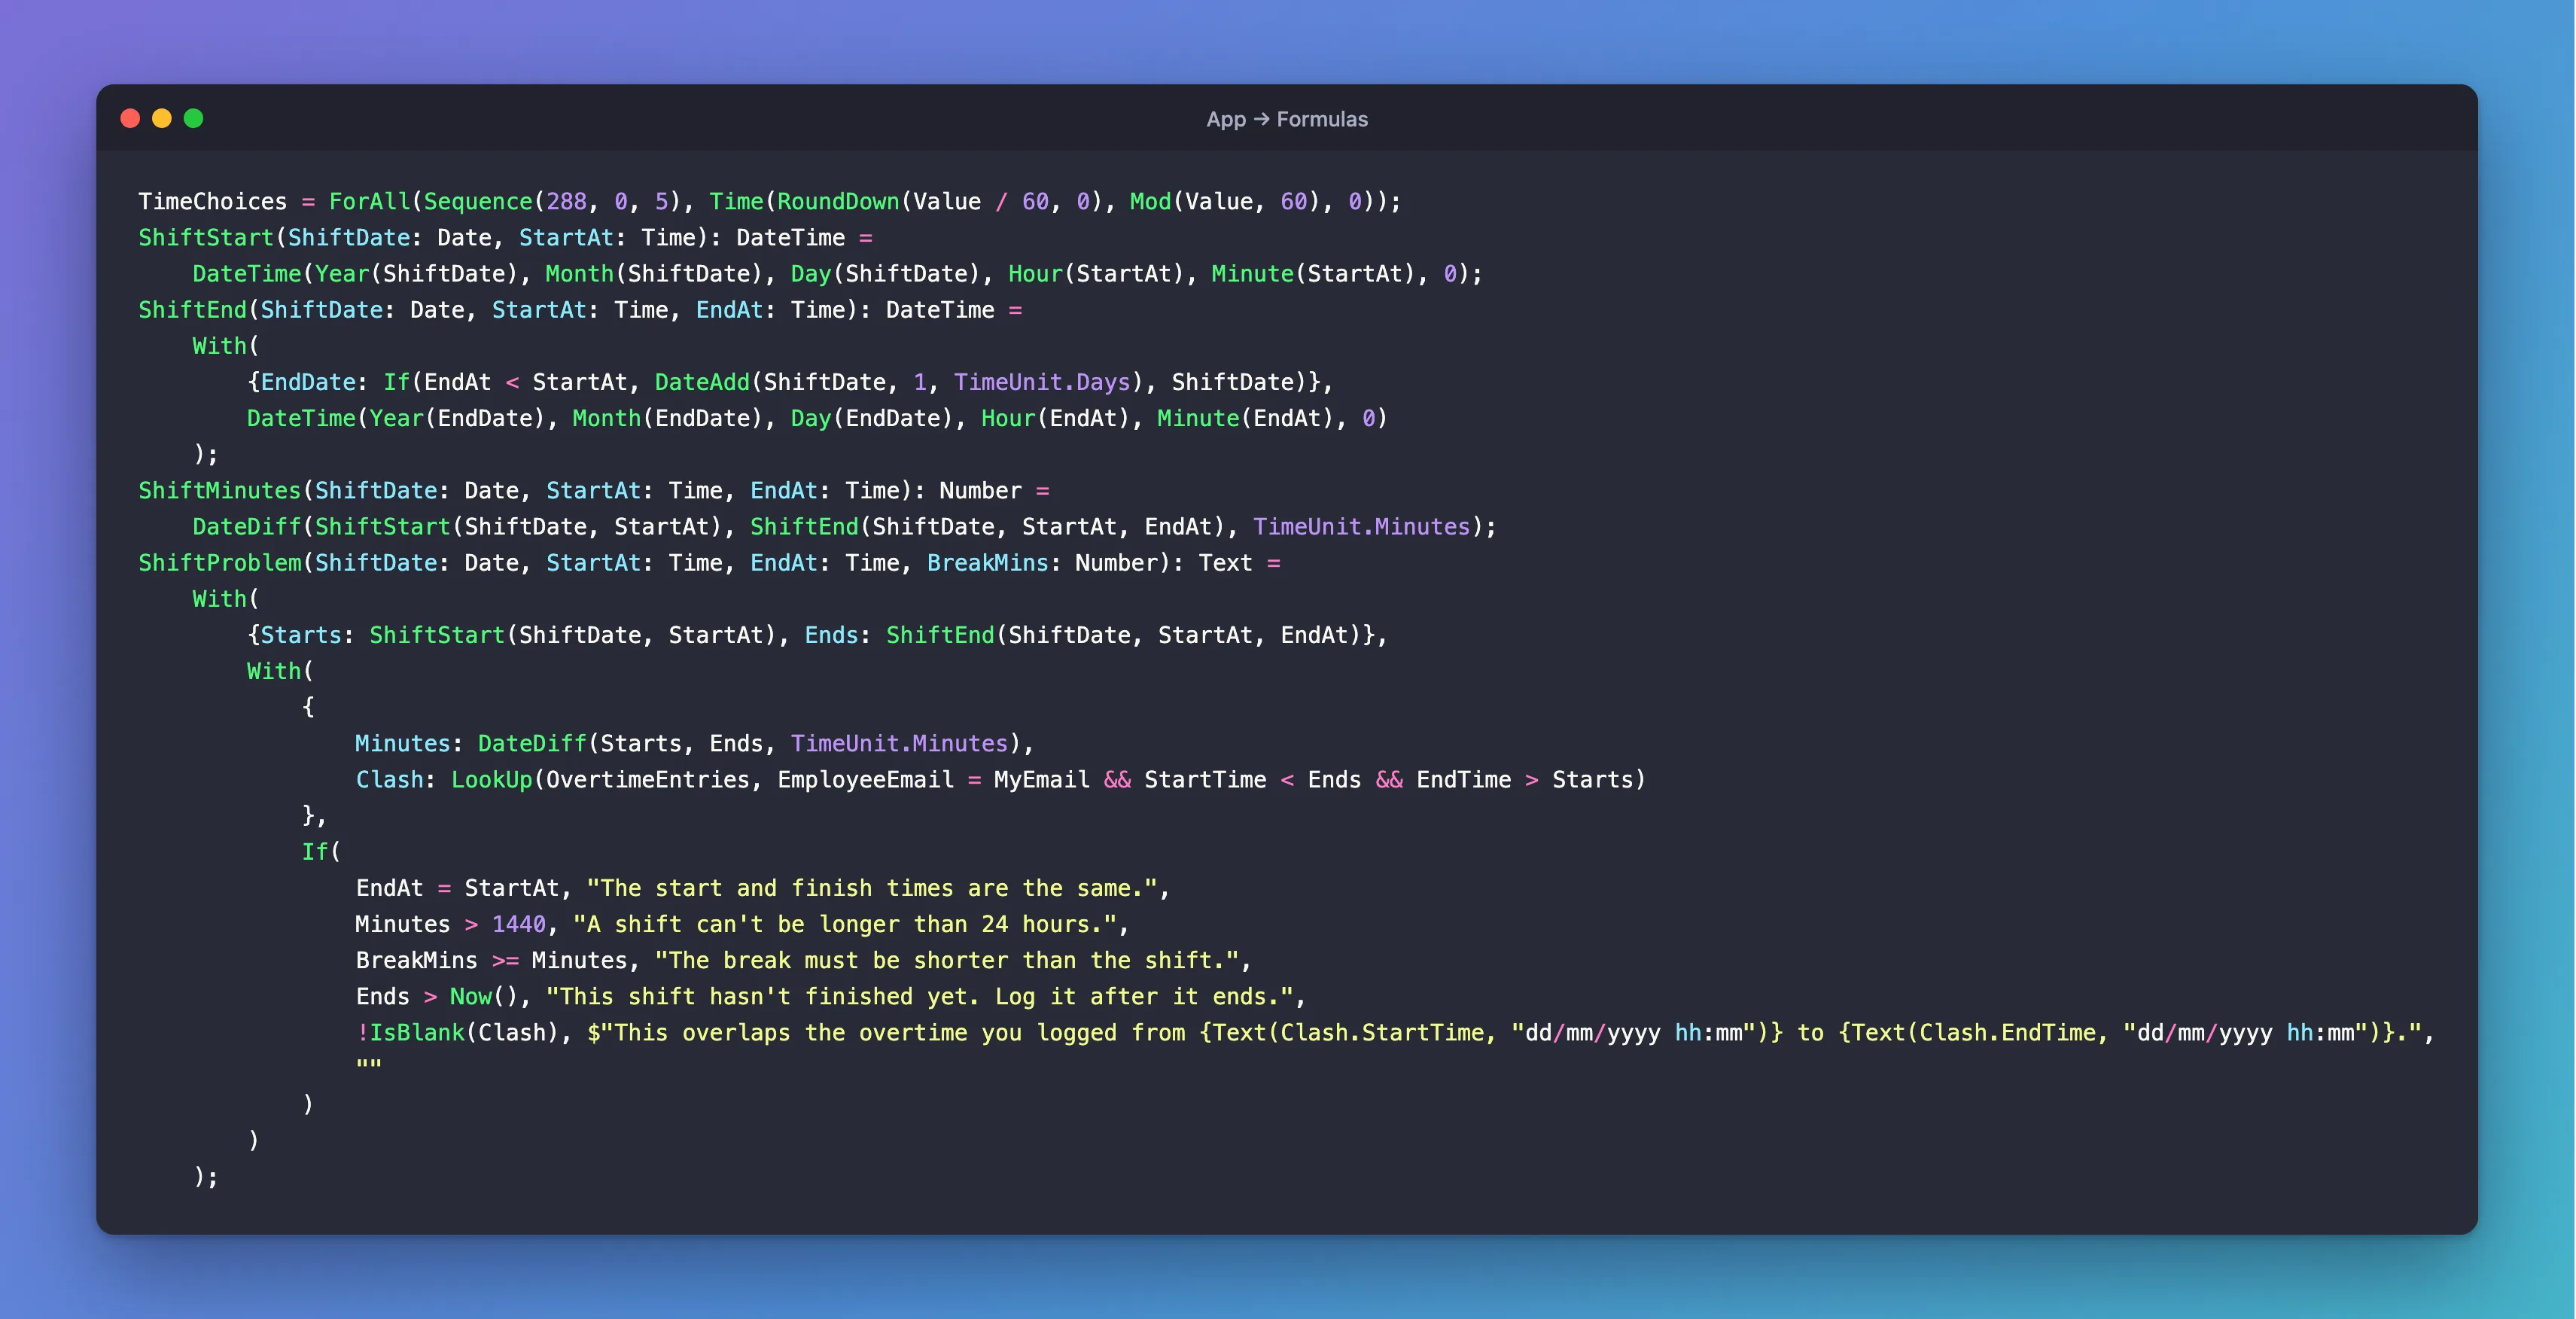
TimeChoices = ForAll(Sequence(288, 0, 5), Time(RoundDown(Value / 60, 0), Mod(Value, 60), 0));
ShiftStart(ShiftDate: Date, StartAt: Time): DateTime =
    DateTime(Year(ShiftDate), Month(ShiftDate), Day(ShiftDate), Hour(StartAt), Minute(StartAt), 0);
ShiftEnd(ShiftDate: Date, StartAt: Time, EndAt: Time): DateTime =
    With(
        {EndDate: If(EndAt < StartAt, DateAdd(ShiftDate, 1, TimeUnit.Days), ShiftDate)},
        DateTime(Year(EndDate), Month(EndDate), Day(EndDate), Hour(EndAt), Minute(EndAt), 0)
    );
ShiftMinutes(ShiftDate: Date, StartAt: Time, EndAt: Time): Number =
    DateDiff(ShiftStart(ShiftDate, StartAt), ShiftEnd(ShiftDate, StartAt, EndAt), TimeUnit.Minutes);
ShiftProblem(ShiftDate: Date, StartAt: Time, EndAt: Time, BreakMins: Number): Text =
    With(
        {Starts: ShiftStart(ShiftDate, StartAt), Ends: ShiftEnd(ShiftDate, StartAt, EndAt)},
        With(
            {
                Minutes: DateDiff(Starts, Ends, TimeUnit.Minutes),
                Clash: LookUp(OvertimeEntries, EmployeeEmail = MyEmail && StartTime < Ends && EndTime > Starts)
            },
            If(
                EndAt = StartAt, "The start and finish times are the same.",
                Minutes > 1440, "A shift can't be longer than 24 hours.",
                BreakMins >= Minutes, "The break must be shorter than the shift.",
                Ends > Now(), "This shift hasn't finished yet. Log it after it ends.",
                !IsBlank(Clash), $"This overlaps the overtime you logged from {Text(Clash.StartTime, "dd/mm/yyyy hh:mm")} to {Text(Clash.EndTime, "dd/mm/yyyy hh:mm")}.",
                ""
            )
        )
    );
| Name | What it gives | Guide |
|---|---|---|
TimeChoices | The 288 times of day, every 5 minutes, for the time pickers | How to Let Users Pick a Time in Power Apps |
ShiftStart | The start time on the shift's date | How to Combine a Date and a Time in Power Apps with DateTime |
ShiftEnd | The finish time, on the next day when it's earlier than the start | How to Calculate Hours for an Overnight Shift in Power Apps |
ShiftMinutes | The real minutes from start to finish | How to Calculate Hours Across a Daylight Saving Time Change in Power Apps |
ShiftProblem | The first thing wrong with the shift, or empty text | How to Validate a Form Without an Edit Form in Power Apps |
The overlap check filters on the person's email first, and Step 13 indexes that column: How to Check for Overlapping Times in Power Apps.
Step 3: Add the Field Groups
Each field sits in its own small vertical container, with a label above the control. Every group has the same settings:
| Setting | Value |
|---|---|
| Flexible height | Off; Height 56, or 144 for conReasonLO |
| Width | Min(480, Parent.Width - 48) |
| Align in container | Start |
| Align (horizontal) | Stretch |
| Gap | 4 |
| Padding, Drop shadow, Border radius | 0, None, 0 |
The Width keeps the fields 480 pixels wide on a large screen, and the full width on a phone, less the body's padding of 24 on each side. 56 is a 20-pixel label, the gap, and a 32-pixel control.
Each label is a Text control (How to Add a Text Control in Power Apps): Size 14, Font weight Semibold, Height 20, padding top and bottom 0, and AccessibleLabel Self.Text. Their texts:
| Label | Text |
|---|---|
lblDateLO | "Date the shift started" |
lblStartLO | "Start" |
lblEndLO | "Finish" |
lblBreakLO | "Unpaid break (minutes)" |
lblDepartmentLO | "Department" |
lblReasonLO | "Reason for the overtime" |
Date the shift started answers the question a night-shift worker would ask: the date of the evening it started, not of the morning it finished.
Step 4: The Date
In conDateLO, under its label, add a modern Date picker, dpWorkDateLO (How to Add a Date Picker in Power Apps):
| Property | Value | Why |
|---|---|---|
| DefaultDate | Today() | Starts on today; people change it for an earlier shift |
| Format | "dd/mm/yyyy" | UK dates for everyone: How to Show Dates as dd/mm/yyyy in a Power Apps Date Picker |
| StartOfWeek | StartOfWeek.Monday | A UK calendar week |
| EndDate | Today() | No future dates: How to Stop Users Picking a Future Date in a Power Apps Date Picker |
| AccessibleLabel | "Date the shift started" | What screen readers announce |
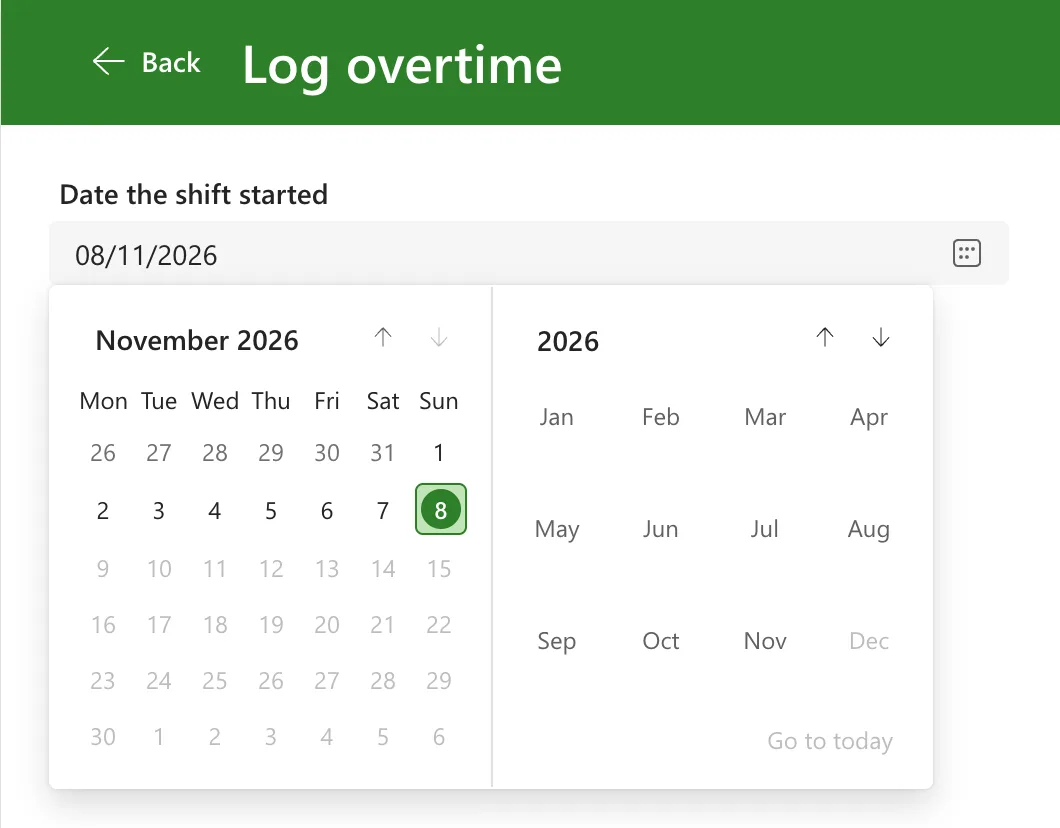
In Preview, the calendar starts on Monday and greys out the days after today:
Step 5: The Start and Finish Times
In conStartLO and conEndLO, add a modern Combobox each, cmbStartLO and cmbEndLO (How to Let Users Pick a Time in Power Apps):
| Property | cmbStartLO | cmbEndLO |
|---|---|---|
| Items | TimeChoices | TimeChoices |
| ItemDisplayText | Text(ThisItem.Value, "hh:mm") | Text(ThisItem.Value, "hh:mm") |
| SelectMultiple | false | false |
| InputTextPlaceholder | "Choose a time" | "Choose a time" |
| AccessibleLabel | "Start time" | "Finish time" |
Both start empty, so nobody saves a time they didn't choose. Typing filters the list: 22 leaves 22:00 to 22:55:
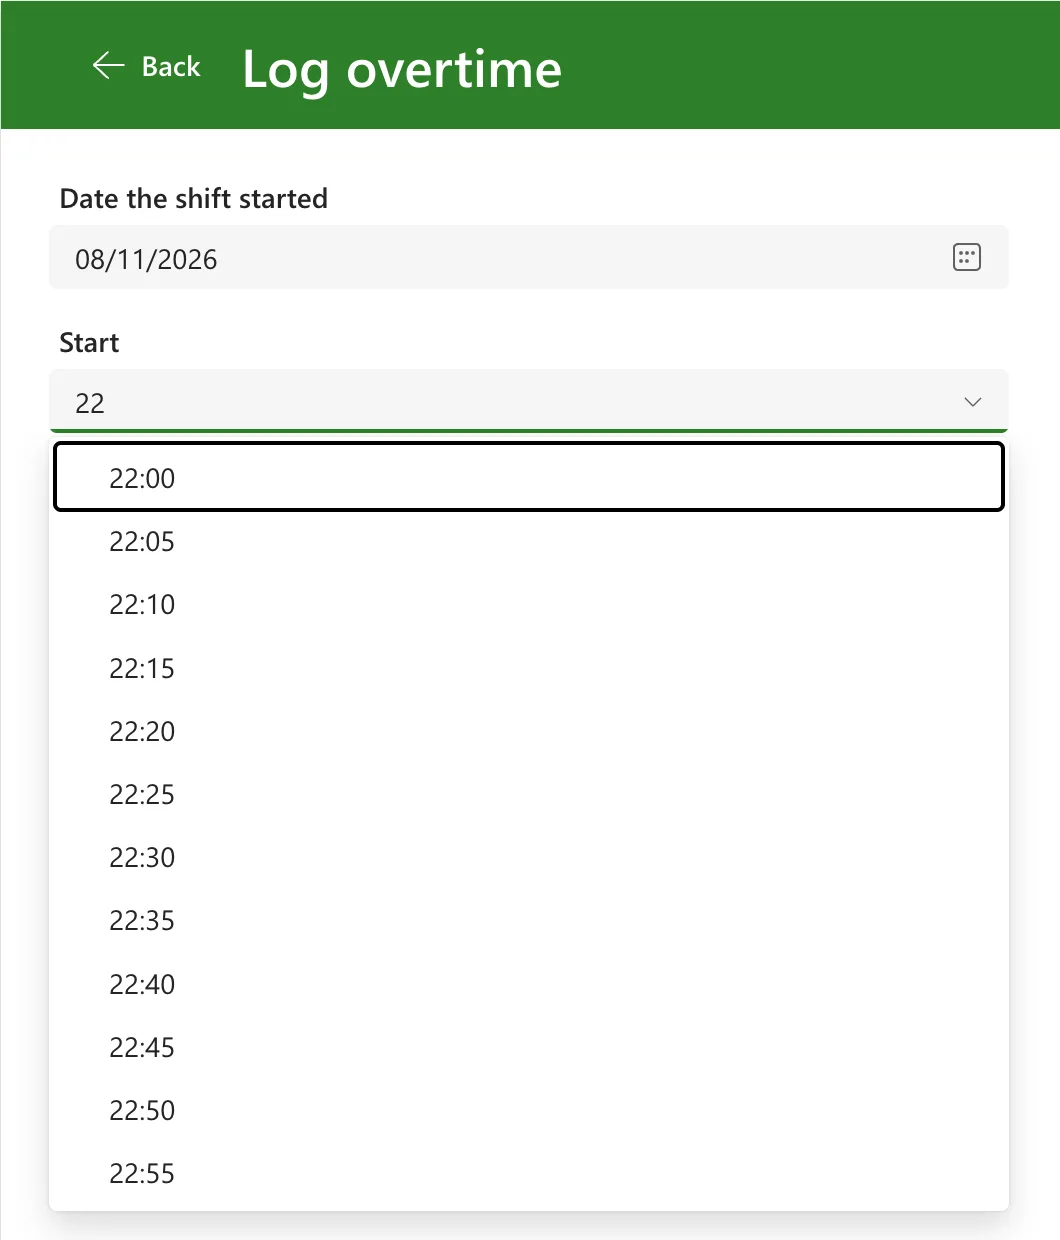
The chosen time is cmbStartLO.Selected.Value, a Time the functions from Step 2 take as it is.
Step 6: The Unpaid Break
In conBreakLO, add a modern Number input, numBreakLO (How to Add a Number Input in Power Apps):
| Property | Value | Why |
|---|---|---|
| Min | 0 | No negative breaks |
| Max | 1440 | A day has 1,440 minutes |
| Step | 5 | The arrows move five minutes at a time |
| Precision | DecimalPrecision.'0' | Whole minutes |
| HintText | "0" | Shown while the box is empty |
| AccessibleLabel | "Unpaid break in minutes" | What screen readers announce |
Its Value changes when the box loses focus, not with every key, so the hours in the next step update when people move on to the next field.
Step 7: The Hours Worked
Under conBreakLO, in conBodyLO itself, add a Text control, lblHoursLO: Size 20, Font weight Semibold, Auto height on, Width Min(480, Parent.Width - 48), Align in container Start, and AccessibleLabel Self.Text. Its Text:
If(
    IsBlank(cmbStartLO.Selected) || IsBlank(cmbEndLO.Selected),
    "Choose the start and finish times to see the hours worked.",
    With(
        {Minutes: Max(0, ShiftMinutes(dpWorkDateLO.SelectedDate, cmbStartLO.Selected.Value, cmbEndLO.Selected.Value) - numBreakLO.Value)},
        $"Hours worked: {Text(Minutes / 60, "0.00")} ({RoundDown(Minutes / 60, 0)} h {Mod(Minutes, 60)} min)"
    )
)
It shows decimal hours, the way payroll counts them, and hours and minutes, the way people read them: How to Convert Minutes to Hours and Minutes in Power Apps. Max(0, …) keeps it from going below zero while the break is longer than the shift; Step 10's message says so.
My first version checked for a missing time with IsEmpty(cmbEndLO.SelectedItems). With a start chosen and no finish, it showed Hours worked: 2.00 (2 h 0 min): IsEmpty returned false for a combo box with nothing chosen, and the blank finish counted as midnight. Microsoft's check for "nothing chosen" is IsBlank(cmbEndLO.Selected), and that's what the formula uses now: Fixed: IsEmpty Returns False When Nothing Is Selected in a Power Apps Combo Box.
On the night the UK clocks went back in 2026, 22:00 to 06:00 with an hour's break is 8.00 hours: nine real hours, less the break. The old Excel timesheet recorded 7:
Step 8: The Department
In conDepartmentLO, add a modern Combobox, cmbDepartmentLO (How to Add a Combo Box in Power Apps):
| Property | Value |
|---|---|
| Items | Sort(Filter(Departments, IsActive = true), Department) |
| ItemDisplayText | ThisItem.Department |
| DefaultSelectedItems | Filter(Departments, IsActive = true, Department = MyDepartment) |
| SelectMultiple | false |
| InputTextPlaceholder | "Choose a department" |
| AccessibleLabel | "Department the overtime was for" |
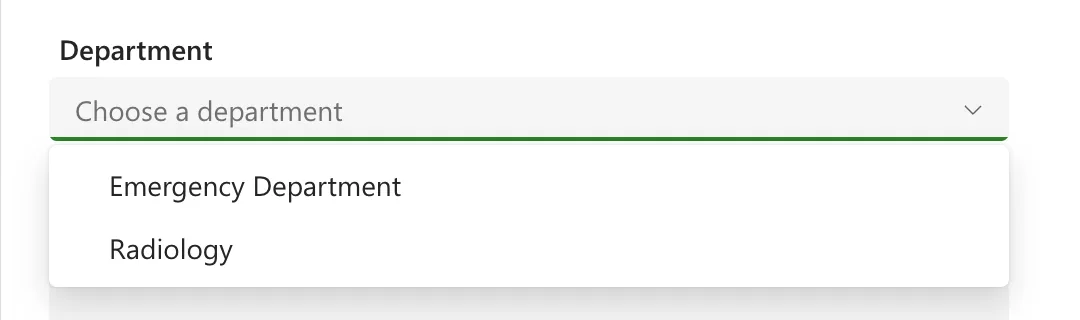
The list shows the active departments in alphabetical order, and starts on the person's own department when their Microsoft 365 profile names one in the list; Part 16 checks that as each persona. Someone covering a shift elsewhere picks that department instead, so its approvers decide. The maker's profile says Management, which isn't a department in the list, so for them it starts empty:
Step 9: The Reason
In conReasonLO, add a modern Text input, txtReasonLO (How to Add a Multi-Line Text Input in Power Apps):
| Property | Value |
|---|---|
| Type | TextInputType.Multiline |
| Height | 96 |
| Placeholder | "Why was the overtime needed?" |
| MaxLength | 500 |
| AccessibleLabel | "Reason for the overtime" |
Under it, a copy of lblDateLO renamed lblReasonCountLO, with Size 12 and Font weight Normal, counts what's typed (How to Limit Text Length and Show a Character Count in Power Apps):
$"{Len(txtReasonLO.Text)} of 500 characters"
The group is 144 pixels high: the label, the 96-pixel box and the count, with their gaps.
Step 10: The Problem Message
Under conReasonLO, in conBodyLO, add a classic Text label, lblProblemLO. It's the classic label because only it can be a live region, which screen readers announce when its text changes: How to Make Screen Readers Announce a Message in Power Apps.
| Property | Value |
|---|---|
| Live | Live.Polite |
| Auto height | On |
| Font | App.Theme.Font |
| Size | 12 |
| FontWeight | FontWeight.Semibold |
| Color | Color.DarkRed |
| PaddingLeft, PaddingRight | 0, 0 |
| Width | Min(480, Parent.Width - 48) |
| Align in container | Start |
Its Text asks ShiftProblem once both times are chosen:
If(
    IsBlank(cmbStartLO.Selected) || IsBlank(cmbEndLO.Selected),
    "",
    ShiftProblem(dpWorkDateLO.SelectedDate, cmbStartLO.Selected.Value, cmbEndLO.Selected.Value, numBreakLO.Value)
)
One message at a time, the first that applies:
| The shift | The message |
|---|---|
| Starts and finishes at the same time | The start and finish times are the same. |
| Is longer than 24 hours | A shift can't be longer than 24 hours. |
| Has a break as long as the shift | The break must be shorter than the shift. |
| Finishes after now | This shift hasn't finished yet. Log it after it ends. |
| Overlaps an entry already logged | This overlaps the overtime you logged from … to …. |
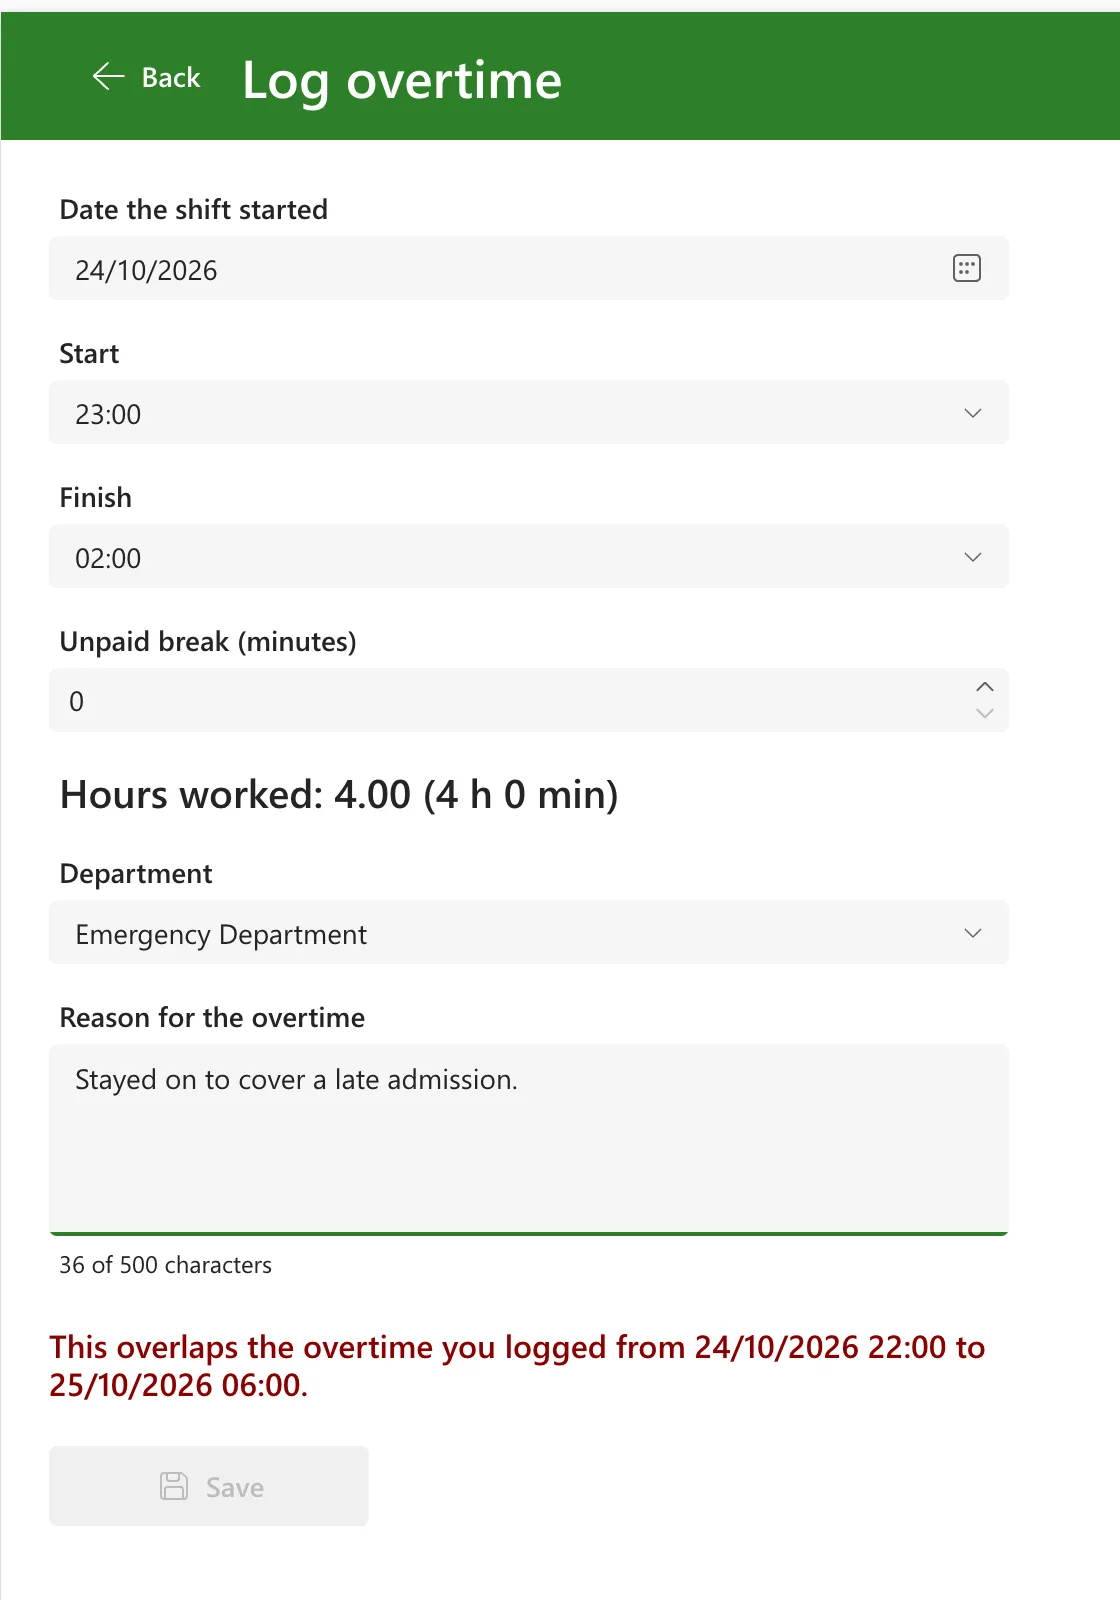
How to Validate a Form Without an Edit Form in Power Apps shows each one on this screen. The overlap message names the entry it clashes with:
Step 11: The Save Button
Last in conBodyLO, add a button, btnSaveLO:
| Property | Value |
|---|---|
| Text | If(locIsSaving, "Saving...", "Save") |
| Icon | "Save" |
| Width, Height | 160, 40 |
| Align in container | Start |
| AccessibleLabel | "Save this overtime entry" |
DisplayMode enables it only when every field is filled in and the problem message is empty, and not while a save is running (How to Validate a Form Without an Edit Form in Power Apps):
If(
    !locIsSaving &&
    !IsBlank(dpWorkDateLO.SelectedDate) &&
    !IsBlank(cmbStartLO.Selected) &&
    !IsBlank(cmbEndLO.Selected) &&
    !IsBlank(cmbDepartmentLO.Selected) &&
    !IsBlank(Trim(txtReasonLO.Text)) &&
    IsBlank(lblProblemLO.Text),
    DisplayMode.Edit,
    DisplayMode.Disabled
)
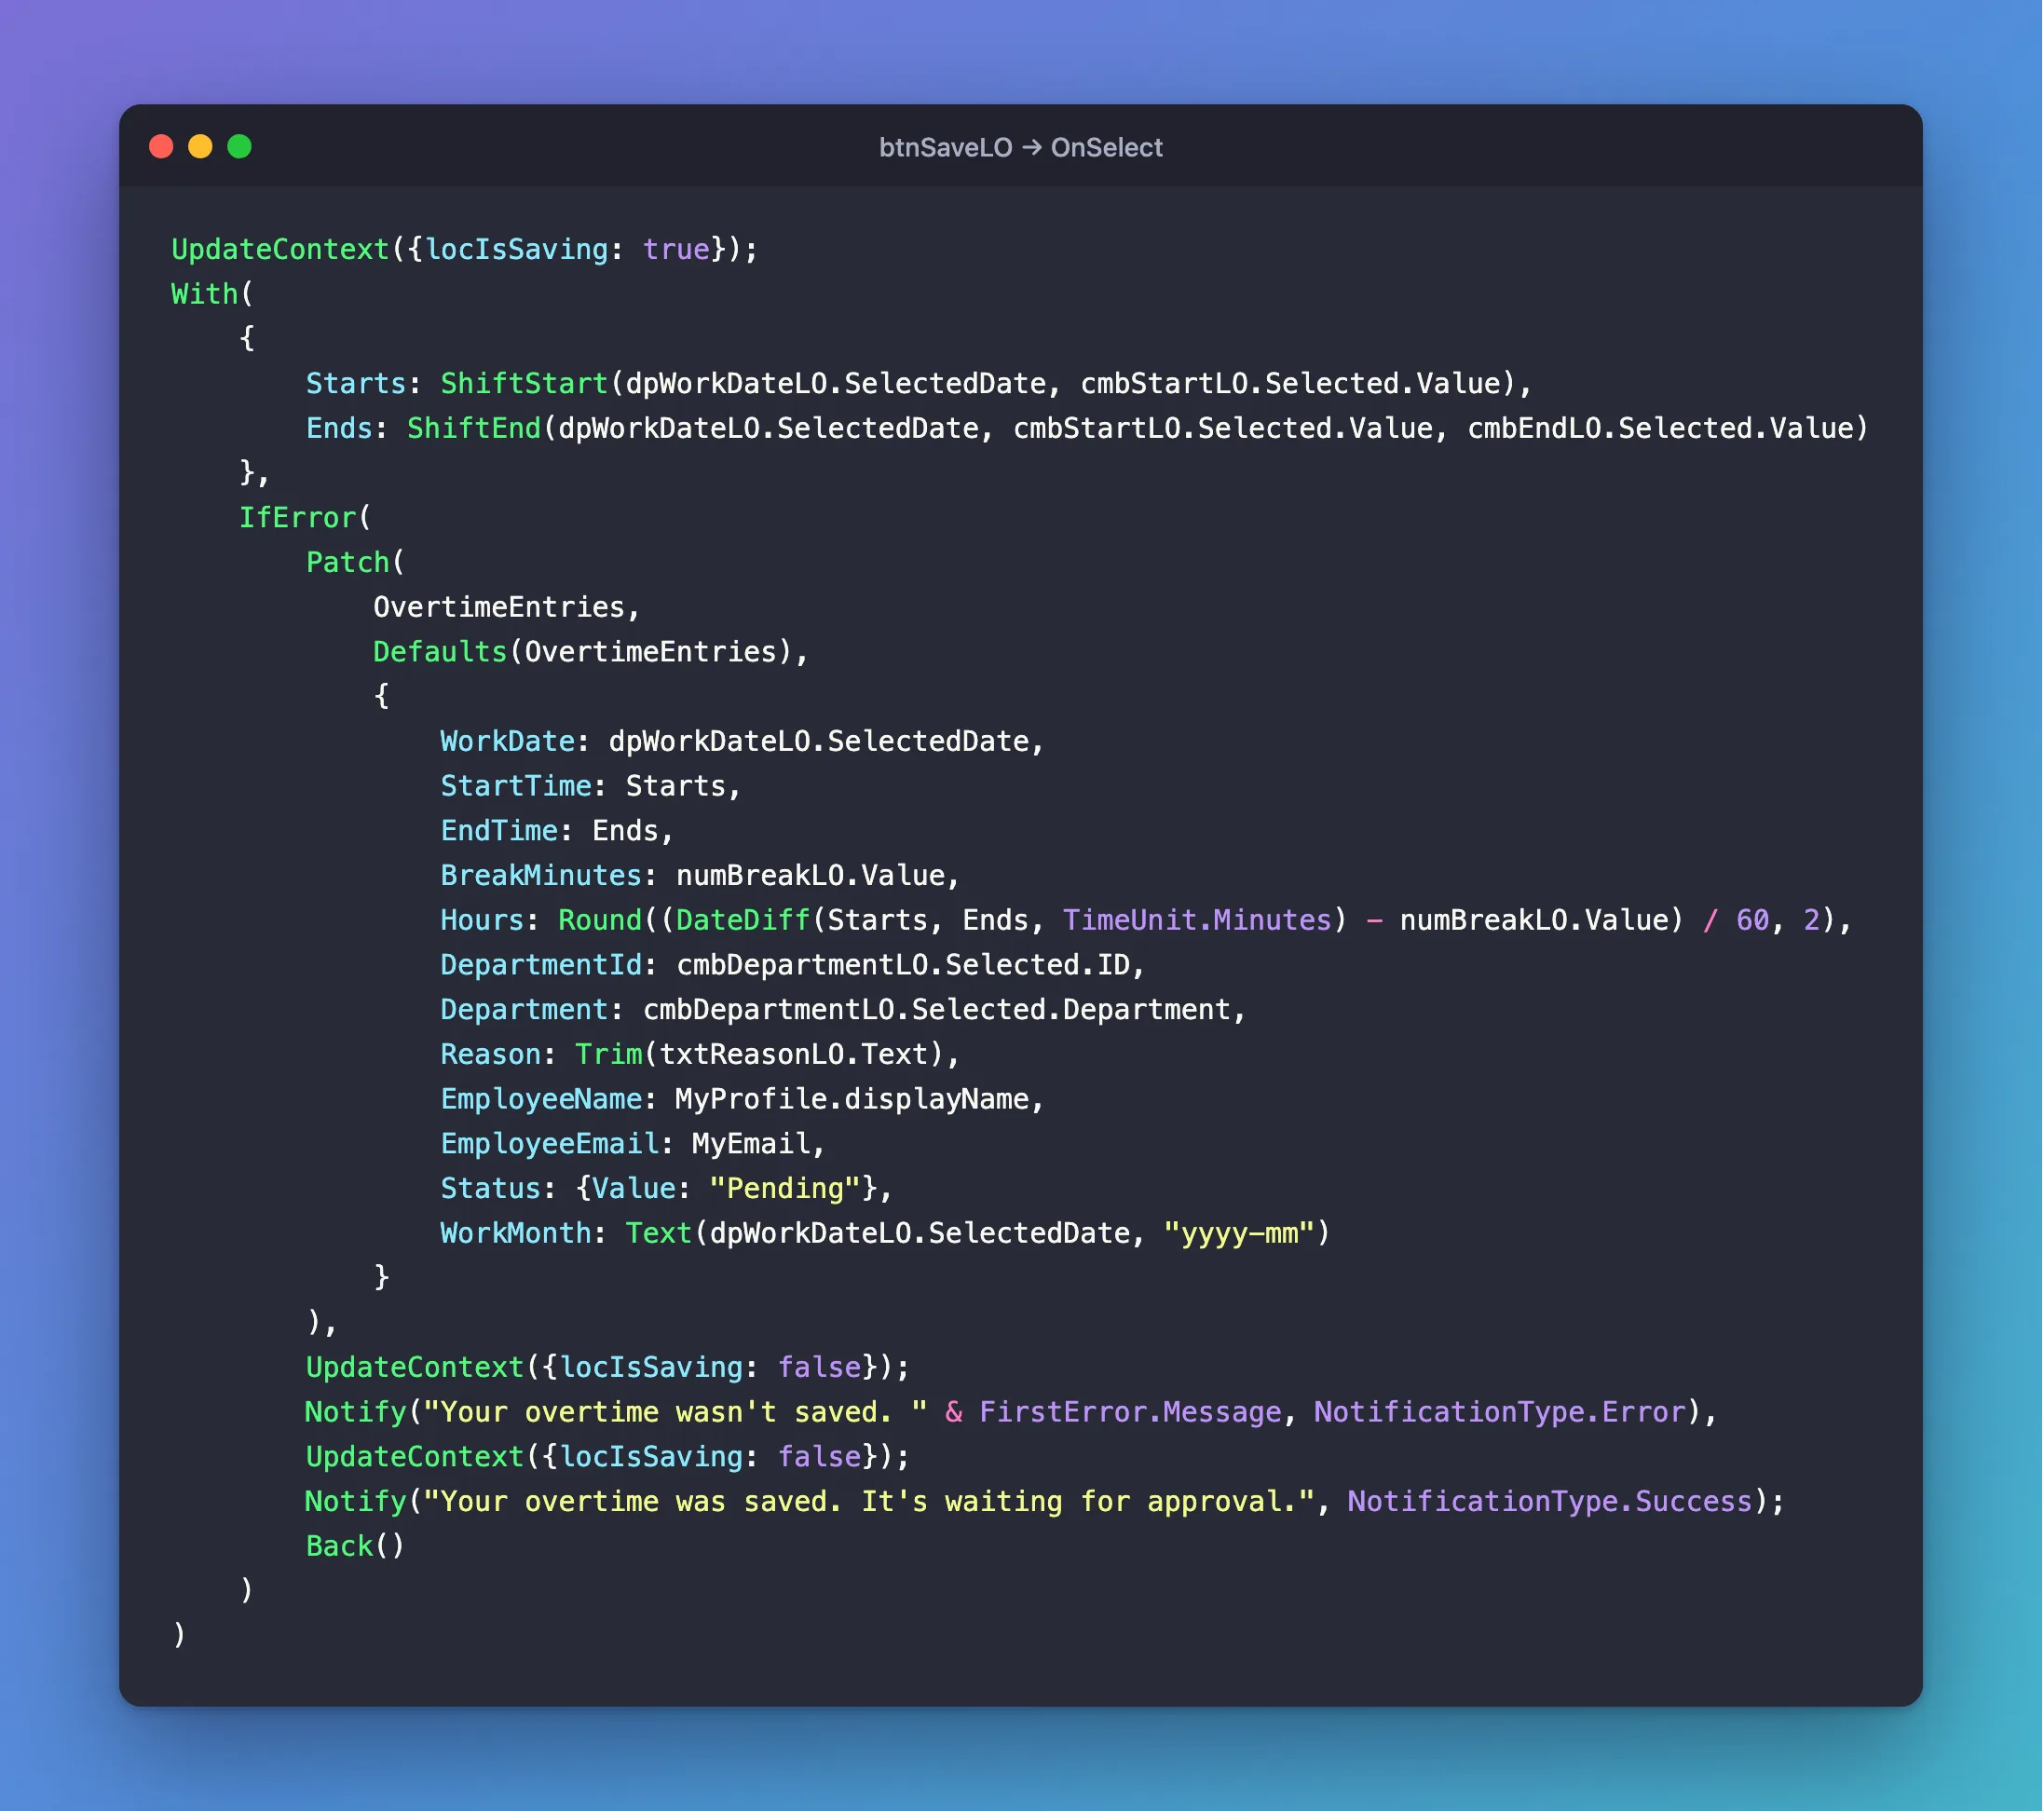
OnSelect saves the entry:
UpdateContext({locIsSaving: true});
With(
    {
        Starts: ShiftStart(dpWorkDateLO.SelectedDate, cmbStartLO.Selected.Value),
        Ends: ShiftEnd(dpWorkDateLO.SelectedDate, cmbStartLO.Selected.Value, cmbEndLO.Selected.Value)
    },
    IfError(
        Patch(
            OvertimeEntries,
            Defaults(OvertimeEntries),
            {
                WorkDate: dpWorkDateLO.SelectedDate,
                StartTime: Starts,
                EndTime: Ends,
                BreakMinutes: numBreakLO.Value,
                Hours: Round((DateDiff(Starts, Ends, TimeUnit.Minutes) - numBreakLO.Value) / 60, 2),
                DepartmentId: cmbDepartmentLO.Selected.ID,
                Department: cmbDepartmentLO.Selected.Department,
                Reason: Trim(txtReasonLO.Text),
                EmployeeName: MyProfile.displayName,
                EmployeeEmail: MyEmail,
                Status: {Value: "Pending"},
                WorkMonth: Text(dpWorkDateLO.SelectedDate, "yyyy-mm")
            }
        ),
        UpdateContext({locIsSaving: false});
        Notify("Your overtime wasn't saved. " & FirstError.Message, NotificationType.Error),
        UpdateContext({locIsSaving: false});
        Notify("Your overtime was saved. It's waiting for approval.", NotificationType.Success);
        Back()
    )
)
locIsSavingdisables the button while the save runs, so a second tap can't save the shift twice: How to Stop a Button Being Selected Twice While It Saves in Power Apps.- The date goes to the date-only WorkDate, the real start and finish to StartTime and EndTime, and the month as text to WorkMonth: How to Save a Date and Time to a SharePoint List with Patch in Power Apps.
- Department and EmployeeName are copies of the names when the entry is saved, as Part 2 designed, and DepartmentId links the entry to its department.
- Status is set to Pending in the formula:
Defaults(OvertimeEntries).Status.Valueshowed Blank in Studio, although the column's default is Pending (How to Use the Defaults Function in Power Apps). - If SharePoint refuses the entry, the error message says why and the person stays on the screen; if it's saved, they're told and taken back (How to Show a Notification in Power Apps with Notify).
Step 12: Reset the Form When the Screen Opens
The controls keep their values when people leave the screen, so the next entry would start with the last one's times, and a text input would show its old text: Fixed: Text Input Shows Old Text When a Screen Opens Again in Power Apps. The screen's OnVisible puts every field back to its default (How to Reset a Control to Its Default Value in Power Apps with Reset):
UpdateContext({locIsSaving: false});
Reset(dpWorkDateLO);
Reset(cmbStartLO);
Reset(cmbEndLO);
Reset(numBreakLO);
Reset(cmbDepartmentLO);
Reset(txtReasonLO)

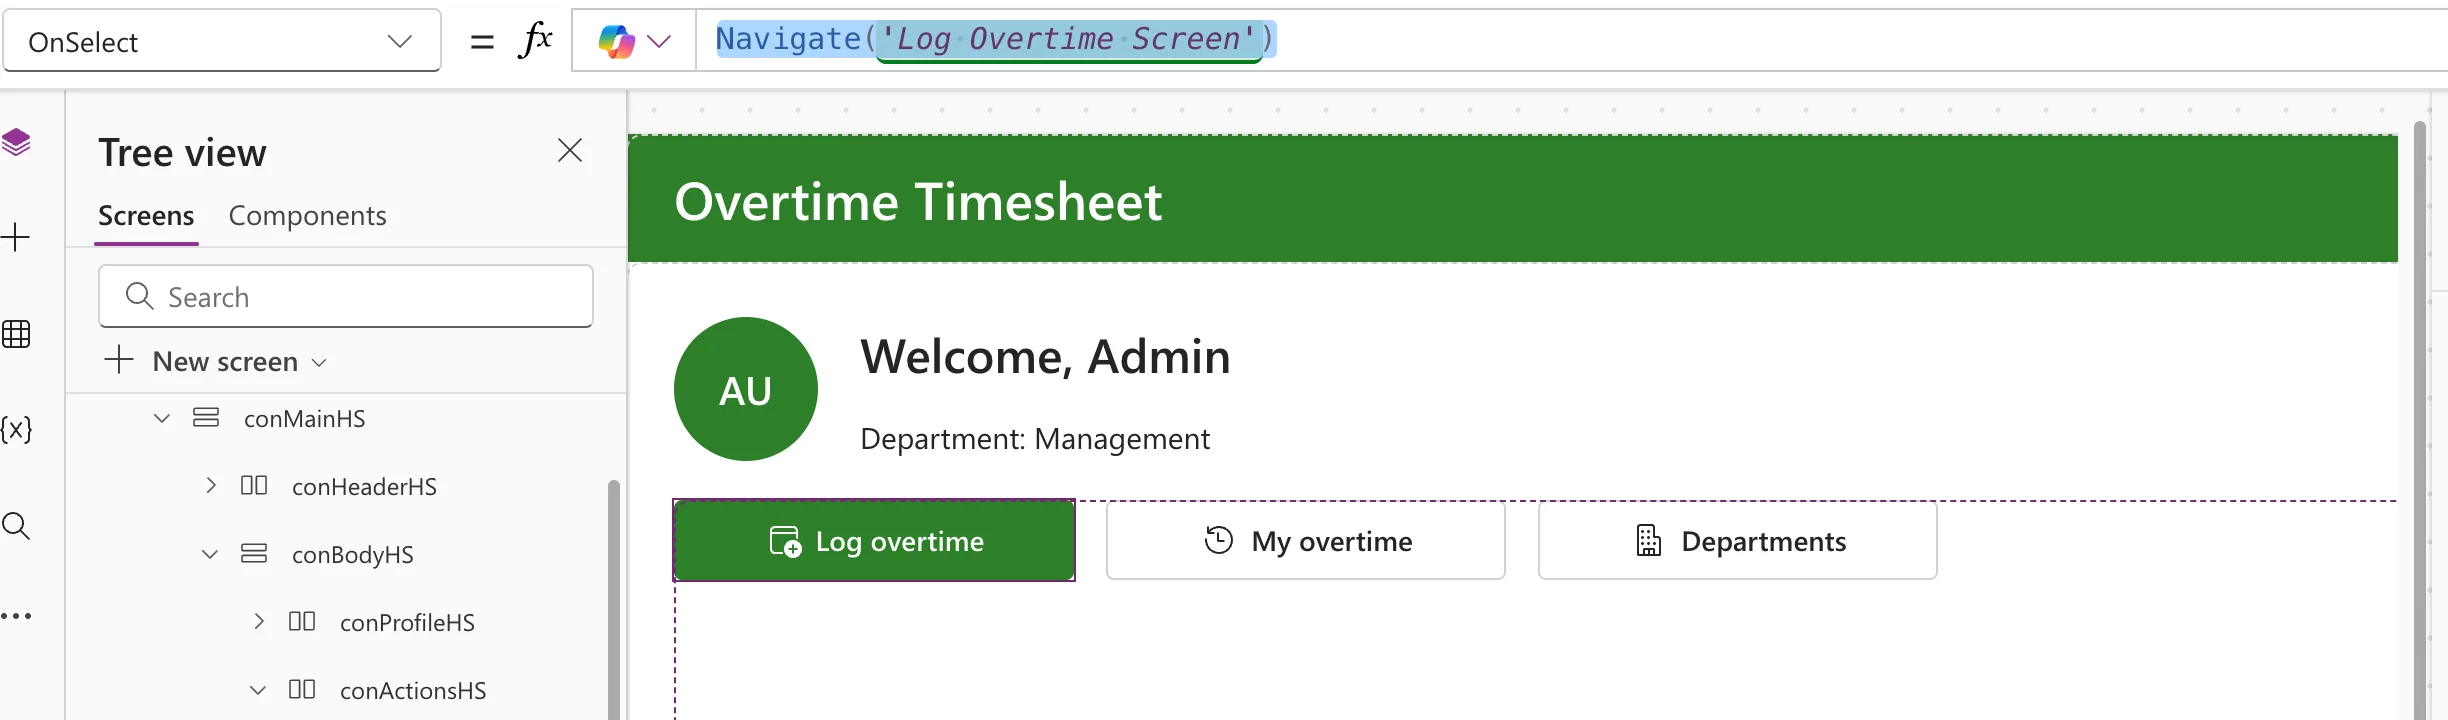
Step 13: Open the Screen from the Home Tile
On the Home screen, set the Log overtime tile's OnSelect, which Part 5 left as false (How to Go to Another Screen in Power Apps with Navigate):
Navigate('Log Overtime Screen')
Step 14: Index the EmployeeEmail Column
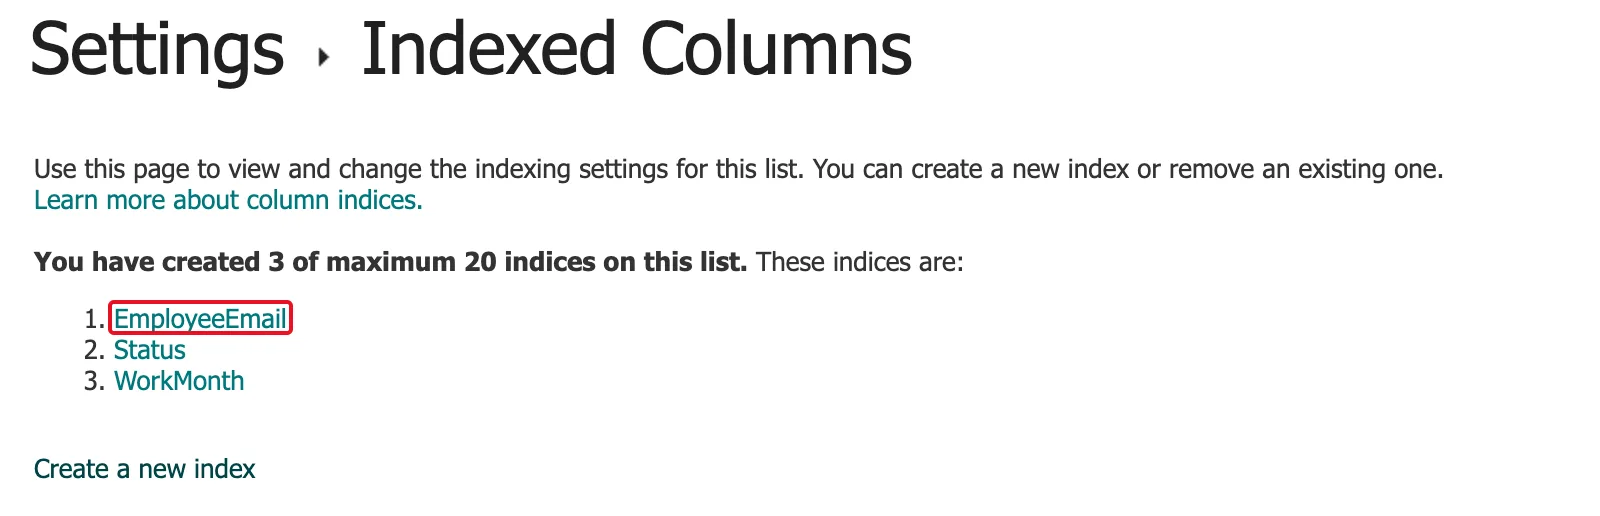
The overlap check filters OvertimeEntries on EmployeeEmail. SharePoint blocks a query that has to work through more than about 5,000 items, so the column needs an index before the list grows: How to Index a Column in a SharePoint List. In the list's Indexed columns settings, it joins Part 2's Status and WorkMonth:
Step 15: Log Some Overtime
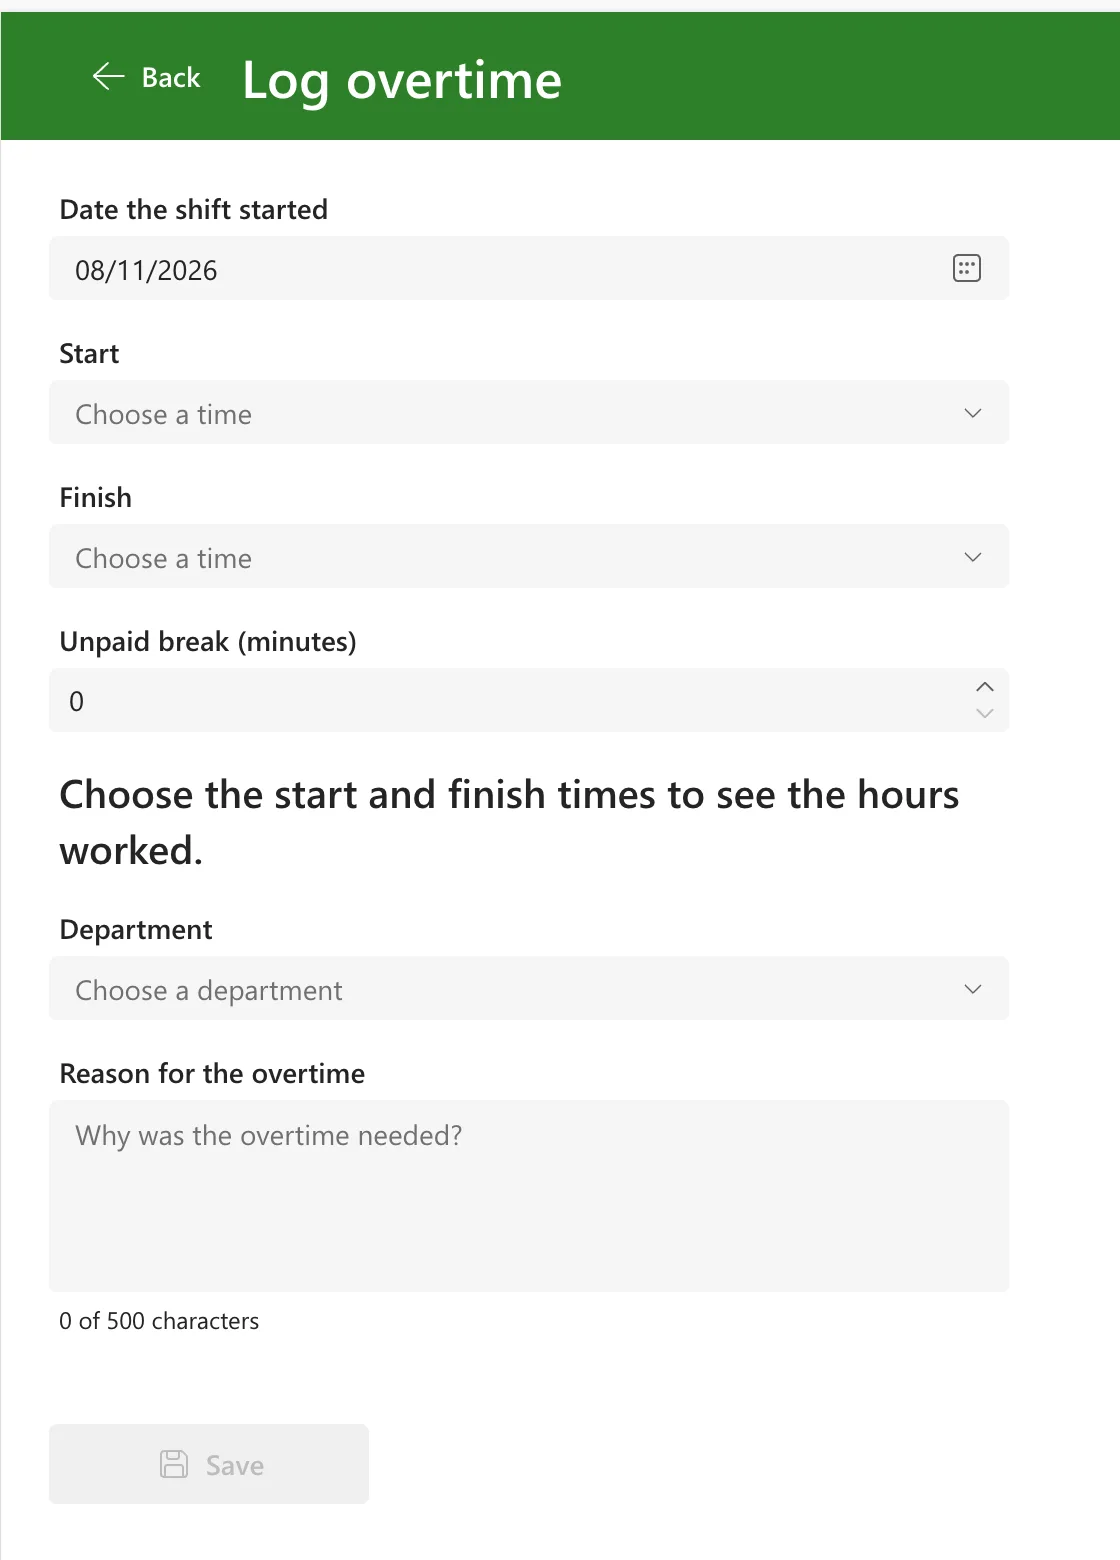
Select the Home screen and preview with F5 (How to Preview a Canvas App in Power Apps Studio), then select Log overtime. The form opens on today's date, with the times and department empty and Save disabled:
I logged three of the maker's shifts:
| Date | Start | Finish | Break | Department | Hours |
|---|---|---|---|---|---|
| 24/10/2026 | 22:00 | 06:00 | 60 | Emergency Department | 8.00 |
| 06/11/2026 | 17:00 | 20:30 | 0 | Radiology | 3.50 |
| 02/11/2026 | 18:00 | 21:00 | 0 | Emergency Department | 3.00 |
Each time, the app said Your overtime was saved. It's waiting for approval. and went back to the Home screen. During the third save, the button showed Saving... and was disabled, as Step 11 intends. In the OvertimeEntries list, after the first two, the new entries sit beside two earlier ones, with the night shift finishing on the 25th:
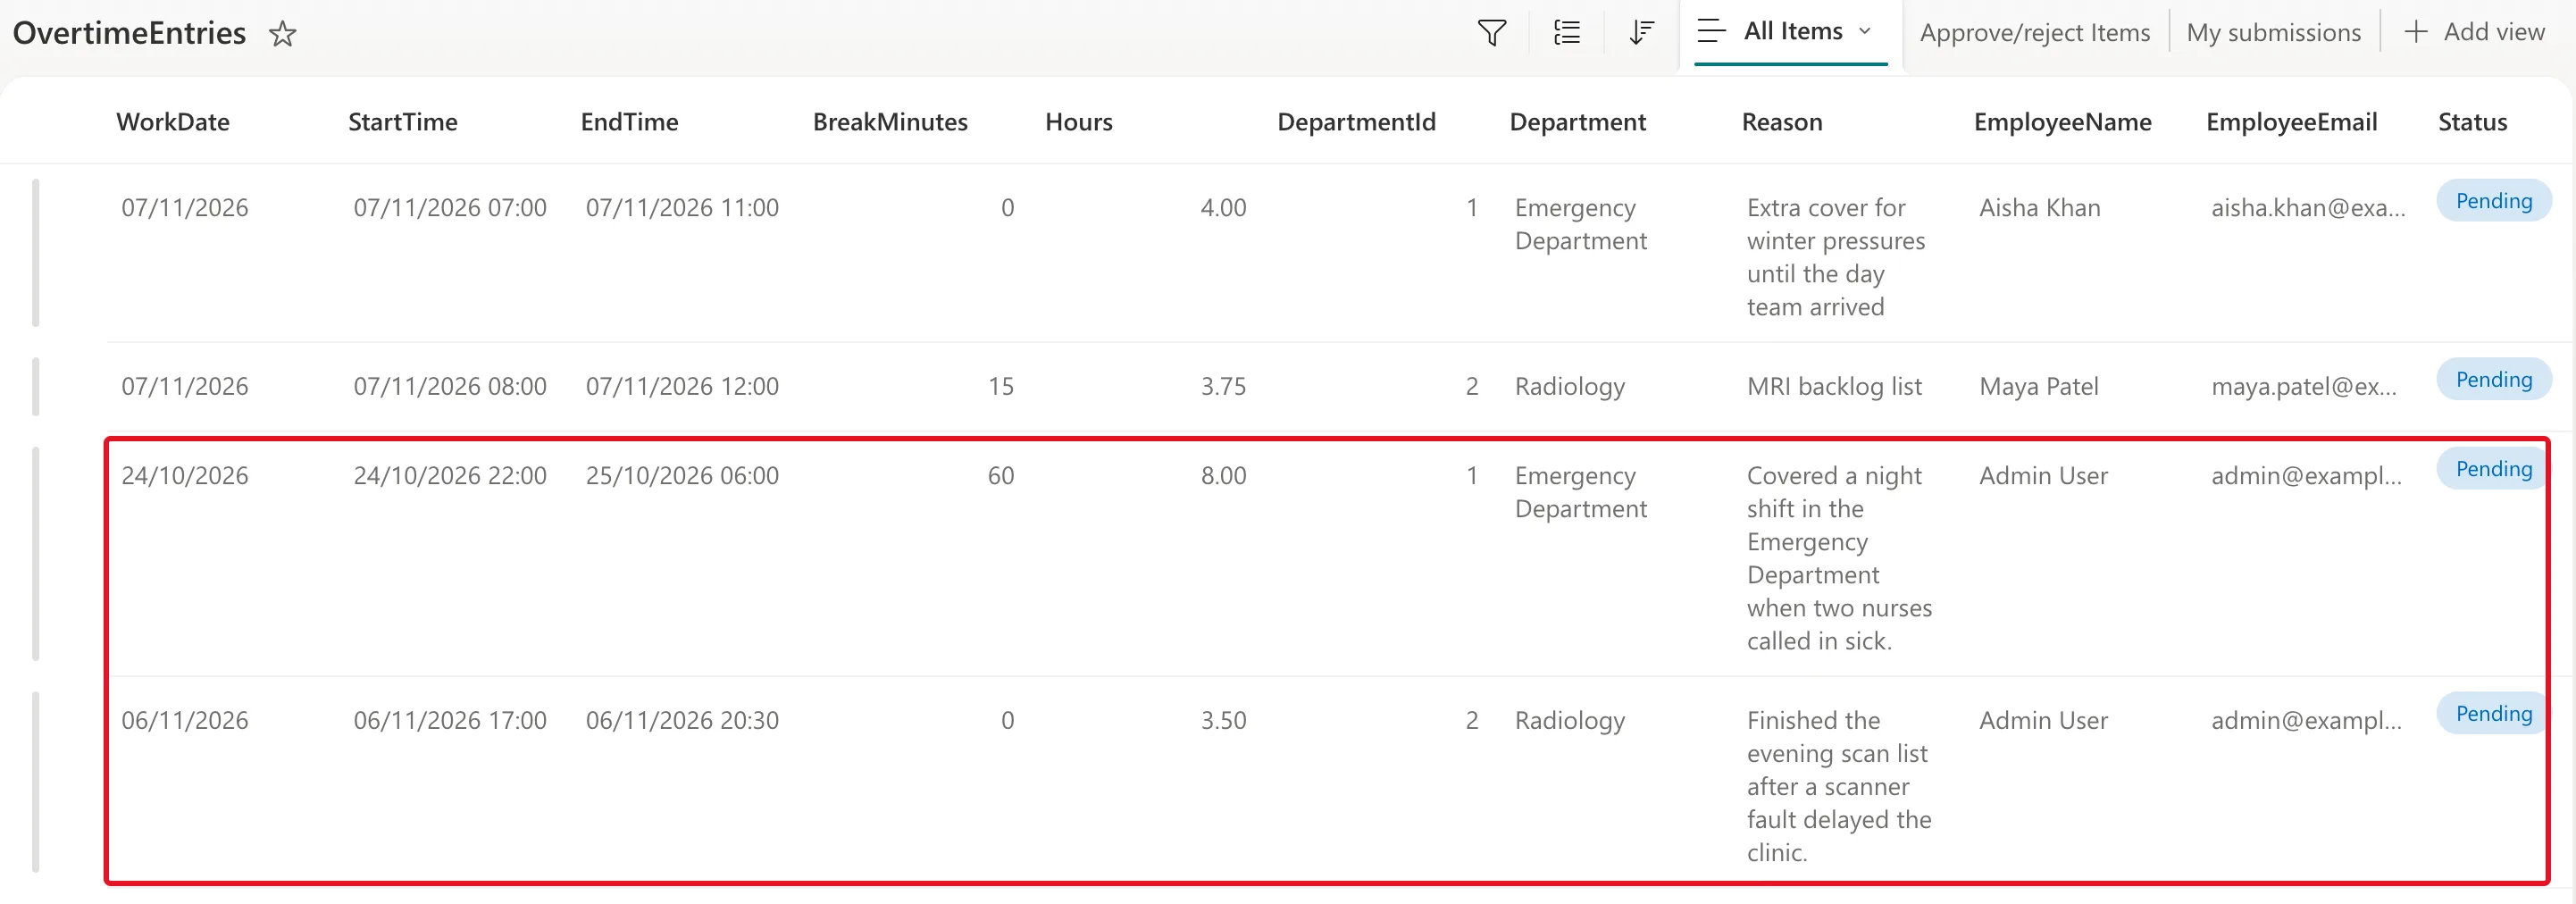
Logging 23:00 to 02:00 on 24 October afterwards showed the overlap message from Step 10, and Save stayed disabled.
Step 16: Check the Screen on a Phone
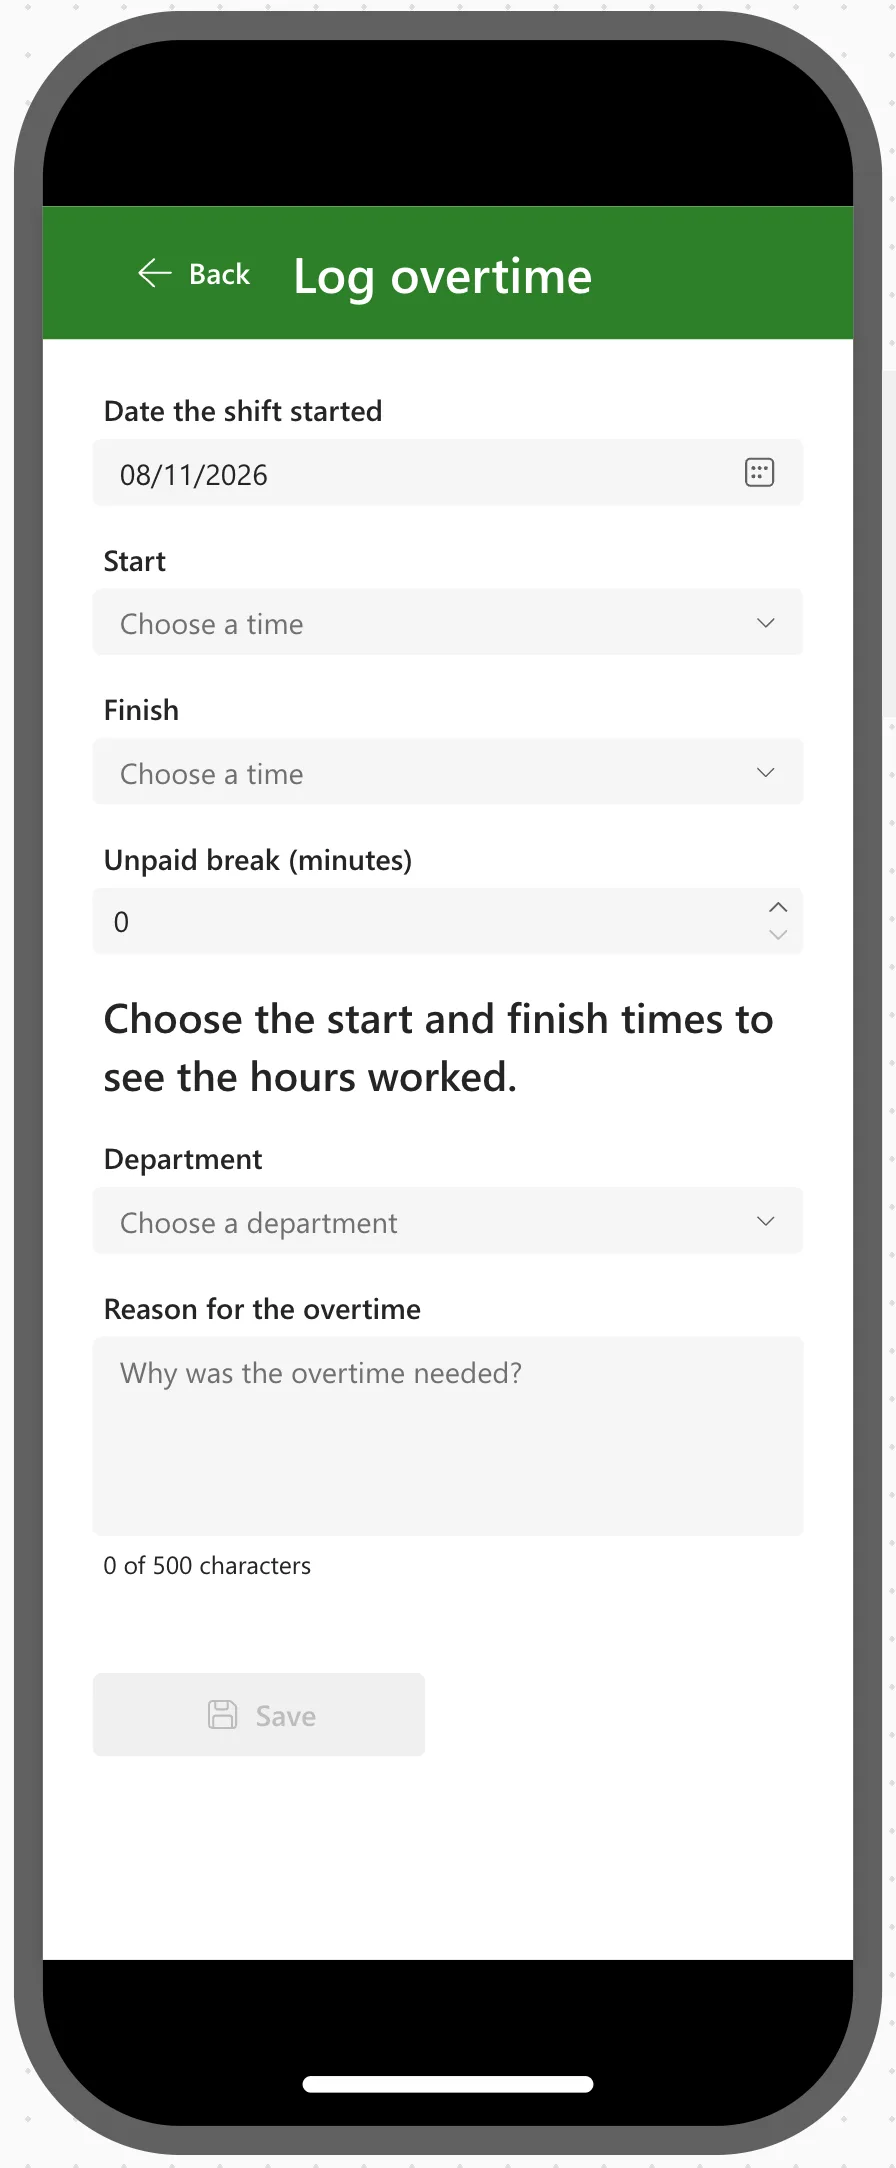
In Preview, choose Apple iPhone 12, 13, 14 (How to Test a Power Apps Canvas App on Phone and Tablet Sizes). The fields take the full width, and the body scrolls to Save:
Step 17: Run the App Checker
Open the App checker and select Accessibility. It lists four errors, the same two as in Part 5, now for both headings, lblTitleHS and lblTitleLO:
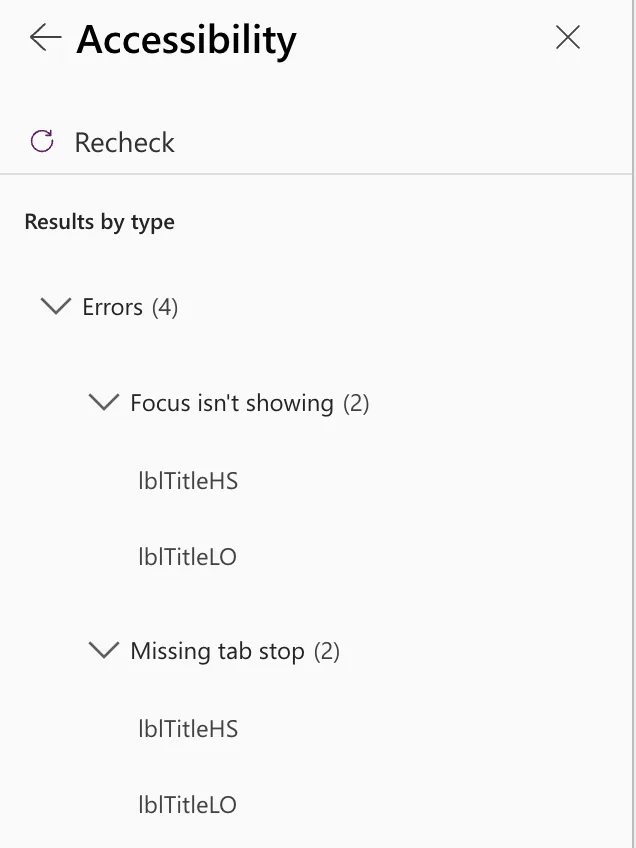
Leave them, for the reasons in Fixed: "Missing Tab Stop" in the Power Apps App Checker and Fixed: "Focus Isn't Showing" in the Power Apps App Checker. The form's controls added nothing. Formulas has no count, and Data source has none either, now that formulas use OvertimeEntries.
Step 18: Save the App
Select Save. Don't publish yet: nobody else can open the app until Part 15 shares it. The screen's controls in the Tree view:
Common Mistakes
| Mistake | What happens | Do this instead |
|---|---|---|
| Putting a night shift's finish on the start date | Negative hours, and SharePoint's validation rule doesn't allow it | ShiftEnd moves it to the next day |
Adding times to dates with + | Results that ignore the clock change | DateTime and DateDiff, as in Step 2 |
IsEmpty(cmbEndLO.SelectedItems) for "no finish yet" | Hours for a shift with no finish | IsBlank(cmbEndLO.Selected) |
| Relying on Defaults for Status | Status comes through blank | Status: {Value: "Pending"} in the Patch |
| No reset in OnVisible | The last entry's values appear in the next one | Reset every field |
| No index on EmployeeEmail | The overlap check fails once the list grows past the threshold | Index it, as in Step 14 |
Troubleshooting
| Symptom | Likely cause | Fix |
|---|---|---|
ShiftMinutes is underlined red | The functions aren't in App.Formulas, or the setting from Step 2 is off | Check both |
| The hours show for a shift with no finish | The formula uses IsEmpty | IsBlank(… .Selected) |
| Save stays disabled | A field is empty, or the problem message isn't | Read the message; check each field |
| The department list is empty | No department has IsActive set to Yes | Check the Departments list |
| Times in SharePoint differ from the app | The site's time zone isn't the users' | Part 2's site settings: London time |
| Your overtime wasn't saved | SharePoint refused the entry; the message says why | Fix what it names and save again |
FAQ
Can people edit an entry after saving it?
Yes, until it's approved. Part 7 builds My Overtime, where people see their entries, and its Edit button opens one on this screen to change it.
What about a shift that starts before midnight and finishes after?
That's one entry: choose the date it started and the finish time, and ShiftEnd puts the finish on the next day. A shift from 23:00 to 02:00 is 3 hours on most nights, and 4 on the night the clocks go back.
Why can't people log tomorrow's shift in advance?
Overtime is logged after it's worked: the date picker stops at today, and a shift that hasn't finished yet gets This shift hasn't finished yet. Log it after it ends.
Does this need premium licenses?
No. The screen uses SharePoint and Office 365 Users, both standard connectors, and the app's license designation stays Standard.
Conclusion
People can now log overtime:
- a Log Overtime screen with the date, start and finish times, unpaid break, department and reason, in UK formats and on phones;
- four functions in App.Formulas that turn a date and two times into a real start and finish, so the hours are right across midnight and clock changes, and check each shift against five rules;
- a Save button that's enabled only for a complete, valid entry, can't save twice, and writes the shift to OvertimeEntries with Pending status;
- an index on EmployeeEmail for the overlap check.
Part 7 builds My Overtime: each person's entries by month, with weekly and monthly totals, and editing until an entry is approved.
Additional Resources
- App object: user-defined functions: the functions in Step 2.
- DateAdd, DateDiff, and TimeZoneOffset functions: adding a day and counting minutes.
- Date Picker modern control and Combo box modern control.
- Power Apps delegable functions and operations for SharePoint: what the overlap check asks SharePoint to do.
- Patch function: creating the entry.
← Previous: Part 5: Build the Home Screen Next → Part 7: Build the My Overtime Screen
