Build an Overtime Timesheet App in Power Apps — Part 5: Build the Home Screen

The app gets its first real screen in this part. The Home screen greets the signed-in person, shows their department and, if they approve overtime, which departments they approve for. Its tiles depend on the person's role: everyone can log overtime, but only approvers, payroll staff and admins see the screens meant for them.
This is Part 5 of a 20-part series.
- Part 1: Plan the App and Set Up the Demo Organization
- Part 2: Create the SharePoint Site and Lists
- Part 3: Keep Overtime Private with SharePoint Permissions
- Part 4: Create the Solution, Environment Variables and Canvas App
- Part 5: Build the Home Screen (you are here)
- Part 6: Build the Log Overtime Screen
- Part 7: Build the My Overtime Screen
- Part 8: Build the Approval Flow for Teams and Outlook
- Part 9: Show Approvers What's Waiting (coming soon)
- Part 10: Build the Departments Screen (coming soon)
- Part 11: Build the Reports Screen (coming soon)
- Part 12: Import the Old Excel Timesheet (coming soon)
- Part 13: Create the Monthly Payroll Workbook with Office Scripts (coming soon)
- Part 14: Build the Power BI Overtime Report (coming soon)
- Part 15: Share the App and Add It to Microsoft Teams (coming soon)
- Part 16: Test Every Role and Department (coming soon)
- Part 17: Build a Setup Flow That Creates the Lists (coming soon)
- Part 18: Run the Solution Checker and Export the Solutions (coming soon)
- Part 19: Install the App in a New Environment (coming soon)
- Part 20: Recap, Production Checklist and Next Steps (coming soon)
Part 4 left an empty app connected to the lists. This part decides how the app recognizes each role, writes that down once as named formulas, and builds the screen on top. Each generic task has its own guide; this part gives the values for this app, and why.
What You'll Build
| Who | How the app knows | Tiles they see |
|---|---|---|
| Everyone | Signed in | Log overtime, My overtime |
| Approvers | Named in a department's Approvers column | Plus Waiting for approval and Reports |
| Payroll staff | Members of the Overtime Payroll group | Plus Reports |
| Admins | Members of the Overtime Admins group | Plus Departments |
The tiles don't open anything yet: each later part builds a screen and points its tile at it.
Prerequisites
- Part 4 completed: the solution, its environment variables, and the canvas app with its data sources.
- The guides this part relies on. Each step says which one to follow:
- How to Find a Group's Object ID in Microsoft Entra
- How to Store App Settings in a SharePoint List for Power Apps
- How to Add the Office 365 Groups Connector to a Canvas App in Power Apps
- How to Use Named Formulas in Power Apps (App.Formulas)
- How to Check If the Current User Is in a SharePoint Person Column in Power Apps
- How to Check If the Current User Is in a Security Group in Power Apps
- How to Rename a Screen or Control in Power Apps and How to Set the Start Screen in Power Apps with App.StartScreen
- How to Add a Vertical Container in Power Apps and How to Add a Horizontal Container in Power Apps
- How to Add a Heading for Screen Readers in Power Apps, How to Add an Avatar Control in Power Apps and How to Add a Text Control in Power Apps
- How to Add a Button in Power Apps and How to Add an Icon to a Button in Power Apps
- How to Wrap Controls onto the Next Row in a Horizontal Container in Power Apps
- How to Apply a Modern Theme in Power Apps
How the App Recognizes Each Role
Three roles, three sources of truth:
- Approvers are already in SharePoint: Part 2's Departments list names each department's approvers in its Approvers column. The app checks whether the signed-in person's email is in that column for any active department.
- Payroll staff and admins are the members of two security groups from Part 1, Overtime Payroll and Overtime Admins. The standard Office 365 Groups connector lists a group's members.
- The groups' IDs differ for every organization that installs the app, so they can't be typed into formulas. Environment variables would be the usual home for them, but the documented way for a canvas app to read a text environment variable is the Dataverse connector, which is premium, and this app runs on standard licenses. They go in a small SharePoint list, Settings, instead: How to Store App Settings in a SharePoint List for Power Apps explains the choice.
Showing or hiding a tile doesn't protect anything: Part 3's SharePoint permissions do that. The tiles only keep the app tidy for each role.
Step 1: Create the Settings List
On the Overtime Timesheet site, follow How to Store App Settings in a SharePoint List for Power Apps, Steps 1 to 6:
| Setting | Value |
|---|---|
| List name | Settings, not in the site navigation |
| Columns | Title, required and unique; Value, single line of text, required |
| List description | Settings for the Overtime Timesheet app, such as the IDs of the payroll and admins groups. Only site owners can change them. |
| Permissions | Unique: Overtime Timesheet Owners with Full Control, Overtime Timesheet Visitors with Read |
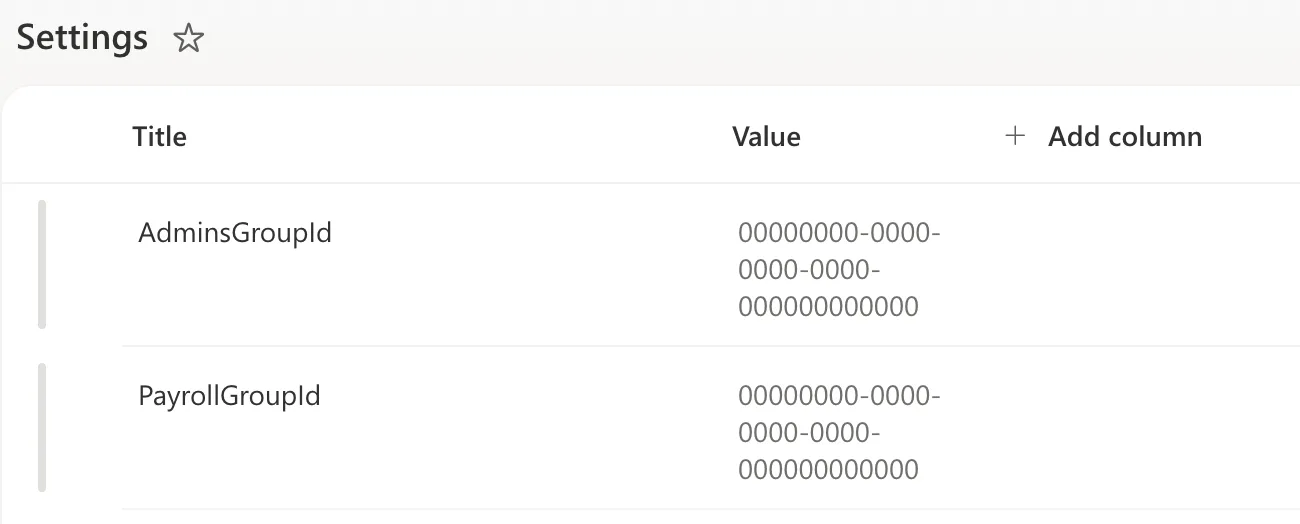
| Items | PayrollGroupId and AdminsGroupId, each with its group's Object ID |
The Object IDs come from each group's Overview in Microsoft Entra: How to Find a Group's Object ID in Microsoft Entra. Staff can read the list through Visitors, as Part 3 set up for the whole site, and only owners can change it. The list holds both settings (IDs masked):
Step 2: Add an Environment Variable for the List
Open the Overtime Timesheet solution and add a fifth variable, as in Part 4, with How to Create Environment Variables for a SharePoint Site and List in Power Apps:
| Display name | Name | Parameter Type | Site | Current list | Description |
|---|---|---|---|---|---|
| Settings | dewiride_SettingsList | List | Overtime Timesheet Site | Settings | The SharePoint list of app settings, such as the IDs of the payroll and admins groups. |
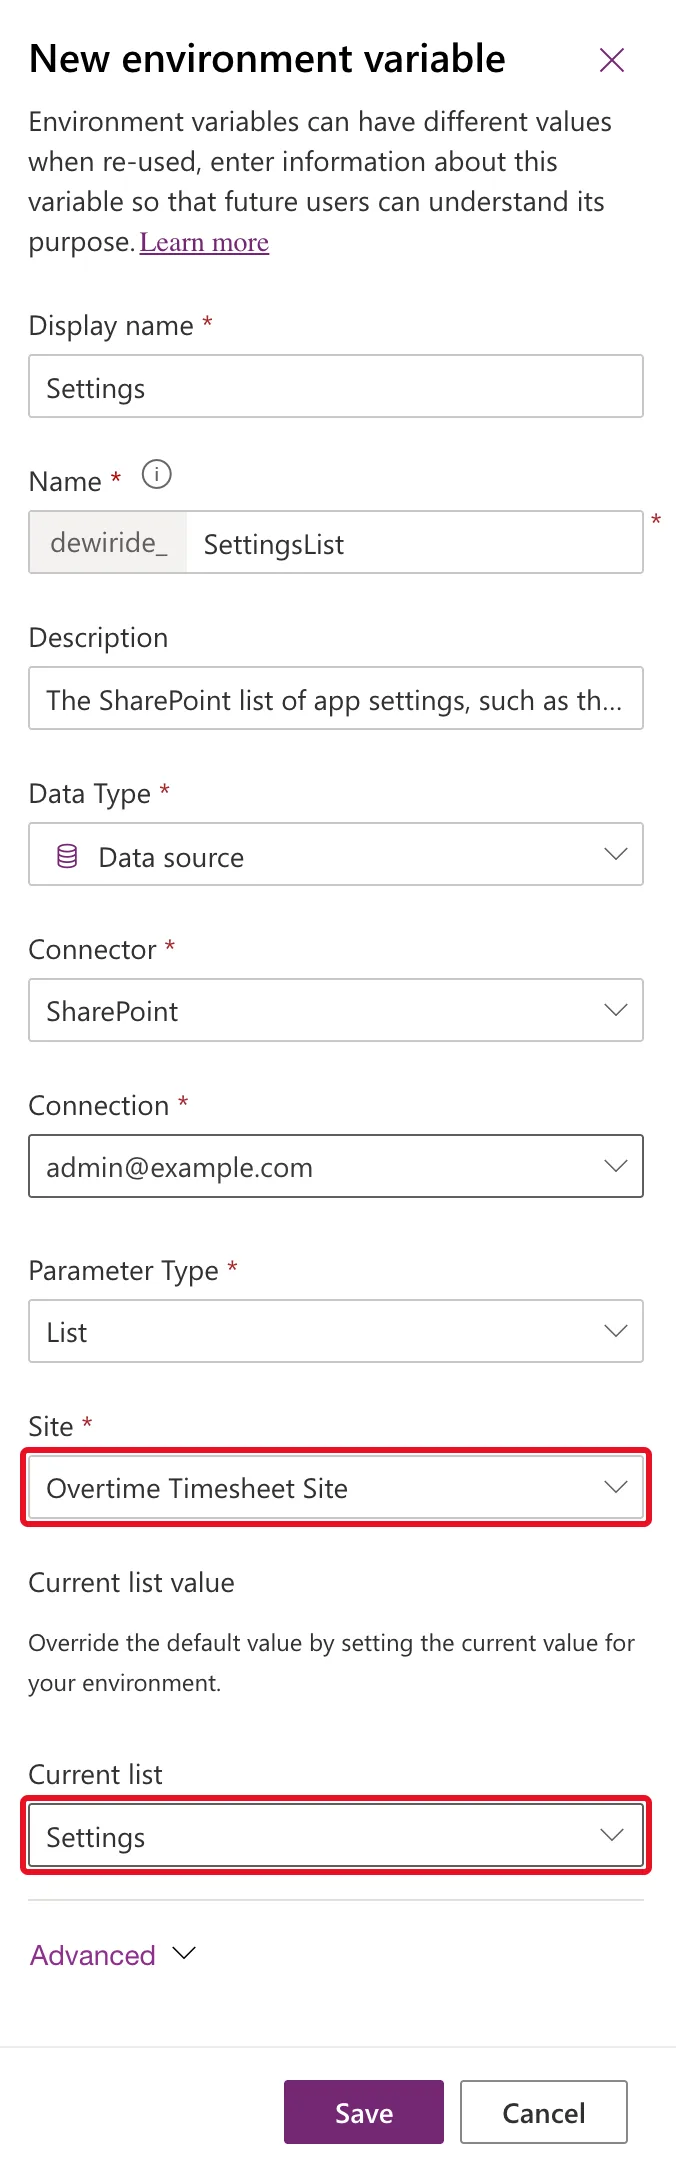
Leave Default Value empty, like the others, so whoever installs the solution chooses their own list.
Step 3: Add the Settings List and Office 365 Groups to the App
Open the app in Studio from the solution and add two data sources:
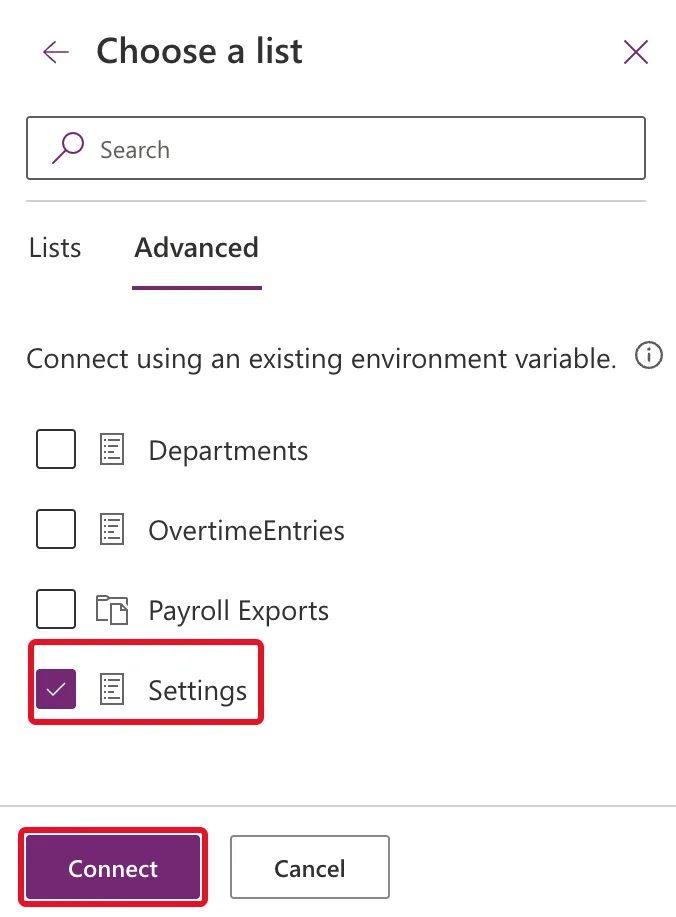
- Settings, through its variable: How to Connect a Canvas App to SharePoint Lists with Environment Variables. Choose Overtime Timesheet Site on the Advanced tab, then tick Settings on the second Advanced tab:
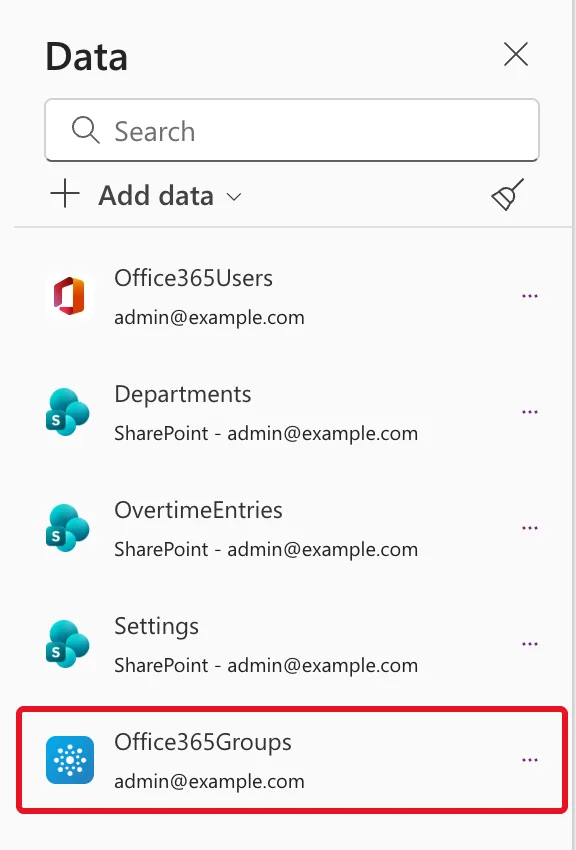
- Office 365 Groups: How to Add the Office 365 Groups Connector to a Canvas App in Power Apps. It's a standard connector, so the app's license designation stays Standard.
The Data pane now lists five sources:
Step 4: Write the Named Formulas
Named formulas are values the whole app can use, calculated when something needs them (How to Use Named Formulas in Power Apps). Select App in the Tree view, choose Formulas in the property list, and enter these, in four groups.
The app and the person:
AppTitle = "Overtime Timesheet";
MyProfile = Office365Users.MyProfileV2({'$select': "id,displayName,givenName,mail,userPrincipalName,jobTitle,department"});
MyEmail = Coalesce(MyProfile.mail, MyProfile.userPrincipalName);
MyDepartment = Trim(MyProfile.department);
AppTitleis the header's text, in one place.MyProfilereads the person's Microsoft 365 profile once, only the fields the app uses, includingidfor the group checks anddepartmentfor the screen: How to Get the Current User's Profile and Job Title in Power Apps (MyProfileV2).MyEmailfalls back to the sign-in name for an account without an email address (Coalesce).MyDepartmentdrops stray spaces from the profile's department, so it matches the Departments list later (Trim).
Approvers, from the Departments list:
MyApproverDepartments = With(
    {ActiveDepartments: Filter(Departments, IsActive = true)},
    Concat(Filter(ActiveDepartments, MyEmail in Approvers.Email), Department, ", ")
);
IsApprover = !IsBlank(MyApproverDepartments);
SharePoint returns the active departments, and the app checks each one's Approvers for the person's email. The result is text, the names of the departments they approve, and IsApprover is true when it isn't blank: How to Check If the Current User Is in a SharePoint Person Column in Power Apps.
My first version was a single Filter(Departments, IsActive = true, MyEmail in Approvers.Email) returning a table, and Studio raised two delegation warnings. Each has its own post, with what I checked and why the version above clears it:
- Fixed: Delegation Warning. The Highlighted Part of This Formula Might Not Work Correctly on Large Data Sets
- Fixed: Delegation Warning. The Named Formula Is Not Delegable So Its Usage in This Formula Might Not Work Correctly on Large Data Sets
The group IDs, from the Settings list:
PayrollGroupId = LookUp(Settings, Title = "PayrollGroupId").Value;
AdminsGroupId = LookUp(Settings, Title = "AdminsGroupId").Value;
Payroll and admins, from the two groups:
IsPayroll = IfError(
    MyProfile.id in Office365Groups.ListGroupMembers(PayrollGroupId, {'$top': 999}).value.id,
    false
);
IsAdmin = IfError(
    MyProfile.id in Office365Groups.ListGroupMembers(AdminsGroupId, {'$top': 999}).value.id,
    false
);
Each asks for up to 999 of the group's members and checks whether the person's ID is among them. If anything fails, such as a missing setting, the answer is false, so the app shows less rather than more: How to Check If the Current User Is in a Security Group in Power Apps.
Here's all of App.Formulas:
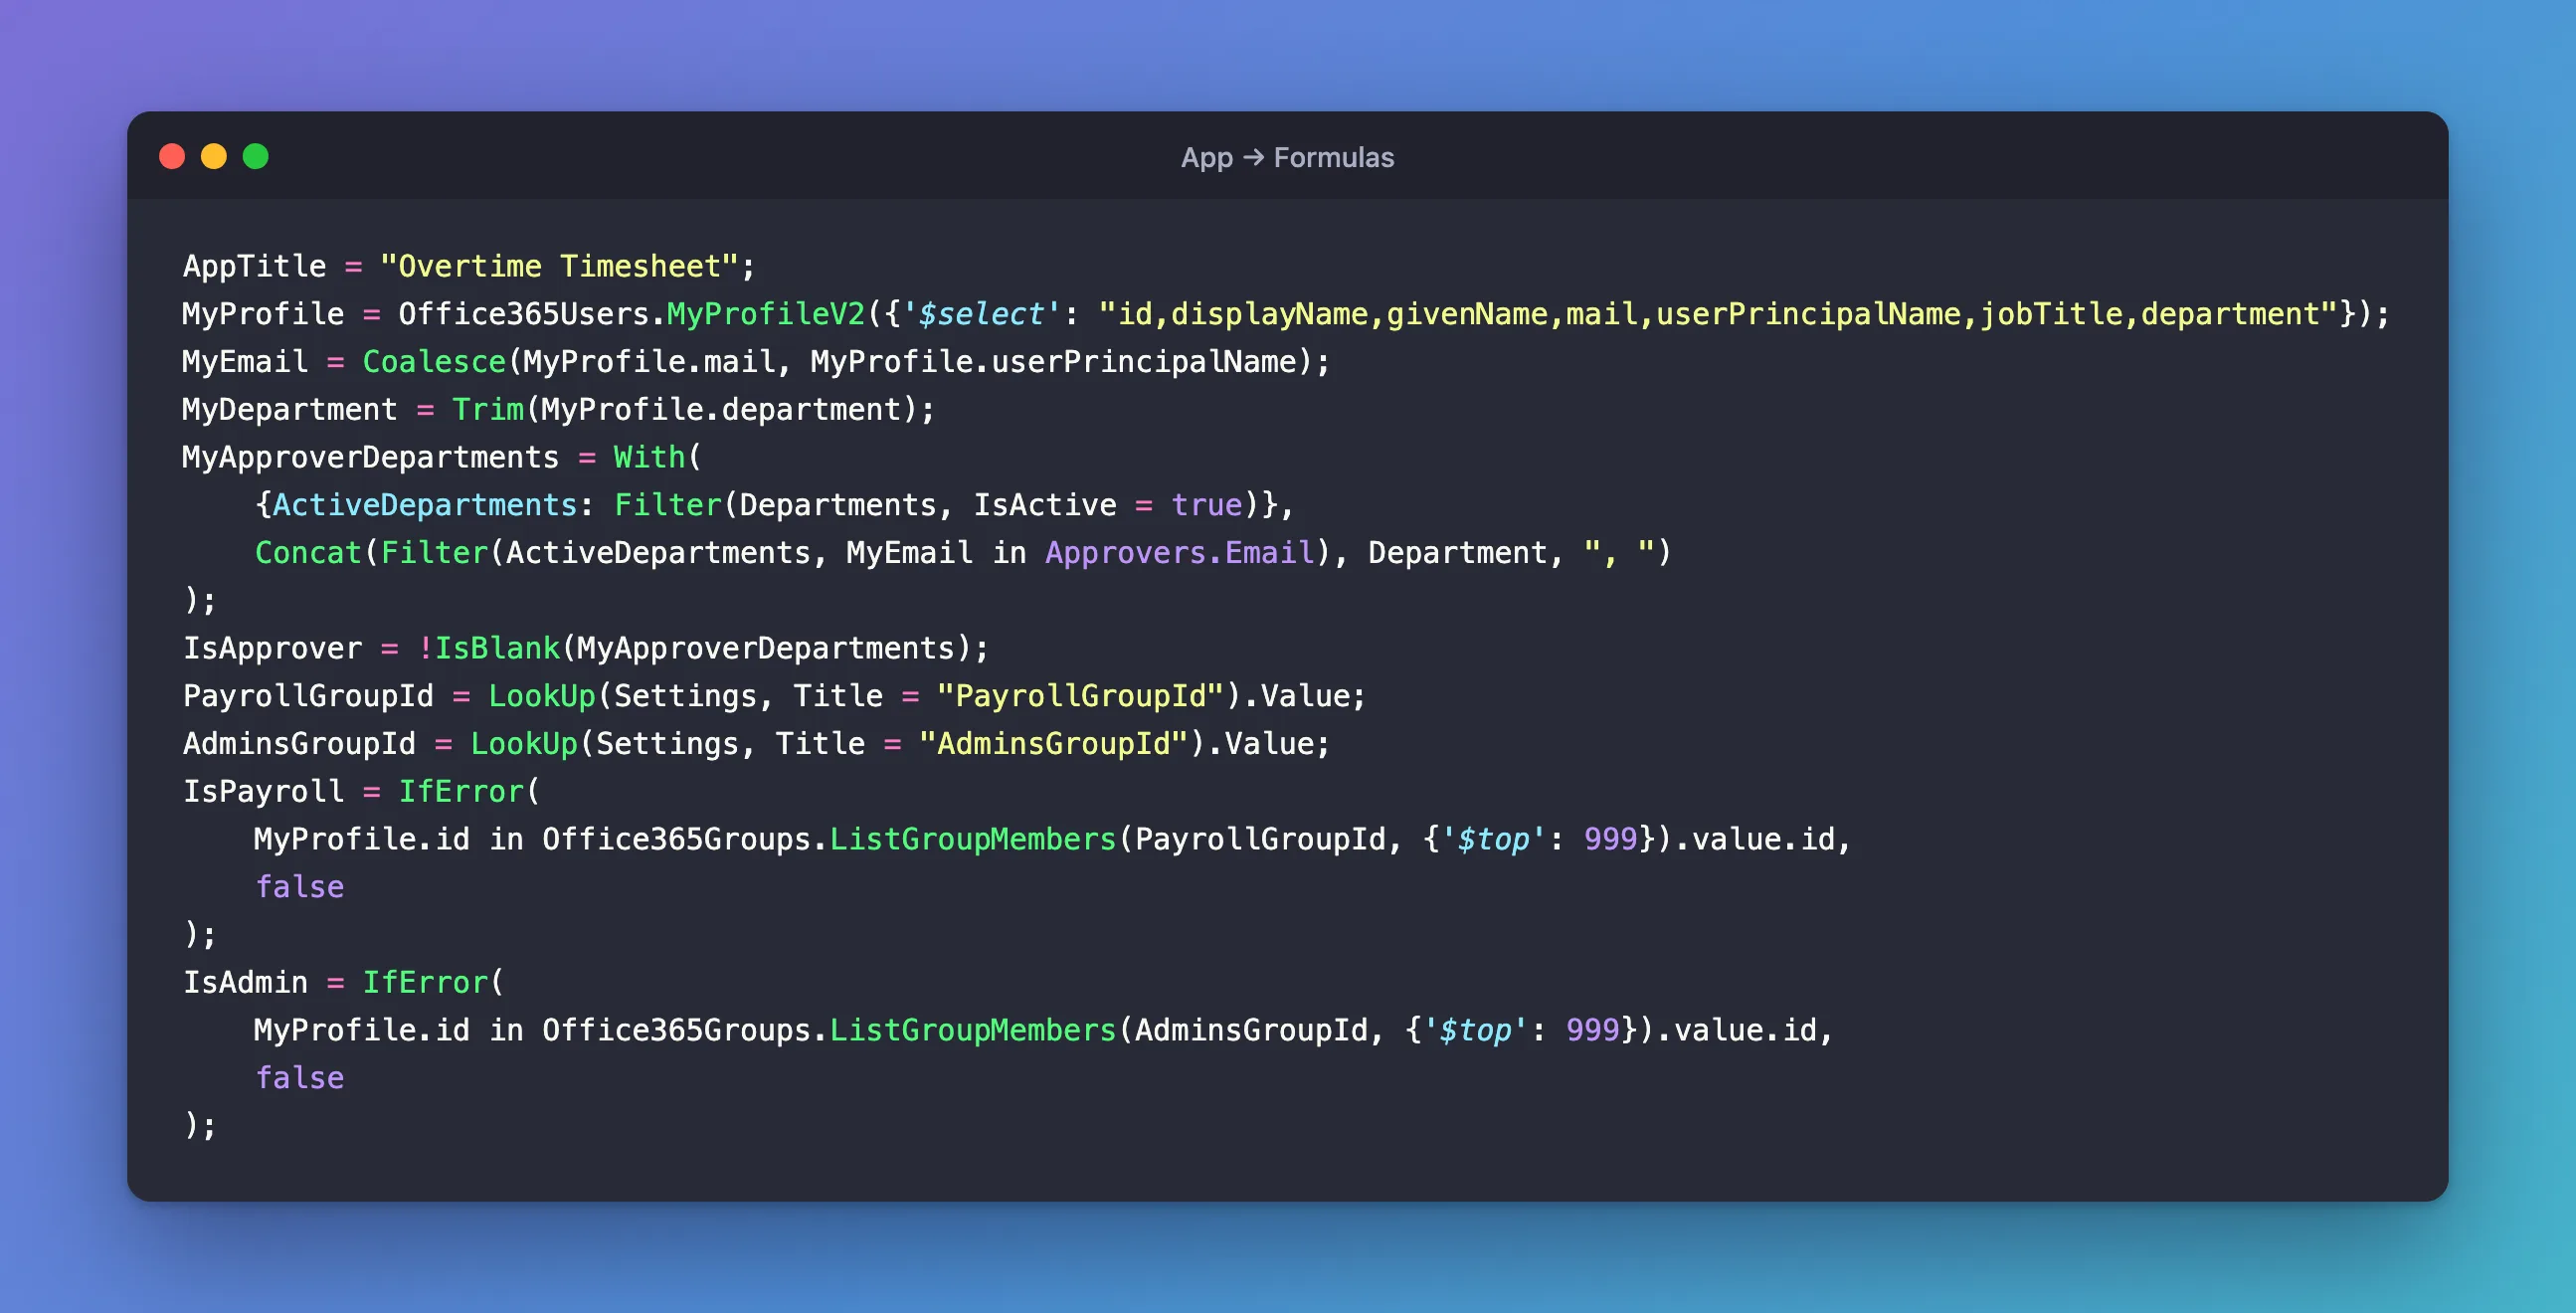
AppTitle = "Overtime Timesheet";
MyProfile = Office365Users.MyProfileV2({'$select': "id,displayName,givenName,mail,userPrincipalName,jobTitle,department"});
MyEmail = Coalesce(MyProfile.mail, MyProfile.userPrincipalName);
MyDepartment = Trim(MyProfile.department);
MyApproverDepartments = With(
    {ActiveDepartments: Filter(Departments, IsActive = true)},
    Concat(Filter(ActiveDepartments, MyEmail in Approvers.Email), Department, ", ")
);
IsApprover = !IsBlank(MyApproverDepartments);
PayrollGroupId = LookUp(Settings, Title = "PayrollGroupId").Value;
AdminsGroupId = LookUp(Settings, Title = "AdminsGroupId").Value;
IsPayroll = IfError(
    MyProfile.id in Office365Groups.ListGroupMembers(PayrollGroupId, {'$top': 999}).value.id,
    false
);
IsAdmin = IfError(
    MyProfile.id in Office365Groups.ListGroupMembers(AdminsGroupId, {'$top': 999}).value.id,
    false
);
Open Variables (the {x} icon on the left) to see their values for you. For the maker, IsAdmin is true, IsApprover and IsPayroll are false, and MyDepartment is Management (the IDs and email are masked here):
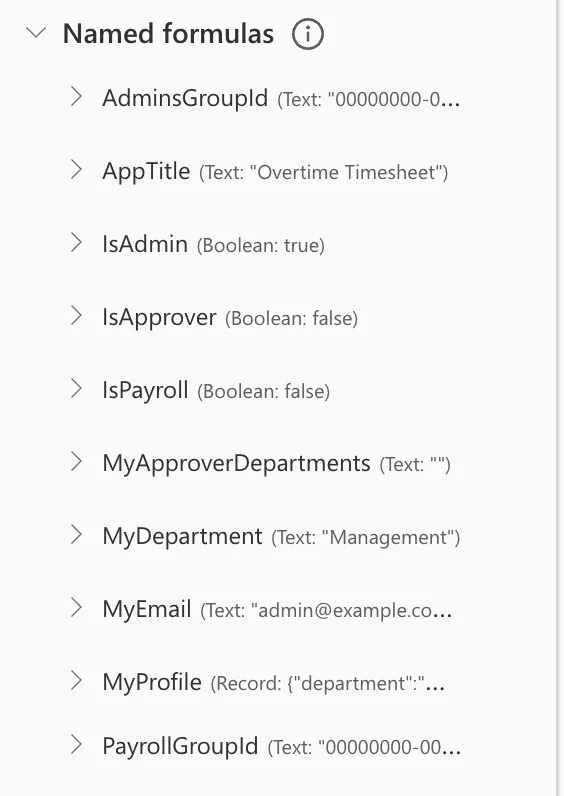
In the example, after Format text in the expanded formula bar, the editor went blank, and later App.Formulas was missing the two approver formulas. Leaving Studio, opening the app again and entering the formulas once more fixed it; I didn't find the cause. Read the whole list once more before you save.
Step 5: Rename the Screen and Make It the Start Screen
Rename Screen1 to Home Screen (How to Rename a Screen or Control in Power Apps):
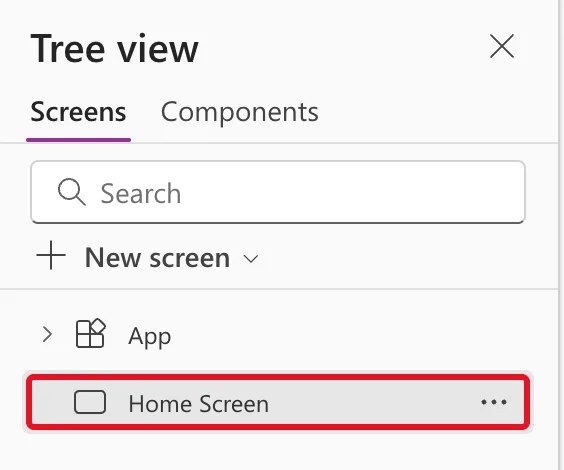
Screen readers announce a screen's name when it opens, and the App checker suggests a better one while it's still Screen1: Fixed: "Revise Screen Name" in the Power Apps App Checker. Then select App and set StartScreen (How to Set the Start Screen in Power Apps with App.StartScreen):
'Home Screen'
The app opens on the Home screen whatever screens later parts add.
Step 6: Build the Layout
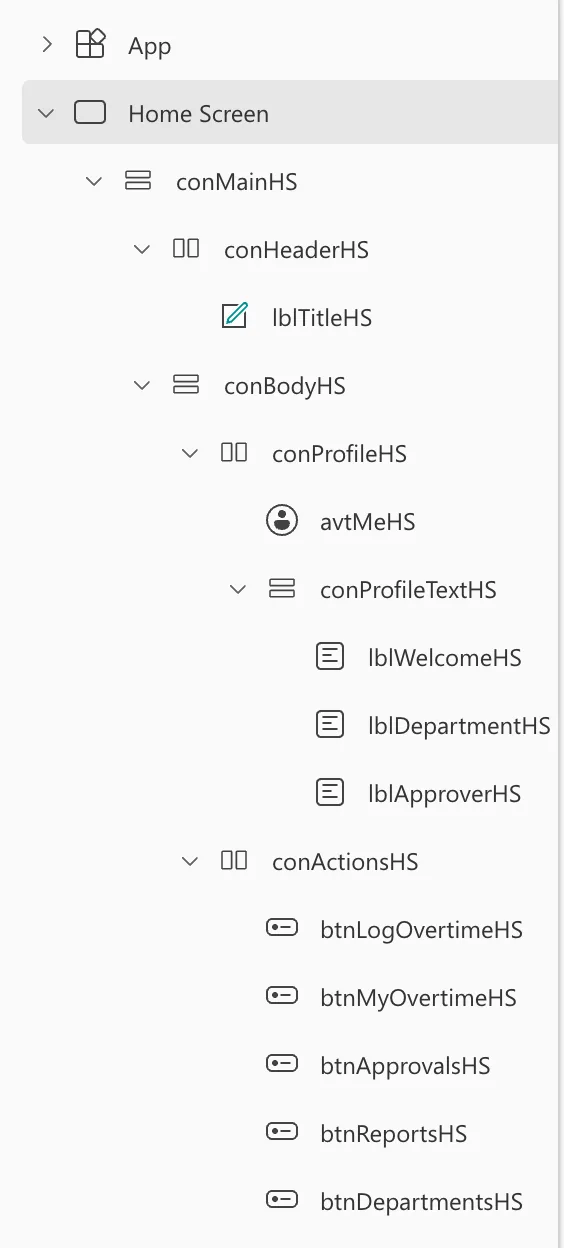
Containers arrange the controls and resize with the window. This is the screen's tree, with the suffix HS for Home Screen on every name (Power Apps Naming Conventions for Screens, Controls and Formulas):
Home Screen
└─ conMainHS                vertical: fills the screen
   ├─ conHeaderHS           horizontal: the header
   │  └─ lblTitleHS         the app's name, the screen's main heading
   └─ conBodyHS             vertical: everything below the header
      ├─ conProfileHS       horizontal: the profile row
      │  ├─ avtMeHS         initials or photo
      │  └─ conProfileTextHS    vertical: the lines of text
      │     ├─ lblWelcomeHS
      │     ├─ lblDepartmentHS
      │     └─ lblApproverHS
      └─ conActionsHS       horizontal: the tiles, wrapping on phones
         ├─ btnLogOvertimeHS
         ├─ btnMyOvertimeHS
         ├─ btnApprovalsHS
         ├─ btnReportsHS
         └─ btnDepartmentsHS
The containers. Insert each one inside its parent and rename it:
| Container | Type | Settings |
|---|---|---|
conMainHS | Vertical | X, Y 0; Width Parent.Width; Height Parent.Height; Align (horizontal) Stretch; Padding 0; Drop shadow None; Border radius 0 |
conHeaderHS | Horizontal | Flexible height Off, Height 64; Fill App.Theme.Colors.Primary; Align (vertical) Center; Padding left and right 24, top and bottom 0; Drop shadow None; Border radius 0 |
conBodyHS | Vertical | Flexible height On; Align (horizontal) Stretch; Gap 16; Padding 24; Vertical overflow Scroll; Drop shadow None; Border radius 0 |
conProfileHS | Horizontal | Flexible height Off, Height from the formula below; Gap 16; Align (vertical) Center; Padding 0; Drop shadow None; Border radius 0 |
conProfileTextHS | Vertical | Flexible width On, fill portions 1; Gap 4; Align (horizontal) Stretch; Justify (vertical) Center; Padding 0; Drop shadow None; Border radius 0 |
conActionsHS | Horizontal | Flexible height On, fill portions 1; Gap 16; Align (vertical) Start; Horizontal and Vertical overflow Hide; Wrap On; Padding 0; Drop shadow None; Border radius 0 |
The header's color is the theme's main color, so it follows the theme in Step 7 (How to Use Theme Colors and Fonts in Power Apps Formulas). The body scrolls when it doesn't fit. The tiles' row fills the rest of the screen and moves tiles onto new rows when they don't fit across: How to Wrap Controls onto the Next Row in a Horizontal Container in Power Apps.
The heading. Inside conHeaderHS, insert Classic → Text label, lblTitleHS. It's the classic label because it has Role, which tells screen readers this is the screen's main heading: How to Add a Heading for Screen Readers in Power Apps.
| Property | Value |
|---|---|
| Text | AppTitle |
| Role | TextRole.Heading1, set in the formula bar |
| Color | Color.White |
| Font | App.Theme.Font |
| Size | If(App.ActiveScreen.Size = ScreenSize.Small, 18, 20) |
| FontWeight | FontWeight.Semibold |
| Flexible width | On, fill portions 1 |
| Height | 40 |
| PaddingLeft | 0 |
| TabIndex | -1 |
The profile row. Inside conProfileHS, insert Display → Avatar, avtMeHS (How to Add an Avatar Control in Power Apps):
| Property | Value |
|---|---|
| Image | If(Office365Users.UserPhotoMetadata(User().Email).HasPhoto, User().Image) |
| Name | User().FullName |
| Badge | Blank() |
| Width, Height | 72, 72 |
| AccessibleLabel | "Profile picture of " & User().FullName |
The Image formula uses a photo only when there is one, so people without a photo see their initials, not a grey person icon: Fixed: Power Apps Avatar Shows Grey Person Icon Instead of Initials.
Inside conProfileTextHS, insert three Display → Text controls (How to Add a Text Control in Power Apps) with Auto height on and AccessibleLabel Self.Text:
"Welcome, " & Coalesce(MyProfile.givenName, MyProfile.displayName)
If(
    IsBlank(MyDepartment),
    "Your Microsoft 365 profile has no department. You can still choose one each time you log overtime.",
    "Department: " & MyDepartment
)
"You approve overtime for " & MyApproverDepartments & "."
IsApprover
A profile without a department gets a sentence instead of an empty line (If), and the approver line shows only for approvers (Visible).
conProfileHS has a fixed height, so it needs a formula that grows with its text, and leaves out the approver line when it's hidden:
Max(
    avtMeHS.Height,
    lblWelcomeHS.Height + lblDepartmentHS.Height + conProfileTextHS.LayoutGap
        + If(lblApproverHS.Visible, lblApproverHS.Height + conProfileTextHS.LayoutGap, 0)
)
Max takes the larger of the avatar and the text column (How to Get the Largest Value in Power Apps with Max). Without it, wrapped text on a phone would be cut off: Fixed: Text Cut Off Inside a Container on Small Screens. For the maker, with the approver line hidden, it comes to 79.
The tiles. Inside conActionsHS, add two buttons, btnLogOvertimeHS and btnMyOvertimeHS, and set them up. Then copy btnMyOvertimeHS and paste it three times for the role tiles, renaming each copy (How to Copy and Paste Controls Between Screens in Power Apps):
| Button | Text | Icon | Appearance | Visible | AccessibleLabel |
|---|---|---|---|---|---|
btnLogOvertimeHS | "Log overtime" | "CalendarAdd" | Primary | true | "Log overtime: add the extra hours you worked" |
btnMyOvertimeHS | "My overtime" | "History" | Secondary | true | "My overtime: your entries and totals" |
btnApprovalsHS | "Waiting for approval" | "TextBulletListSquareClock" | Secondary | IsApprover | "Waiting for approval: overtime that needs your decision" |
btnReportsHS | "Reports" | "ArrowTrending" | Secondary | IsApprover || IsPayroll | "Reports: overtime totals by department, person and month" |
btnDepartmentsHS | "Departments" | "Building" | Secondary | IsAdmin | "Departments: add or change departments and their approvers" |
Every tile also gets:
| Property | Value |
|---|---|
| Width | If(App.ActiveScreen.Size = ScreenSize.Small, Parent.Width, 200) |
| Height | 40 |
| OnSelect | false |
- Icon names come from the button's own icon list: How to Add an Icon to a Button in Power Apps.
- Reports is for approvers or payroll:
||is Or (How to Combine Conditions in Power Apps with And and Or). - Width makes each tile full width on phones and 200 pixels elsewhere.
- OnSelect is
falseuntil the screens exist; Part 6 points Log overtime at its screen. The AccessibleLabel says where each tile leads, for screen readers.
Before the theme, the screen is in the default Power Apps blue. The maker sees three tiles: the two for everyone, and Departments, because they're in Overtime Admins:
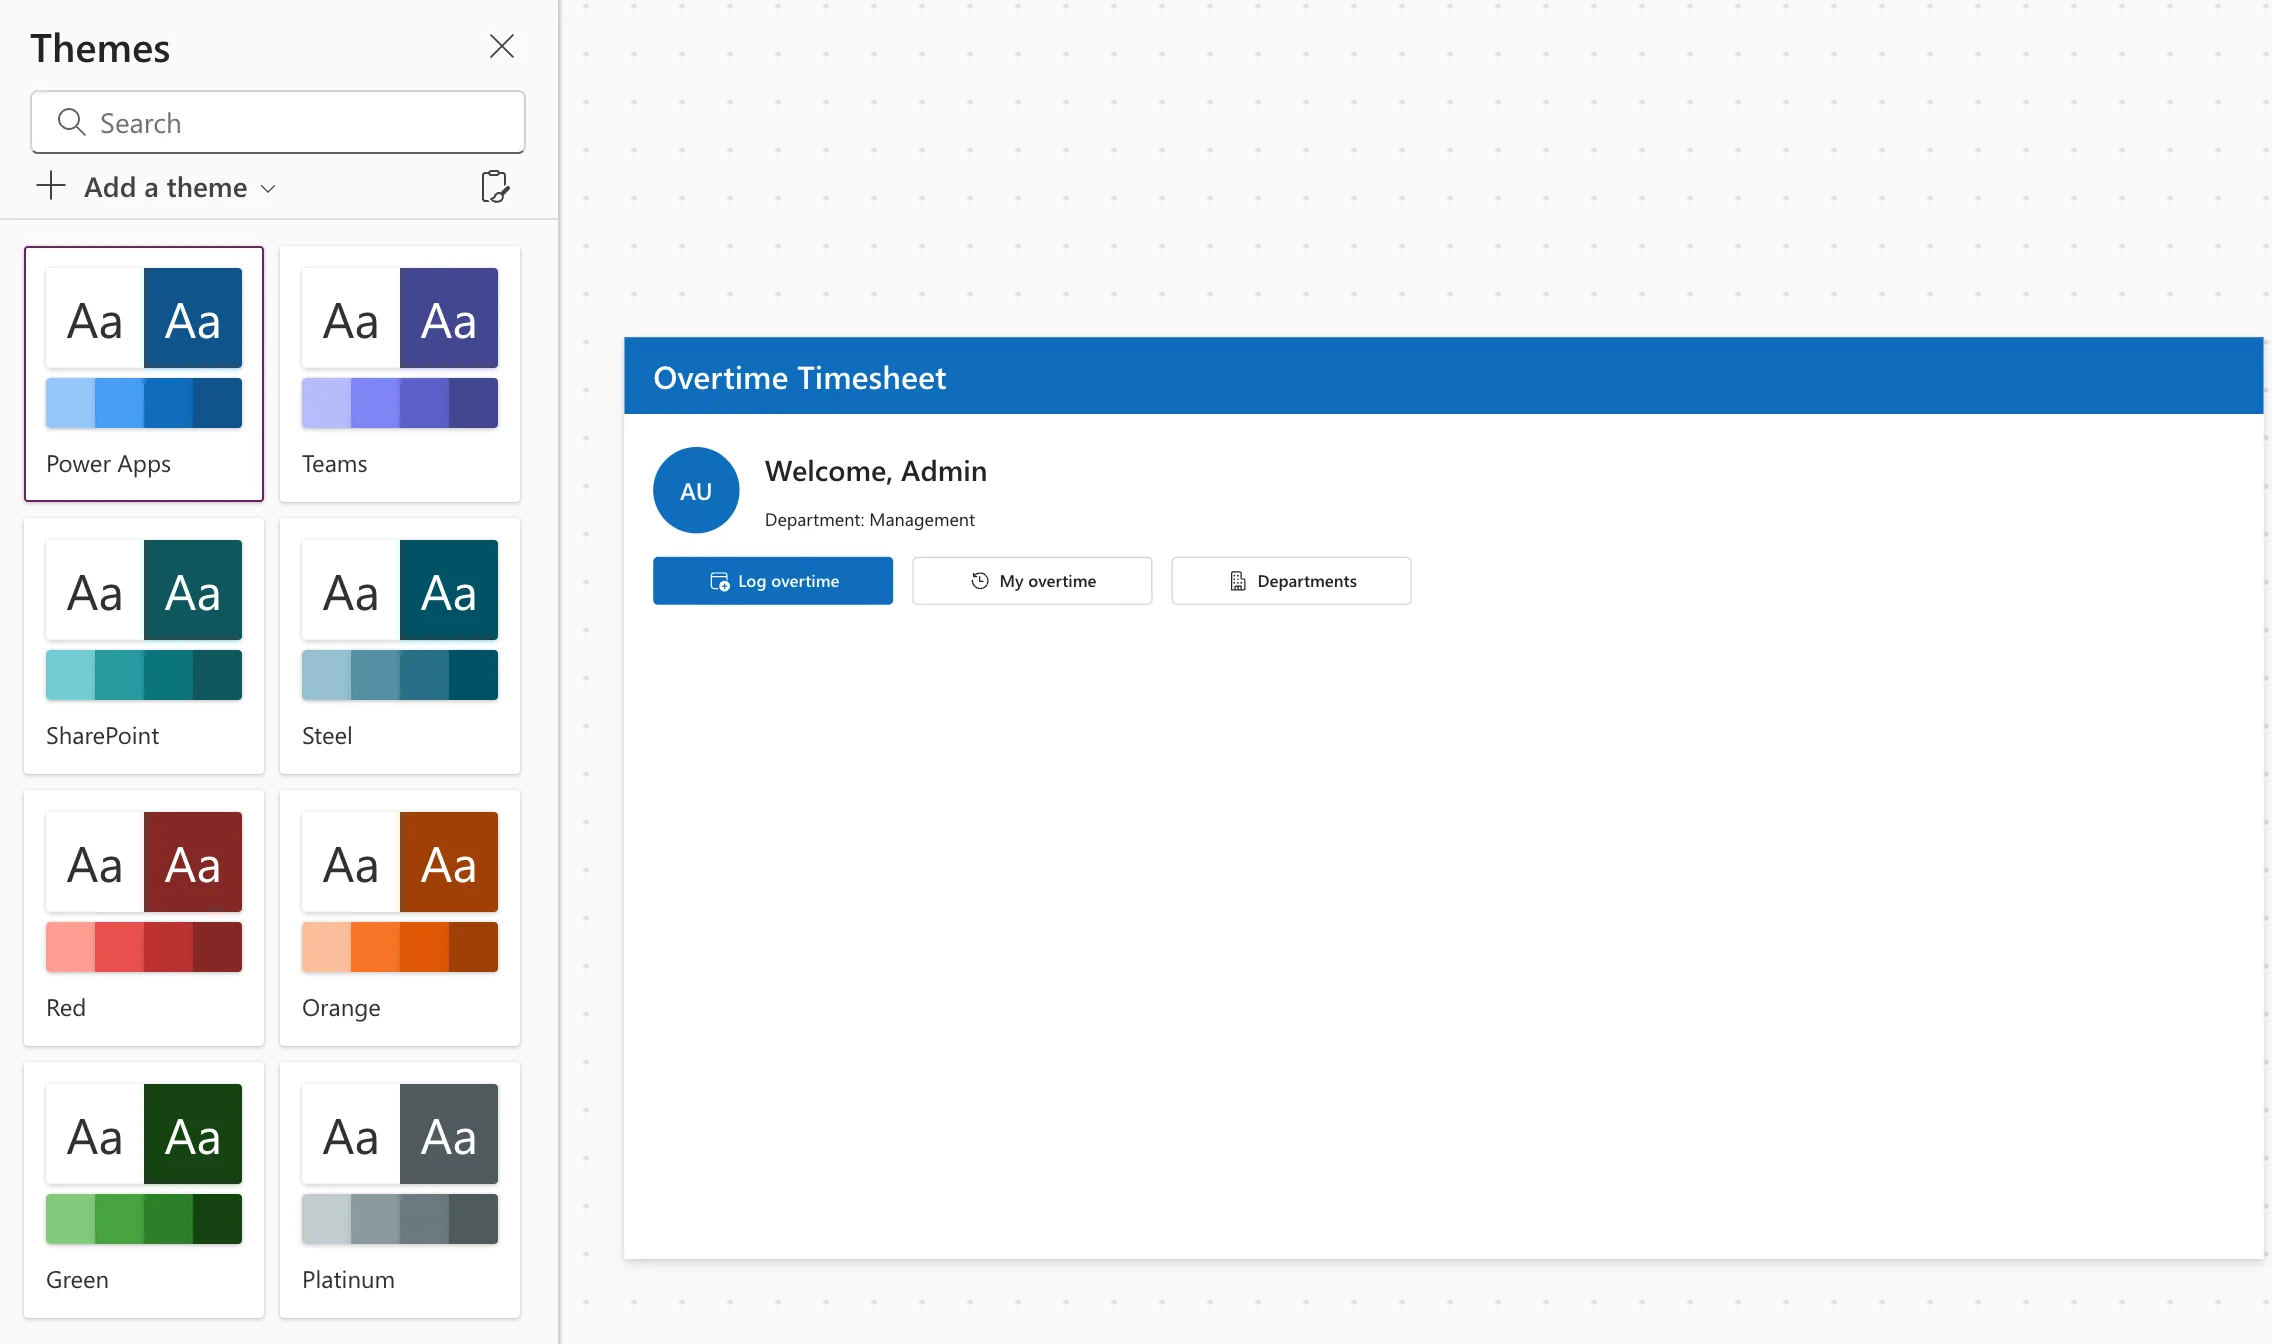
Step 7: Apply the Green Theme
Follow How to Apply a Modern Theme in Power Apps and select Green. Studio asks whether to Apply to classic controls; select Cancel, because the only classic control, lblTitleHS, takes its color and font from the formulas above. The header, the avatar and the Log overtime tile turn green together, because their colors come from the theme:
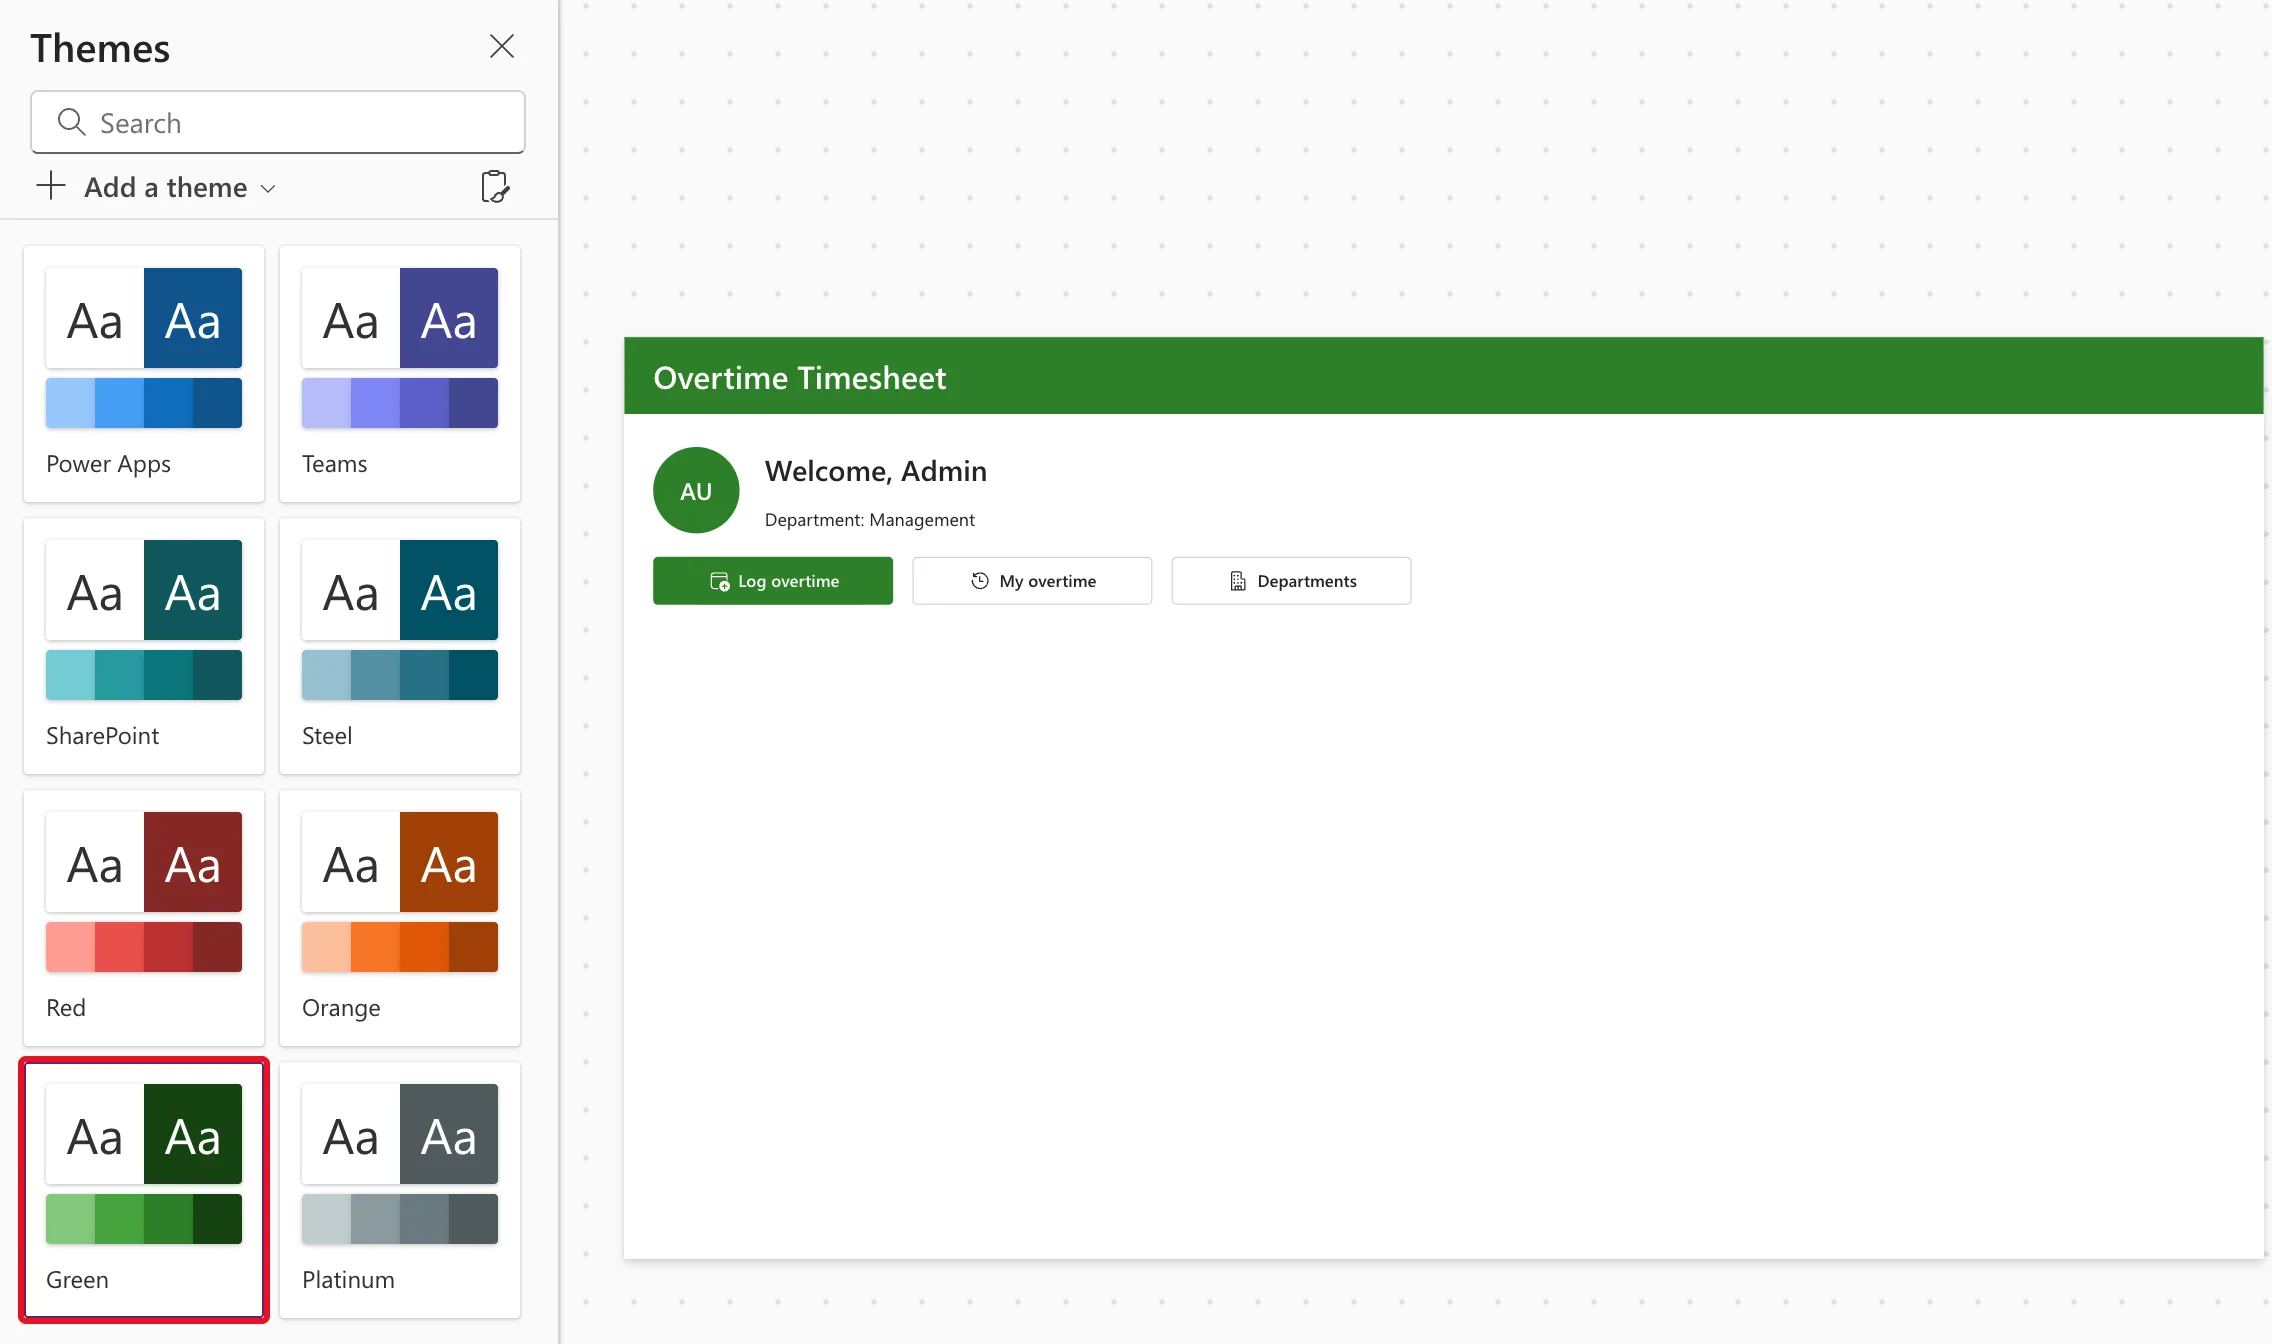
App.Theme is now GreenTheme.
Step 8: Check the Roles
Select a tile and its Visible formula shows the value for you. For btnDepartmentsHS, IsAdmin = true, and the tile is on the screen:
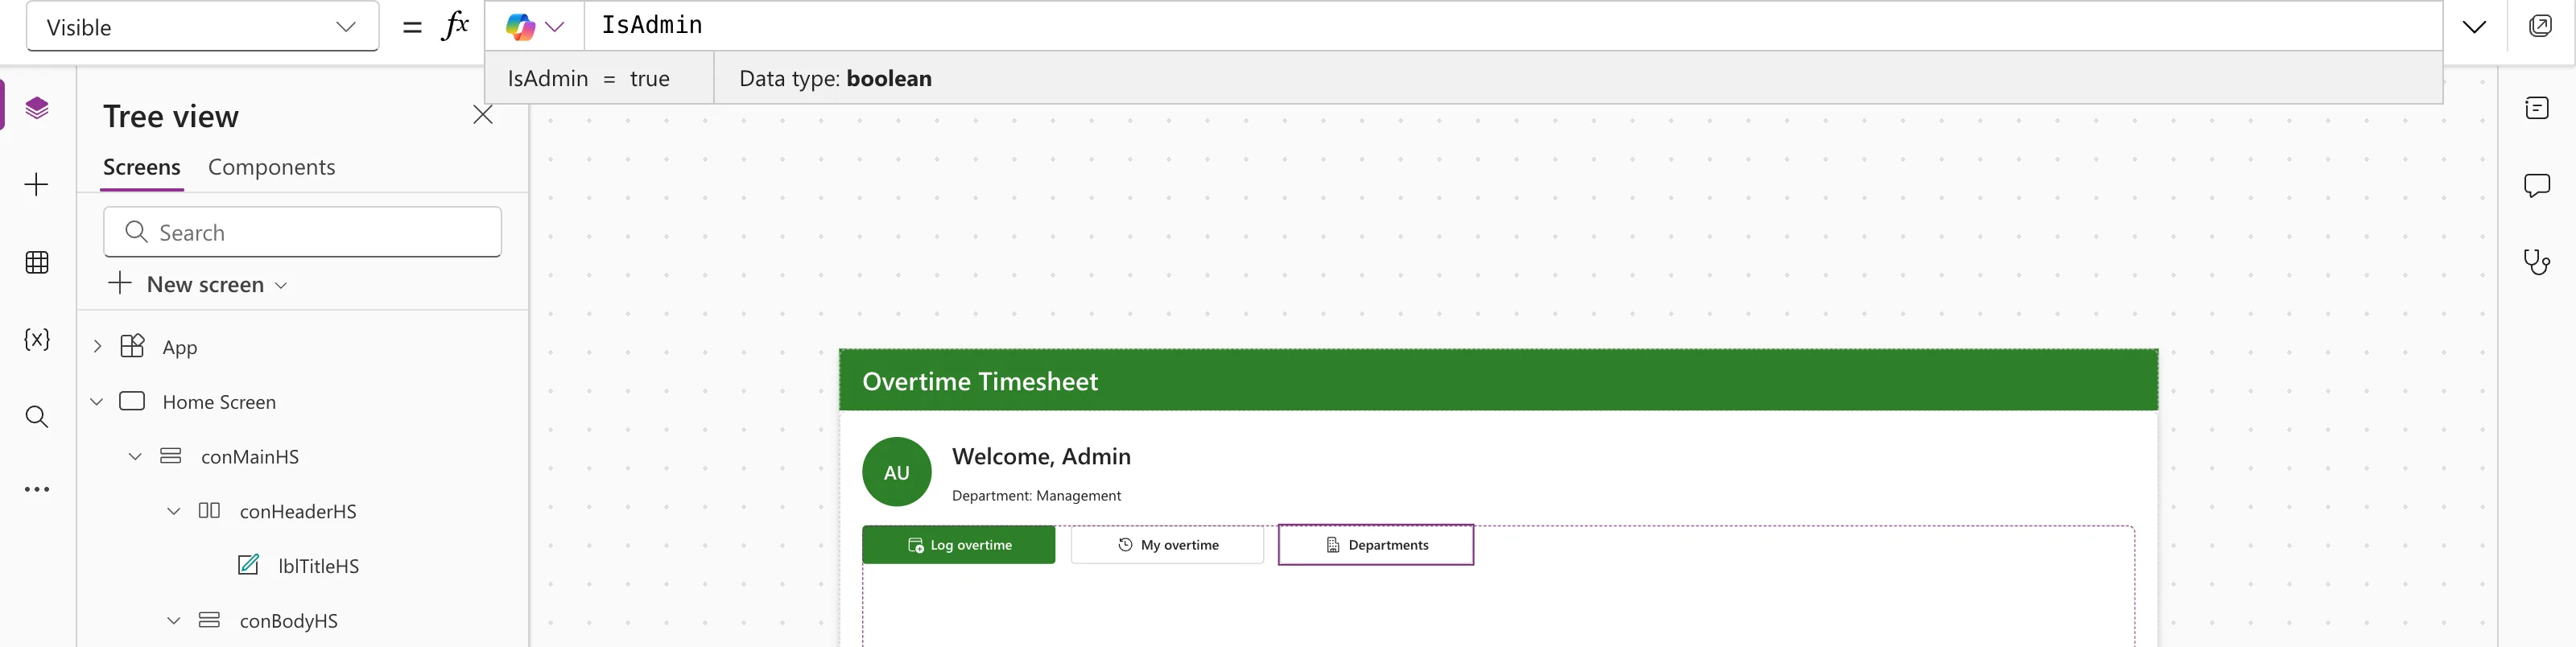
The maker isn't an approver or in payroll, so Waiting for approval and Reports stay hidden, and so does the approver line. To see the formulas give the right answer for an approver without signing in as one, How to Check If the Current User Is in a SharePoint Person Column in Power Apps uses Olivia Bennett's email for a moment and gets Emergency Department. Part 16 signs in as every persona and checks each one's screen.
Step 9: Check the Screen on a Phone
Preview the app with F5 (How to Preview a Canvas App in Power Apps Studio) and choose Apple iPhone 12, 13, 14 (How to Test a Power Apps Canvas App on Phone and Tablet Sizes). The title is smaller, and the tiles wrap into one full-width column:
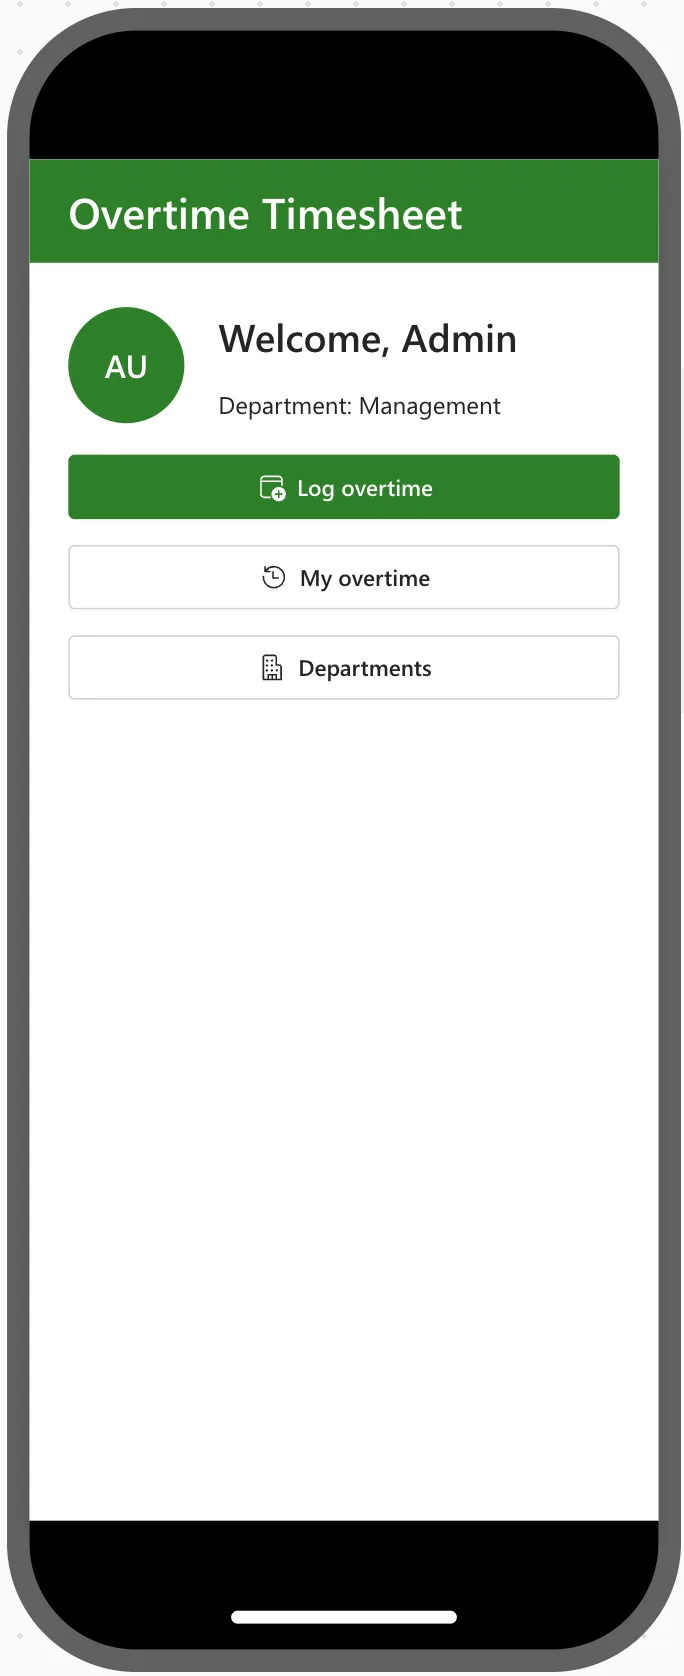
Step 10: Run the Accessibility Check
Open the App checker and select Accessibility. It lists two errors, both on the heading, lblTitleHS:
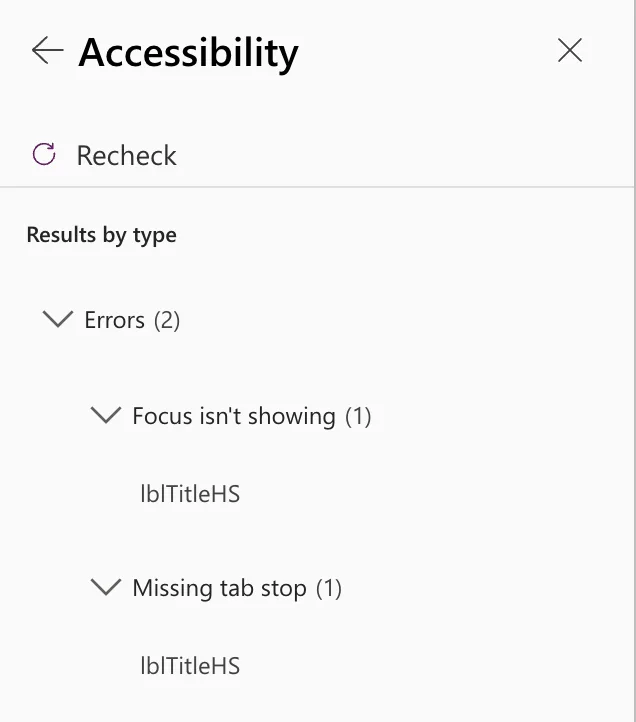
Leave both as they are. The heading isn't something to select, so it shouldn't take a place in the keyboard's Tab order, and Microsoft's guidance for labels that aren't interactive is TabIndex -1. The two posts explain each error and why a heading keeps it:
- Fixed: "Missing Tab Stop" in the Power Apps App Checker
- Fixed: "Focus Isn't Showing" in the Power Apps App Checker
Data source (1) is OvertimeEntries, which no formula uses until Part 6: Fixed: "Unused Data Sources" in the Power Apps App Checker. Formulas has no count.
Step 11: Save the App
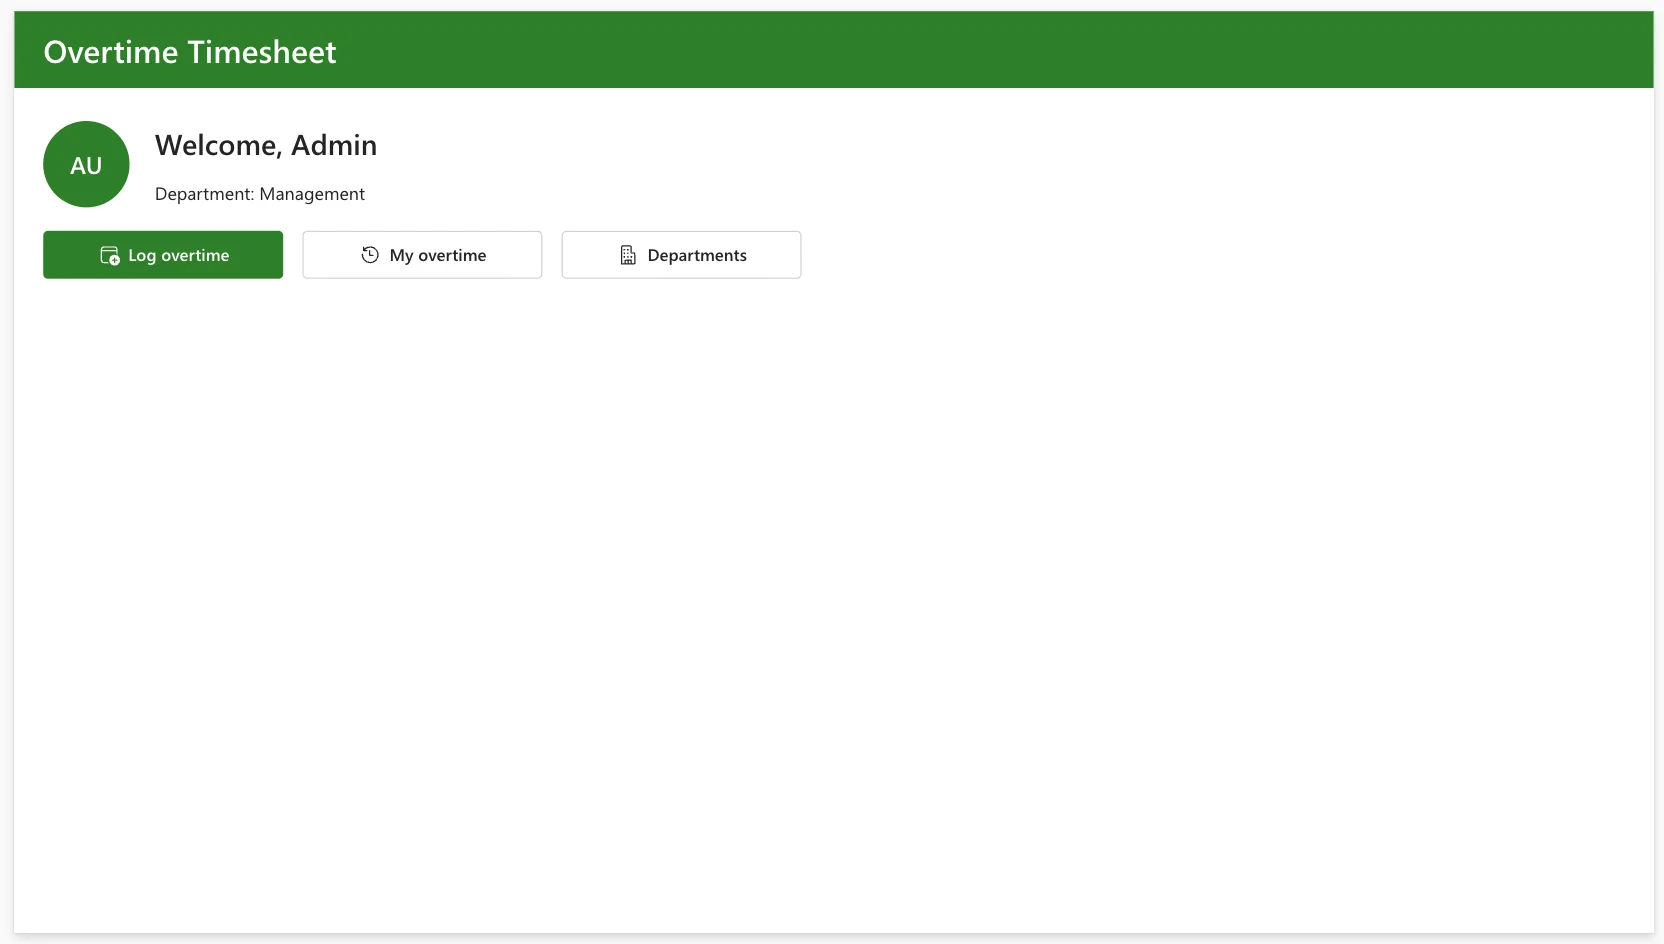
Select Save. Don't publish yet: nobody else can open the app until Part 15 shares it. Here's the finished Home screen on the canvas:
And its controls in the Tree view, matching the layout from Step 6:
Common Mistakes
| Mistake | What happens | Do this instead |
|---|---|---|
| Typing the group IDs into the formulas | Every organization that installs the app has to edit it | Keep them in the Settings list |
| Leaving Members able to edit Settings | Anyone in Members can change who counts as payroll or admin | Owners only, as in Step 1 |
Filtering Departments with in directly | Delegation warnings, and missed departments past 500 items | Use the With version from Step 4 |
Leaving id out of MyProfile's '$select' | IsPayroll and IsAdmin are always false | Select id |
| Relying on hidden tiles for privacy | The data is still open to anyone SharePoint lets in | Keep Part 3's permissions |
A fixed Height on conProfileHS | Text is cut off on phones | Use the Max formula |
Troubleshooting
| Symptom | Likely cause | Fix |
|---|---|---|
| Departments doesn't show for an admin | AdminsGroupId is blank or wrong, or the person isn't a direct member | Check the Settings item and the group's Members |
IsApprover is false for an approver | The department's IsActive is No, or the emails differ | Check the department, then compare MyEmail with Approvers |
| The approver line shows a blank department | lblApproverHS's Visible isn't IsApprover | Set Visible to IsApprover |
| Tiles run off the edge of a phone | Wrap is off on conActionsHS | Turn it on |
Settings is underlined red in a formula | The list isn't in the app | Add it as in Step 3 |
FAQ
Why does the maker see the Departments tile?
Because the maker is in Overtime Admins, as Part 1 set up. By the same formulas, Leo Martin, the payroll officer, gets Reports instead, and Olivia Bennett and Daniel Brooks, the approvers, get Waiting for approval and Reports. Part 16 signs in as each of them to confirm it.
Where's this month's total?
On the My Overtime screen, which Part 7 builds with each person's entries and totals. The Home screen stays a quick menu.
Why named formulas and not App.OnStart?
Named formulas are calculated when something needs them, so the screen doesn't wait for every lookup before it opens, and each value is defined once for the whole app. How to Use Named Formulas in Power Apps compares the two.
Does this need premium licenses?
No. SharePoint, Office 365 Users and Office 365 Groups are standard connectors, and the app's license designation stays Standard.
Conclusion
The app now opens on a Home screen that knows who you are:
- a Settings list with the payroll and admins group IDs, editable only by site owners, and a fifth environment variable for it;
- the Office 365 Groups connector, and named formulas for the person, their department and their roles:
IsApproverfrom the Approvers column,IsPayrollandIsAdminfrom the groups; - a responsive layout whose tiles depend on the role and wrap into one column on phones, in the Green theme.
Part 6 builds the first screen behind a tile: Log overtime, with dates, times, breaks and the hours worked out as you type.
Additional Resources
- Named formulas: the App.Formulas property.
- Office 365 Groups connector reference: List group members and its limits.
- Power Apps delegable functions and operations for SharePoint: what SharePoint can filter.
- Building responsive canvas apps: containers and wrapping.
- Review a canvas app for accessibility: the checks in Step 10.
← Previous: Part 4: Create the Solution, Environment Variables and Canvas App Next → Part 6: Build the Log Overtime Screen
