Build an Overtime Timesheet App in Power Apps — Part 2: Create the SharePoint Site and Lists

Every screen and flow of the Overtime Timesheet app reads or writes three things in SharePoint: a list of departments and their approvers, a list of overtime entries, and a library for payroll's monthly workbooks. This part builds them, and the site they live on, column by column and setting by setting.
This is Part 2 of a 20-part series.
- Part 1: Plan the App and Set Up the Demo Organization
- Part 2: Create the SharePoint Site and Lists (you are here)
- Part 3: Keep Overtime Private with SharePoint Permissions
- Part 4: Create the Solution, Environment Variables and Canvas App
- Part 5: Build the Home Screen
- Part 6: Build the Log Overtime Screen
- Part 7: Build the My Overtime Screen
- Part 8: Build the Approval Flow for Teams and Outlook
- Part 9: Show Approvers What's Waiting (coming soon)
- Part 10: Build the Departments Screen (coming soon)
- Part 11: Build the Reports Screen (coming soon)
- Part 12: Import the Old Excel Timesheet (coming soon)
- Part 13: Create the Monthly Payroll Workbook with Office Scripts (coming soon)
- Part 14: Build the Power BI Overtime Report (coming soon)
- Part 15: Share the App and Add It to Microsoft Teams (coming soon)
- Part 16: Test Every Role and Department (coming soon)
- Part 17: Build a Setup Flow That Creates the Lists (coming soon)
- Part 18: Run the Solution Checker and Export the Solutions (coming soon)
- Part 19: Install the App in a New Environment (coming soon)
- Part 20: Recap, Production Checklist and Next Steps (coming soon)
What You'll Set Up
- A communication site, Overtime Timesheet, that exists only to hold the app's data, set to London time, UK dates and the 24-hour clock.
- Departments: one item per department, with the people who approve its overtime.
- OvertimeEntries: one item per shift, with 15 columns, a validation rule that refuses impossible shifts, and two indexes.
- Payroll Exports: a document library for the monthly payroll workbooks.
- The two departments of the demo organization.
Permissions come in Part 3. Until then, only you, the site's owner, can open any of it.
Prerequisites
- Part 1 completed: the demo team with their new job titles and managers, and the three groups.
- An account that can create SharePoint sites, such as the admin account from Part 1. As the site's creator, you become its owner.
- The SharePoint guides this part relies on. Each step says which one to follow and gives the values to use:
- Sites: How to Create a SharePoint Communication Site, How to Change the Time Zone of a SharePoint Site, How to Change the Date Format of a SharePoint Site, How to Show Times in 24-Hour Format in SharePoint.
- Lists and columns: How to Create a List and Add Columns in SharePoint Online, How to Add a Number Column to a SharePoint List, How to Set a Minimum and Maximum Value for a SharePoint Number Column, How to Add a Date Column to a SharePoint List, How to Add a Person Column to a SharePoint List, How to Add a Multiple Lines of Text Column to a SharePoint List.
- Column settings: How to Make a Column Required in a SharePoint List, How to Set a Default Value for a SharePoint List Column, How to Add a Description to a SharePoint List Column, How to Enforce Unique Values in a SharePoint List Column, How to Hide the Title Column in a SharePoint List.
- List settings: How to Add List Validation in SharePoint to Compare Two Columns, How to Turn Off Attachments and Hide a SharePoint List from Search, How to Index a Column in a SharePoint List.
- Libraries and items: How to Create a Document Library in SharePoint Online, How to Rename a SharePoint Library Without Changing Its URL, How to Add an Item to a SharePoint List.
Step 1: Create the Site
Follow How to Create a SharePoint Communication Site with these values:
| Setting | Value |
|---|---|
| Site type | Communication site |
| Template | Blank |
| Site name | Overtime Timesheet |
| Site description | Lists for the Overtime Timesheet app: departments and their approvers, overtime entries, and the monthly payroll workbooks. |
| Site address | OvertimeTimesheet (filled in from the name) |
| Language | English |
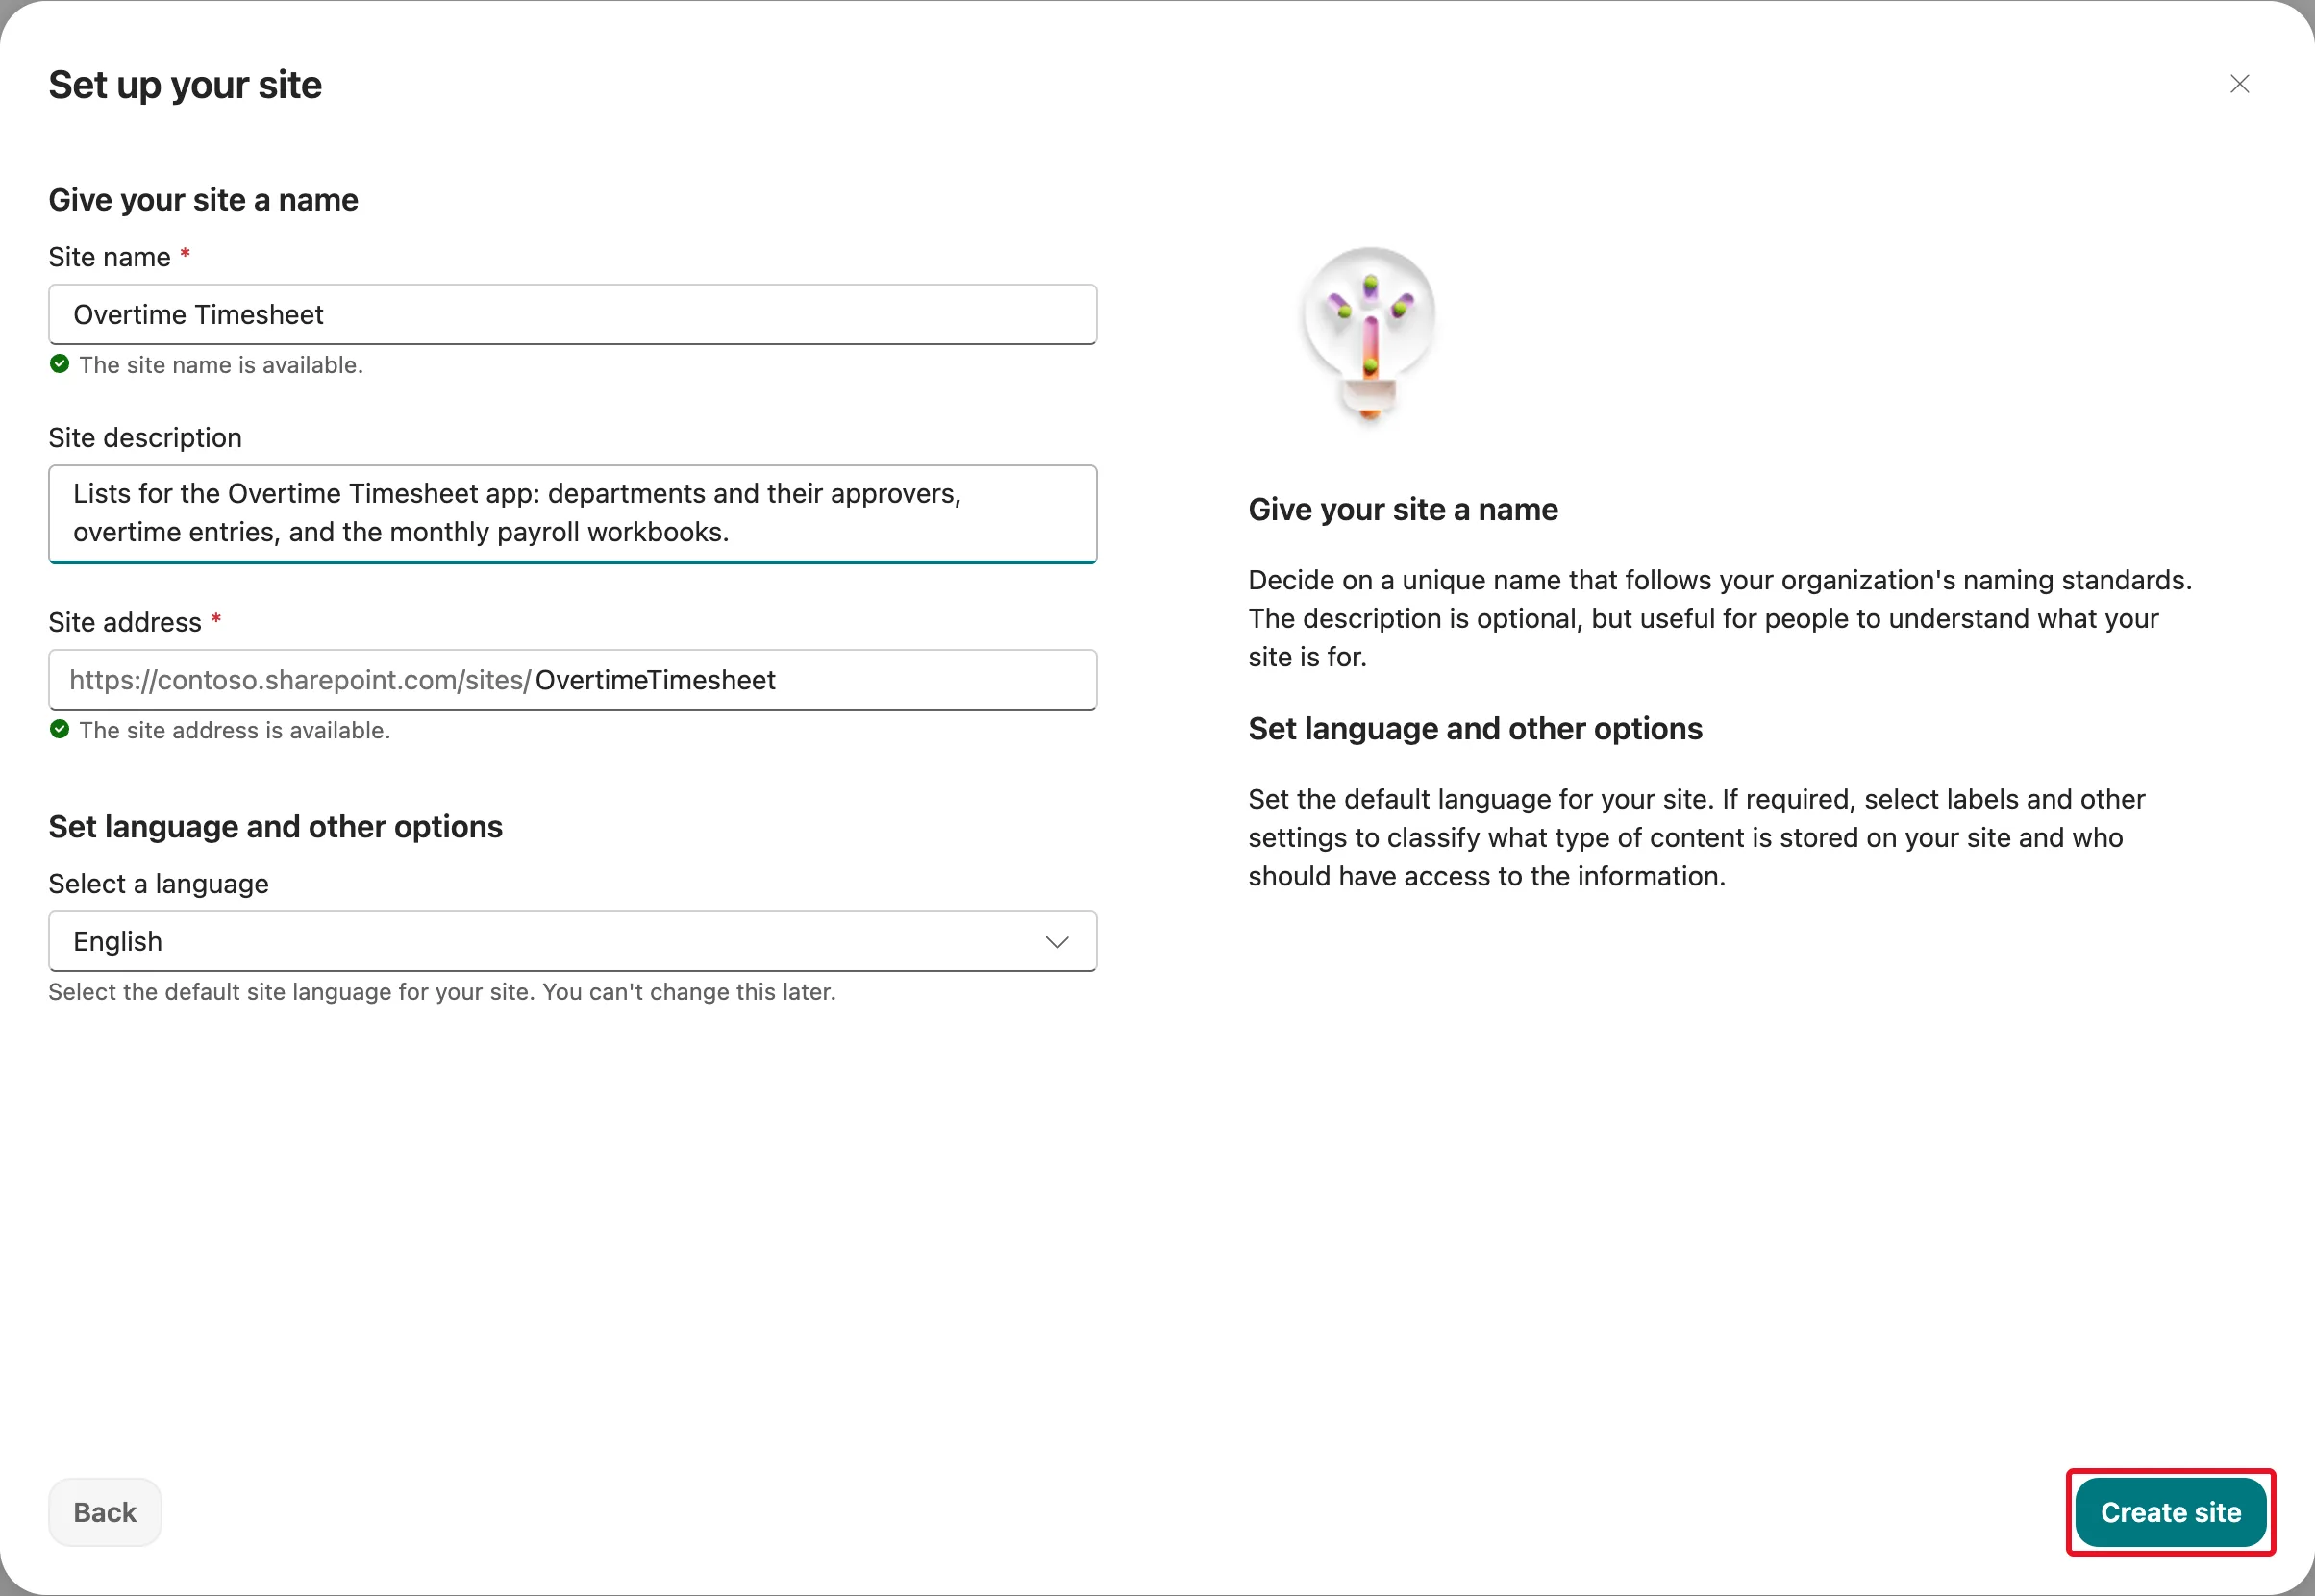
The site opens with an empty home page:

Note the site's address, https://<your-organization>.sharepoint.com/sites/OvertimeTimesheet; the app's settings use it in Part 4. And note Published on 11/7/26: the site writes 7 November month first. Step 4 changes that.
Step 2: Create the Departments List
Create a list called Departments (How to Create a List and Add Columns in SharePoint Online) with these columns:
| Column | Type | Required | Settings | Description |
|---|---|---|---|---|
| Department | Single line of text | Yes | Enforce unique values on | The department's name, such as Radiology. Each department can appear only once. |
| Approvers | Person | Yes | Allow multiple selections on; Allow selection of Groups cleared | The people who approve overtime for this department. |
| IsActive | Yes/No | Yes | Default Yes | Yes: staff can choose this department. No: retired, and kept for history. |
Then hide Title from the view and the form (How to Hide the Title Column in a SharePoint List). It isn't required in a new list, so it can be hidden straight away. In List settings, the columns look like this:
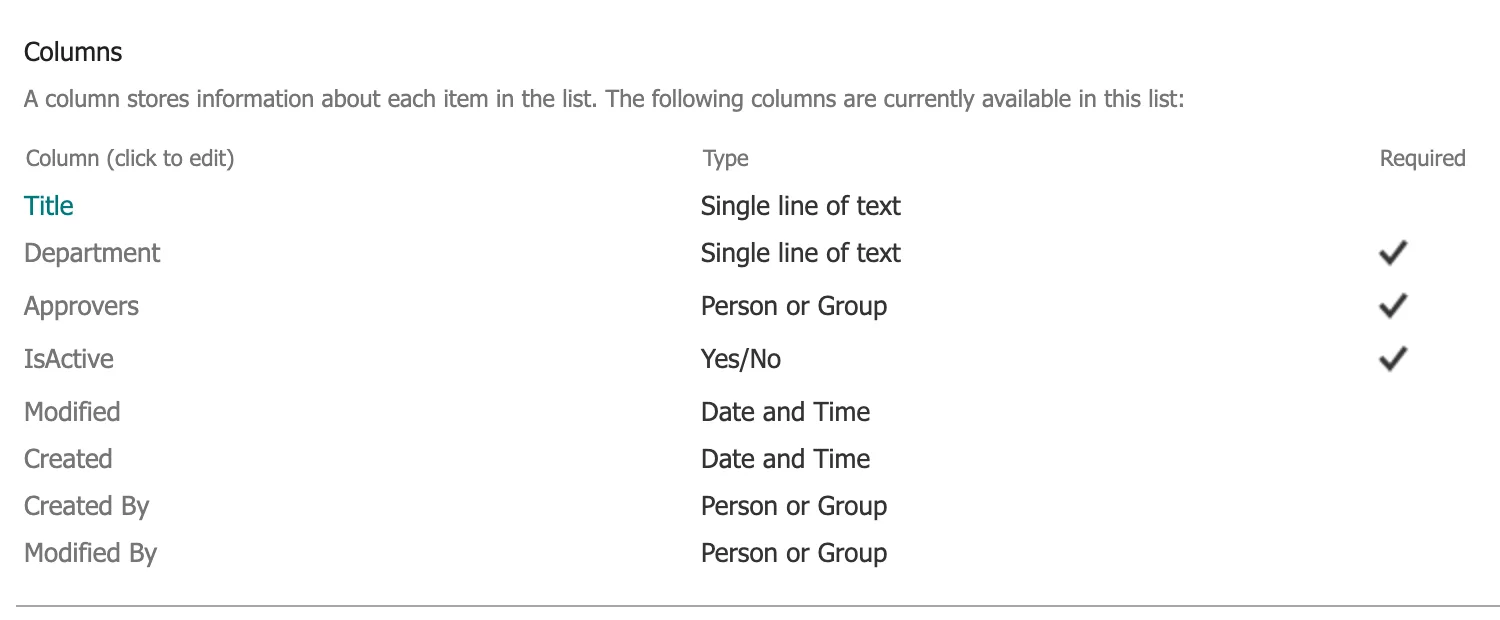
Why the list looks like this:
- A unique Department. Two items called Radiology would leave the app unsure whose approvers to use. SharePoint refuses a duplicate with This value already exists in the list., and it indexed the column on its own when it became unique.
- Approvers as people, not names. A Person column only accepts people who exist in your organization, and the approval flow in Part 8 reads each approver's email from it. Allow multiple selections lets a department have more than one approver; groups are left out because approvers are named people.
- IsActive instead of deleting. A department that closes is switched to No. Its past overtime still points at it, and the app stops offering it.
Step 3: Create the OvertimeEntries List
Create a second list, OvertimeEntries, with these columns, in this order:
| Column | Type | Required | Settings | Description |
|---|---|---|---|---|
| WorkDate | Date and time | Yes | Include Time off | The day the shift started. |
| StartTime | Date and time | Yes | Include Time on | When the shift started. |
| EndTime | Date and time | Yes | Include Time on | When the shift finished. Can be the next day for a night shift. |
| BreakMinutes | Number | Yes | 0 decimal places; default 0; minimum 0 | The unpaid break during the shift, in minutes. |
| Hours | Number | Yes | 2 decimal places; minimum 0; maximum 24 | Hours worked: the time from start to finish, minus the break. Worked out by the app. |
| DepartmentId | Number | Yes | 0 decimal places; Use thousands separator off | The ID of the department's item in the Departments list. |
| Department | Single line of text | Yes | — | The department's name when the entry was saved. |
| Reason | Multiple lines of text | Yes | Use enhanced rich text off | Why the overtime was needed. |
| EmployeeName | Single line of text | Yes | — | The name of the person who worked the shift, when the entry was saved. |
| EmployeeEmail | Single line of text | No | — | Their email address when the entry was saved. Empty only for imported entries of people who have left. |
| Status | Choice | Yes | Choices Pending, Approved, Rejected; default Pending | Pending until an approver approves or rejects the entry. Set by the approval flow. |
| ApproverComment | Multiple lines of text | No | Use enhanced rich text off | The approver's comment, if they gave one. |
| DecisionBy | Single line of text | No | — | The name of the approver who approved or rejected the entry. |
| DecisionOn | Date and time | No | Include Time on | When the entry was approved or rejected. |
| WorkMonth | Single line of text | Yes | — | The month the shift started in, as year and month, such as 2026-11. The app and flows filter on it. |
Hide Title here too. The finished columns:
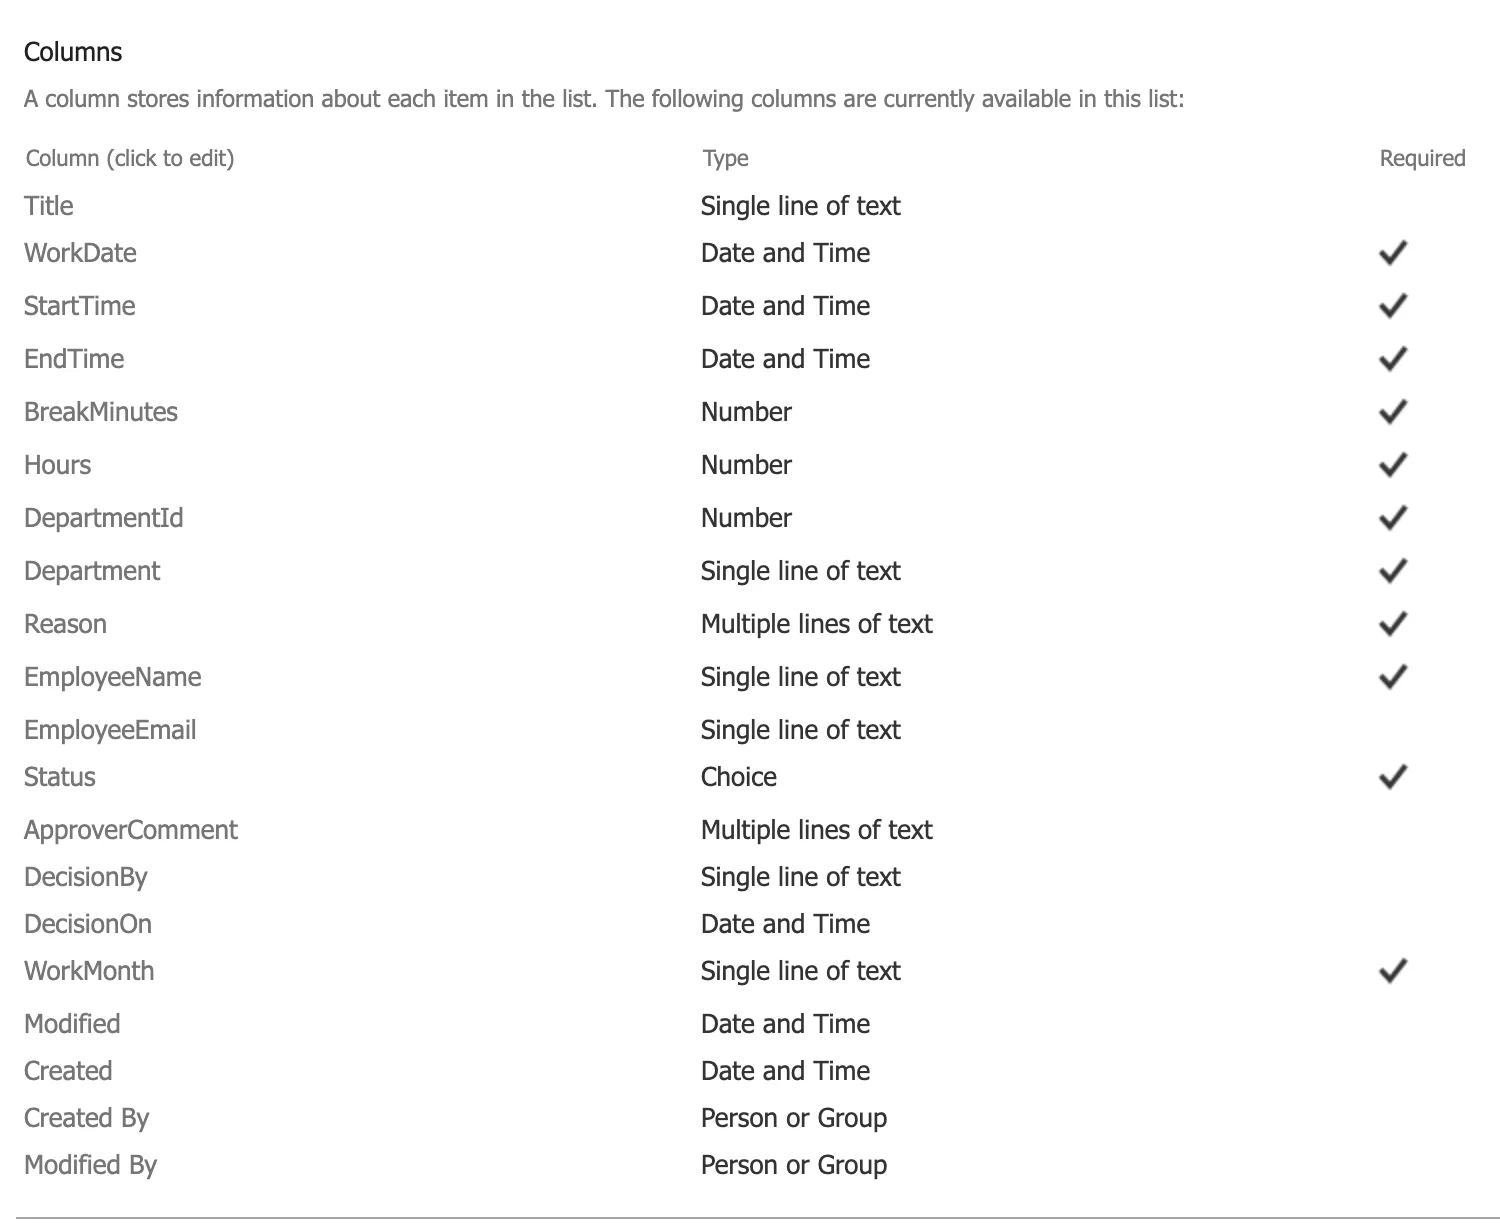
Why the list looks like this:
- One item per shift. Each item is one stretch of overtime, approved or rejected on its own.
- A day and two moments. WorkDate is the day the shift started, for grouping and display. StartTime and EndTime are exact moments, and the hours come from them. Working from real start and finish times is what lets the app count a night shift across midnight, and across a clock change, correctly: the old workbook in Part 1 got Ben Harris's clock-change night wrong because it didn't.
- Hours is stored. The app works it out when the entry is saved, and the approval flow works it out again from the times and saves its own number with the decision, so reports, the payroll workbook and Power BI all add up the same number.
- DepartmentId and Department. The ID links an entry to its department with a number instead of a Lookup column. The name is a copy for reports, so an entry still says which department it was for if the department is later renamed.
- EmployeeName and EmployeeEmail are copies too. SharePoint's own Created By records who saved an entry; these record who worked it, in a form reports can use. EmployeeEmail isn't required because Part 12 imports old entries for Ben Harris, who left before the app existed and has no account.
- Status starts at Pending. Every new entry waits for approval. Only the approval flow should set it to Approved or Rejected; Part 3 makes sure that editing an entry can't approve it.
- WorkMonth is text, not a date. Every monthly screen, flow and report asks for "the entries of one month", so each entry carries its month as
2026-11. Power Apps can hand a text=filter to SharePoint (Connect to SharePoint from a canvas app lists=as delegable for text), and a text month is the same for every user. Microsoft's Troubleshoot date and time issues in Power Apps canvas apps lists "The Date Only value shows the wrong date for some users and time zones" among its known issues; a month written as text avoids the question. - Plain text and names without spaces: apps read plain text, and column names without spaces are the same everywhere.
Step 4: Set the Site's Time Zone, Date Format and Clock
Open the OvertimeEntries list, select + New, and pick 7 November at 22:00 in WorkDate and StartTime (then Cancel: don't save it). The form uses US settings:
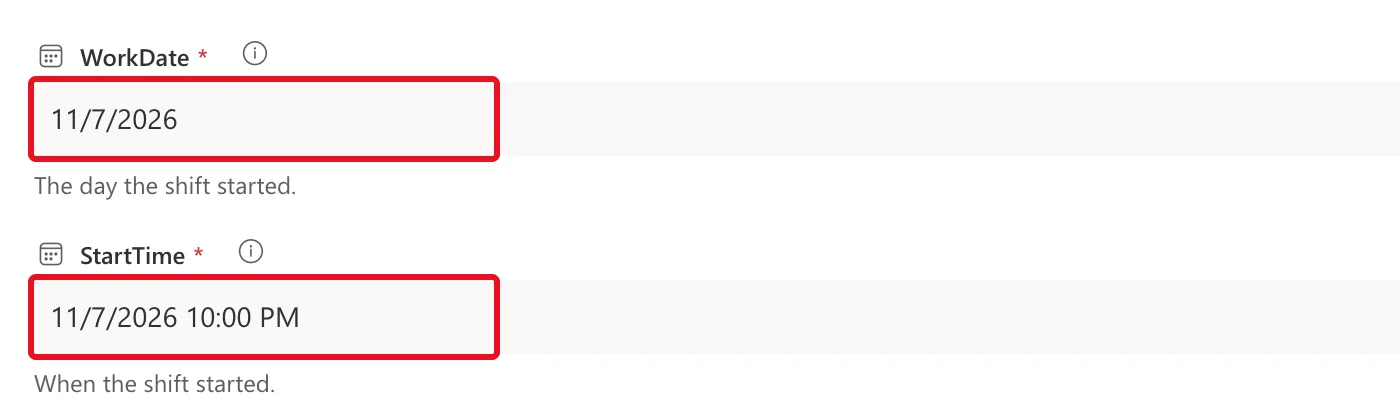
Each date field also had an (i) icon naming the site's time zone: (UTC-08:00) Pacific Time (US and Canada). A new site takes the SharePoint admin center's default time zone, which is Pacific Time until an admin changes it. For a UK team, all three settings need changing. In Regional settings, in this order:
| Setting | Value | Guide |
|---|---|---|
| Locale | English (United Kingdom) (change it first: it resets the other settings to its defaults) | How to Change the Date Format of a SharePoint Site |
| Time zone | (UTC) Dublin, Edinburgh, Lisbon, London | How to Change the Time Zone of a SharePoint Site |
| Time format | 24 Hour (the UK locale sets it already) | How to Show Times in 24-Hour Format in SharePoint |
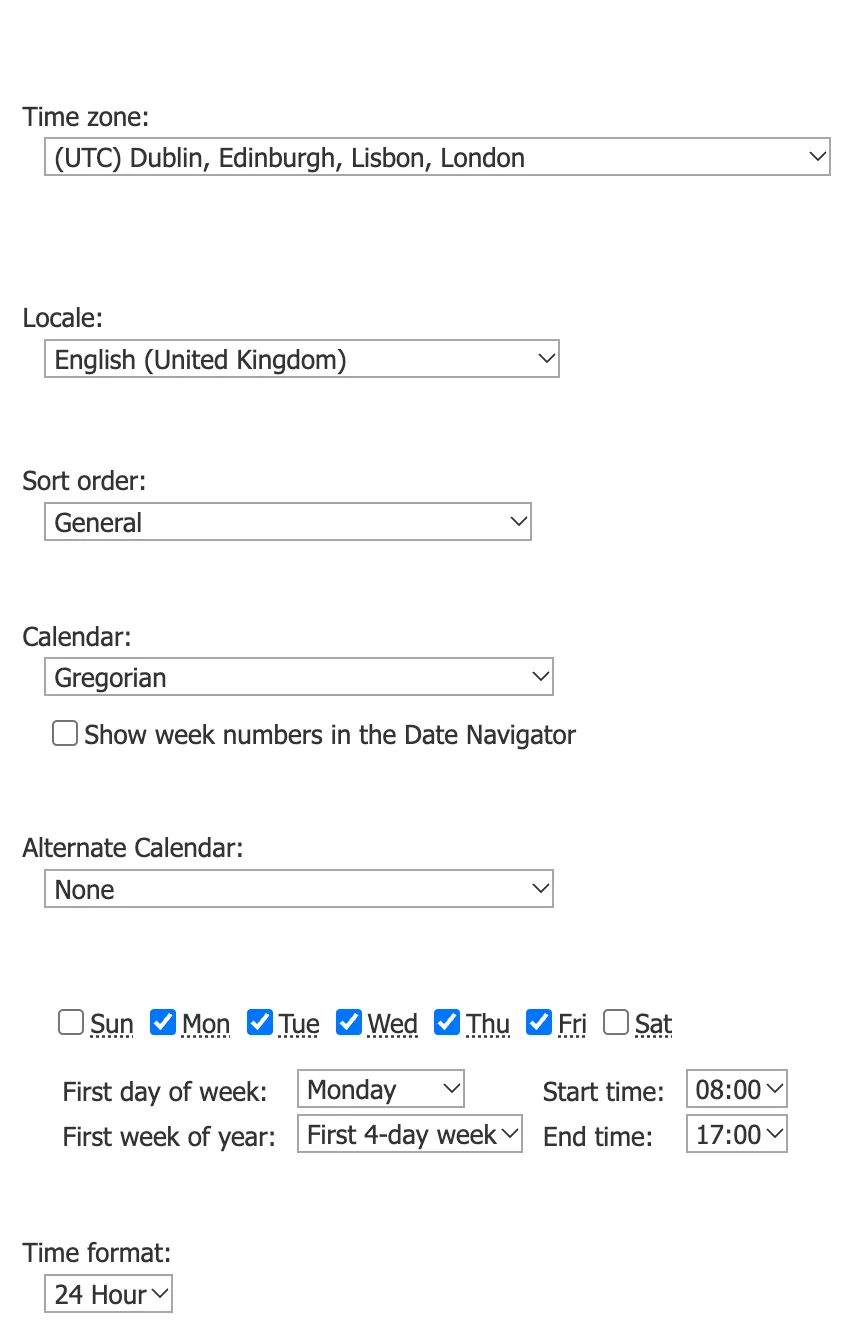
Select OK. The same form now shows UK dates and the 24-hour clock, and the time zone icons are gone:
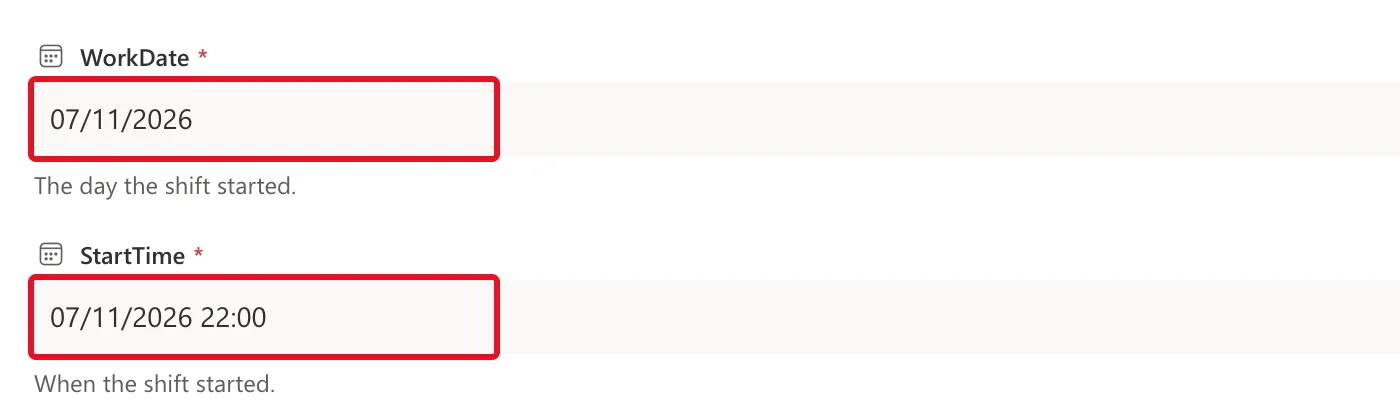
These settings decide what people see when they open the lists in SharePoint. The app formats its own dates and times, in Part 6. If your organization isn't in the UK, choose your own locale and time zone.
Step 5: Refuse Impossible Shifts with List Validation
The app will check every shift before saving it, in Part 6. But anyone who can edit an entry can also edit it in SharePoint, so the list checks it too. Follow How to Add List Validation in SharePoint to Compare Two Columns and enter this formula in OvertimeEntries → List settings → Validation settings:
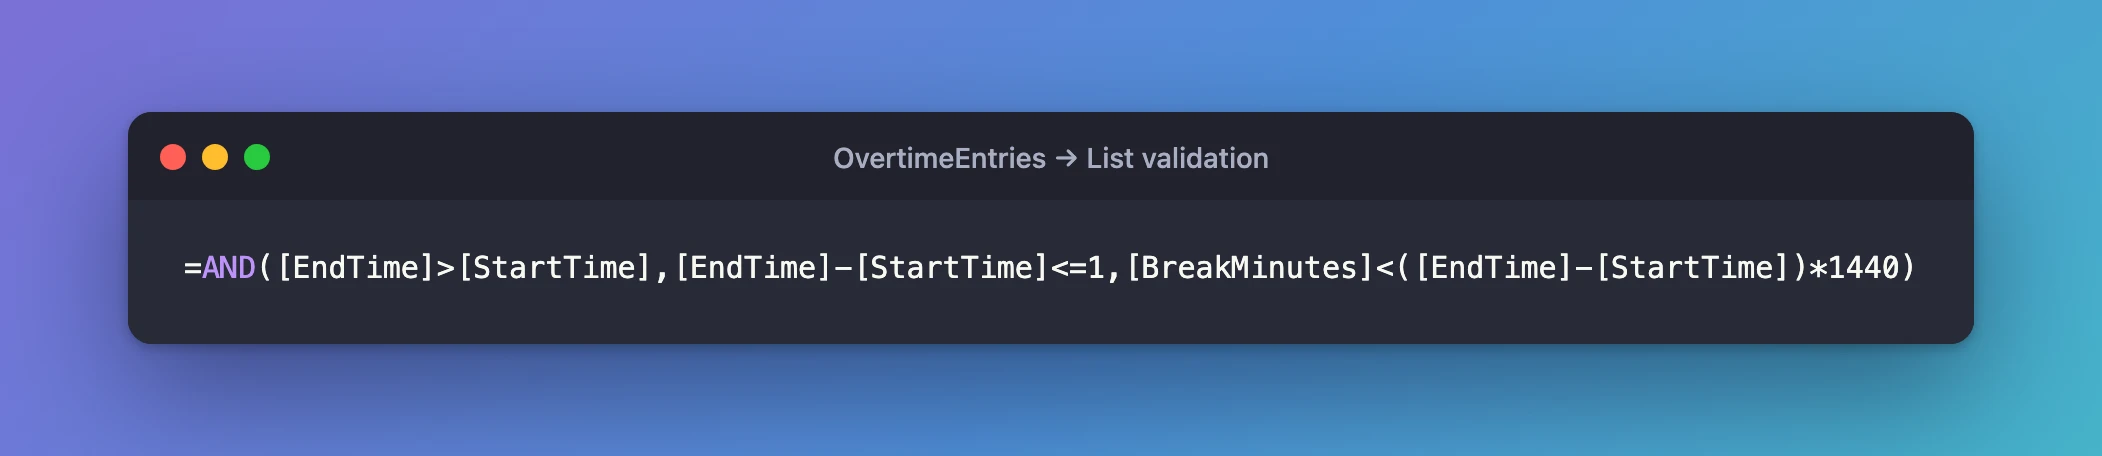
=AND([EndTime]>[StartTime],[EndTime]-[StartTime]<=1,[BreakMinutes]<([EndTime]-[StartTime])*1440)
[EndTime]>[StartTime]: the shift finishes after it starts.[EndTime]-[StartTime]<=1: subtracting dates gives days, so the shift lasts no more than 24 hours.[BreakMinutes]<([EndTime]-[StartTime])*1440: the break, in minutes, is shorter than the shift; a day has 1,440 minutes.
And this User Message:
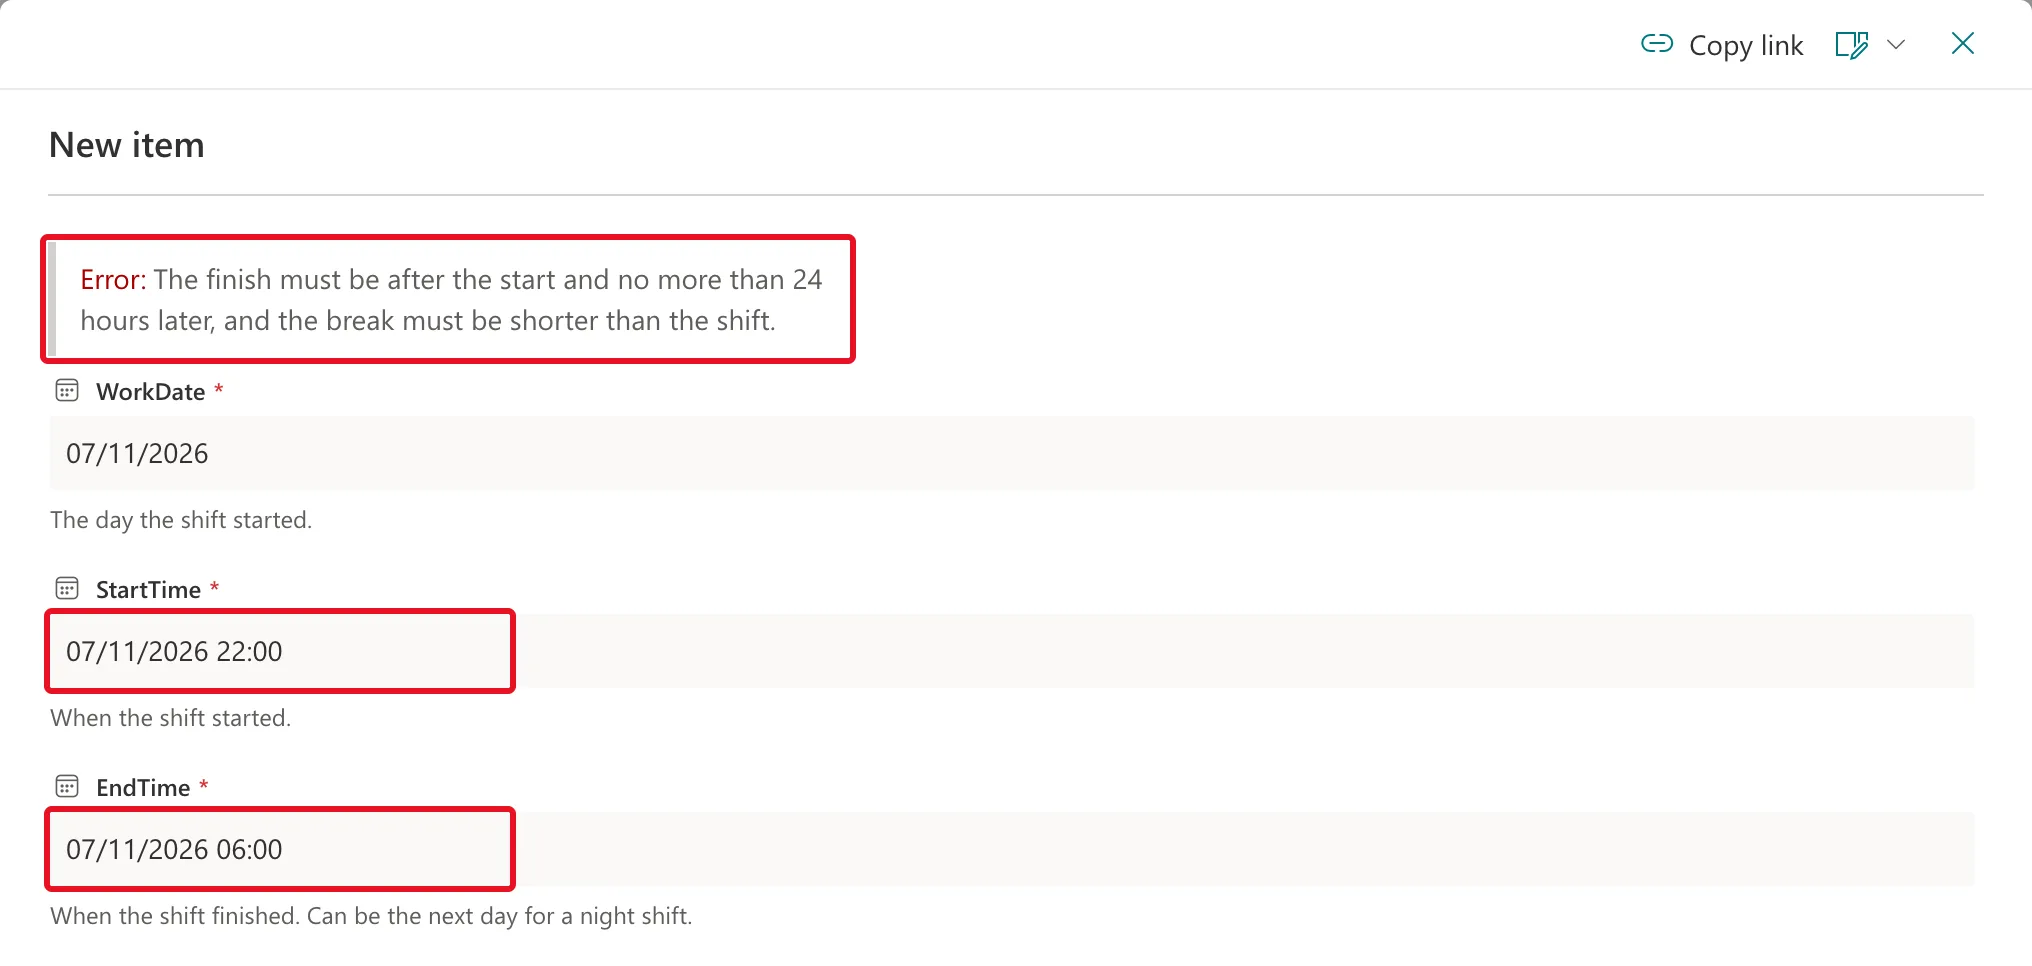
The finish must be after the start and no more than 24 hours later, and the break must be shorter than the shift.
A night shift with the finish left on the start day, 22:00 to 06:00 both on 7 November, is refused with that message:
Step 6: Change Both Lists' Settings
Follow How to Turn Off Attachments and Hide a SharePoint List from Search for each list:
| Setting | Departments | OvertimeEntries |
|---|---|---|
| Description | Departments and their overtime approvers. Used by the Overtime Timesheet app. | Overtime entries: one item per shift worked. Written by the Overtime Timesheet app. |
| Attachments | Disabled | Disabled |
| Allow items to appear in search results | Yes (the default) | No |
Neither list needs attachments. Overtime is personal, so its entries stay out of search results. Search isn't what keeps them private, though: Part 3's permissions do that.
Step 7: Index the Columns the App Filters On
Add two indexes to OvertimeEntries (How to Index a Column in a SharePoint List). Departments already has one, on Department, from Step 2:
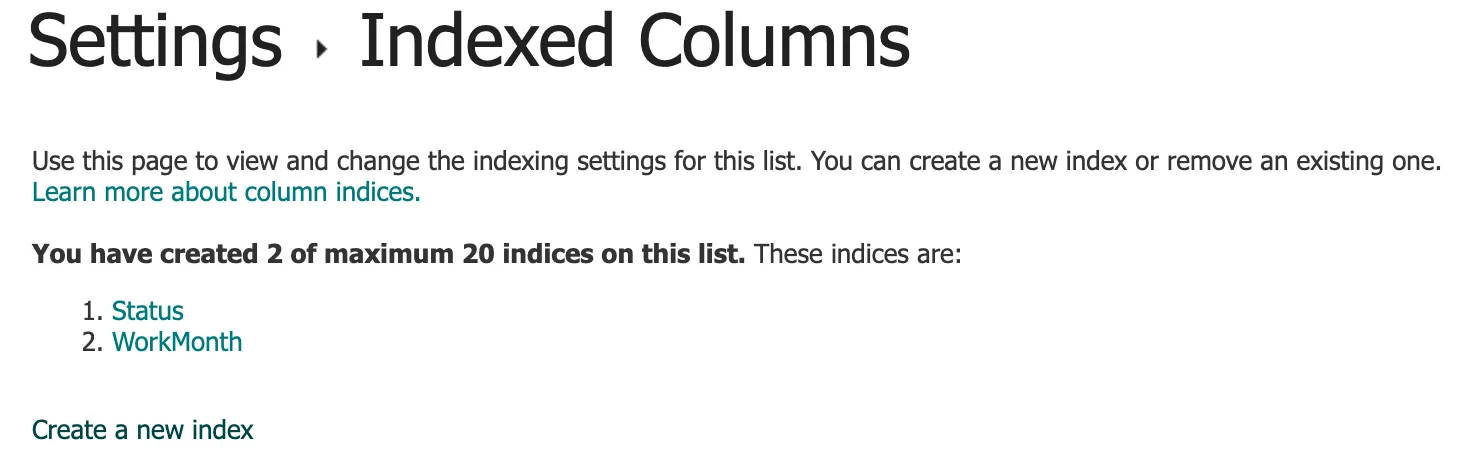
SharePoint's list view threshold is 5,000 items: a query that has to look through more than that, with no index to narrow it down, can fail. Overtime entries only ever grow, month after month. With these indexes, a month's entries and the pending queue stay small queries however big the list gets. How to Index a Column in a SharePoint List explains the threshold.
| Index | Used by | Asks SharePoint for |
|---|---|---|
| WorkMonth | My Overtime, Reports, the payroll workbook, the Home screen's month total | The entries of one month |
| Status | The approval screens and flows | The entries still pending |
Both indexes went in while the list was still empty, before the app writes its first entry.
Step 8: Create the Payroll Exports Library
Follow How to Create a Document Library in SharePoint Online, then How to Rename a SharePoint Library Without Changing Its URL:
| Setting | Value |
|---|---|
| Type | Blank library |
| Name when created | PayrollExports |
| Description | Monthly overtime workbooks for payroll. Created by the Overtime Timesheet app. |
| Show in site navigation | Cleared |
| Name after renaming | Payroll Exports |

Payroll sees a friendly name; the flow in Part 13 uses the address without spaces. The library stays out of the site's menu because only payroll will be able to open it, from Part 3.
Step 9: Add the Departments
Add the demo organization's two departments with + New (How to Add an Item to a SharePoint List):
| Department | Approvers | IsActive |
|---|---|---|
| Emergency Department | Olivia Bennett | Yes |
| Radiology | Daniel Brooks | Yes |
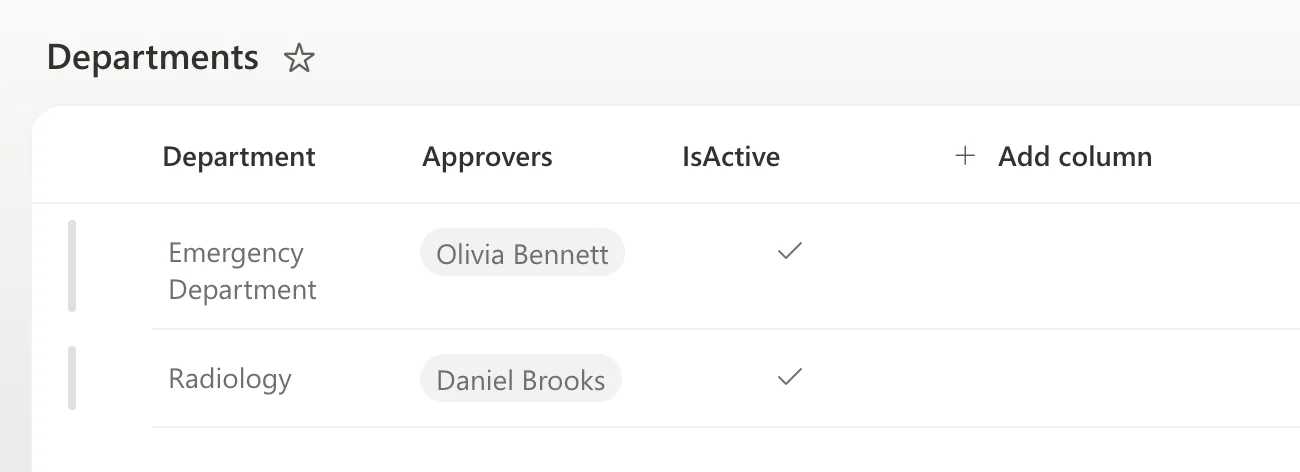
When I typed "Olivia", the picker first suggested her old job title, Head of Sales, hours after Part 1 changed it. SharePoint's copy of people's profiles updates on its own schedule: Fixed: SharePoint People Picker Shows a User's Old Job Title. The item stores the person, so it doesn't matter.
Two people in the demo organization are covered by these departments without being approvers: Aisha Khan logs overtime in the Emergency Department, and covers one Radiology shift, which goes to Daniel. Daniel's own overtime can't go to himself; Part 8's flow sends it to his manager instead.
OvertimeEntries stays empty. The app writes to it from Part 6, and Part 12 imports the old workbook.
The Finished Site
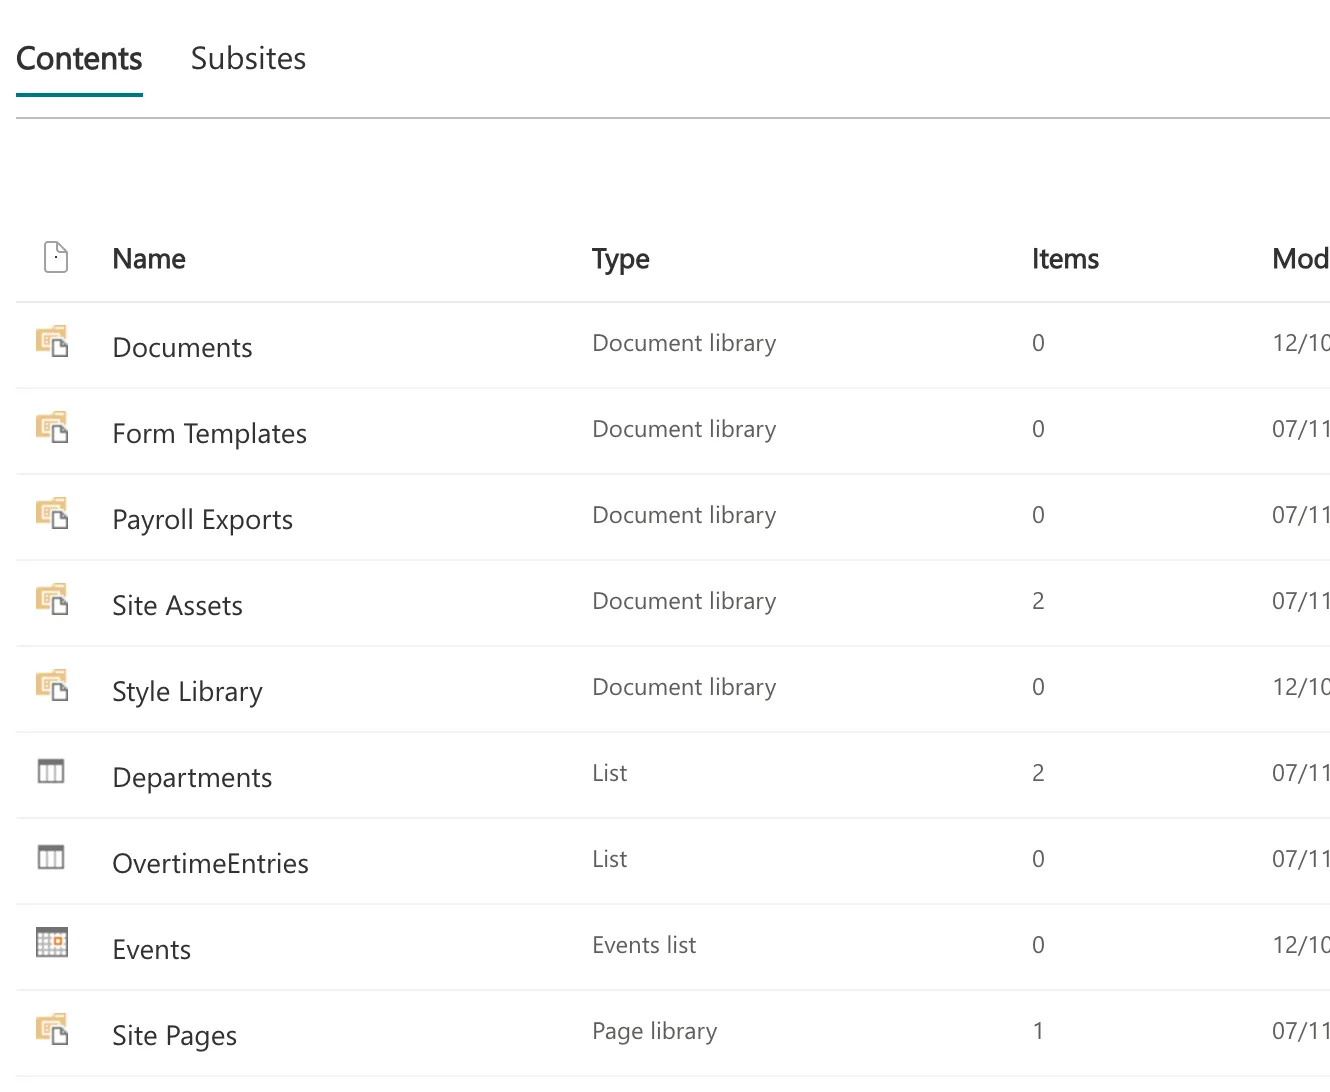
Site contents shows the two lists and the library next to the libraries every site starts with:
Common Mistakes
| Mistake | What happens | Do this instead |
|---|---|---|
| Leaving the site on Pacific Time and US dates | Times and dates in SharePoint read wrong for a UK team | Set the locale first, then the time zone, in Regional settings |
| Making EmployeeEmail required | The import in Part 12 can't save entries for people who have left | Leave it optional |
| Using a Date column for the month | Monthly filters depend on time zones | Store WorkMonth as text such as 2026-11 |
| Giving Approvers multiple groups | Approvals go to whole groups | Leave Allow selection of Groups cleared |
| Adding test entries to OvertimeEntries | Test data mixes with real overtime | Leave it empty; the app and the import fill it |
Troubleshooting
| Symptom | Likely cause | Fix |
|---|---|---|
| This value already exists in the list. when adding a department | That department is already there | Edit the existing item instead |
| A night shift is refused when saving | The finish is on the same day as the start | Put the finish on the next day |
| Dates show month first | The locale is still English (United States) | Regional settings → Locale |
| The picker shows an old job title | SharePoint's copy of the profile hasn't synced | Wait; pick the person anyway |
FAQ
Why two lists and a library, not one list?
Departments change rarely and are managed by admins; entries are written all day by everyone; workbooks are files. Each gets the permissions it needs in Part 3.
Why a Number column for the department, not a Lookup?
It's simple to store, filter and write from the app, and the app shows the department's name from the copy in Department.
Why does SharePoint store the hours at all?
So every report adds up the same stored number. The app works it out, and the approval flow in Part 8 works it out again from the start and finish times, shows that number to the approver and saves it with the decision.
Can people see each other's overtime now?
Nobody but you could open the site at this point. Part 3 gives the team access, with SharePoint's item-level permissions so each person can open only their own entries.
Do I have to build these lists by hand in every organization?
No. Part 17 builds a setup flow that creates them for you.
Conclusion
The Overtime Timesheet site now has everything the app stores: a Departments list with named approvers, an OvertimeEntries list whose columns, defaults, ranges and validation rule keep each shift sensible, two indexes for the queries the app makes most, and a library for payroll. The site shows London time, UK dates and the 24-hour clock.
Part 3 keeps overtime private: unique permissions on each list and the library, item-level permissions so staff open only their own entries, content approval so an edited entry goes back for approval, and a check of what each person can see.
Additional Resources
- List and library column types and options
- Change regional settings for a site
- Examples of common formulas in lists
- Add an index to a list or library column
- Connect to SharePoint from a canvas app
← Previous: Part 1: Plan the App and Set Up the Demo Organization Next → Part 3: Keep Overtime Private with SharePoint Permissions
