Build an Overtime Timesheet App in Power Apps — Part 14: Create the Payroll Workbook from the App

Part 13's workbook arrives on the 1st, but payroll sometimes needs one now: for a month that's just been corrected, or one that was never sent. This part adds a Create payroll workbook button to the Reports screen. It runs the same child flow for the month on screen, and an Open the workbook button opens the result.
This is Part 14 of a 21-part series.
- Part 1: Plan the App and Set Up the Demo Organization
- Part 2: Create the SharePoint Site and Lists
- Part 3: Keep Overtime Private with SharePoint Permissions
- Part 4: Create the Solution, Environment Variables and Canvas App
- Part 5: Build the Home Screen
- Part 6: Build the Log Overtime Screen
- Part 7: Build the My Overtime Screen
- Part 8: Build the Approval Flow for Teams and Outlook
- Part 9: Show Approvers What's Waiting
- Part 10: Build the Departments Screen
- Part 11: Build the Reports Screen
- Part 12: Import the Old Excel Timesheet
- Part 13: Create the Monthly Payroll Workbook with Office Scripts
- Part 14: Create the Payroll Workbook from the App (you are here)
- Part 15: Build the Power BI Overtime Report (coming soon)
- Part 16: Share the App and Add It to Microsoft Teams (coming soon)
- Part 17: Test Every Role and Department (coming soon)
- Part 18: Build a Setup Flow That Creates the Lists (coming soon)
- Part 19: Run the Solution Checker and Export the Solutions (coming soon)
- Part 20: Install the App in a New Environment (coming soon)
- Part 21: Recap, Production Checklist and Next Steps (coming soon)
Part 13 built Create Payroll Workbook, a child flow that makes the workbook for a month and returns its name, link and number of entries. An app can only add flows that start with a Power Apps trigger, so this part adds a small flow Power Apps can run, Create Payroll Workbook Now, which calls the child flow and passes the answer back. On the Reports screen from Part 11, payroll then gets two buttons, and the payroll officer tests them. Each generic task has its own guide; this part gives the values for this app, and why.
What You'll Build
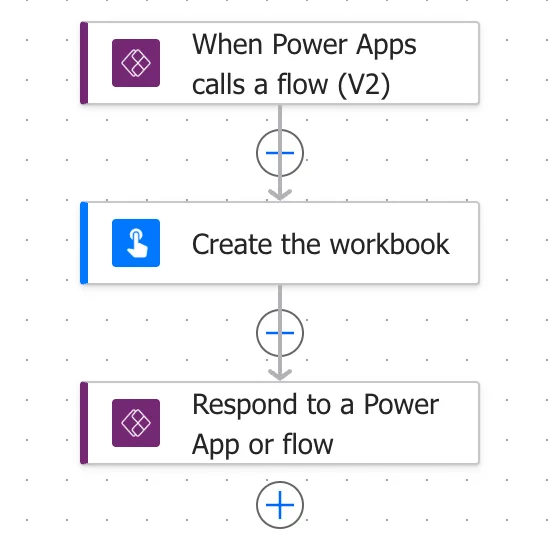
The flow, action by action:
When Power Apps calls a flow (V2)        Month: any day in the month, as yyyy-mm-dd
├─ Create the workbook                   Run a Child Flow: Create Payroll Workbook, for that month
└─ Respond to a Power App or flow        fileName, link, entries
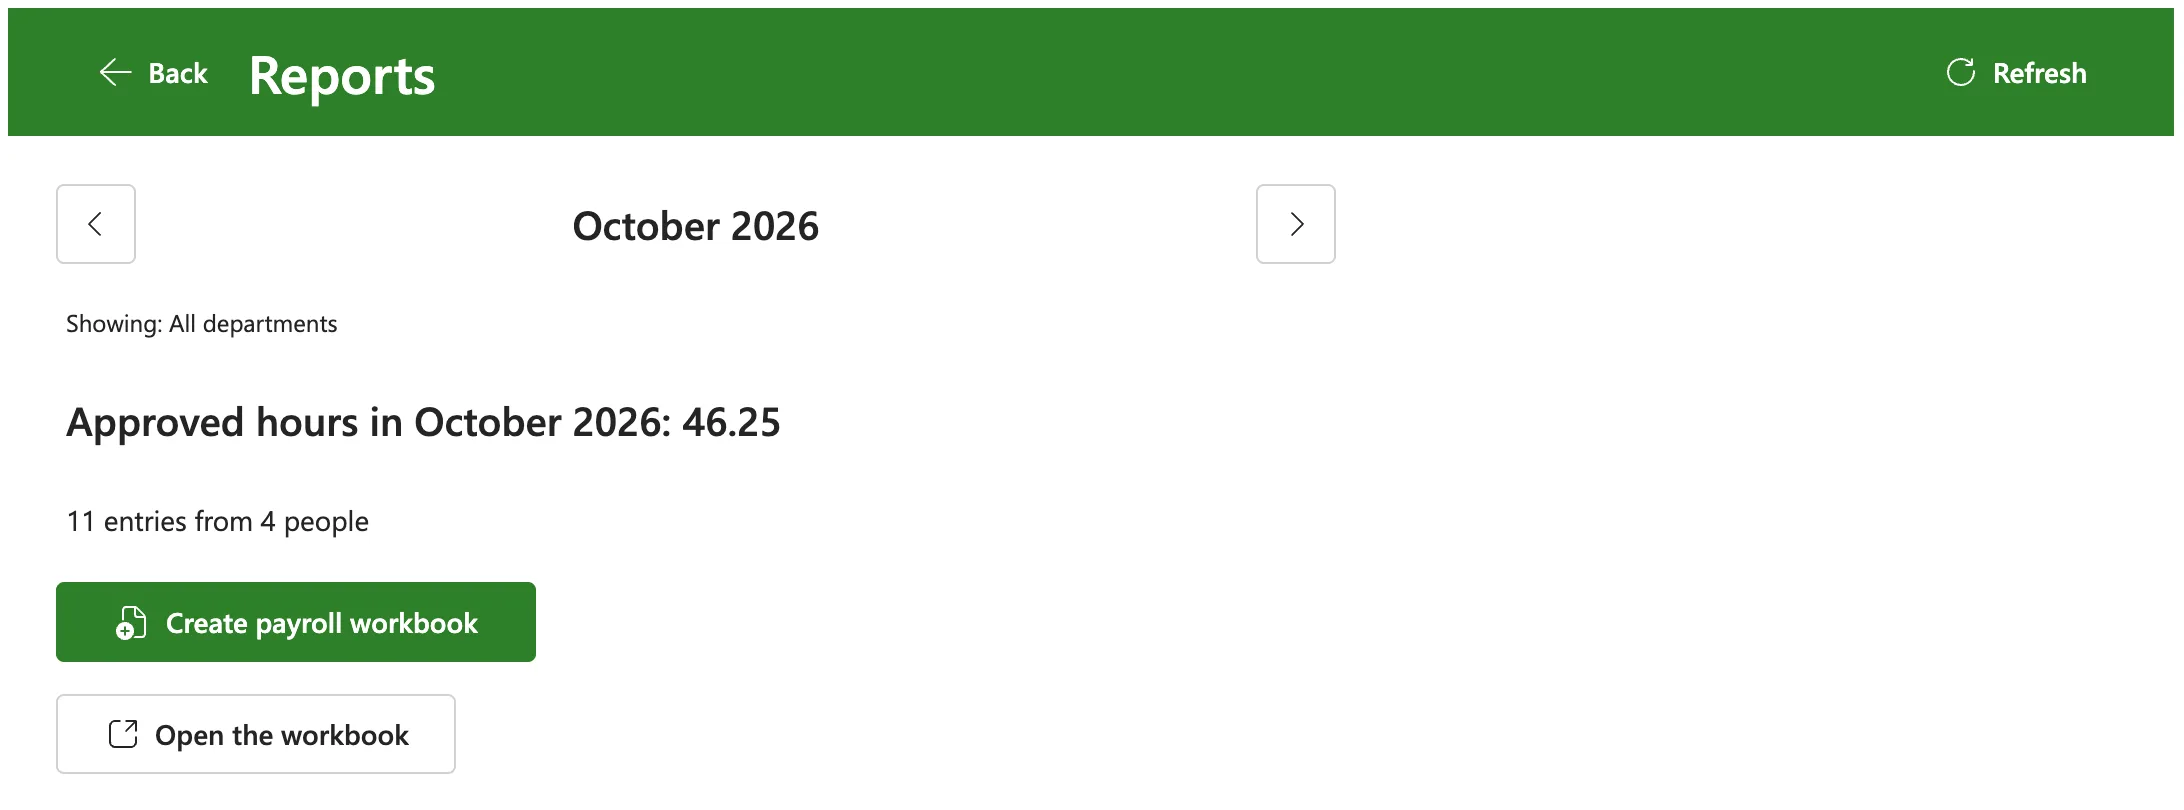
The Reports screen for payroll, after a workbook was made:
How It Works
The decisions behind it:
- The same workbook as on the 1st. The button's flow calls Part 13's child flow, so a workbook made from the app is the same as the monthly one: same template, same script, same library.
- Only payroll sees the button. It's visible when IsPayroll, the named formula from Part 5, is true. That's convenience: the security is the flow itself, which only its run-only users can run, and the library, which only payroll can read.
- The month on screen. The button makes the workbook for the month the Reports screen is showing, so payroll looks at the month's totals before making its workbook.
- One click at a time. The button is disabled while the flow runs, about 15 seconds, and says Creating the workbook....
- Two buttons, not one. Microsoft's Launch reference warns that a pop-up blocker can stop Launch from opening a page. The link only exists once the flow has finished, so instead of opening it automatically, the app shows Open the workbook, and the tab opens on the person's own click.
Prerequisites
- Part 13 completed.
Step 1: Create the Flow Power Apps Runs
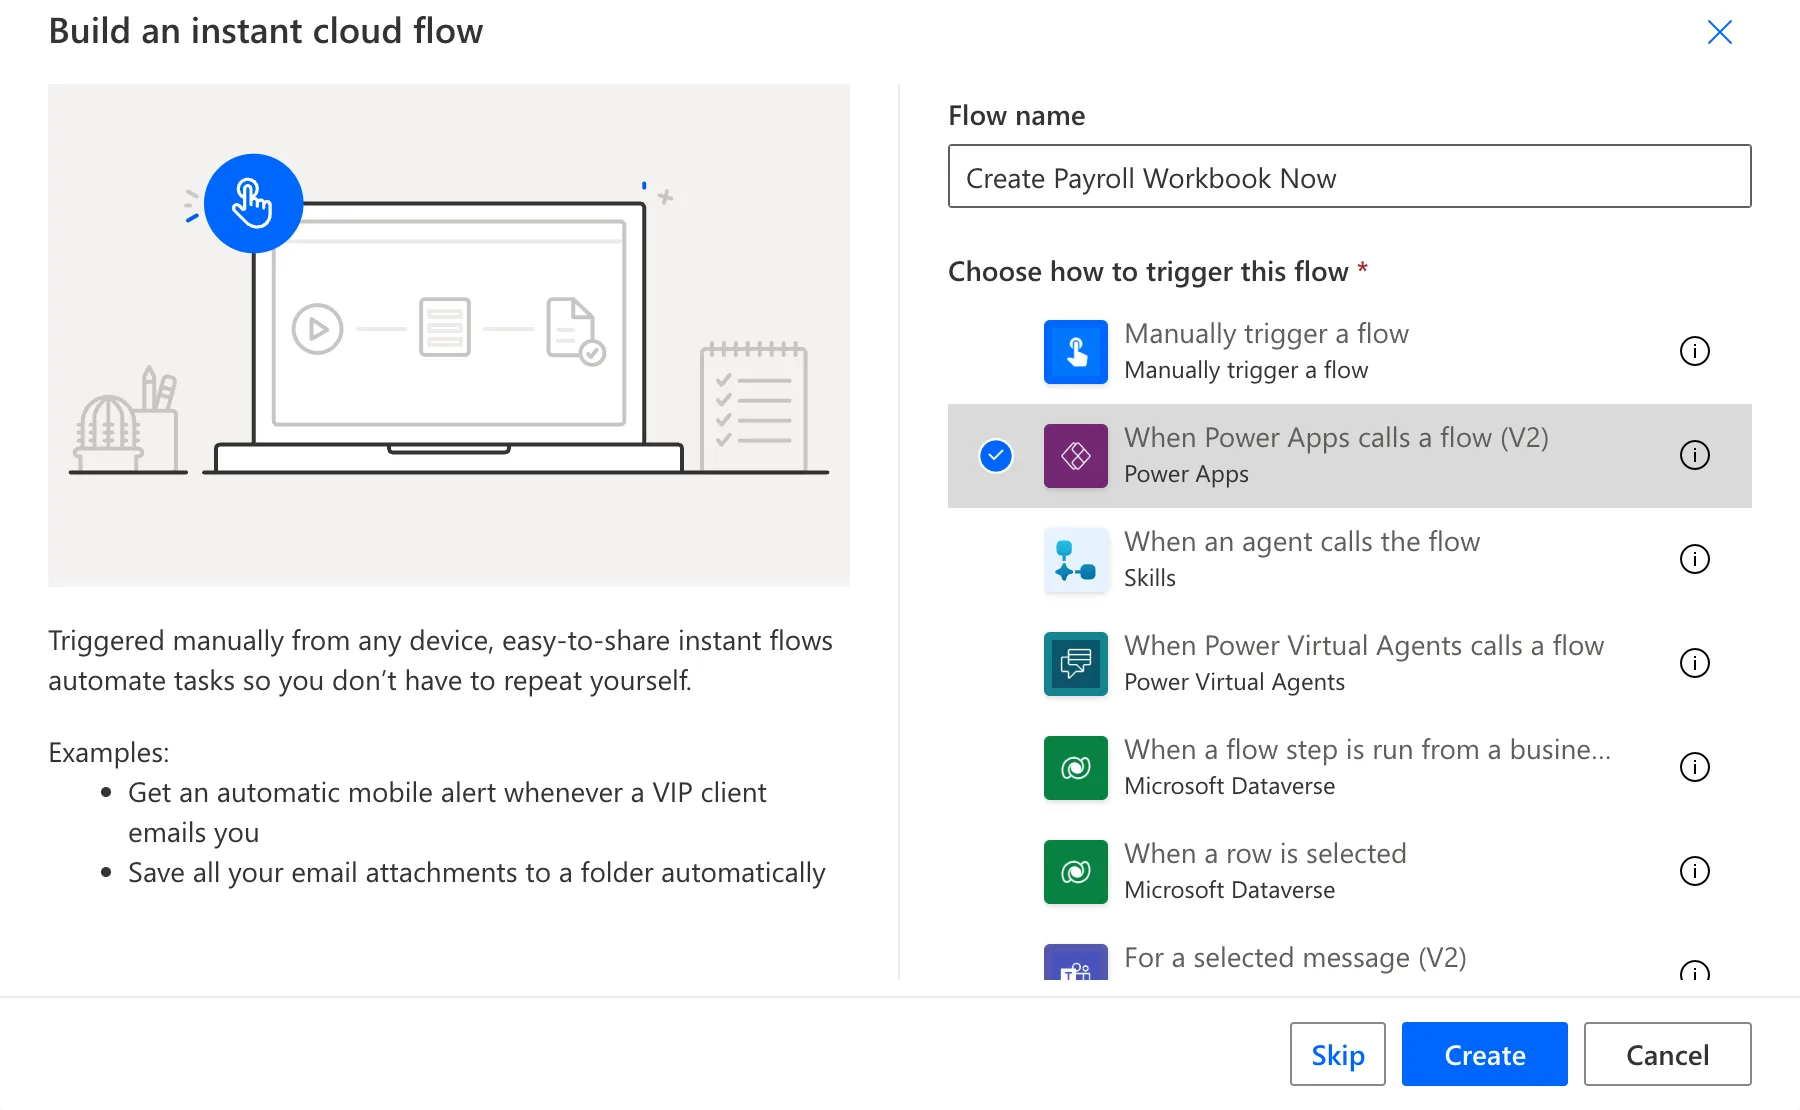
In the Overtime Timesheet solution, select New > Automation > Cloud flow > Instant, name it Create Payroll Workbook Now, and choose When Power Apps calls a flow (V2) (How to Create a Flow That Power Apps Can Run in Power Automate):
Give the trigger one Date input, Month, described as Any day in the month, as yyyy-mm-dd (How to Add an Input to the Power Apps (V2) Trigger in Power Automate). As in Part 11, the app sends a day of the month, and the flow works out the month.
The flow opened in the classic designer. I added an empty Respond to a Power App or flow and selected Save, and the Flow checker opened with a warning about it: Remove the response action so the flow trigger completes instantaneously. The response is the point of this flow, so I closed the checker, saved with the Save on the canvas, and opened the flow again from the solution, with Edit on its own page, to work in the new designer.
Step 2: Call the Child Flow
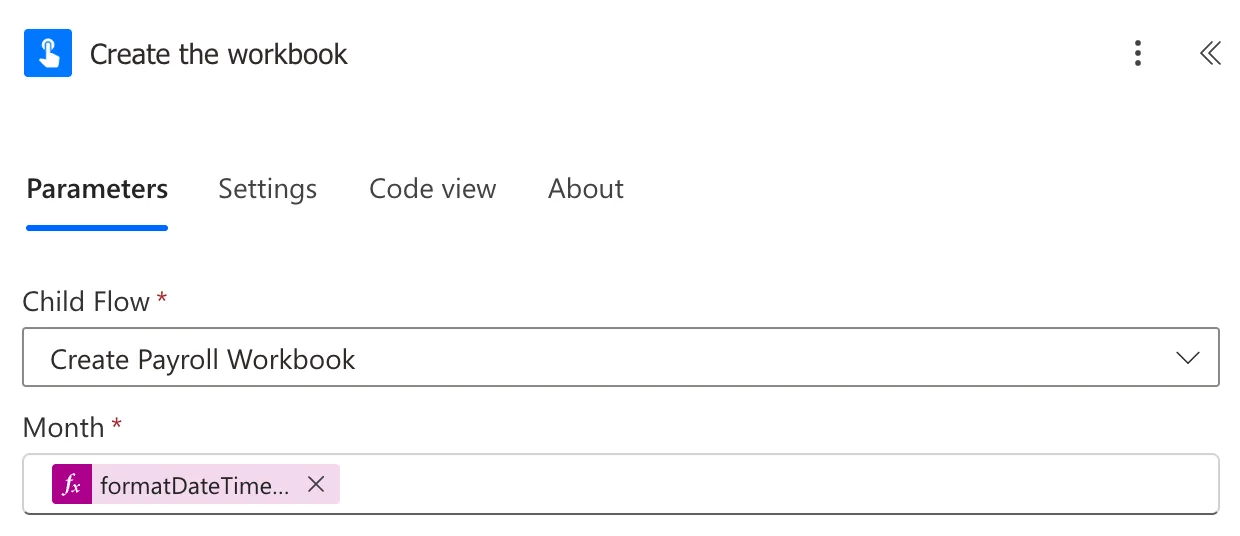
Add Run a Child Flow, called Create the workbook (How to Call a Child Flow in Power Automate): Child Flow Create Payroll Workbook, and Month this expression:
formatDateTime(triggerBody()?['date'], 'yyyy-MM')
triggerBody()?['date'] is the trigger's Month input, a date like 2026-10-01, and 'yyyy-MM' turns it into 2026-10, the form the child flow takes (How to Format a Date in Power Automate with formatDateTime).
Step 3: Send the Answer Back to the App
Fill Respond to a Power App or flow with the child flow's three outputs (How to Send Values Back to Power Apps from a Flow in Power Automate):
| Output | Type | Value |
|---|---|---|
| fileName | Text | fileName of Create the workbook |
| link | Text | link of Create the workbook |
| entries | Number | entries of Create the workbook |
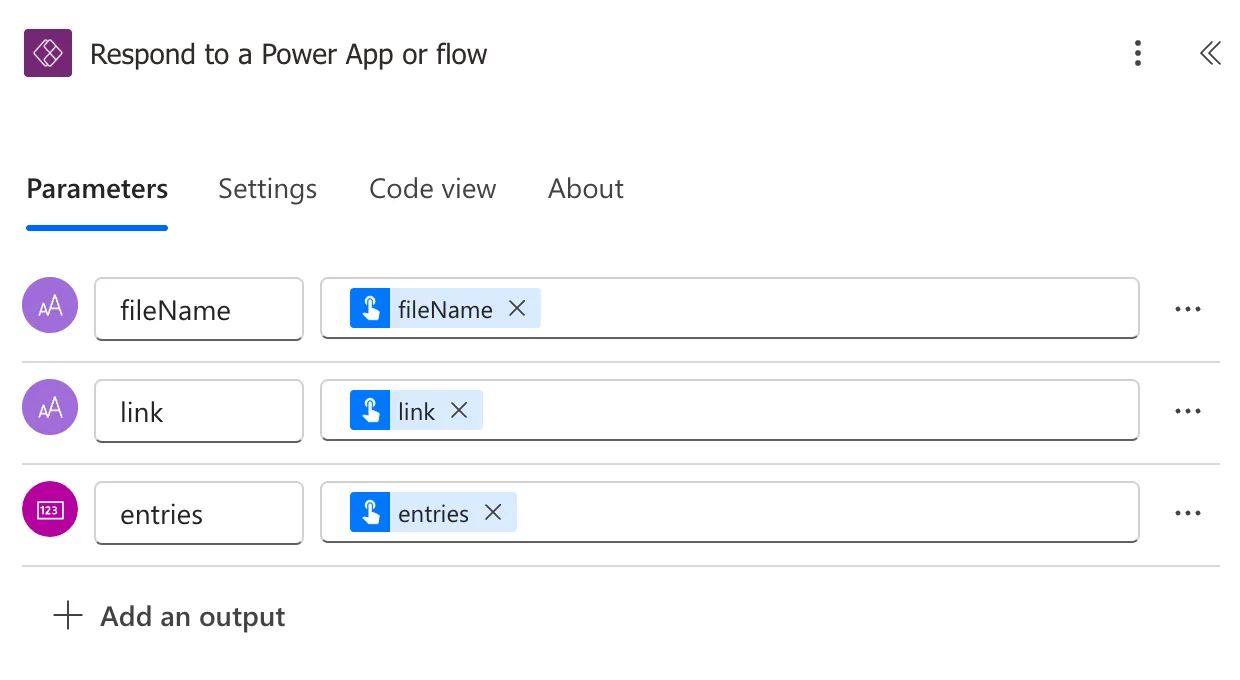
In Code view, fileName is stored as filename, in lower case, which is the name the app will use. Save and publish the flow. The whole flow is three cards:
Step 4: Let Payroll Run It
On the flow's page, add the payroll officer, Leo Martin, as a run-only user (How to Share a Flow with Run-Only Users in Power Automate). As with Parts 9 and 11, this share is for testing; Part 16 replaces it with the Overtime Payroll group. The panel listed no connections to choose, because this flow uses none of its own: the child flow uses the owner's embedded connections from Part 13.
Leo doesn't need the child flow shared with him. Running Create Payroll Workbook Now was enough for it to run Create Payroll Workbook too.
Step 5: Add the Flow to the App
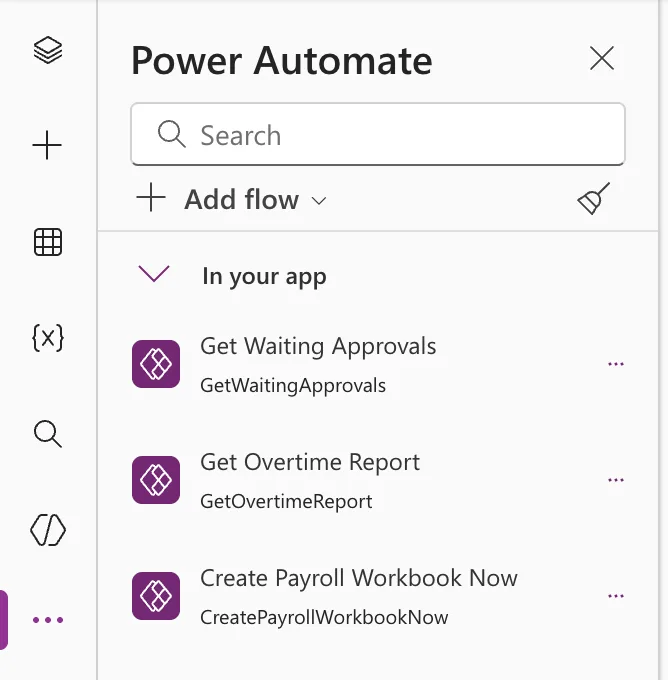
Open the app from the solution and, in Power Apps Studio's Power Automate pane, select Add flow and Create Payroll Workbook Now (How to Add a Flow to a Canvas App in Power Apps). It joins the app's other two flows as CreatePayrollWorkbookNow, the name formulas use:
Step 6: Add the Create Button
On the Reports screen, select Insert > Button (How to Add a Button in Power Apps). The new button went to the end of the body's container, conBodyRS, under the list of people. To move it up under the counts, lblCountsRS, the Tree view's menu didn't do it for me. Microsoft's responsive apps article says the order in a container changes via the Tree view, or by using the arrow keys as shortcuts, so I selected the button on the canvas and pressed the Up arrow, one press per place, until it was under the counts. I renamed it btnCreateWorkbookRS in the Properties pane.
Its properties:
| Property | Value |
|---|---|
| Text | If(locIsCreatingRS, "Creating the workbook...", "Create payroll workbook") |
| Icon | "DocumentAdd" |
| Width, Height | 240, 40 |
| AlignInContainer | AlignInContainer.Start |
| Visible | IsPayroll |
| DisplayMode | If(locIsCreatingRS || locIsLoadingRS || locLoadFailedRS || IsEmpty(locRowsRS), DisplayMode.Disabled, DisplayMode.Edit) |
| AccessibleLabel | $"Create the payroll workbook for {Text(locMonthRS, "mmmm yyyy")}" |
- Text changes while the flow runs, so the button says what's happening.
- DisplayMode disables it while the workbook is being made, while the month is loading, when the month failed to load, and when the month has no approved entries: there's nothing to put in a workbook (How to Stop a Button Being Selected Twice While It Saves in Power Apps).
- AccessibleLabel names the month for screen readers, because the button's text doesn't.
Its OnSelect runs the flow and keeps the answer:
UpdateContext({ locIsCreatingRS: true });
With(
    { month: locMonthRS },
    With(
        { workbook: IfError(CreatePayrollWorkbookNow.Run(Text(month, "yyyy-mm-dd")), Blank()) },
        If(
            IsBlank(workbook),
            Notify(
                "The payroll workbook couldn't be created. Look in the Payroll Exports library in a few minutes before you try again.",
                NotificationType.Error
            ),
            UpdateContext({ locWorkbookRS: { Month: month, FileName: workbook.filename, Link: workbook.link, Entries: workbook.entries } });
            Notify($"{workbook.filename} is ready, with {workbook.entries} approved entries.", NotificationType.Success)
        )
    )
);
UpdateContext({ locIsCreatingRS: false })
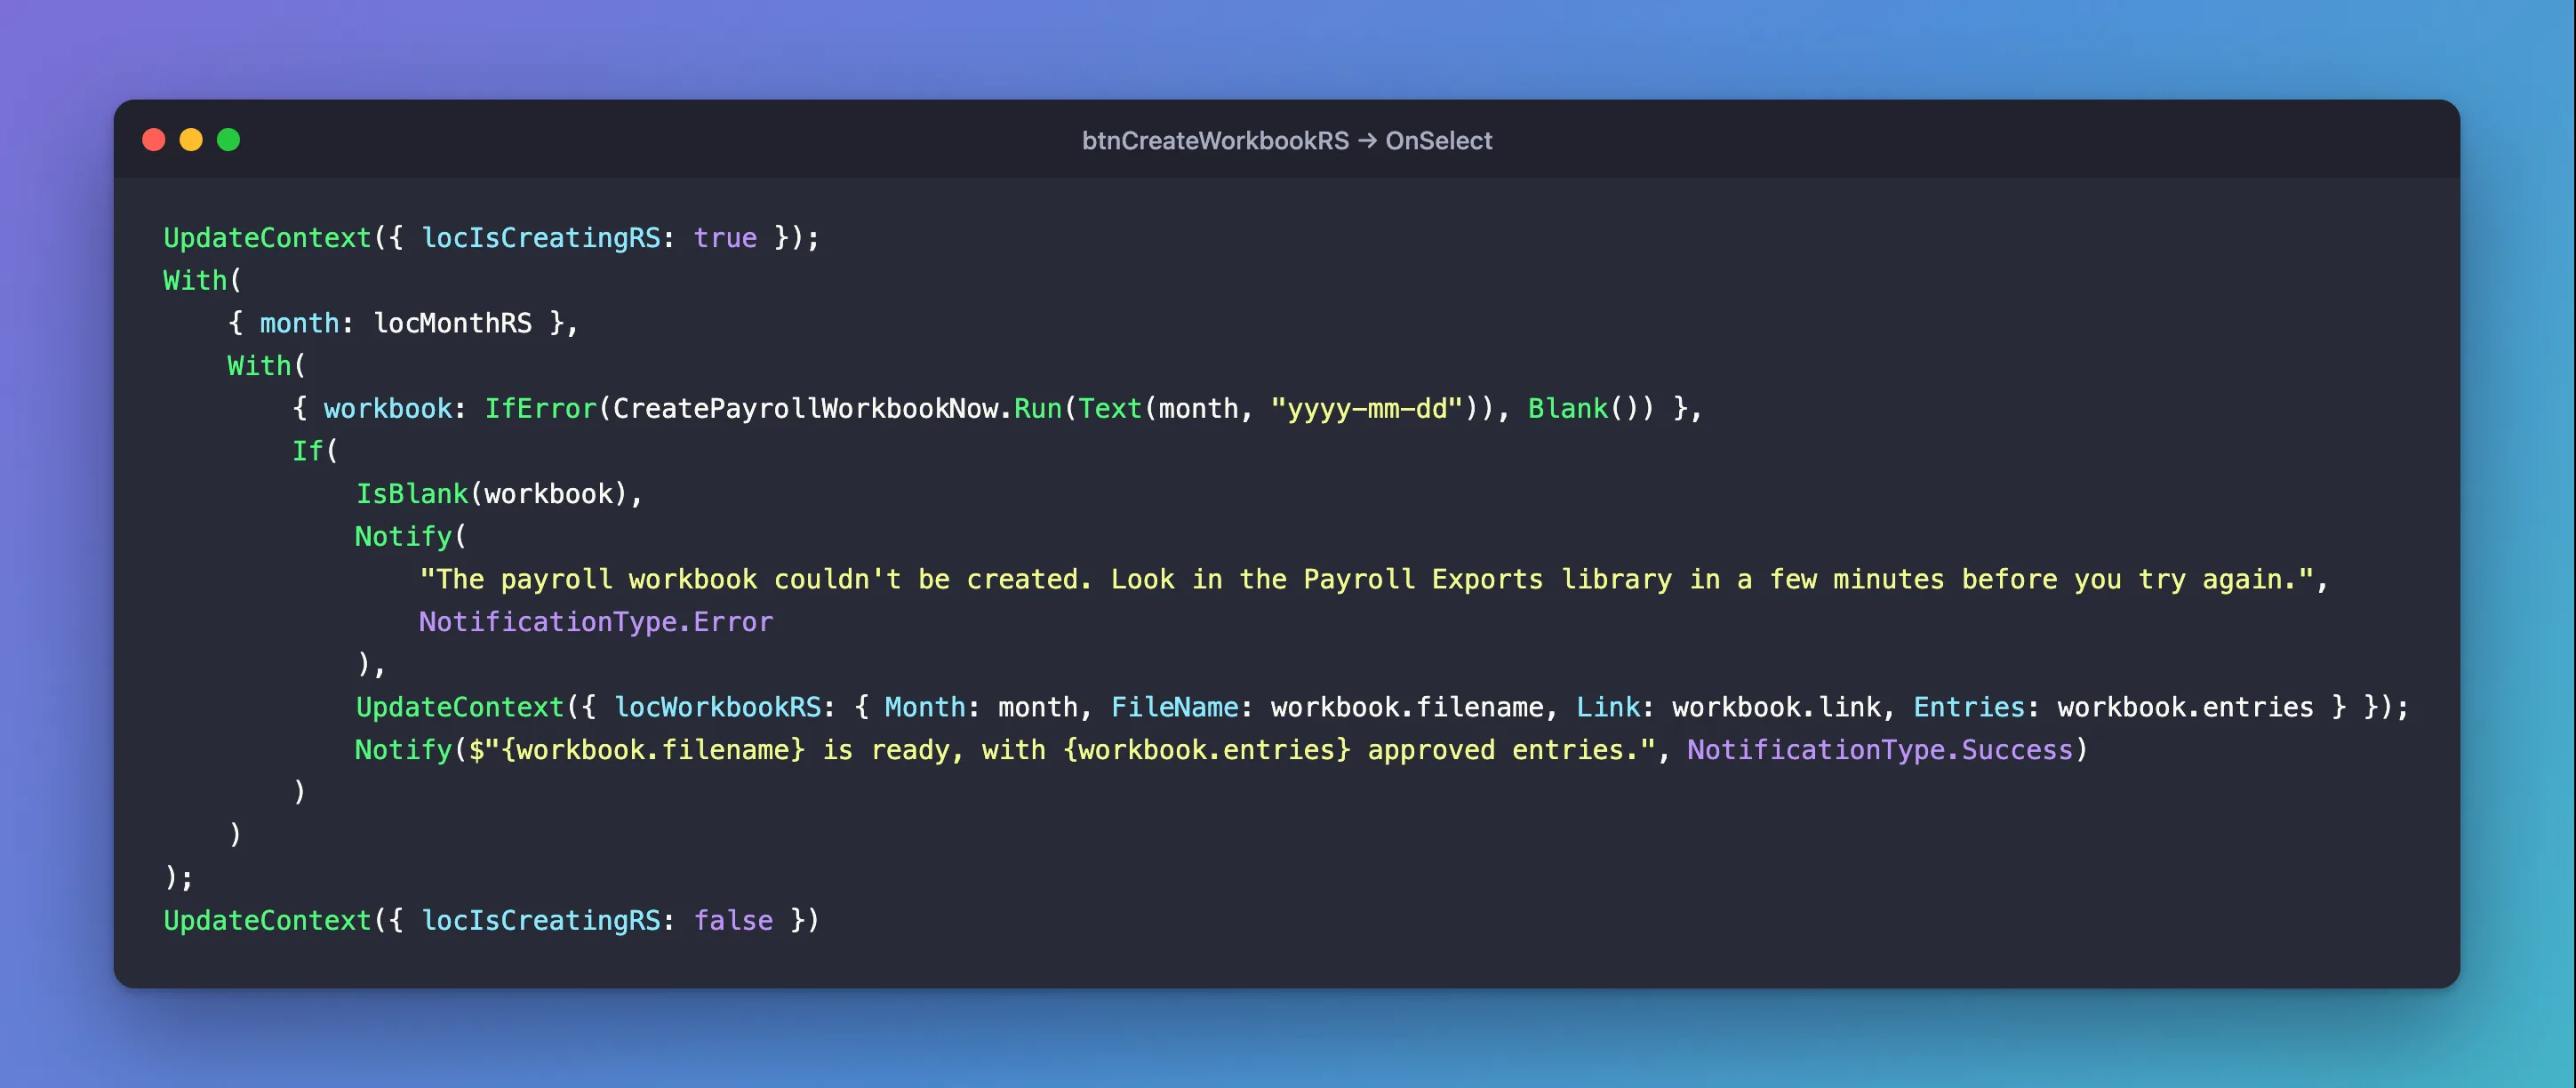
locIsCreatingRSis true while the flow runs, which changes the button's text and disables it.With({ month: locMonthRS }, ...)reads the month once, before the call. My first version readlocMonthRSagain after the call; if payroll moved to another month during the 15 seconds, the workbook would have been recorded against the wrong one.Text(month, "yyyy-mm-dd")sends the date the way the flow's Date input expects (How to Send a Date to a Flow from Power Apps).IfError(..., Blank())turns a failed run into nothing, so the formula can tell payroll what to do instead of stopping (How to Handle a Failed Flow Call in Power Apps). The message asks them to look in the library first: a run can fail after the workbook was saved.locWorkbookRSkeeps the workbook's month, name, link and count for the Open button. My first version also emptied it when a run failed, which hid the link to a workbook made a moment earlier, so I took that out.
Format the formula with Format text in the formula bar (How to Format a Formula in Power Apps Studio).
Step 7: Add the Open Button
Insert another button under the first, btnOpenWorkbookRS:
| Property | Value |
|---|---|
| Text | "Open the workbook" |
| Icon | "Open" |
| Appearance | ButtonAppearance.Secondary |
| Width, Height | 200, 40 |
| AlignInContainer | AlignInContainer.Start |
| Visible | !IsBlank(locWorkbookRS) && locWorkbookRS.Month = locMonthRS |
| OnSelect | Launch(locWorkbookRS.Link) |
| AccessibleLabel | $"Open {locWorkbookRS.FileName}" |
- Visible shows it only after a workbook was made, and only on the month it was made for.
Launch(locWorkbookRS.Link)opens the workbook in a new tab (How to Open a Web Page from Power Apps with Launch).- Secondary keeps the green for the main action.
The modern button's icon list had DocumentAdd and Open, but no Excel or table icon, so those two it is. Save the app and publish it (How to Publish a Canvas App in Power Apps).
Step 8: Test It as Payroll
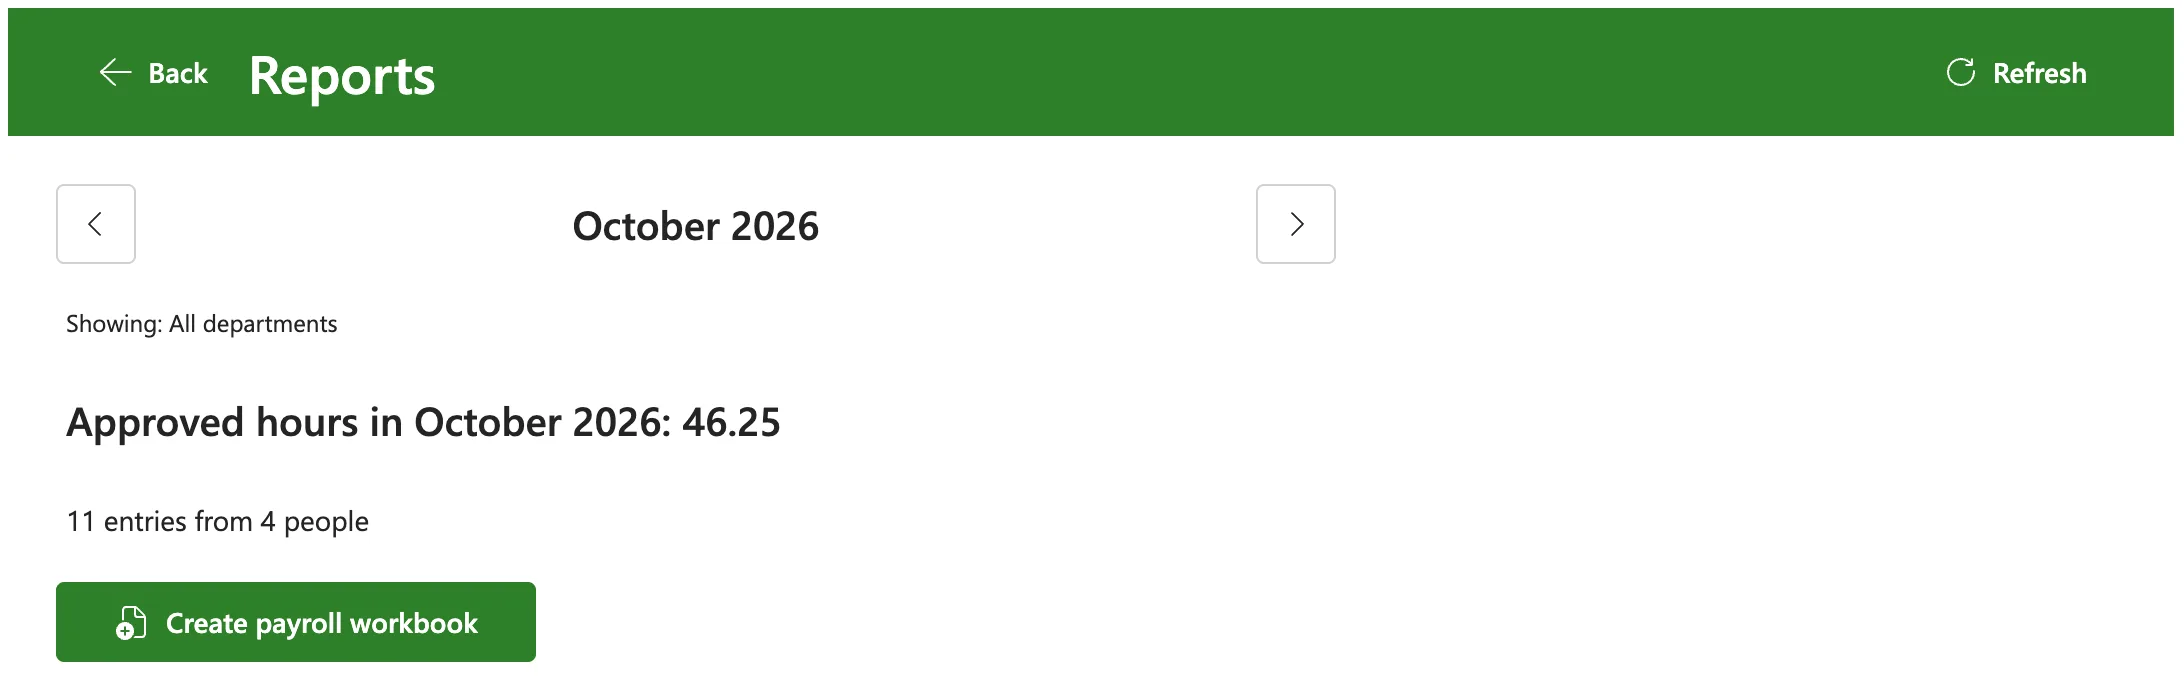
Signed in as Leo Martin, I opened the app. Because the app had just been published, it showed a notice about its version, with a Refresh button, which I selected. On the Reports screen, October 2026 showed 46.25 hours from 11 entries by 4 people, and the Create payroll workbook button:
Selecting it turned it grey, with Creating the workbook...:
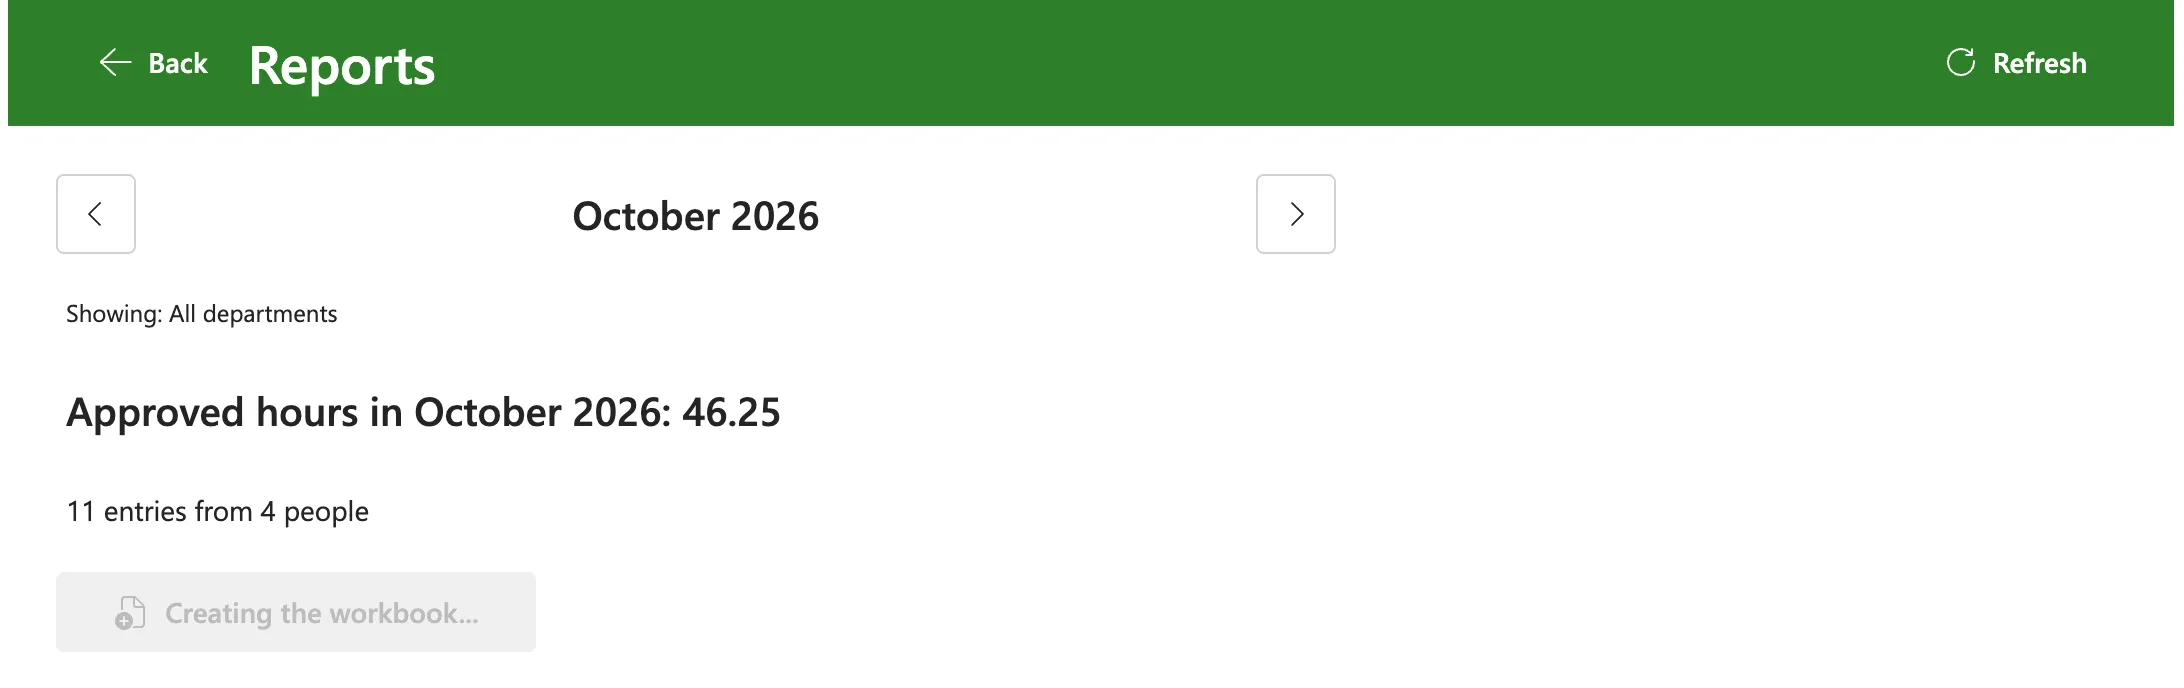
About 15 seconds later, the app said Overtime 2026-10 created 2026-11-20 11.41.xlsx is ready, with 11 approved entries., and Open the workbook appeared under the button, as in the picture at the top of this part. It opened the workbook in Excel for the web in a new tab, in Viewing mode, because Leo can only read the library: the 11 entries and a total of 46.25 hours.
Common Mistakes
| Mistake | What happens | Do this instead |
|---|---|---|
| Adding the child flow to the app | A flow must have a Power Apps trigger to be added to an app, and the child flow has Manually trigger a flow | A small flow with the V2 trigger that calls the child |
| Opening the link automatically after the flow | A pop-up blocker can stop it | An Open button that the person selects |
Reading locMonthRS after the call | The workbook can be recorded against another month | Capture the month first, with With |
| Leaving the button enabled while it runs | A second click makes a second workbook | DisplayMode disabled while locIsCreatingRS |
| Forgetting the run-only users | The button fails for payroll | Share the flow with them, or with their group in Part 16 |
Troubleshooting
| Symptom | Likely cause | Fix |
|---|---|---|
| The button isn't there | The person isn't in Overtime Payroll, so IsPayroll is false | Check the group's members |
| The payroll workbook couldn't be created | The flow failed, or the person can't run it | Look in Payroll Exports, then the flow's run history |
| The button stays grey | The month has no approved entries, or failed to load | Refresh, or pick a month with entries |
| Open the workbook does nothing | The browser blocked the new tab | Allow pop-ups for the app's address |
| The workbook opens read-only | The person has Read on the library | Expected: payroll reads the workbooks, the flow writes them |
| A notice about the app's version when it opens | The app was published again since it was loaded | Select Refresh |
FAQ
Why not have the app call Create Payroll Workbook directly?
Microsoft's Use Power Automate pane lists Have a Power Apps trigger for your flows among the requirements for adding a flow to an app, and a child flow starts with Manually trigger a flow, which other flows call. A three-step flow in between keeps one copy of the workbook logic for both the schedule and the app.
Does each click make a new file?
Yes, with the time in its name, as on the 1st. Nothing is overwritten, and the library keeps every workbook.
Can approvers use the button?
No. It's visible only for Overtime Payroll, and the flow is shared only with payroll. Approvers see their departments' totals on the same screen, without the button.
Does this need premium licences?
No. The flow uses only built-in actions and runs the child flow, whose connectors are standard. An instant flow runs on the licence of the person who runs it.
Conclusion
Payroll can now make the workbook for any month themselves:
- Create Payroll Workbook Now, a flow Power Apps runs, turns the month on screen into yyyy-MM, calls Part 13's child flow and returns the workbook's name, link and number of entries;
- Create payroll workbook, a button only payroll sees, runs it for the month on screen, disables itself while it runs and says what happened;
- Open the workbook appears when the workbook is ready and opens it in a new tab;
- tested as the payroll officer: October's workbook, made in about 15 seconds, with the same 11 entries and 46.25 hours as the screen.
Part 15 builds the Power BI overtime report, for approvers and payroll who want to look across months.
Additional Resources
- Launch and Param functions
- Use Power Automate pane: adding and running flows in canvas apps.
- Create child flows
- Building responsive canvas apps: moving controls in a container with the arrow keys.
← Previous: Part 13: Create the Monthly Payroll Workbook with Office Scripts Next → Part 15: Build the Power BI Overtime Report (coming soon)
