Build an Overtime Timesheet App in Power Apps — Part 13: Create the Monthly Payroll Workbook with Office Scripts

Payroll pays overtime from a spreadsheet, so on the 1st of every month they get one: an Excel workbook of the month's approved overtime, entry by entry and person by person, saved in a library only they can open, with a link in their inbox. This part builds it with an Excel template, an Office Script and two flows.
This is Part 13 of a 21-part series.
- Part 1: Plan the App and Set Up the Demo Organization
- Part 2: Create the SharePoint Site and Lists
- Part 3: Keep Overtime Private with SharePoint Permissions
- Part 4: Create the Solution, Environment Variables and Canvas App
- Part 5: Build the Home Screen
- Part 6: Build the Log Overtime Screen
- Part 7: Build the My Overtime Screen
- Part 8: Build the Approval Flow for Teams and Outlook
- Part 9: Show Approvers What's Waiting
- Part 10: Build the Departments Screen
- Part 11: Build the Reports Screen
- Part 12: Import the Old Excel Timesheet
- Part 13: Create the Monthly Payroll Workbook with Office Scripts (you are here)
- Part 14: Create the Payroll Workbook from the App
- Part 15: Build the Power BI Overtime Report (coming soon)
- Part 16: Share the App and Add It to Microsoft Teams (coming soon)
- Part 17: Test Every Role and Department (coming soon)
- Part 18: Build a Setup Flow That Creates the Lists (coming soon)
- Part 19: Run the Solution Checker and Export the Solutions (coming soon)
- Part 20: Install the App in a New Environment (coming soon)
- Part 21: Recap, Production Checklist and Next Steps (coming soon)
The Reports screen from Part 11 shows payroll each month's totals, but payroll's own process runs on spreadsheets. Part 2 created the Payroll Exports library for them, and Part 3 closed it to everyone except the Overtime Payroll group. This part fills it: a workbook per month, built from a template by an Office Script, by a child flow that any other flow can call. A scheduled flow calls it on the 1st and emails payroll; Part 14 adds a button to the Reports screen that calls it on demand. Each generic task has its own guide; this part gives the values for this app, and why.
What You'll Build
The two flows, action by action:
Manually trigger a flow                  Month, such as 2026-10
├─ Get the approved entries              Get items: that month, approved twice
├─ Payroll rows                          Select: one row per entry, times in UK time
├─ Get the template                      Get file content using path: Setup/Payroll Template.xlsx
├─ Create the workbook                   Create file: Overtime 2026-10 created 2026-11-20 10.29.xlsx
├─ Fill the workbook                     Run script from SharePoint library: Fill Payroll Workbook
├─ Get the workbook link                 Get file properties: the new file's link
└─ Respond to a Power App or flow        fileName, link, entries
Recurrence                               the 1st of every month, 07:00, UK time
├─ Last month                            Compose: last month as yyyy-MM
├─ Create the workbook                   Run a Child Flow: Create Payroll Workbook
├─ Get the payroll group setting         Get items: Settings, PayrollGroupId
├─ List the payroll members              List group members: Overtime Payroll
├─ Payroll emails                        Select: each member's email
└─ Email payroll                         Send an email (V2): the link to the workbook
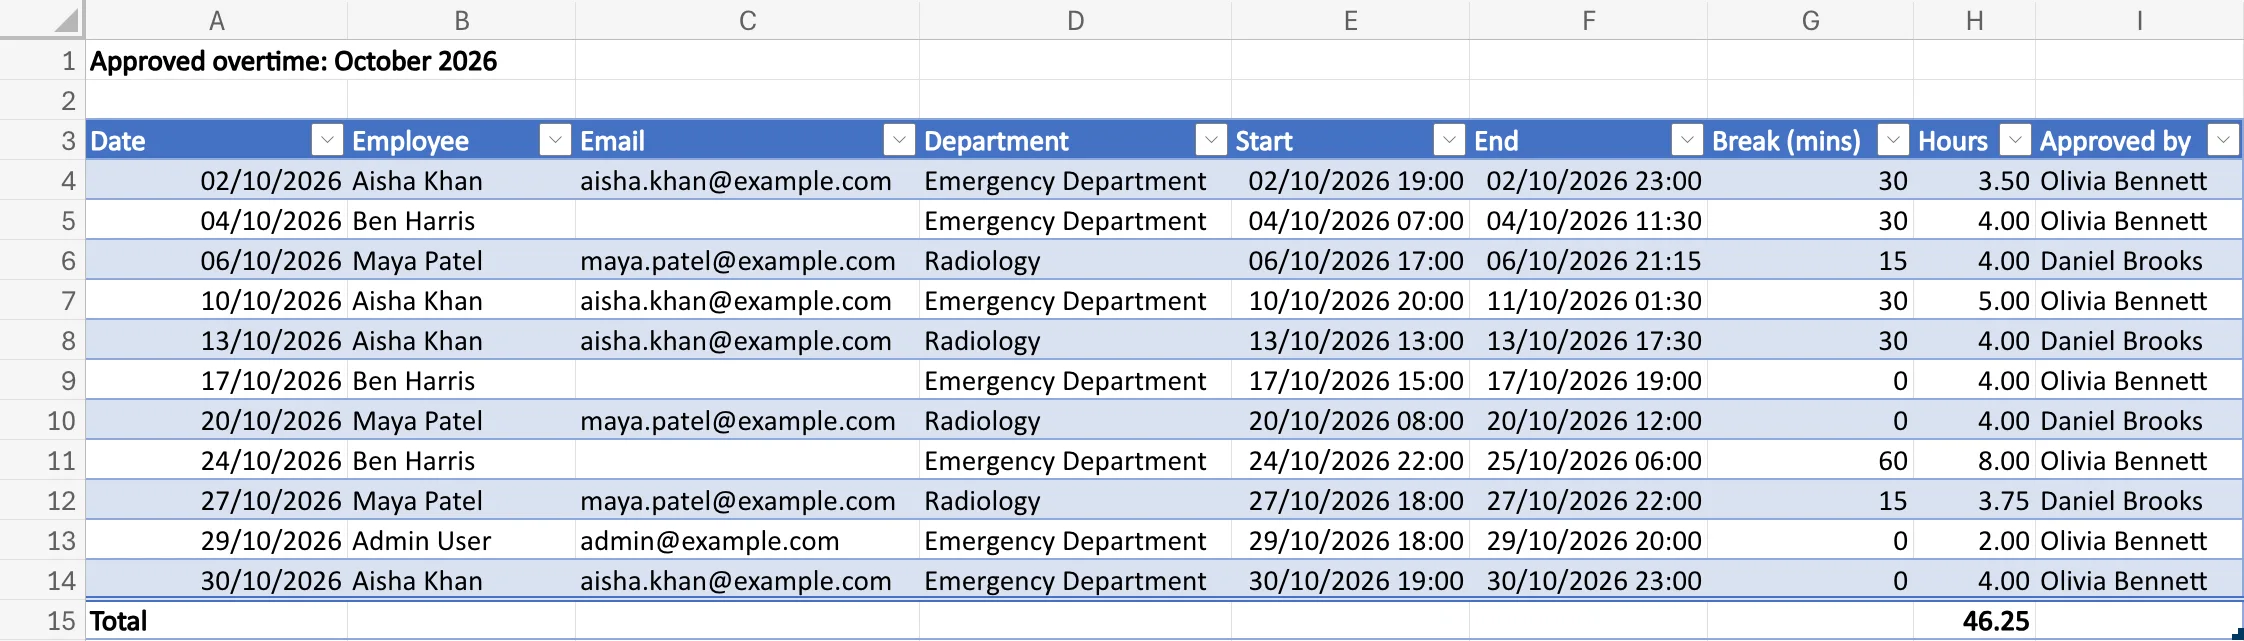
October 2026's workbook, made by the child flow:
How It Works
The decisions behind it:
- One child flow does the work. Making the workbook is the same whoever asks for it, so it lives in one child flow, Create Payroll Workbook, that takes a month and returns the file's name, link and number of entries. The monthly flow calls it, and so does Part 14's button.
- A template keeps the layout out of the code. The workbook's sheets, tables, titles, number formats and total rows are in Payroll Template.xlsx. The flow copies it, and an Office Script only adds the rows.
- One script call per workbook. The flow sends the month's entries to the script as one list, and the script writes them all. Microsoft's Excel Online (Business) connector reference allows up to 3 calls per 10 seconds and up to 1600 calls per day to Run script, so a call per row would soon hit the limits.
- The same entries as the reports. An entry counts when it's approved twice, in Status and in SharePoint's approval, as Part 11 decided. The workbook reads them the same way, so its total matches the Reports screen.
- UK times. SharePoint stores times in UTC. The flow turns them into UK time before the script writes them, so payroll reads the clock times people worked.
- A new file every time. Each workbook's name has the month and the time it was made, such as Overtime 2026-10 created 2026-11-20 10.29.xlsx, so a second run never overwrites a workbook payroll may already be using.
- Last month, on the 1st. The monthly flow runs at 07:00 UK time on the 1st and makes the workbook for the month that has just ended.
Prerequisites
- Part 12 completed.
- A business Microsoft 365 licence for the flows' owner. Microsoft's Run Office Scripts with Power Automate says you need one to use Office Scripts in Power Automate.
Step 1: Make the Template Workbook
The template lives with the workbooks, in the Payroll Exports library, but in a folder of its own. Open the library, create a folder called Setup (How to Create a Folder in a SharePoint Document Library), open it, and create an Excel workbook in it called Payroll Template (How to Create an Excel Workbook in a SharePoint Document Library).
The workbook has two sheets, each with a title in A1, in bold, and a table whose header row is row 3 and which has one empty row (How to Rename a Worksheet in Excel for the Web, How to Add a Worksheet in Excel for the Web):
| Sheet | A1 | Table | Columns |
|---|---|---|---|
| Entries | Approved overtime | Entries, A3:I4 | Date, Employee, Email, Department, Start, End, Break (mins), Hours, Approved by |
| Totals | Approved overtime by person | Totals, A3:E4 | Employee, Email, Departments, Entries, Hours |
To make each table, I typed the headers in row 3, selected the headers and the empty row under them, and chose Insert > Table with My table has headers ticked (How to Format Data as a Table in Excel):
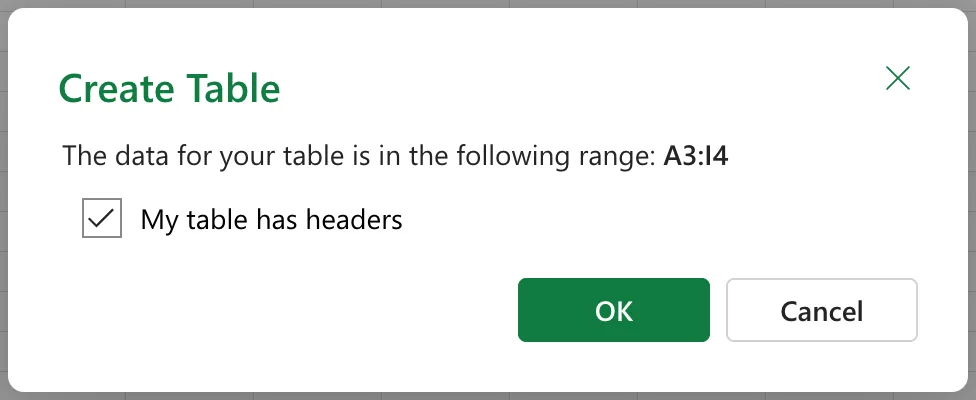
Then I named the tables Entries and Totals on Table Design (How to Rename a Table in Excel): the script finds them by these names.
Both tables have a Total Row (How to Add a Total Row to an Excel Table), with these totals:
| Table | Column | Total |
|---|---|---|
| Entries | Hours | =SUBTOTAL(109,[Hours]) |
| Totals | Entries | =SUBTOTAL(109,[Entries]) |
| Totals | Hours | =SUBTOTAL(109,[Hours]) |
The total row took two goes. Turned on in the empty template, Excel gave the last column Count, and the first workbook's total under Hours said 4 instead of 46.25 (Fixed: Excel Table Total Row Counts Instead of Adding). Each total is now a sum of its whole column, typed with the column's name, and the other total cells are empty. I gave the Hours columns' totals the Number format, so they show two decimals.
Leave the template open on the Entries sheet, at A1: copies open where the template was left.
Step 2: Write the Office Script
In the template, select Automate > New Script > Create in Code Editor (How to Create and Run an Office Script in Excel). The first time, Excel offered Turn actions into scripts, and I chose Write a script. Name the script Fill Payroll Workbook.
The script takes two inputs from the flow and returns one number (How to Pass a Value to an Office Script from Power Automate, How to Return a Value from an Office Script to Power Automate). It starts with the shape of an entry, as the flow will send it, and of a person's totals (How to Pass a List of Records to an Office Script from Power Automate):
interface PayrollEntry {
    date: string;
    employee: string;
    email: string;
    department: string;
    start: string;
    end: string;
    breakMinutes: number;
    hours: number;
    approvedBy: string;
}

interface PersonTotal {
    employee: string;
    email: string;
    departments: string[];
    entries: number;
    hours: number;
}
main checks that both tables exist, fills them when there are entries, writes the titles and returns how many entries it wrote:
/**
 * Fills a copy of the payroll template with one month's approved overtime.
 * @param monthTitle The month in words, for the sheet titles, such as "October 2026".
 * @param entries The month's approved entries, with dates and times in UK time.
 * @returns The number of entries written.
 */
function main(workbook: ExcelScript.Workbook, monthTitle: string, entries: PayrollEntry[]): number {
    const entriesTable = workbook.getTable("Entries");
    const totalsTable = workbook.getTable("Totals");
    if (!entriesTable || !totalsTable) {
        throw new Error("The workbook needs the tables Entries and Totals from the payroll template.");
    }

    if (entries.length > 0) {
        fillWorkbook(entriesTable, totalsTable, entries);
    }

    // The titles go in last, so that the column widths fit the tables, not the titles.
    workbook.getWorksheet("Entries").getRange("A1").setValue(`Approved overtime: ${monthTitle}`);
    workbook.getWorksheet("Totals").getRange("A1").setValue(`Approved overtime by person: ${monthTitle}`);
    workbook.getWorksheet("Entries").activate();
    return entries.length;
}
workbook.getWorksheet("Entries"), by name, and never the active sheet: in a flow, Microsoft's troubleshooting article saysgetActiveWorksheetreturns the first sheet or the last one activated.activate()at the end makes the copy open on Entries.- The titles go in last for a reason Step 10 explains.
fillWorkbook writes one row per entry, formats the dates, times and hours, then adds up each person's entries and hours, and writes one row per person, the most hours first:
// Writes the entries, one row each, and the totals, one row per person.
function fillWorkbook(entriesTable: ExcelScript.Table, totalsTable: ExcelScript.Table, entries: PayrollEntry[]) {
    // One row per entry. Dates and times become Excel date numbers.
    fillTable(entriesTable, entries.map((e) => [
        toExcelDate(e.date), e.employee, e.email, e.department,
        toExcelDate(e.start), toExcelDate(e.end), e.breakMinutes, e.hours, e.approvedBy
    ]));
    entriesTable.getColumnByName("Date").getRangeBetweenHeaderAndTotal().setNumberFormat("dd/mm/yyyy");
    entriesTable.getColumnByName("Start").getRangeBetweenHeaderAndTotal().setNumberFormat("dd/mm/yyyy hh:mm");
    entriesTable.getColumnByName("End").getRangeBetweenHeaderAndTotal().setNumberFormat("dd/mm/yyyy hh:mm");
    entriesTable.getColumnByName("Hours").getRangeBetweenHeaderAndTotal().setNumberFormat("0.00");

    // One row per person: their departments, number of entries and hours.
    const people: PersonTotal[] = [];
    for (const e of entries) {
        const key = (e.email || e.employee).toLowerCase();
        let person = people.find((p) => (p.email || p.employee).toLowerCase() === key);
        if (!person) {
            person = { employee: e.employee, email: e.email, departments: [], entries: 0, hours: 0 };
            people.push(person);
        }
        if (person.departments.indexOf(e.department) < 0) {
            person.departments.push(e.department);
        }
        person.entries += 1;
        person.hours += e.hours;
    }
    people.sort((a, b) => b.hours - a.hours);
    fillTable(totalsTable, people.map((p) => [
        p.employee, p.email, p.departments.sort().join(", "), p.entries, Math.round(p.hours * 100) / 100
    ]));
    totalsTable.getColumnByName("Hours").getRangeBetweenHeaderAndTotal().setNumberFormat("0.00");

    entriesTable.getRange().getFormat().autofitColumns();
    totalsTable.getRange().getFormat().autofitColumns();
}
- A person is their email, or their name when there's no email: Part 12's leavers have none.
getRangeBetweenHeaderAndTotal()is a column's data, without its header and total.autofitColumns()fits the widths to the data (How to AutoFit Columns with an Office Script).
fillTable adds the rows to a table in one call (How to Add Rows to an Excel Table with an Office Script). The template's table starts with one empty row; once the real rows are in, it removes it:
// Adds the rows to the table, then removes the empty row the template's table starts with.
function fillTable(table: ExcelScript.Table, rows: (string | number)[][]) {
    const rowsBefore = table.getRowCount();
    table.addRows(0, rows);
    if (rowsBefore === 1) {
        const lastRow = table.getRangeBetweenHeaderAndTotal().getLastRow().getValues()[0];
        if (lastRow.every((value) => value === "")) {
            table.deleteRowsAt(rows.length, 1);
        }
    }
}
toExcelDate turns the flow's UK dates and times into Excel's day numbers, so the cells hold real dates (How to Write a Date to a Cell with an Office Script):
// "2026-10-02" or "2026-10-02T19:00", in UK time, to an Excel date number.
// Excel numbers dates in days, and 1 January 1970 is day 25569.
function toExcelDate(text: string): number {
    const iso = text.length === 10 ? `${text}T00:00:00Z` : `${text}:00Z`;
    return Date.parse(iso) / 86400000 + 25569;
}
The Z here doesn't make the times UTC. It stops JavaScript from shifting them by the time zone of wherever the script runs, so 19:00 UK time stays 19:00 in the cell.
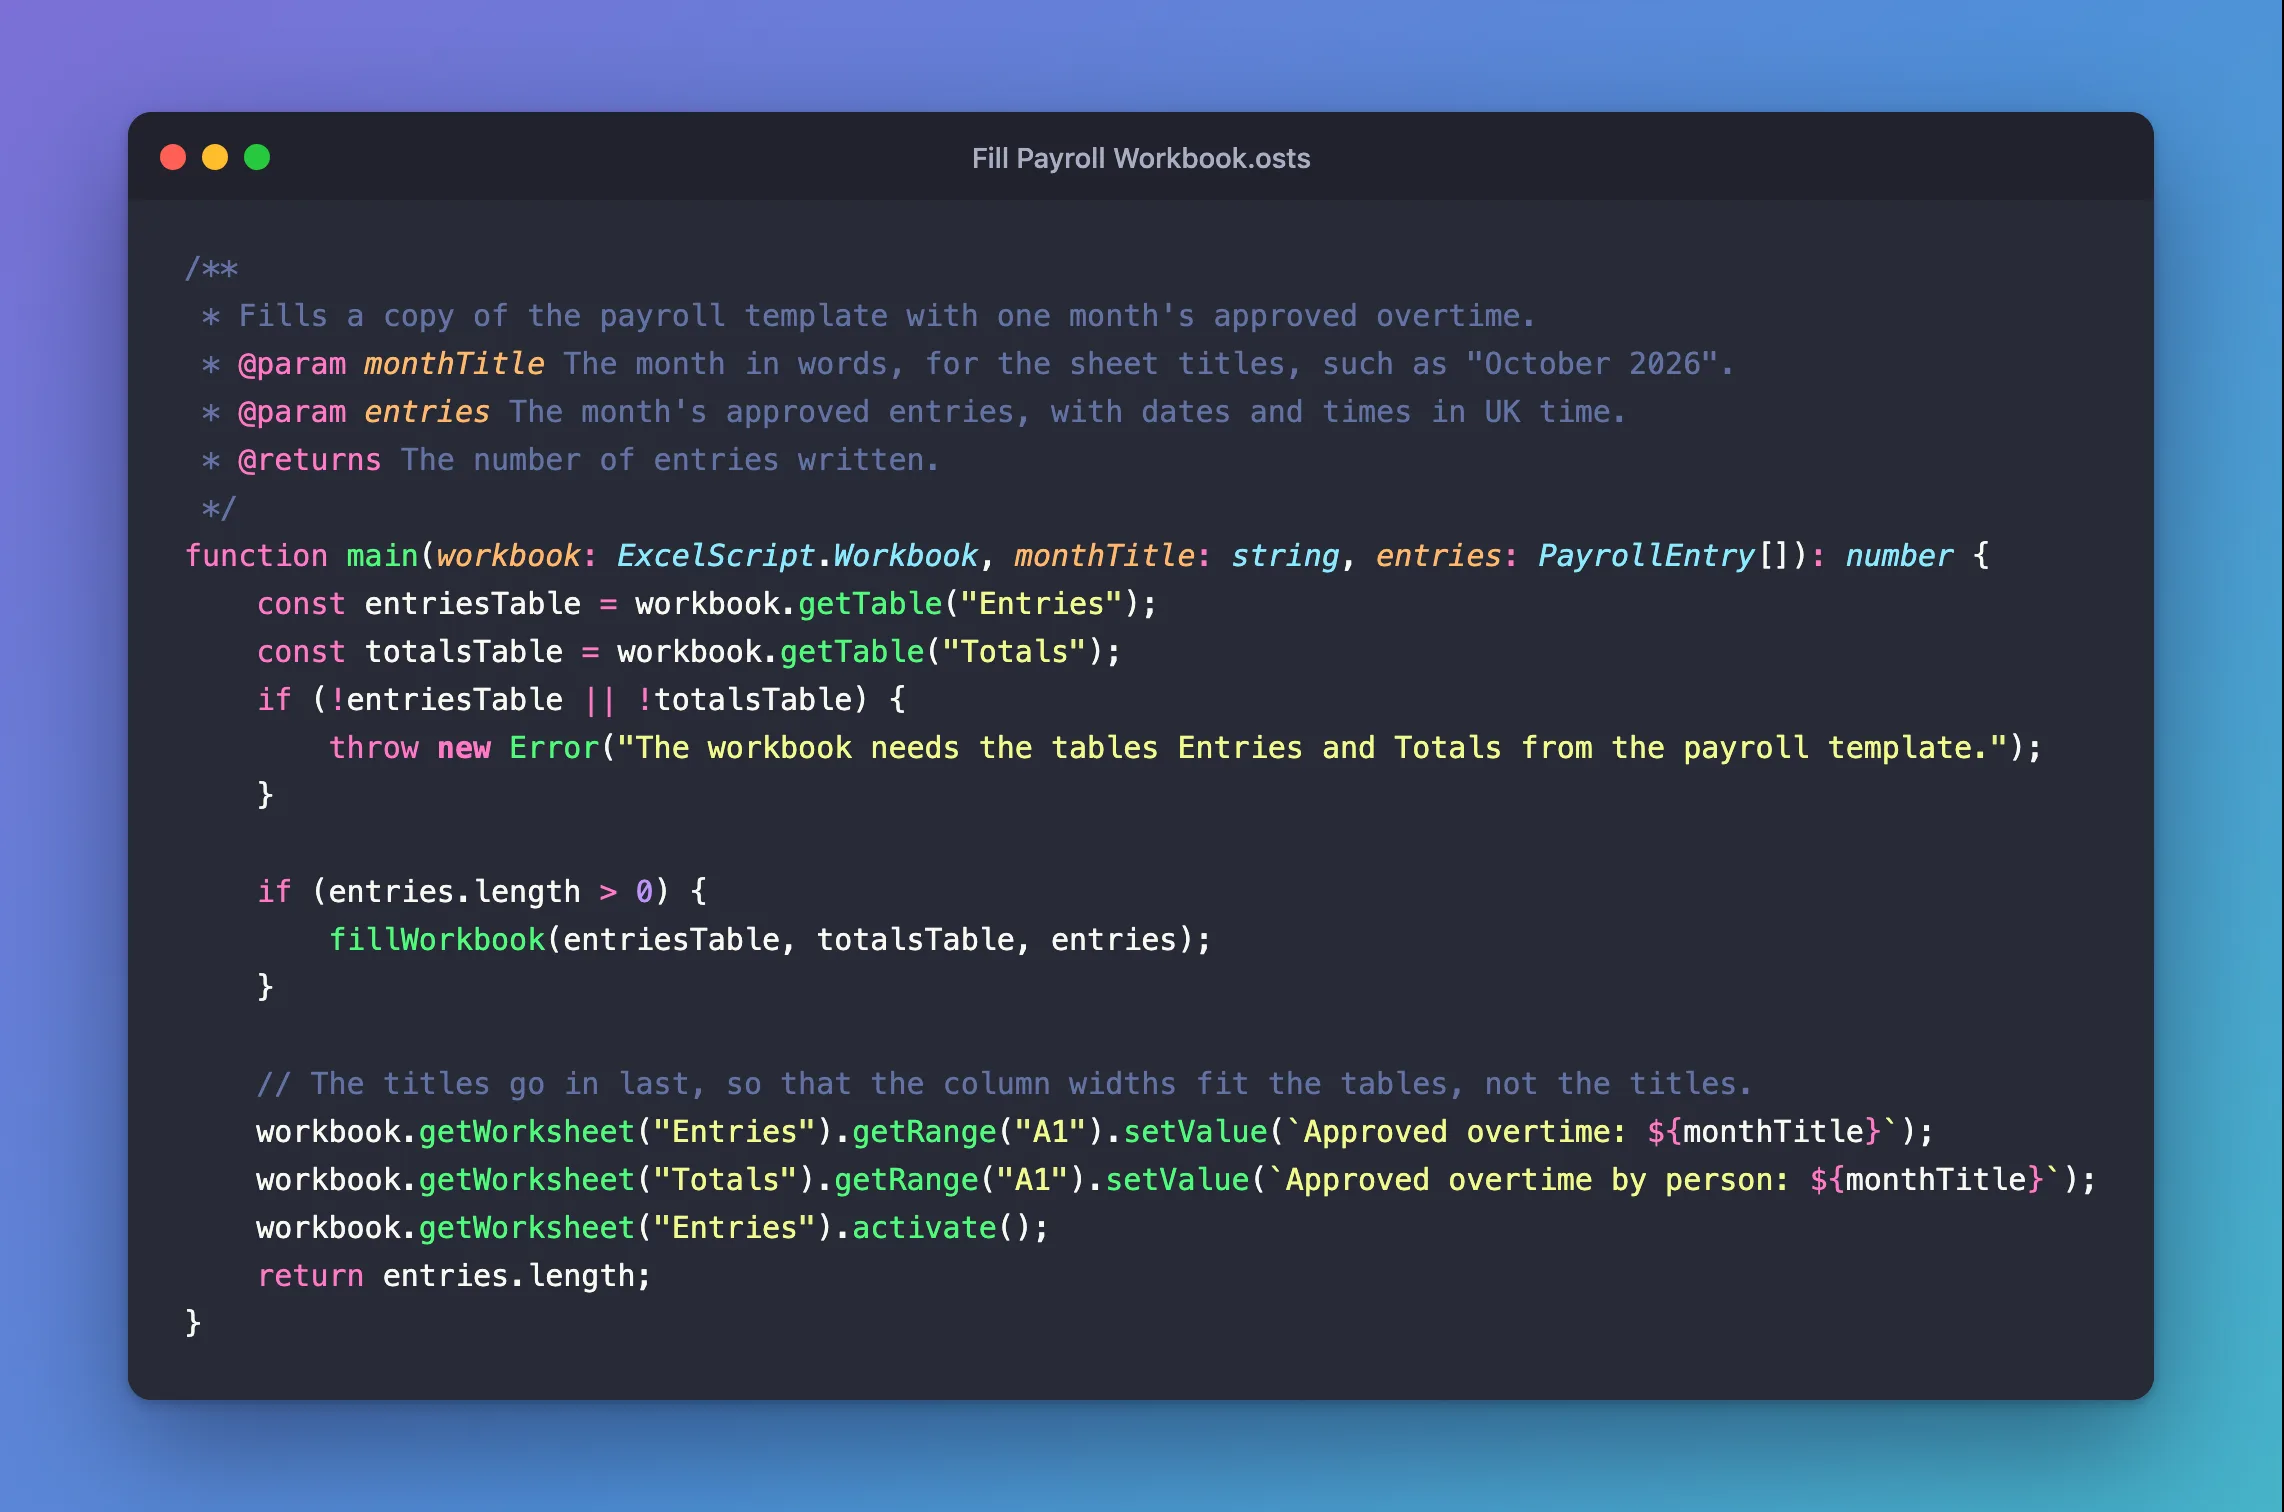
The whole script, as saved:
interface PayrollEntry {
    date: string;
    employee: string;
    email: string;
    department: string;
    start: string;
    end: string;
    breakMinutes: number;
    hours: number;
    approvedBy: string;
}

interface PersonTotal {
    employee: string;
    email: string;
    departments: string[];
    entries: number;
    hours: number;
}

/**
 * Fills a copy of the payroll template with one month's approved overtime.
 * @param monthTitle The month in words, for the sheet titles, such as "October 2026".
 * @param entries The month's approved entries, with dates and times in UK time.
 * @returns The number of entries written.
 */
function main(workbook: ExcelScript.Workbook, monthTitle: string, entries: PayrollEntry[]): number {
    const entriesTable = workbook.getTable("Entries");
    const totalsTable = workbook.getTable("Totals");
    if (!entriesTable || !totalsTable) {
        throw new Error("The workbook needs the tables Entries and Totals from the payroll template.");
    }

    if (entries.length > 0) {
        fillWorkbook(entriesTable, totalsTable, entries);
    }

    // The titles go in last, so that the column widths fit the tables, not the titles.
    workbook.getWorksheet("Entries").getRange("A1").setValue(`Approved overtime: ${monthTitle}`);
    workbook.getWorksheet("Totals").getRange("A1").setValue(`Approved overtime by person: ${monthTitle}`);
    workbook.getWorksheet("Entries").activate();
    return entries.length;
}

// Writes the entries, one row each, and the totals, one row per person.
function fillWorkbook(entriesTable: ExcelScript.Table, totalsTable: ExcelScript.Table, entries: PayrollEntry[]) {
    // One row per entry. Dates and times become Excel date numbers.
    fillTable(entriesTable, entries.map((e) => [
        toExcelDate(e.date), e.employee, e.email, e.department,
        toExcelDate(e.start), toExcelDate(e.end), e.breakMinutes, e.hours, e.approvedBy
    ]));
    entriesTable.getColumnByName("Date").getRangeBetweenHeaderAndTotal().setNumberFormat("dd/mm/yyyy");
    entriesTable.getColumnByName("Start").getRangeBetweenHeaderAndTotal().setNumberFormat("dd/mm/yyyy hh:mm");
    entriesTable.getColumnByName("End").getRangeBetweenHeaderAndTotal().setNumberFormat("dd/mm/yyyy hh:mm");
    entriesTable.getColumnByName("Hours").getRangeBetweenHeaderAndTotal().setNumberFormat("0.00");

    // One row per person: their departments, number of entries and hours.
    const people: PersonTotal[] = [];
    for (const e of entries) {
        const key = (e.email || e.employee).toLowerCase();
        let person = people.find((p) => (p.email || p.employee).toLowerCase() === key);
        if (!person) {
            person = { employee: e.employee, email: e.email, departments: [], entries: 0, hours: 0 };
            people.push(person);
        }
        if (person.departments.indexOf(e.department) < 0) {
            person.departments.push(e.department);
        }
        person.entries += 1;
        person.hours += e.hours;
    }
    people.sort((a, b) => b.hours - a.hours);
    fillTable(totalsTable, people.map((p) => [
        p.employee, p.email, p.departments.sort().join(", "), p.entries, Math.round(p.hours * 100) / 100
    ]));
    totalsTable.getColumnByName("Hours").getRangeBetweenHeaderAndTotal().setNumberFormat("0.00");

    entriesTable.getRange().getFormat().autofitColumns();
    totalsTable.getRange().getFormat().autofitColumns();
}

// Adds the rows to the table, then removes the empty row the template's table starts with.
function fillTable(table: ExcelScript.Table, rows: (string | number)[][]) {
    const rowsBefore = table.getRowCount();
    table.addRows(0, rows);
    if (rowsBefore === 1) {
        const lastRow = table.getRangeBetweenHeaderAndTotal().getLastRow().getValues()[0];
        if (lastRow.every((value) => value === "")) {
            table.deleteRowsAt(rows.length, 1);
        }
    }
}

// "2026-10-02" or "2026-10-02T19:00", in UK time, to an Excel date number.
// Excel numbers dates in days, and 1 January 1970 is day 25569.
function toExcelDate(text: string): number {
    const iso = text.length === 10 ? `${text}T00:00:00Z` : `${text}:00Z`;
    return Date.parse(iso) / 86400000 + 25569;
}
Select Save script. When it saved, the Code Editor reformatted the code to four-space indents and said it had made 66 formatting edits; the code above is the saved version.
Step 3: Keep the Script with the Template
A new script is saved in your own OneDrive, and would stop working for everyone the day your account goes. Move it into the Setup folder of Payroll Exports, next to the template (How to Save an Office Script to SharePoint). The Code Editor's menu had no Move command, and its Make a copy, which I tried first, made Copy of Fill Payroll Workbook in my OneDrive at once; I deleted the copy. Move script is on the script's details page: All scripts, the script's name, ..., Move script. In the picker, Payroll Exports was under Quick access, as Overtime Timesheet - Payroll Exports; I opened its Setup folder and selected Save:
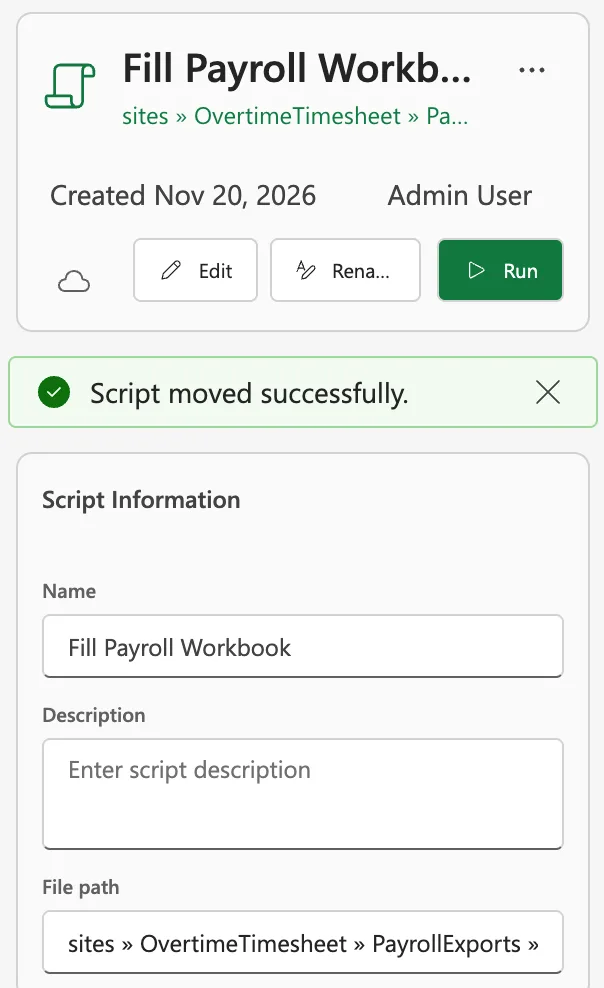
The library now holds the template, the script, and, from Step 7 on, the workbooks. Only Overtime Payroll can read it, and the flows reach it with their owner's connections.
Step 4: Create the Child Flow
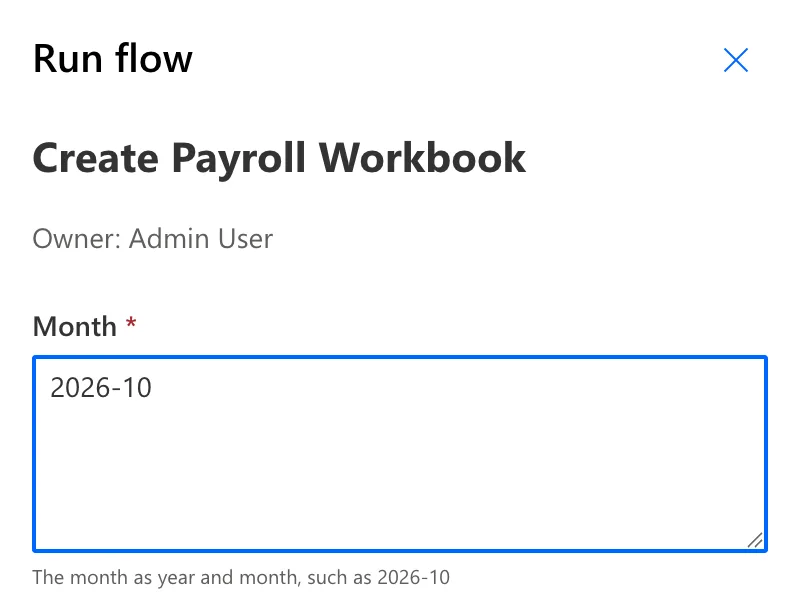
In the Overtime Timesheet solution, select New > Automation > Cloud flow > Instant, name it Create Payroll Workbook, and choose Manually trigger a flow: a child flow must have that trigger and be in a solution (How to Call a Child Flow in Power Automate). Give the trigger one text input, Month, described as The month as year and month, such as 2026-10 (How to Add a Text Input to a Manually Triggered Flow in Power Automate):
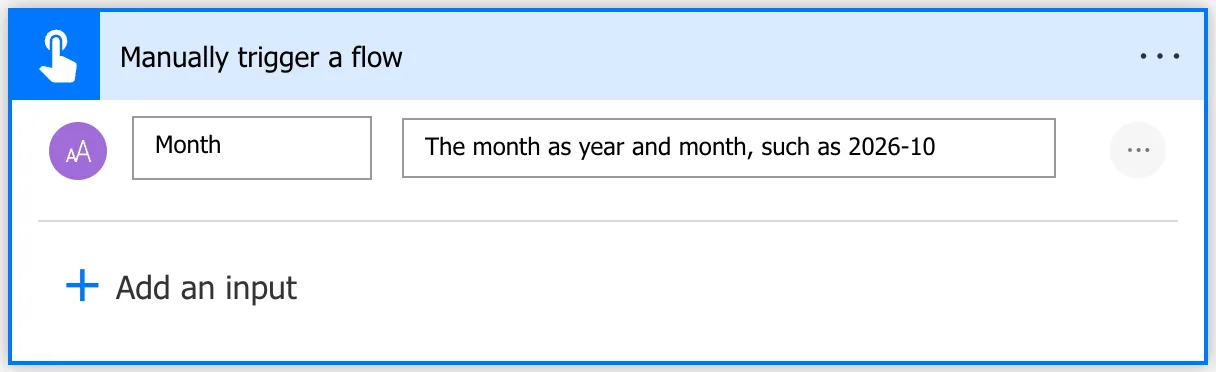
The new flow opened in the classic designer. I added the input and an empty Respond to a Power App or flow, saved, and opened the flow again from the solution, with Edit on its own page, to work in the new designer, where the solution's environment variables are in dynamic content (How to Create an Instant Cloud Flow Inside a Solution in Power Automate).
Step 5: Get the Month's Approved Entries
Add Get items from SharePoint and rename it Get the approved entries. Site Address and List Name are the Overtime Timesheet Site and OvertimeEntries variables (How to Use Environment Variables in a Power Automate Flow). Under Advanced parameters:
| Parameter | Value |
|---|---|
| Filter Query | WorkMonth eq 'Month' and Status eq 'Approved' and OData__ModerationStatus eq 0 |
| Order By | StartTime |
| Top Count | 5000 |
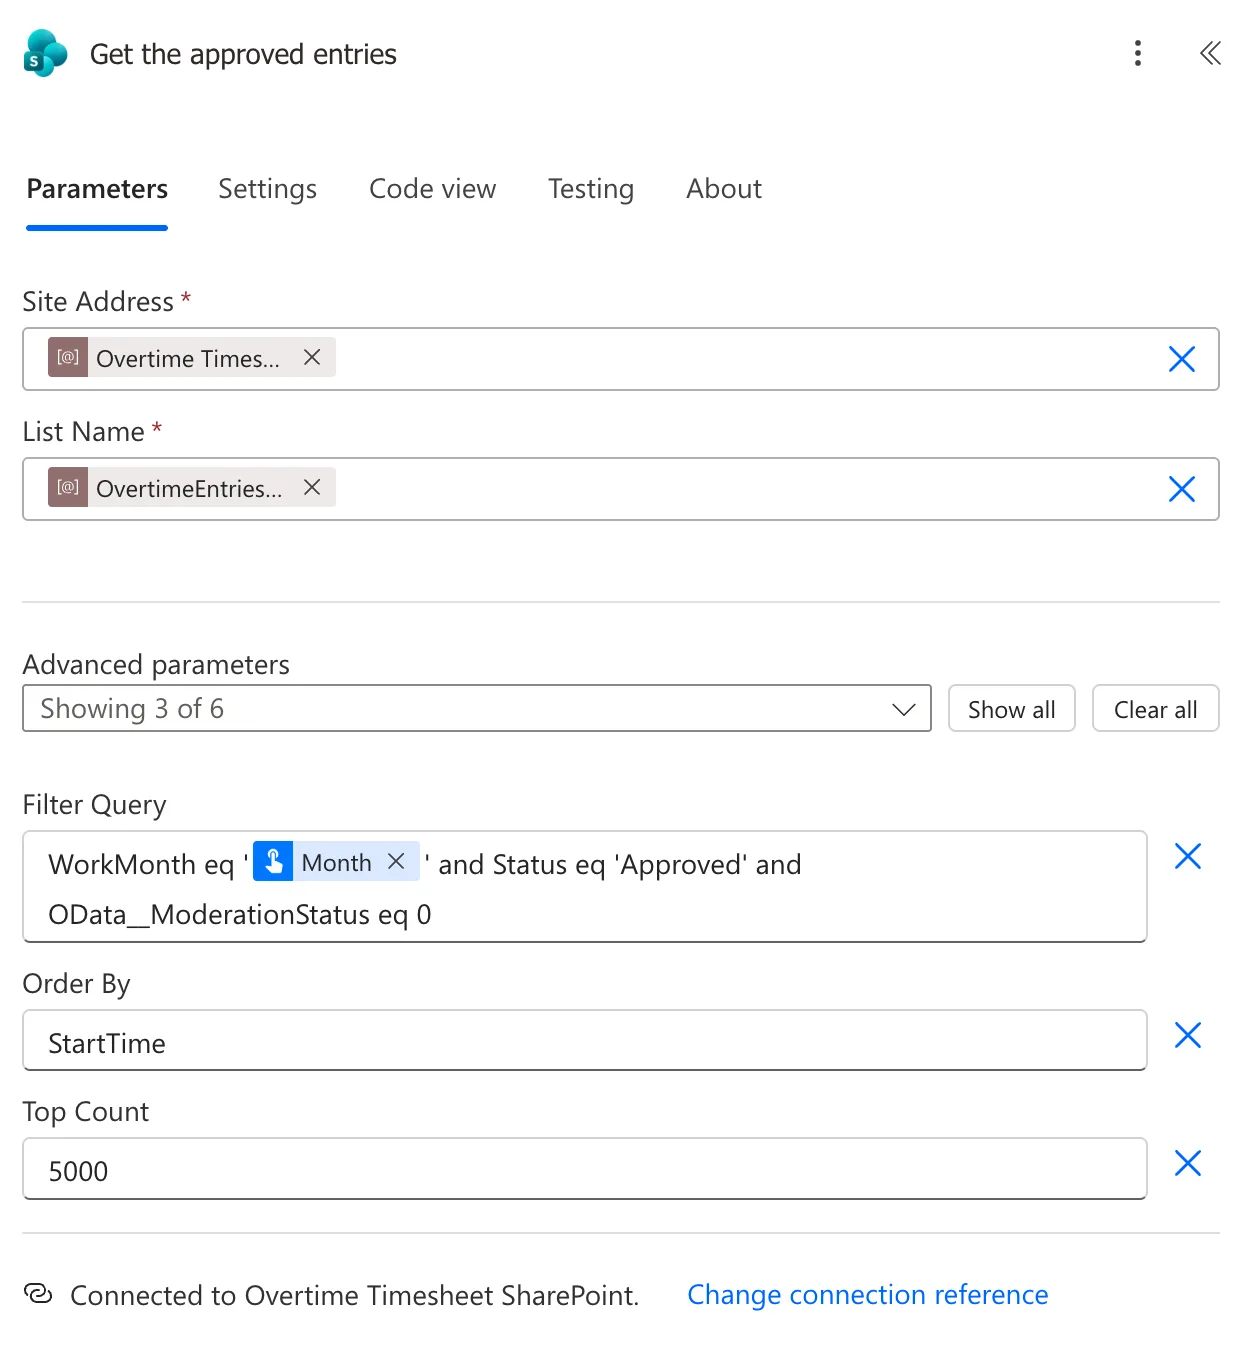
WorkMonth eq '…'picks the month, the Month input between single quotes, because WorkMonth is text like 2026-10 (How to Filter SharePoint Items with a Filter Query in Power Automate).Status eq 'Approved' and OData__ModerationStatus eq 0is Part 11's approved twice (How to Get Only Approved Items from a SharePoint List in Power Automate).StartTimeand5000list the entries in time order, up to 5,000 (How to Sort SharePoint Items and Get More Than 100 in Power Automate).
Check the line under the action. Every SharePoint action I added picked a connection reference from another solution, and I changed each one to Overtime Timesheet SharePoint (Fixed: A Flow in a Solution Uses Another Solution's Connection Reference in Power Automate).
Step 6: Shape the Rows for the Script
Add a Select called Payroll rows (How to Keep Several Fields from Each Item with Select in Power Automate). From is the value of Get the approved entries, and Map has one key for each field of the script's PayrollEntry, with exactly its names:
| Key | Value |
|---|---|
date | WorkDate |
employee | EmployeeName |
email | coalesce(item()?['EmployeeEmail'], '') |
department | Department |
start | convertFromUtc(item()?['StartTime'], 'GMT Standard Time', 'yyyy-MM-ddTHH:mm') |
end | convertFromUtc(item()?['EndTime'], 'GMT Standard Time', 'yyyy-MM-ddTHH:mm') |
breakMinutes | BreakMinutes |
hours | Hours |
approvedBy | coalesce(item()?['DecisionBy'], '') |
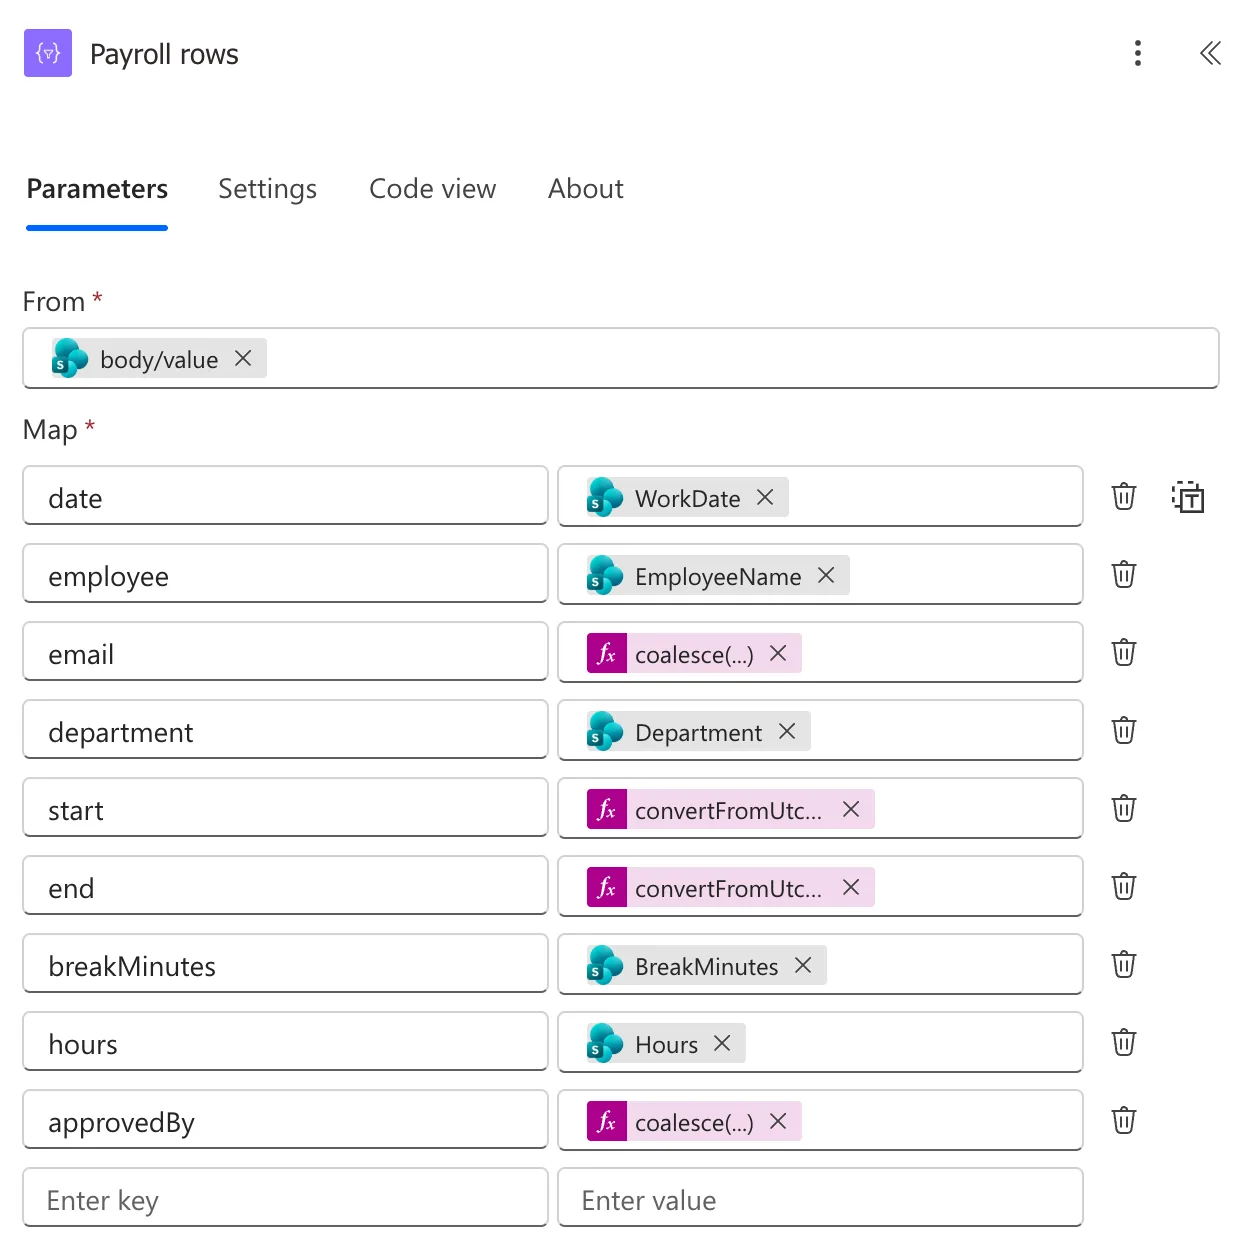
convertFromUtc(..., 'GMT Standard Time', 'yyyy-MM-ddTHH:mm')turns each UTC time into UK time, in the form the script expects (How to Convert UTC to Local Time in Power Automate with convertFromUtc).coalesce(..., '')gives empty text instead of nothing for a leaver's email or an entry without a decision, so every field the script reads is a string.- WorkDate, a date-only column, came through in the run as 2026-10-02: already the form
toExcelDatereads.
Step 7: Copy the Template
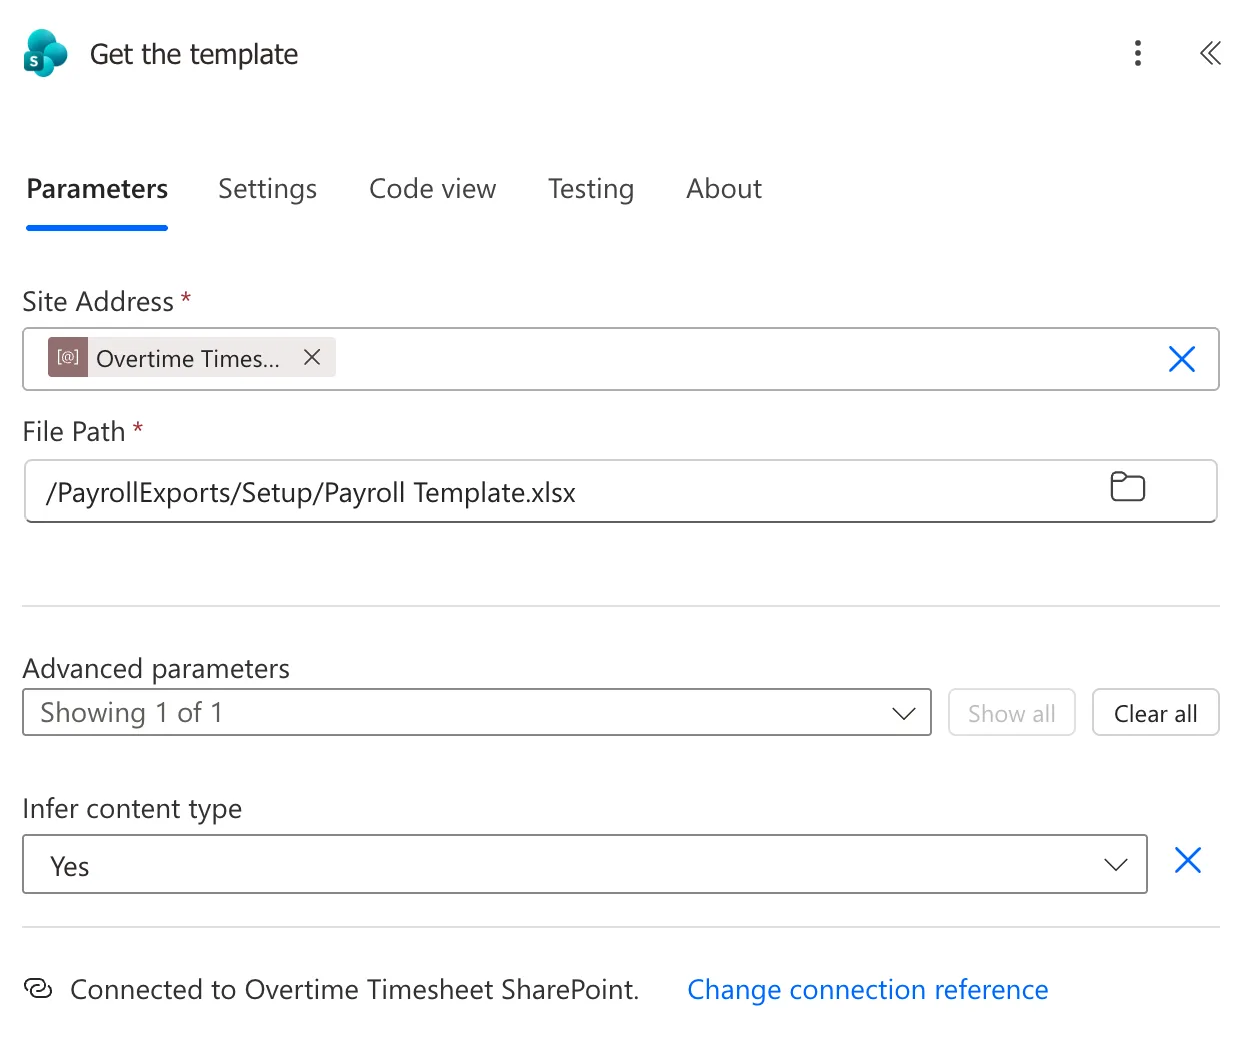
Add Get file content using path from SharePoint, called Get the template: the Overtime Timesheet Site variable, and the file picked with the folder icon, /PayrollExports/Setup/Payroll Template.xlsx (How to Read a File from SharePoint in Power Automate):
Then add Create file from SharePoint, called Create the workbook (How to Create a File in SharePoint in Power Automate). The search listed OneDrive's Create file first, and I added that one by mistake: it asked me to sign in to OneDrive, so I deleted it and added the one under SharePoint.
| Parameter | Value |
|---|---|
| Site Address | The Overtime Timesheet Site variable |
| Folder Path | /PayrollExports, picked with the folder icon |
| File Name | Overtime Monthcreatedthe expression below.xlsx |
| File Content | File Content of Get the template |
convertFromUtc(utcNow(), 'GMT Standard Time', 'yyyy-MM-dd HH.mm')
The time in the name uses a full stop, HH.mm, because a colon can't go in a file name.
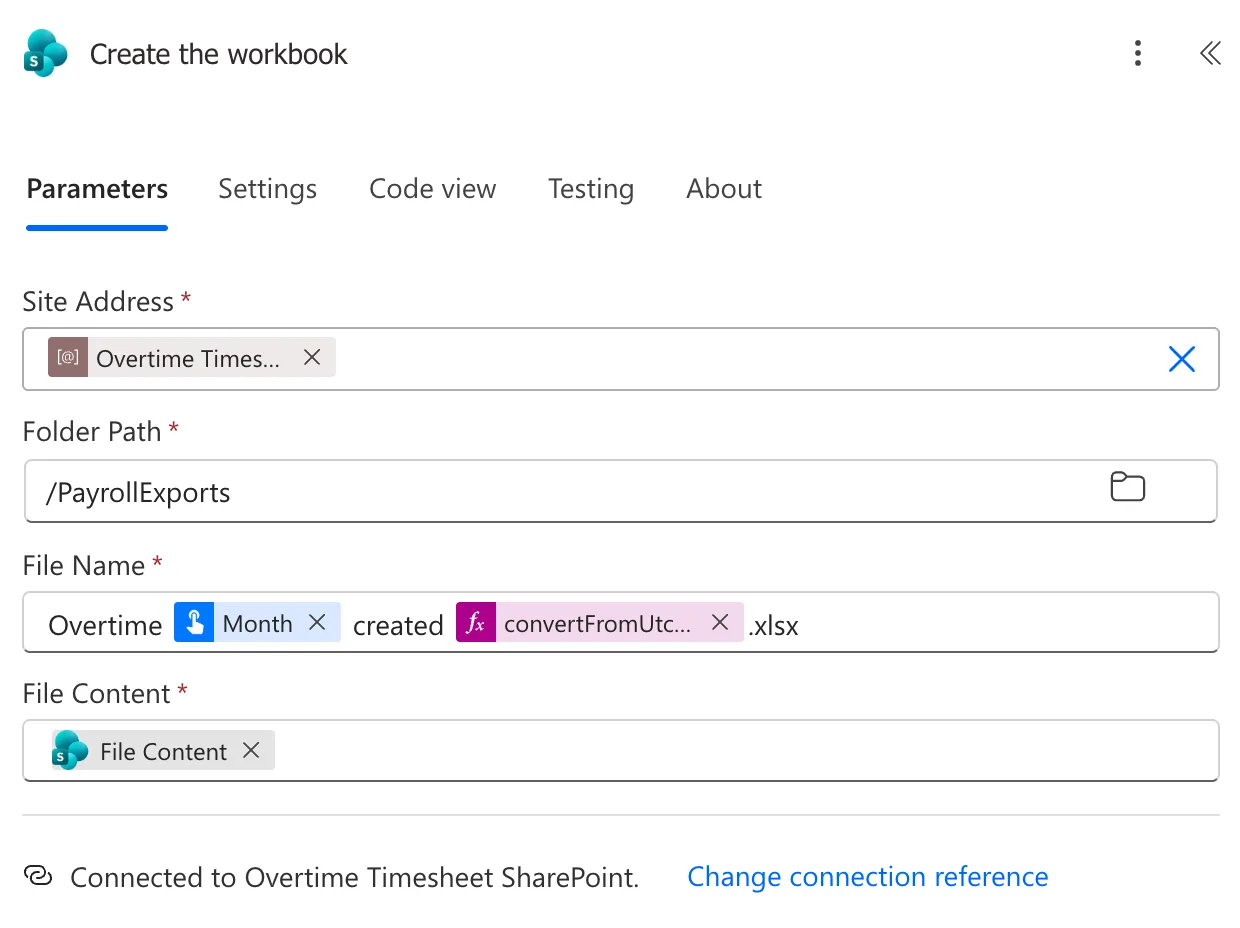
My first File Name ended inside the expression: I typed .xlsx while the expression's editor was still open, and Code view showed …'yyyy-MM-dd HH.mm').xlsx}, which isn't a valid expression. Editing the token didn't fix it, so I emptied the box and built it again, typing .xlsx only after the token, at the end of the box. Check Code view after building a mixed box like this one.
Step 8: Run the Script on the Copy
Add Run script from SharePoint library from Excel Online (Business), called Fill the workbook (How to Run an Office Script from a SharePoint Library in Power Automate):
| Parameter | Value |
|---|---|
| Workbook Location | The Overtime Timesheet Site variable, as a custom value |
| Workbook Library | Payroll Exports |
| Workbook | Id of Create the workbook |
| Script Location | The Overtime Timesheet Site variable |
| Script Library | Payroll Exports |
| Script | /Setup/Fill Payroll Workbook.osts, picked with the folder icon |
| monthTitle | formatDateTime(concat(triggerBody()?['text'], '-01'), 'MMMM yyyy') |
| entries | Output of Payroll rows, after Switch to input entire array |
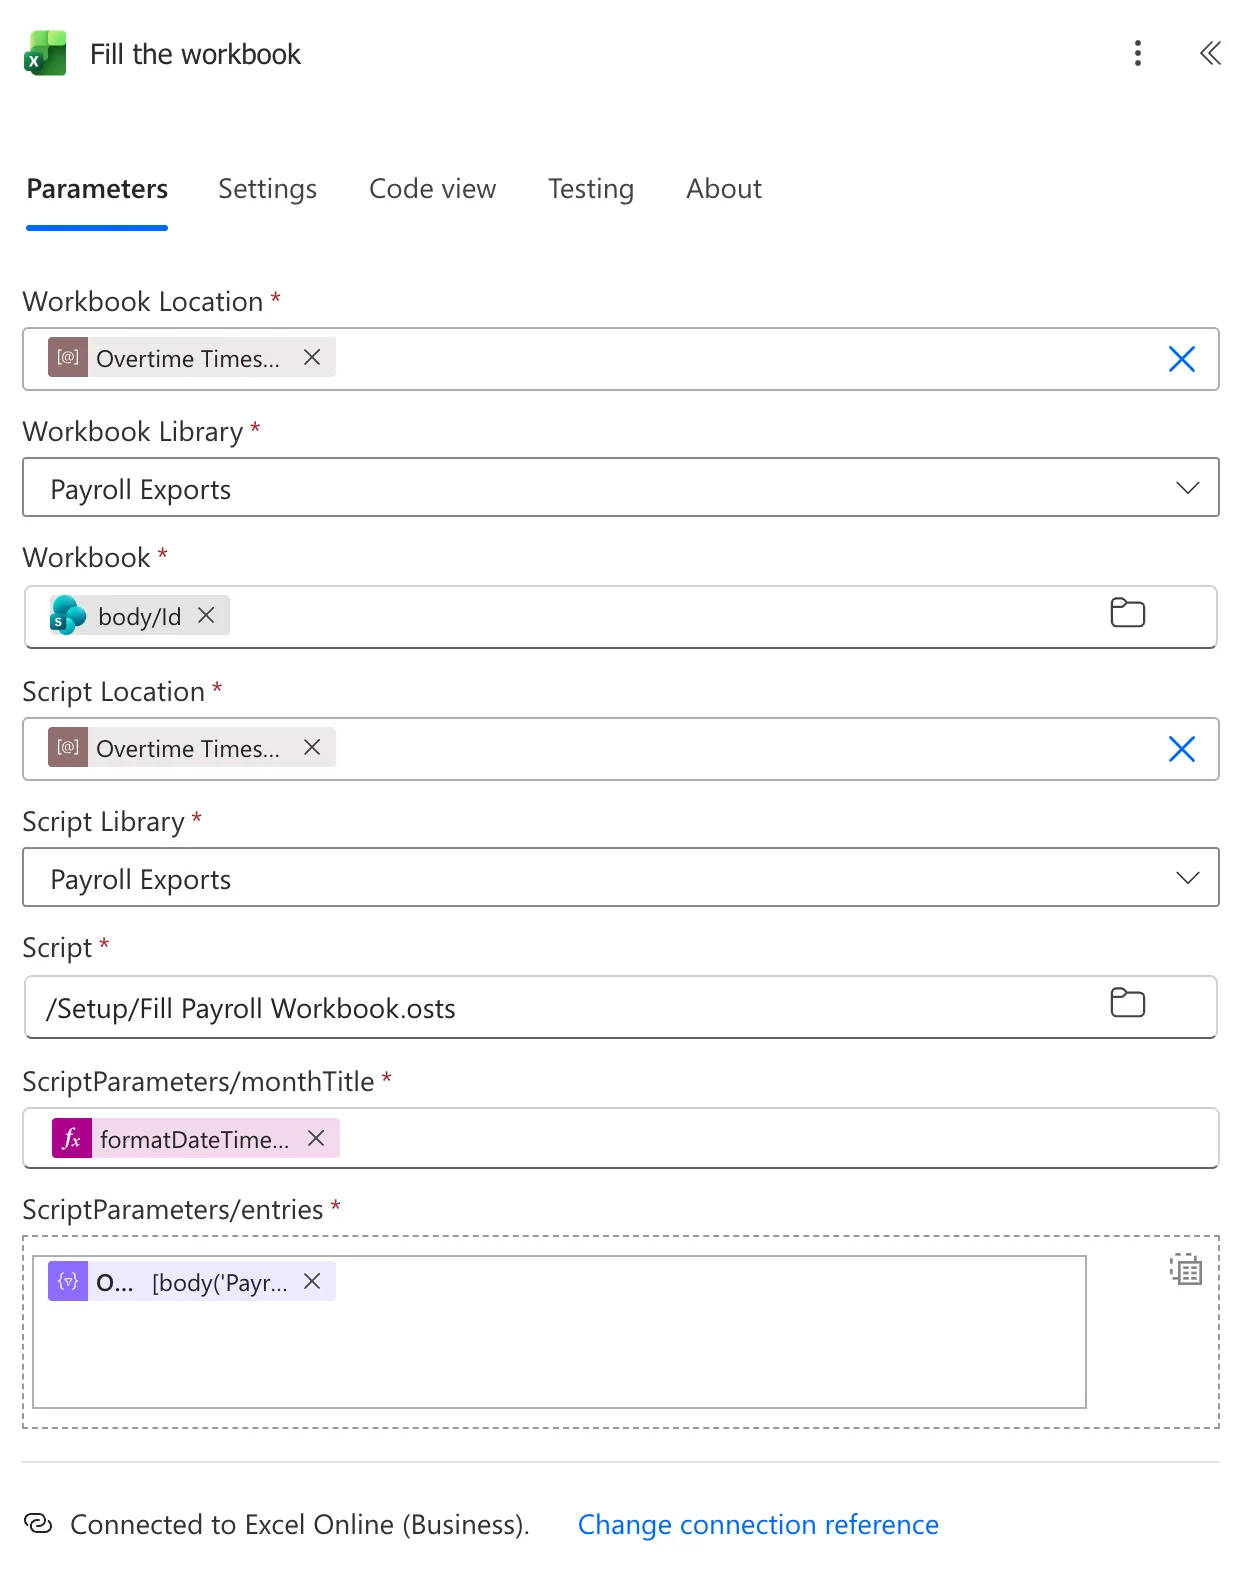
- Workbook is the new file's Id, so the script runs on the copy, never on the template.
- monthTitle turns 2026-10 into October 2026: the first day of the month,
concat(..., '-01'), formatted withMMMM yyyy(How to Format a Date in Power Automate with formatDateTime).triggerBody()?['text']is the Month input. - entries takes the whole list at once (How to Pass a List of Records to an Office Script from Power Automate).
Workbook Library and Script are stored by their IDs in this environment, not by their names. When the solution is installed somewhere else, in Part 20, they have to be picked again.
Step 9: Return the Workbook's Name, Link and Count
Add Get file properties from SharePoint, called Get the workbook link: the Overtime Timesheet Site and Payroll Exports variables, and Id set to ItemId of Create the workbook (How to Get a Link to a SharePoint File in Power Automate):
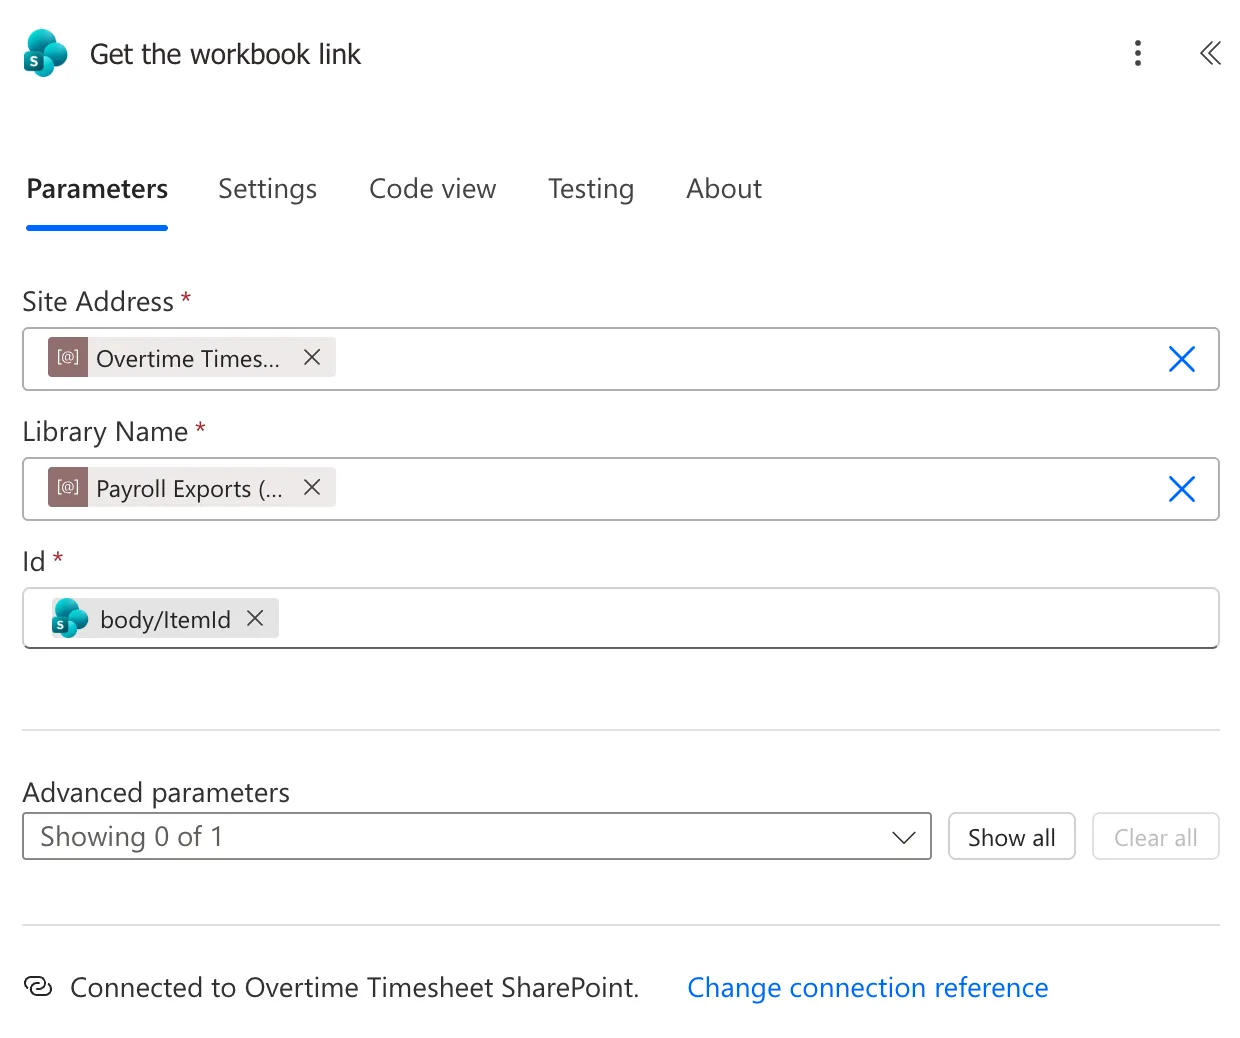
Then fill Respond to a Power App or flow with three outputs:
| Output | Type | Value |
|---|---|---|
| fileName | Text | Name of Create the workbook |
| link | Text | Link to item of Get the workbook link |
| entries | Number | result of Fill the workbook, the number the script returned |
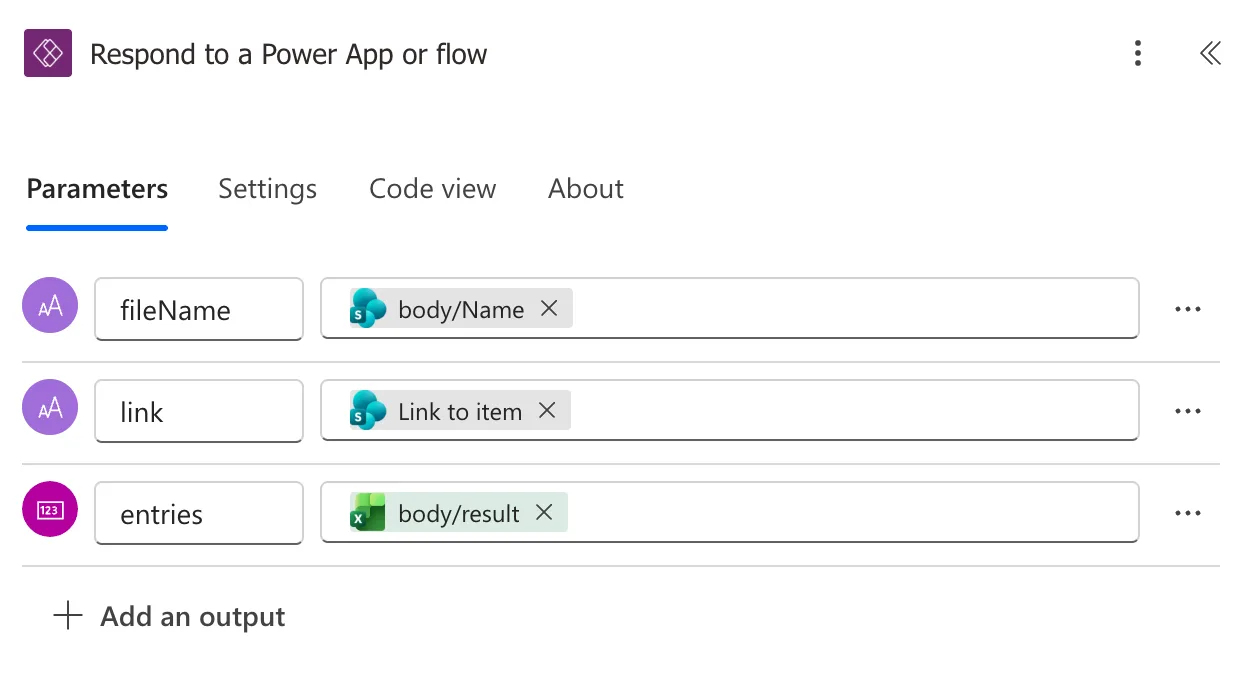
Save and publish the flow.
Step 10: Test the Child Flow
Test the flow with Month 2026-10 (How to Test a Cloud Flow Manually in Power Automate):
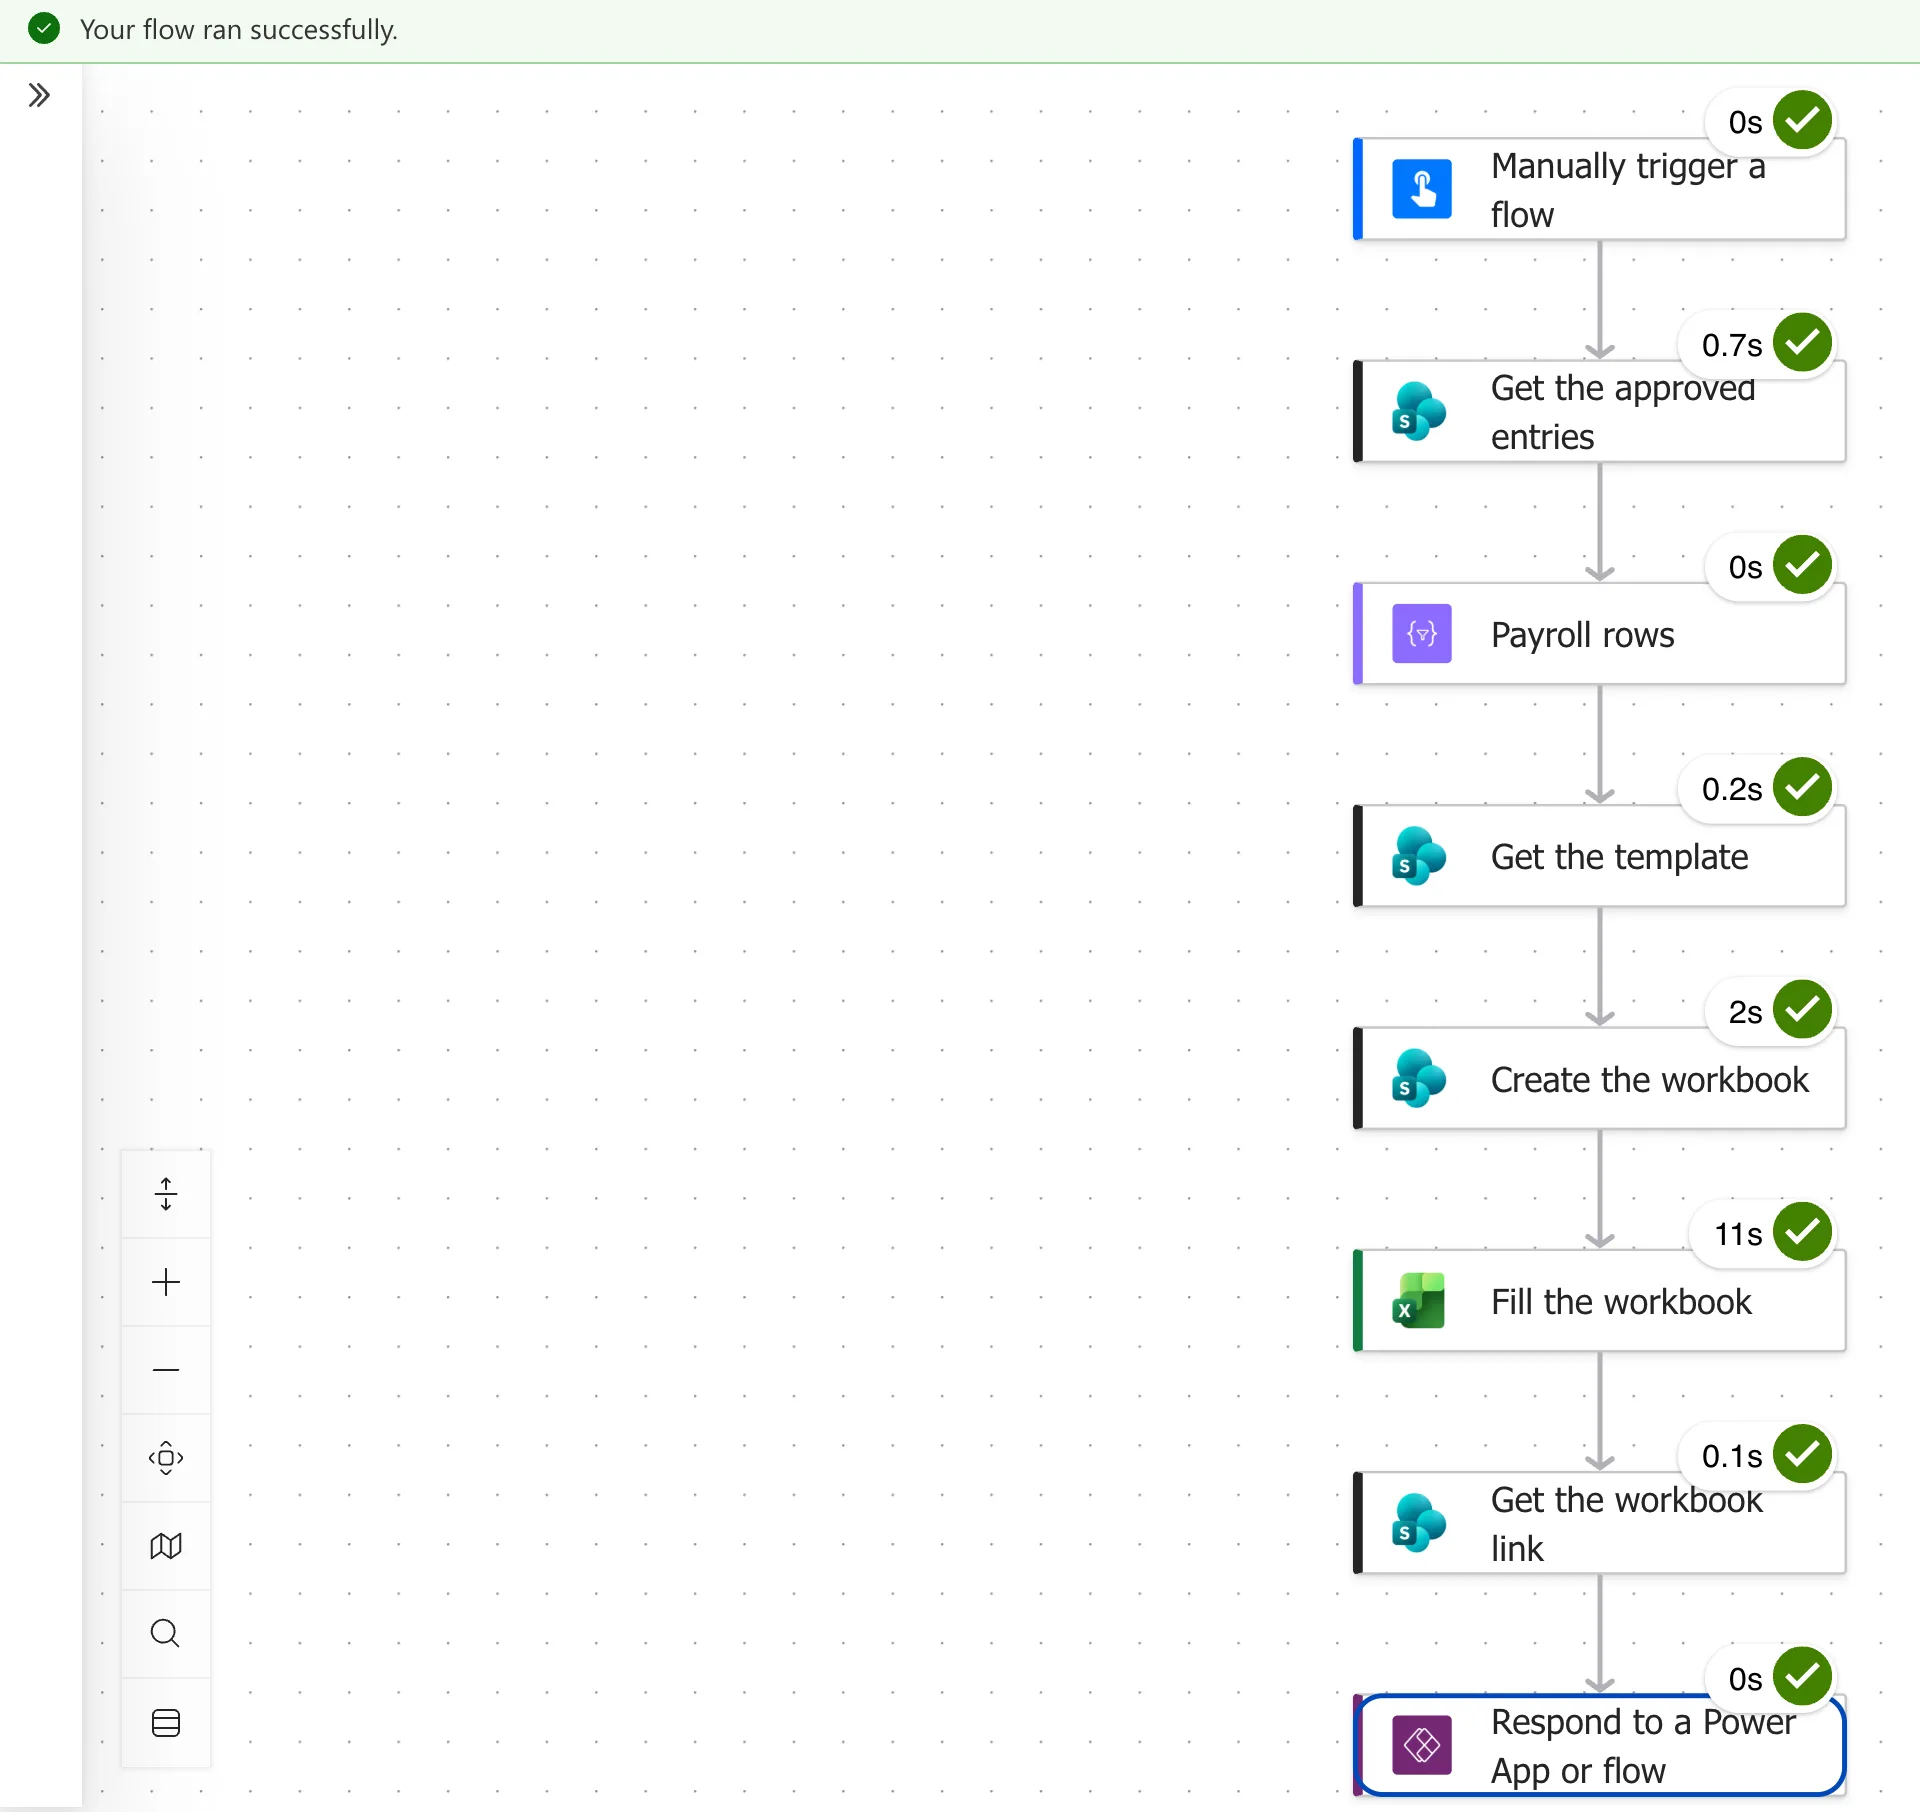
The first run succeeded, with 11 entries. Fill the workbook took 11 seconds:
A successful run isn't the same as a right workbook. Opening the copy showed three problems:
- The total of hours on Totals was 4. The total row was set to Count, from when I turned it on in the empty template. Step 1's sums fixed it (Fixed: Excel Table Total Row Counts Instead of Adding).
- Column A was as wide as the title. My first script wrote the titles, then autofitted the tables, and
autofitColumns()fits a column to everything in it, including the title in A1, above the table. The script now autofits first and writes the titles last (How to AutoFit Columns with an Office Script). - The copy opened on Totals, where I'd left the template. The script now ends with
activate()on Entries, and I saved the template on Entries, at A1.
I deleted the wrong workbook from the library, fixed the template and the script, and ran the flow again. The second workbook's Entries sheet is the one at the top of this part, with every approved October entry in UK time and a total of 46.25 hours. Its Totals sheet has one row per person:
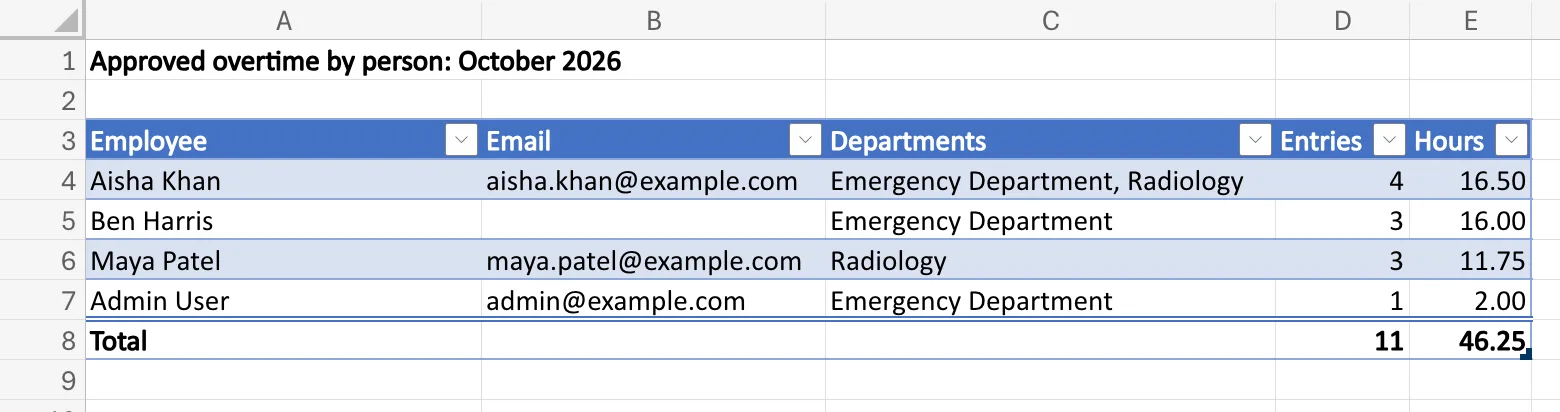
46.25 hours from 11 entries by 4 people: the same as October on the Reports screen in Part 12.
Step 11: Let Run-Only Users Run It with Its Own Connections
Part 14's button runs this child flow for the payroll officer, through another flow. Microsoft's Create child flows says a child flow that uses anything other than built-in actions or Dataverse must use the connections embedded in it: child workflows only support embedded connections.
On the child flow's page, select Edit on the Run only users tile, and for SharePoint and Excel Online (Business) choose Use this connection instead of Provided by run-only user (How to Choose the Connections Run-Only Users Use in Power Automate). A dialog, Connections Used, said Users with run-only access will not control or have access to these connections outside of this flow; I selected OK, then Save. Opened again, the panel shows the owner's connections:
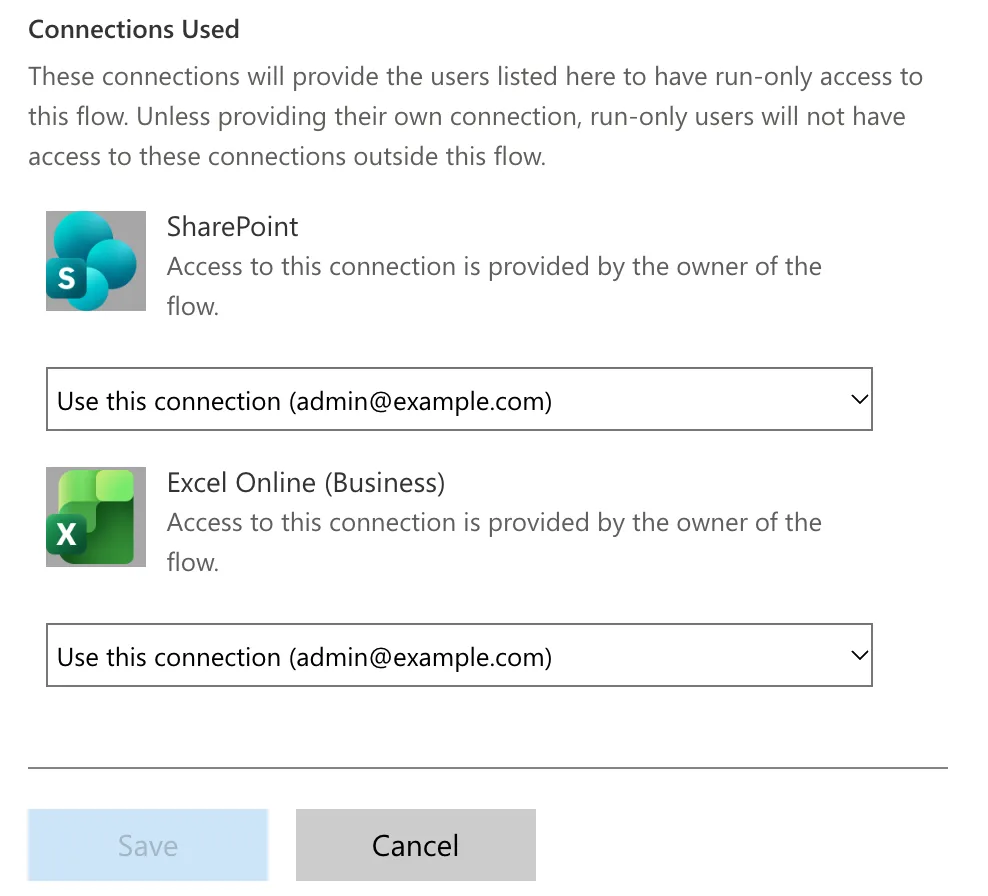
The child flow itself isn't shared with anyone: people run it only through the flows that call it.
Step 12: Create the Monthly Flow
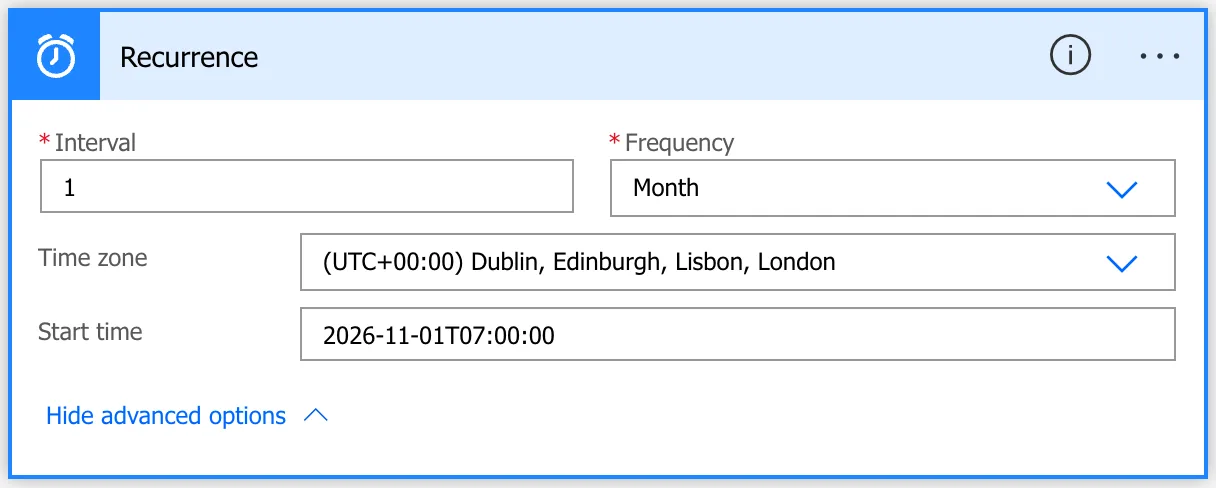
In the solution, create a scheduled cloud flow called Monthly Payroll Workbook, starting on 1 December 2026 at 07:00 and repeating every 1 Month (How to Run a Flow Once a Month in Power Automate). The dialog saved the start as a UTC time, with no time zone, so I opened the Recurrence trigger and set:
- Time zone: (UTC+00:00) Dublin, Edinburgh, Lisbon, London, so 07:00 stays 07:00 UK time after the clocks change.
- Start time:
2026-11-01T07:00:00, with noZ. A start in the past is fine: Microsoft's schedule reference says the Recurrence trigger discards past run times and runs at the next future one, 1 December. A future monthly start, on the other hand, should be set up at least a month ahead, or the first run may be skipped.
Add a Compose called Last month with the month that has just ended (How to Get the First Day of the Month in Power Automate with startOfMonth, How to Add Months to a Date in Power Automate with addToTime):
formatDateTime(addToTime(startOfMonth(convertFromUtc(utcNow(), 'GMT Standard Time')), -1, 'Month'), 'yyyy-MM')
Read from the inside out: the time now in the UK, the first day of its month, one month before that, as 2026-10. Starting from the 1st means the month before always exists, whatever the date.
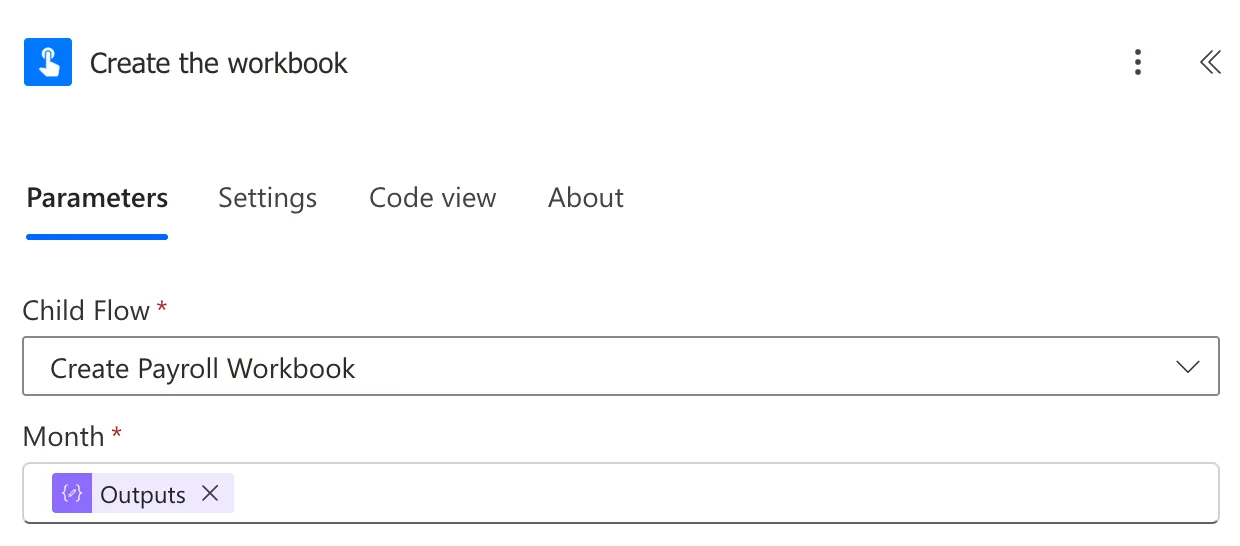
Then Run a Child Flow, called Create the workbook: Child Flow Create Payroll Workbook, and Month the Outputs of Last month (How to Call a Child Flow in Power Automate):
Step 13: Email the Payroll Group
The email goes to whoever is in Overtime Payroll that day, read from the group itself:
| Action | Name | Settings |
|---|---|---|
| Get items (SharePoint) | Get the payroll group setting | The Settings variable; Filter Query Title eq 'PayrollGroupId'; Top Count 1, as in Part 11 |
| List group members (Office 365 Groups) | List the payroll members | Group Id: first(body('Get_the_payroll_group_setting')?['value'])?['Value'] (How to List the Members of a Group in Power Automate) |
| Select | Payroll emails | From the value of the members; text mode, item()?['mail'] (How to Pick One Field from Each Item with Select in Power Automate) |
| Send an email (V2) | Email payroll | Below |
In Email payroll:
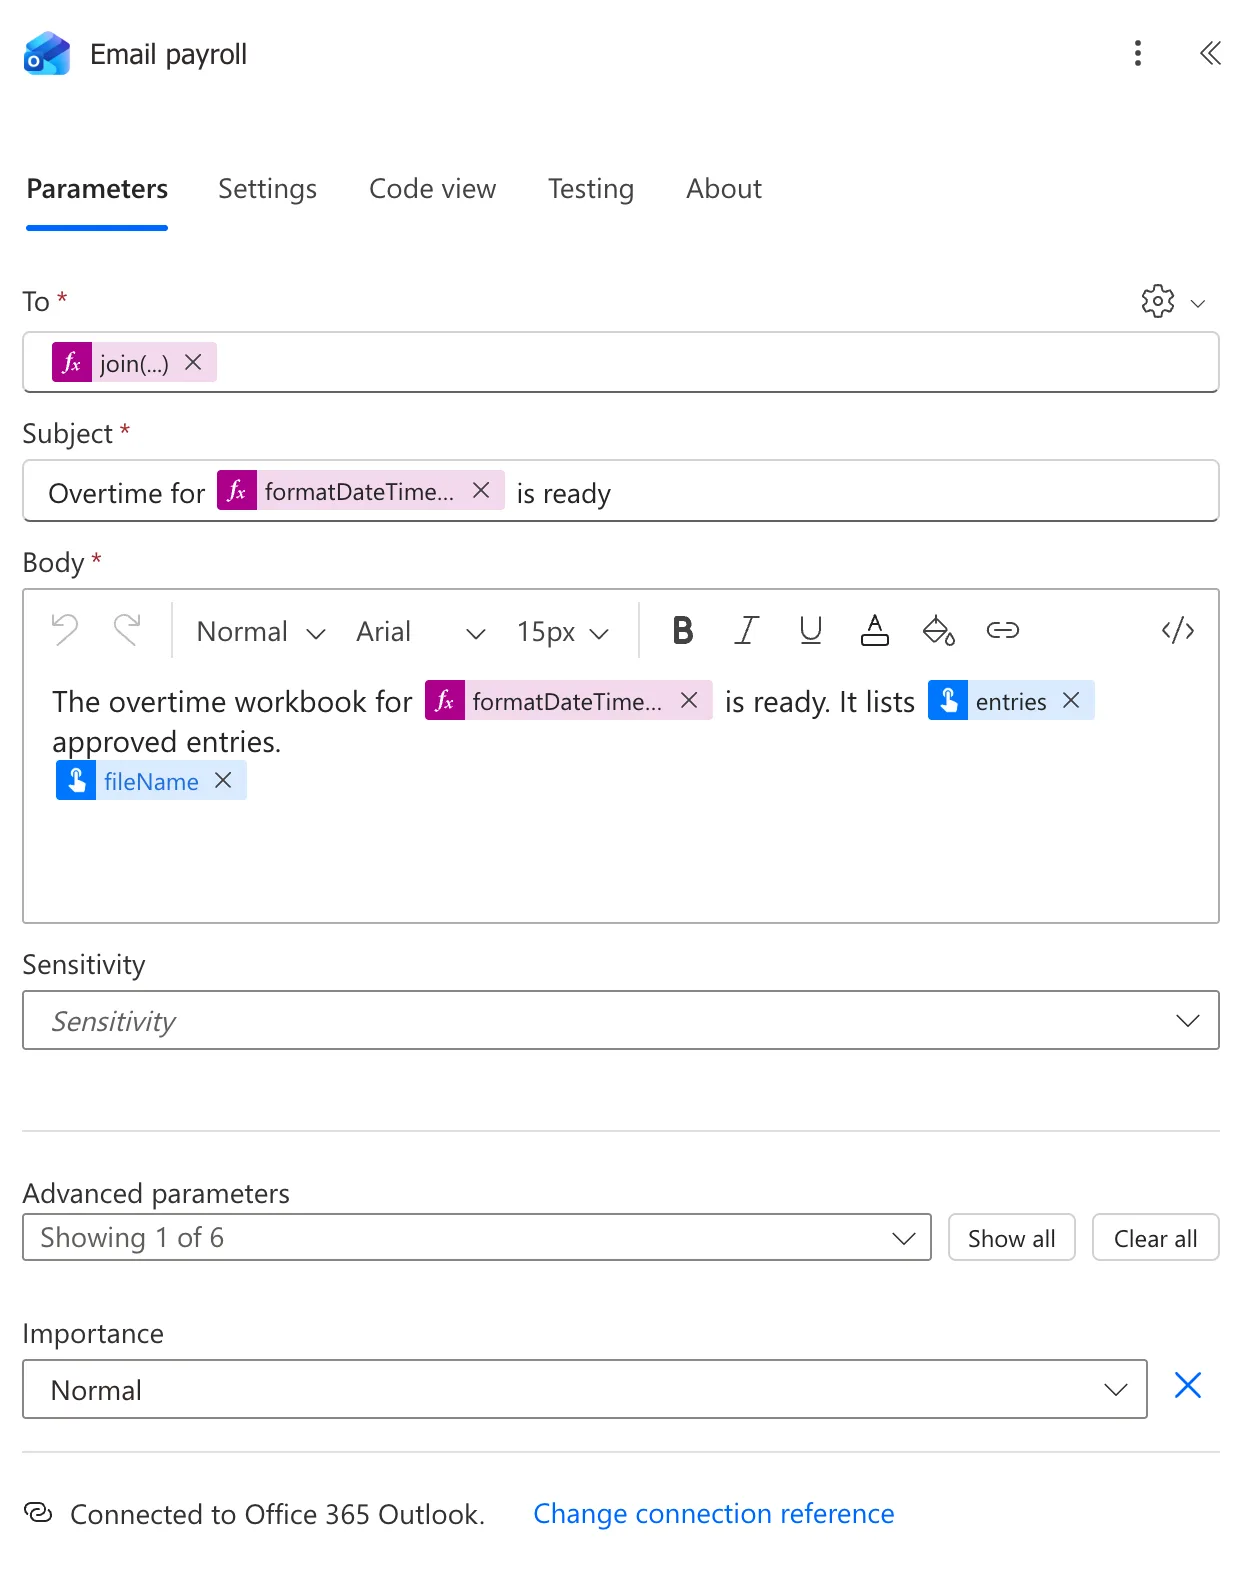
- To: gear > Use dynamic content, then
join(body('Payroll_emails'), ';')(How to Send an Email to Several People in Power Automate). - Subject:
Overtime for, the sameformatDateTime(concat(outputs('Last_month'), '-01'), 'MMMM yyyy')as the titles, thenis ready. - Body, in code view, with the link to the workbook (How to Add a Link to an Email in Power Automate):
<p>The overtime workbook for @{formatDateTime(concat(outputs('Last_month'), '-01'), 'MMMM yyyy')} is ready. It lists @{body('Create_the_workbook')?['entries']} approved entries.</p><p><a href="@{body('Create_the_workbook')?['link']}">@{body('Create_the_workbook')?['filename']}</a></p>
Only the payroll group gets the link, and Part 3 closed the library it points to to everyone else on staff.
Step 14: Test the Monthly Flow
Save, publish, and test the flow now instead of waiting for the 1st. The run made October's workbook and sent the email:
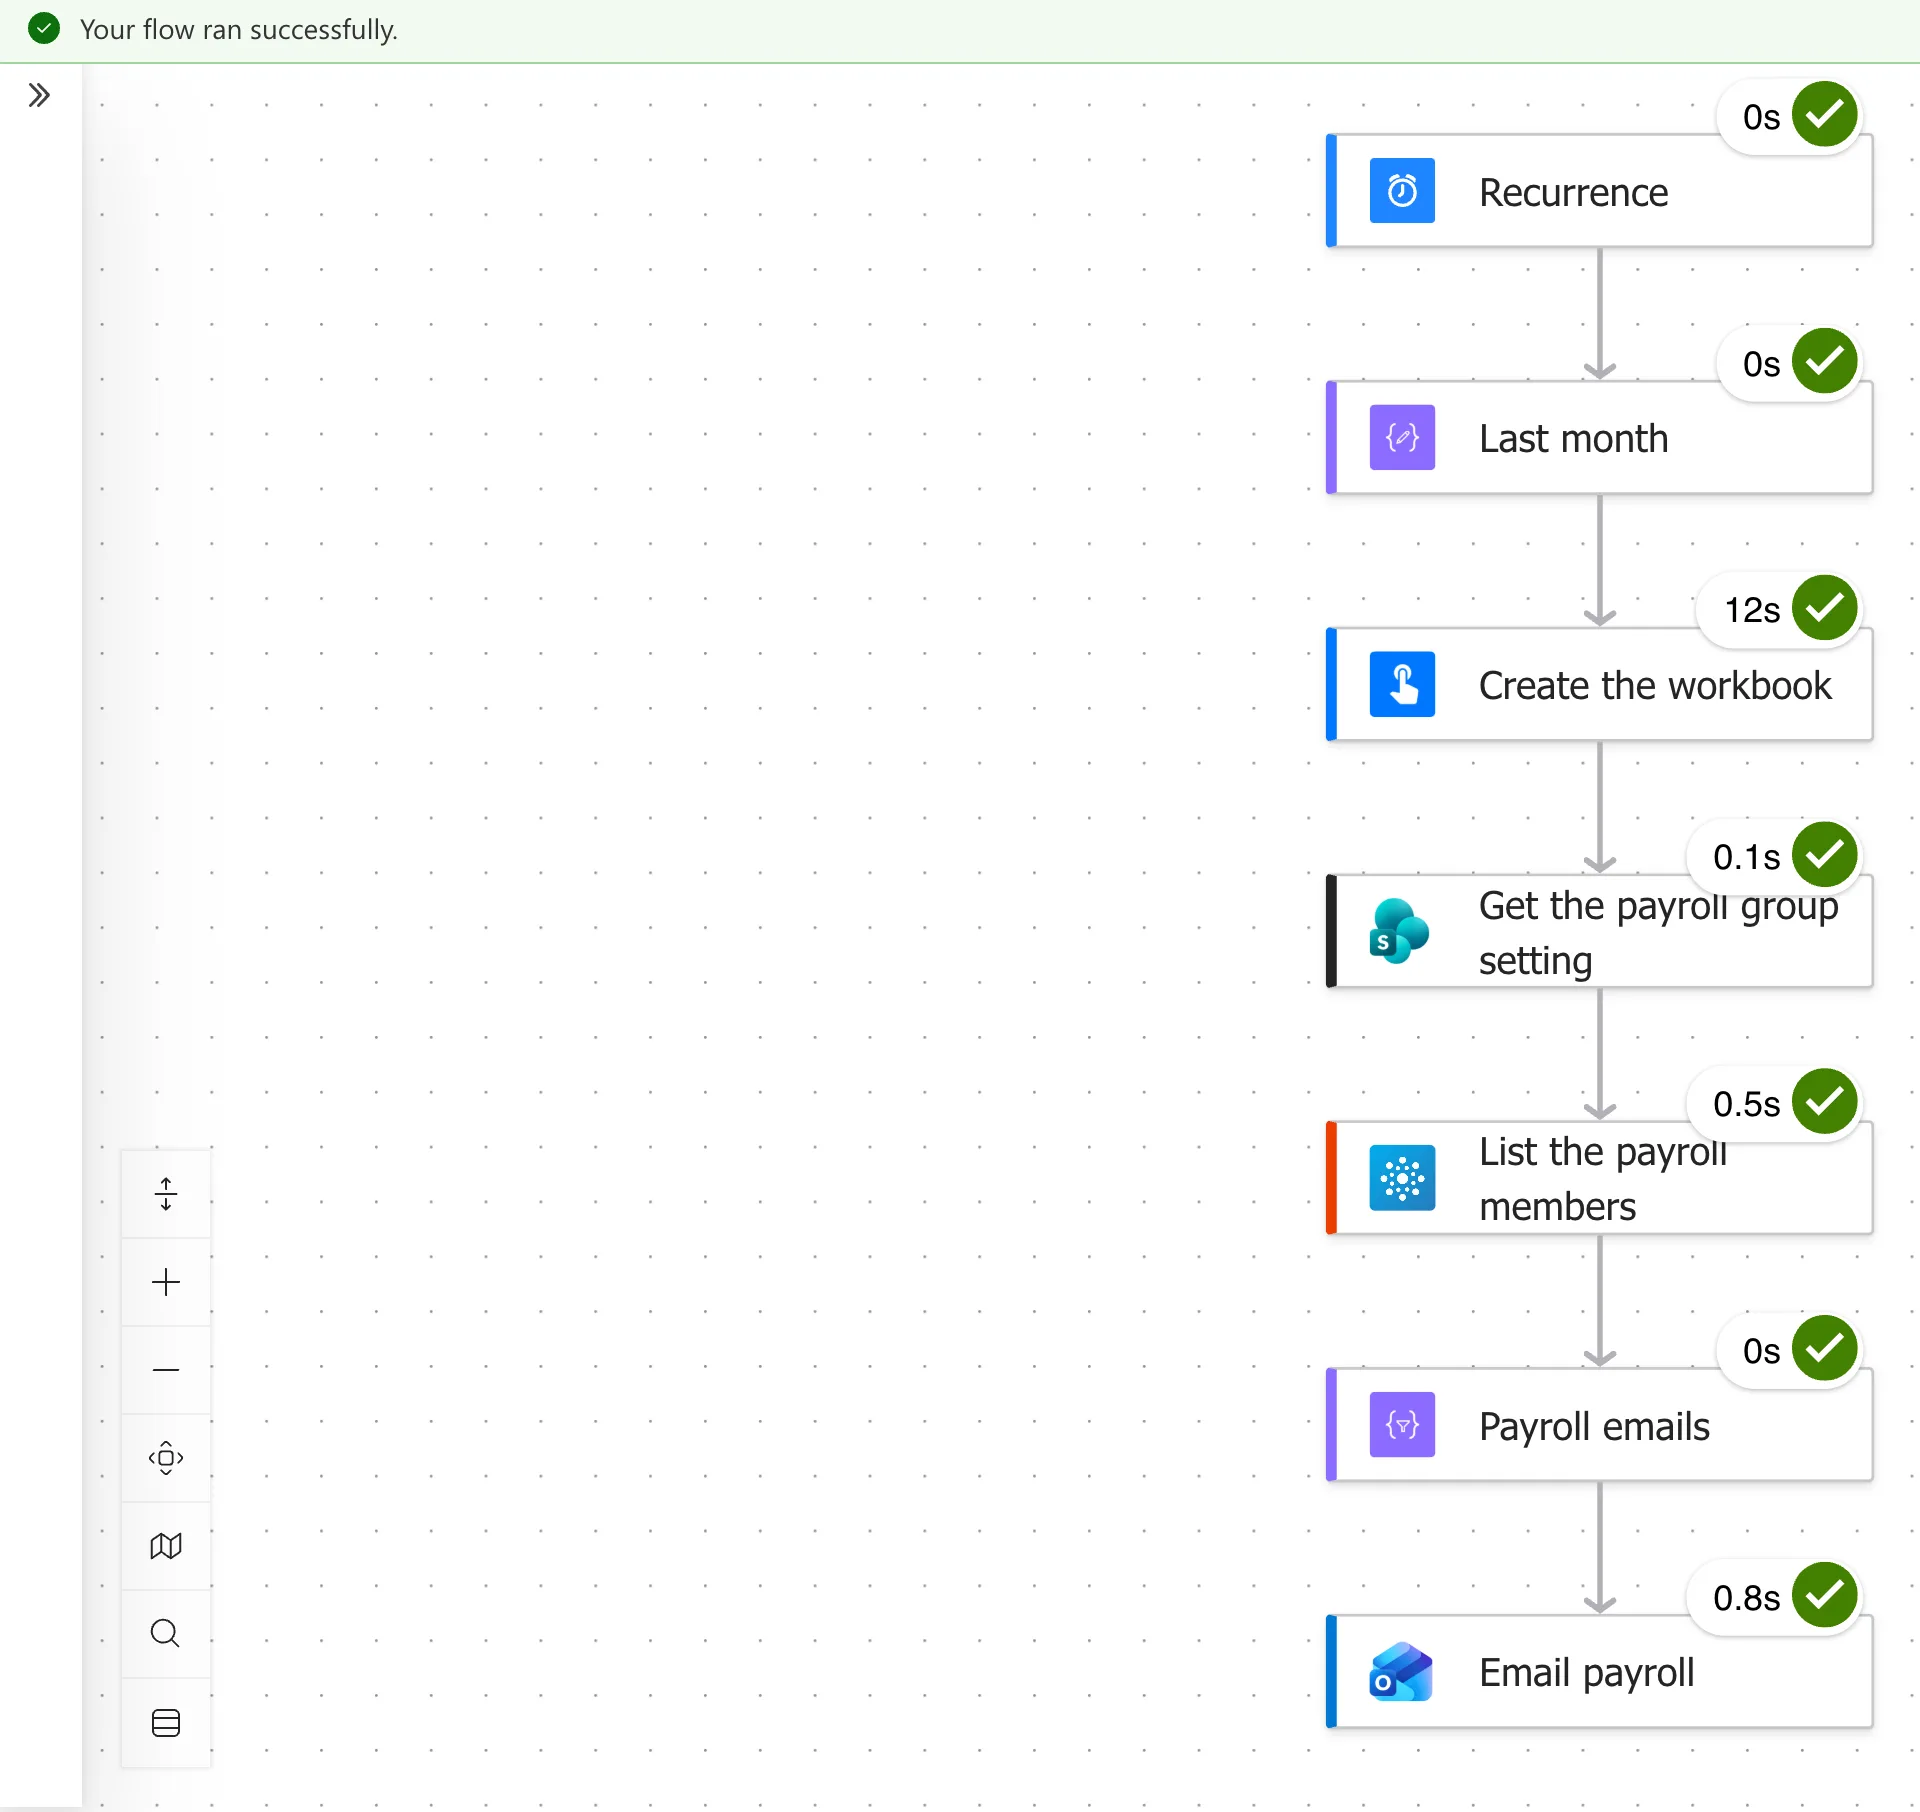
In the run, Create the workbook showed No outputs, although Email payroll used its outputs, and the email had them all.
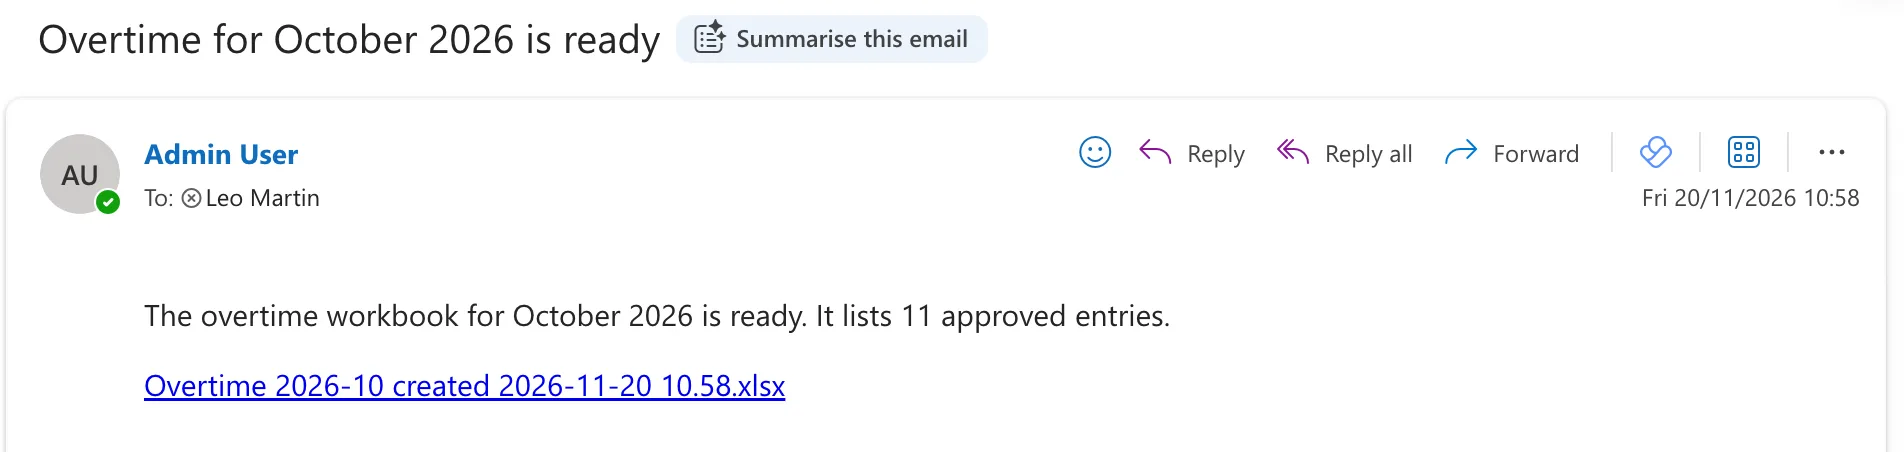
Leo Martin, the payroll officer, had the email in his inbox, with the month, the number of entries and the workbook's link:
What Payroll Gets
- A workbook per month, in Payroll Exports, named with the month and when it was made.
- Entries: every approved entry, with UK dates and times, break, hours and who approved it, totalled at the bottom.
- Totals: one row per person, with their departments, number of entries and hours, the most hours first.
- An email on the 1st at 07:00 UK time, with a link only they can open.
Common Mistakes
| Mistake | What happens | Do this instead |
|---|---|---|
| Turning on a table's total row while it's empty | Excel can choose Count, and the total shows the number of rows | Set each total to a sum of the column, SUBTOTAL(109,[Hours]) |
| Writing the titles before autofitting | Column A is as wide as the title | Autofit first, titles last |
getActiveWorksheet() in a script for a flow | The script writes on the first sheet, or the last activated | getWorksheet("<name>") |
| Running the script on the template | Every month's rows end up in the template | Workbook = the new file's Id |
A Select key that differs from the script's field, such as Email for email | The script reads nothing for that field | Use the interface's names exactly |
| Leaving the array parameter on Add new item | The flow builds the list item by item | Switch to input entire array |
| Leaving the child flow's connections as Provided by run-only user | The parent fails: child flows only support embedded connections | Use this connection |
A start time with Z and a time zone | The time zone is ignored | 2026-11-01T07:00:00, no Z |
Troubleshooting
| Symptom | Likely cause | Fix |
|---|---|---|
| A total of hours that equals the number of people | The total row is Count | =SUBTOTAL(109,[Hours]) |
| The script fails: The workbook needs the tables Entries and Totals | The template's tables have other names | Rename them Entries and Totals |
| Times an hour out in summer | The rows were written in UTC | convertFromUtc(..., 'GMT Standard Time', ...) in Payroll rows |
| Run script fails with BadGateway | Microsoft's limits article: the workbook isn't a standard Excel workbook | Save the template as a standard .xlsx |
| The script isn't in Script | Script Library is a different library | Pick Payroll Exports, then the Setup folder |
| An empty workbook for a month | No entries approved twice that month | Check the month on the Reports screen |
| Nobody gets the email | Overtime Payroll has no members, or PayrollGroupId is wrong | Check the group and the Settings item |
| No outputs on Run a Child Flow in the run | The parent's run view doesn't show them | Check the actions that use them, such as the email |
FAQ
Why a template and a script, and not Excel actions in the flow?
The Excel connector's row actions write one row per call, and Microsoft's reference lists their limits and a delay of up to 30 seconds for changes to take effect. One script call writes every row and the totals at once, and the template keeps the formatting out of the flow.
Can payroll change the template?
Only someone who can edit Payroll Exports. Changes to formatting carry into the next workbook. Renaming the tables or their columns breaks the script, so keep those.
What if a month has no approved entries?
The script is written for it: with no entries, it writes only the titles and returns 0, so the email says the workbook lists 0 approved entries.
Does this need premium licences?
No. SharePoint, Excel Online (Business), Office 365 Groups and Office 365 Outlook are standard connectors. The scheduled flow runs on its owner's licence, and Office Scripts need the business Microsoft 365 licence in the prerequisites.
Can it make a workbook for any other month?
Yes: run the child flow with that month, or use Part 14's button on the Reports screen.
Conclusion
Payroll now gets a workbook every month:
- Payroll Template.xlsx in the Setup folder of Payroll Exports, with an Entries and a Totals table whose total rows add up;
- Fill Payroll Workbook, an Office Script saved with it, that writes a month's entries and each person's totals in one call;
- Create Payroll Workbook, a child flow that reads the month's approved entries, turns them into UK times, copies the template, runs the script and returns the new file's name, link and count, with its own connections;
- Monthly Payroll Workbook, a scheduled flow that runs on the 1st at 07:00 UK time for the month just ended and emails the Overtime Payroll group the link.
Part 14 adds a Create payroll workbook button to the Reports screen, so payroll can make the workbook for any month on demand.
Additional Resources
- Run Office Scripts with Power Automate
- Pass data to and from scripts in Power Automate
- Troubleshoot Office Scripts running in Power Automate
- Platform limits and requirements with Office Scripts
- Excel Online (Business) connector reference
- Create child flows
- Schedule and run recurring workflows with the Recurrence trigger
← Previous: Part 12: Import the Old Excel Timesheet Next → Part 14: Create the Payroll Workbook from the App
