MLflow Tutorial for Machine Learning in Python — Part 1: Install MLflow and Track Your First Experiment

Every time you train a model, you change something: the number of trees, a setting, the data. A week later nobody remembers which change gave the best result. MLflow remembers it for you. In this first part you install MLflow, start your own tracking server, and log your first machine learning experiment from Python.
This is Part 1 of an 8-part series.
- Part 1: Install MLflow and Track Your First Experiment (you are here)
- Part 2: Log Metrics Over Time, Artifacts and Datasets (coming soon)
- Part 3: Autologging and Hyperparameter Tuning with Nested Runs (coming soon)
- Part 4: Log, Load and Validate Models (coming soon)
- Part 5: Evaluate Models and Set Quality Gates (coming soon)
- Part 6: Register, Version and Promote Models with the Model Registry (coming soon)
- Part 7: Serve a Model as a REST API and in Docker (coming soon)
- Part 8: Production Checklist and Recap (coming soon)
Every command and output on this page is real, captured while building the project.
What You'll Have at the End of the Series
Each part covers one piece of MLflow in depth, on real projects you can run on your own computer. By the end of Part 8 you'll know how to:
- track every training run in your own MLflow server: settings, results and charts (this part);
- log richer evidence, such as metrics that change during training, files and the exact dataset a run used (Part 2);
- let MLflow log for you and run a whole search for the best settings as one tidy parent run (Part 3);
- save a trained model with its input format and environment, and load it back anywhere (Part 4);
- evaluate models with MLflow's built-in metrics and charts, and refuse models that don't pass (Part 5);
- register and promote models with versions and aliases in the Model Registry (Part 6);
- serve a model as a REST API, and package it as a Docker image (Part 7);
- run all of it safely with a production checklist (Part 8).
A second series, coming later, covers the other half of MLflow: tracing and evaluating apps built on large language models.
What MLflow Is
MLflow is a free, open-source platform for the machine learning lifecycle. This part uses its oldest and most popular piece, MLflow Tracking: a record of everything you try.
Four words come up again and again:
| Word | What it means | Example in this part |
|---|---|---|
| Tracking server | A small web server that stores your records and shows them in a web page, the MLflow UI | Runs on your computer at http://127.0.0.1:8080 |
| Experiment | A folder for related runs, usually one per project or question | house-price-prediction |
| Run | One execution of your training code | Training a forest with 300 trees |
| Params, metrics, tags, artifacts | What a run records: its settings, its results, labels, and files | n_estimators=300, rmse=0.504, model_type, a chart |
Here is how the pieces fit together:
Your code never writes to the database itself. It sends everything to the tracking server, and the server keeps it in two places: a SQLite database for the numbers and text, and a folder for files.
The Example Project
This series is about MLflow, not about any one model, so the examples stay simple and are built for you along the way. Part 1 uses a house price project:
- The data: scikit-learn's California Housing dataset. It has 20,640 rows, one per district from the 1990 U.S. census, with 8 numbers such as median income and house age. The value to predict is the district's median house value, in units of $100,000.
- The model: a random forest from scikit-learn, one of the most reliable models for this kind of table.
- What MLflow records: the forest's settings, three error scores, two labels and a chart of predicted against actual prices.
Later parts add two more projects, so you see MLflow handle different problems: predicting whether an online shopper buys, and whether a bank customer signs up for a deposit.
What This Part Costs
Nothing. MLflow, Python, uv and scikit-learn are free, open-source software, and everything in this part runs on your own computer.
One thing to know before you start: open-source MLflow collects anonymous usage data by default (since MLflow 3.2.0), such as which features you use. It never collects your parameters, data or file names. You can switch it off with one environment variable; How to Turn Off MLflow Telemetry shows how, on macOS, Linux and Windows. It's off for everything on this page.
Prerequisites
- Python 3.15 and uv 0.13.8 or newer. uv is a fast tool that creates Python projects and installs packages. Check both:
uv --version
uv run --python 3.15 python --version
uv 0.13.8 (3d97a6aad 2026-11-12 aarch64-apple-darwin)
Python 3.15.2
- VS Code or any editor you like.
- About 1.5 GB of free disk space for MLflow and its packages, and an internet connection for the downloads.
Every command on this page works the same in Terminal (macOS), PowerShell (Windows) and Linux shells, unless a step shows a tab for each.
Step 1: Create a Folder for the Tracking Server
The tracking server gets its own folder, separate from any project. Its database and files will live there, and later parts point other projects at the same server, the way a team shares one server.
Open a terminal in the folder where you keep your code, for example a source folder in your home folder, and run:
uv init --bare --python 3.15 mlflow-server
Initialized project `mlflow-server` at `/Users/you/source/mlflow-server`
--bare creates only a pyproject.toml file: no sample code, no README, no Git repository. The folder only runs a server, so that's all it needs. --python 3.15 records that it needs Python 3.15 or newer. How to Create a Python Project with uv explains every uv init option.
Move into the folder:
cd mlflow-server
Step 2: Install MLflow
uv add mlflow
The output is long. Here is the start and the important lines:
Using CPython 3.15.2 interpreter at: /Library/Frameworks/Python.framework/Versions/3.15/bin/python3
Creating virtual environment at: .venv
Resolved 92 packages in 2.06s
      Built pyyaml==6.0.3
Prepared 88 packages in 14.71s
Installed 88 packages in 792ms
 + aiohappyeyeballs==2.7.1
 + aiohttp==3.14.5
...
 + mlflow==3.18.0
 + mlflow-skinny==3.18.0
 + mlflow-tracing==3.18.0
...
 + scikit-learn==1.9.1
...
 + uvicorn==0.54.0
...
uv add did three things:
- It created a virtual environment in
.venv, a private copy of Python for this folder, so nothing is installed system-wide. - It installed MLflow 3.18.0 and the 87 packages it needs, such as pandas, scikit-learn and the uvicorn web server.
- It wrote the versions it chose into
uv.lock, so the same install can be repeated exactly.
The line Built pyyaml==6.0.3 is normal on Python 3.15: PyYAML has no ready-made package for Python 3.15 yet, so uv built it from its source code in a second.
Check the version:
uv run mlflow --version
mlflow, version 3.18.0
How to Install MLflow in a Python Project with uv covers the three MLflow packages and the other ways to install it.
Step 3: Start the Tracking Server
uv run mlflow server --port 8080
Backend store URI not provided. Using sqlite:///mlflow.db
Registry store URI not provided. Using backend store URI.
2026/11/13 17:19:14 INFO mlflow.store.db.utils: Creating initial MLflow database tables...
2026/11/13 17:19:14 INFO mlflow.store.db.utils: Updating database tables
[MLflow] Security middleware enabled with default settings (localhost-only). To allow connections from other hosts, use --host 0.0.0.0 and configure --allowed-hosts and --cors-allowed-origins.
2026/11/13 17:19:15 INFO mlflow.server.jobs.executor_registry: Available backends after discovery: docker, local
2026/11/13 17:19:15 INFO mlflow.server.jobs.executor_registry: Job executor backend 'local' passed requirements check
2026/11/13 17:19:15 INFO:     Uvicorn running on http://127.0.0.1:8080 (Press CTRL+C to quit)
2026/11/13 17:19:15 INFO:     Started parent process [93838]
/Users/you/source/mlflow-server/.venv/lib/python3.15/site-packages/mlflow/server/fastapi_app.py:24: StarletteDeprecationWarning: starlette.middleware.wsgi is deprecated and will be removed in a future release. Please refer to https://github.com/abersheeran/a2wsgi as a replacement.
  from starlette.middleware.wsgi import WSGIResponder, build_environ
/Users/you/source/mlflow-server/.venv/lib/python3.15/site-packages/mlflow/server/fastapi_app.py:24: StarletteDeprecationWarning: starlette.middleware.wsgi is deprecated and will be removed in a future release. Please refer to https://github.com/abersheeran/a2wsgi as a replacement.
  from starlette.middleware.wsgi import WSGIResponder, build_environ
/Users/you/source/mlflow-server/.venv/lib/python3.15/site-packages/mlflow/server/fastapi_app.py:24: StarletteDeprecationWarning: starlette.middleware.wsgi is deprecated and will be removed in a future release. Please refer to https://github.com/abersheeran/a2wsgi as a replacement.
  from starlette.middleware.wsgi import WSGIResponder, build_environ
/Users/you/source/mlflow-server/.venv/lib/python3.15/site-packages/mlflow/server/fastapi_app.py:24: StarletteDeprecationWarning: starlette.middleware.wsgi is deprecated and will be removed in a future release. Please refer to https://github.com/abersheeran/a2wsgi as a replacement.
  from starlette.middleware.wsgi import WSGIResponder, build_environ
2026/11/13 17:19:18 INFO:     Started server process [93843]
2026/11/13 17:19:18 INFO:     Waiting for application startup.
2026/11/13 17:19:18 INFO:     Started server process [93844]
2026/11/13 17:19:18 INFO:     Waiting for application startup.
2026/11/13 17:19:18 INFO:     Started server process [93842]
2026/11/13 17:19:18 INFO:     Waiting for application startup.
2026/11/13 17:19:18 INFO:     Started server process [93841]
2026/11/13 17:19:18 INFO:     Waiting for application startup.
2026/11/13 17:19:18 INFO:     Application startup complete.
2026/11/13 17:19:19 INFO:     Application startup complete.
2026/11/13 17:19:19 INFO:     Application startup complete.
2026/11/13 17:19:19 INFO:     Application startup complete.
What the important lines mean:
Using sqlite:///mlflow.db: since MLflow 3.7.0, the server stores its records in a SQLite database file,mlflow.db, in the folder you start it from. The first start creates the tables.Security middleware enabled … (localhost-only): the server only accepts requests from this computer. That's what you want on a laptop.Uvicorn running on http://127.0.0.1:8080: the address of your server.127.0.0.1means "this computer".Application startup completeappears four times because the server runs 4 worker processes by default. Wait for all four before you open the UI.StarletteDeprecationWarningcomes from MLflow's own code, once per worker. It's harmless; Fixed: "StarletteDeprecationWarning: starlette.middleware.wsgi is deprecated" When You Start the MLflow Server shows where it comes from.
A few seconds later the server's job runner adds four lines about scheduled tasks. They're for MLflow's AI features, and you can ignore them for now:
2026/11/13 17:19:21 INFO mlflow.server.jobs.utils: Registered online_scoring_scheduler periodic task (runs every 1 minute)
2026/11/13 17:19:21 INFO mlflow.server.jobs.utils: Registered trace_archival_scheduler periodic task (polls every 1 minute and no-ops when trace archival is disabled or unconfigured)
2026/11/13 17:19:21 INFO mlflow.server.jobs.utils: Registered issue_detection_scheduler periodic task (polls every 15 minutes and no-ops when no experiment has a detection schedule)
2026/11/13 17:19:21 INFO mlflow.server.jobs.utils: SQL trace rollup scheduler was not registered because rollups are disabled
Why port 8080 and not MLflow's usual 5000? On a Mac, port 5000 belongs to the AirPlay Receiver. The server starts anyway, but the address in MLflow's own quickstart, http://localhost:5000, opens an "Access to localhost was denied" page instead of MLflow. Fixed: "Access to localhost was denied" HTTP ERROR 403 When You Open the MLflow UI on a Mac shows exactly why. Port 8080 works the same on macOS, Windows and Linux; How to Change the MLflow Server Port covers other ports.
Leave this terminal open. The server runs as long as the terminal does. How to Start an MLflow Tracking Server on Your Computer explains every option of mlflow server.
Step 4: Open the MLflow UI
Open http://127.0.0.1:8080 in your browser. On the first visit, MLflow opens in GenAI mode with the MLflow Assistant panel on the right:
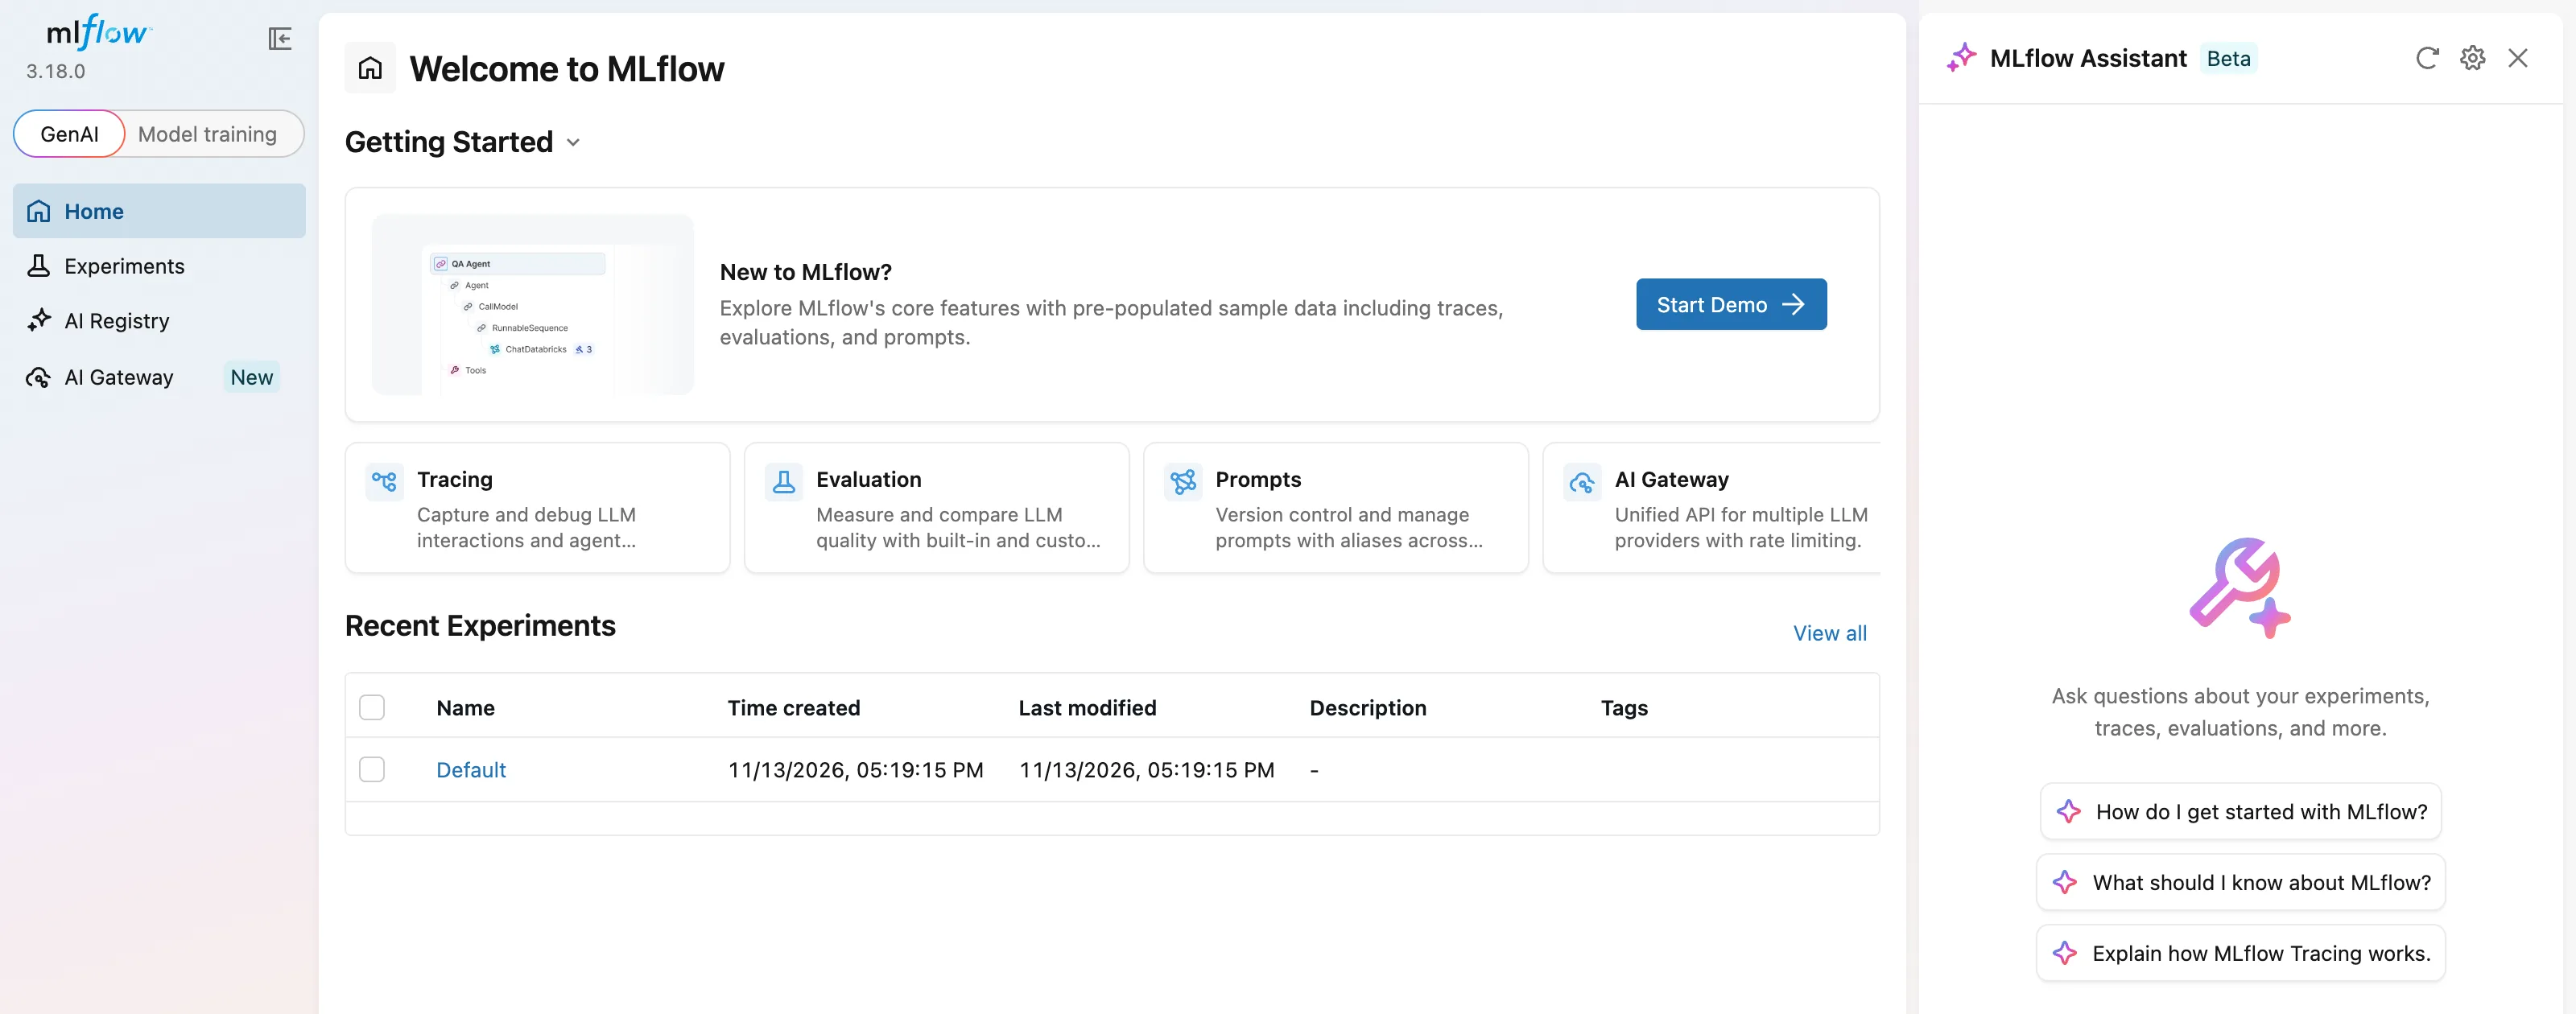
This series is about classic machine learning, so make two changes:
- Click Model training at the top of the sidebar. The menu changes to Home, Experiments and Model registry.
- Close the MLflow Assistant panel with the X in its top-right corner.
The browser remembers both choices. This is what it looks like now:
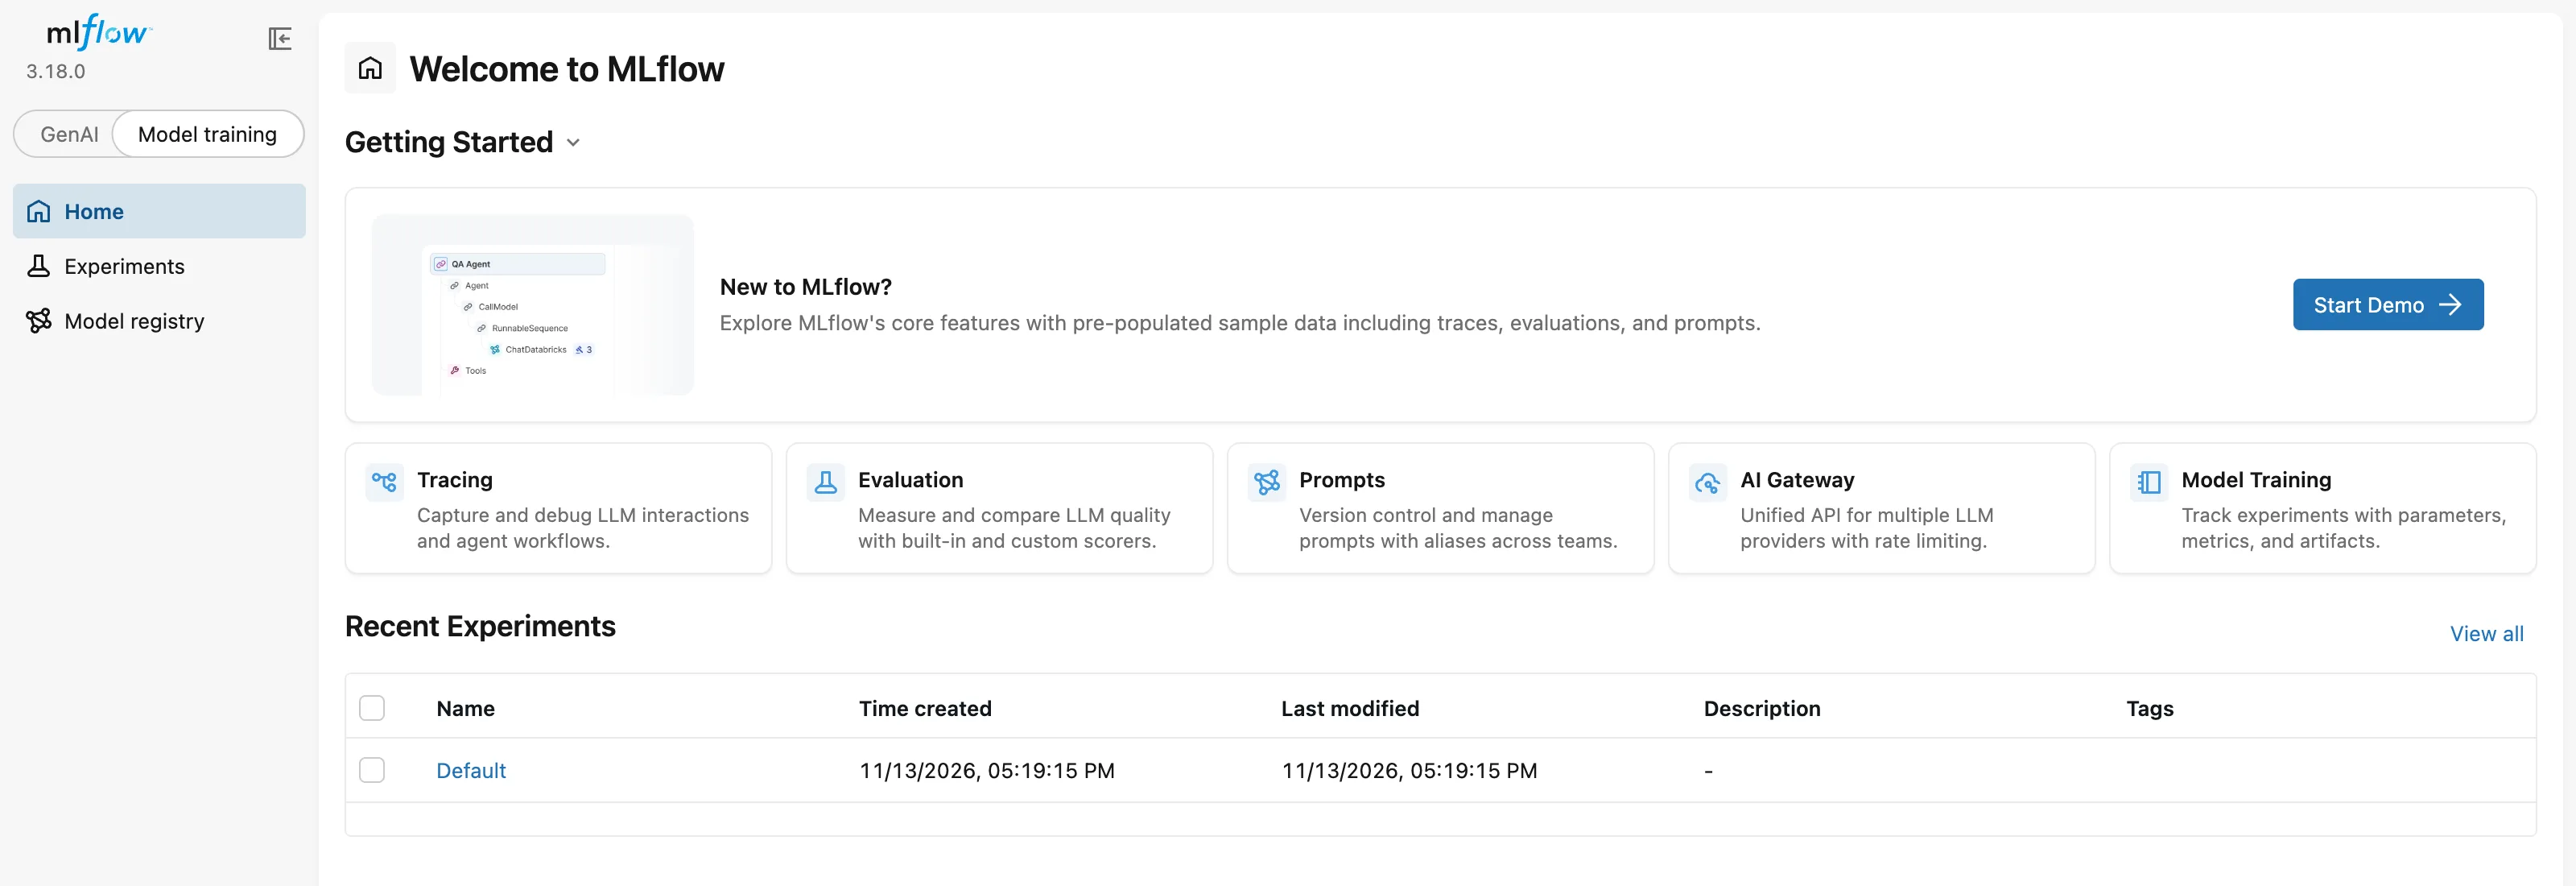
The only experiment so far is Default, which every MLflow server creates. How to Open the MLflow UI and Find Your Runs tours every page you'll use in this series.
Step 5: Create the Project
Open a second terminal, so the server keeps running in the first one, and go back to the folder that holds mlflow-server:
cd ..
uv init --package --name house-price-prediction --python 3.15 dewiride-house-price-prediction
Initialized project `house-price-prediction` at `/Users/you/source/dewiride-house-price-prediction`
| Part of the command | What it does |
|---|---|
--package | Creates an installable package with a src/ folder, the layout production projects use |
--name house-price-prediction | The project's name. Python code imports it as house_price_prediction |
--python 3.15 | Python 3.15 or newer |
dewiride-house-price-prediction | The folder to create |
uv also turned the folder into a Git repository. Move into it:
cd dewiride-house-price-prediction
Step 6: Add the Packages
uv add mlflow scikit-learn pandas matplotlib pydantic-settings
Using CPython 3.15.2 interpreter at: /Library/Frameworks/Python.framework/Versions/3.15/bin/python3.15
Creating virtual environment at: .venv
Resolved 92 packages in 494ms
      Built house-price-prediction @ file:///Users/you/source/dewiride-house-price-prediction
Prepared 5 packages in 482ms
Installed 90 packages in 1.05s
...
 + matplotlib==3.11.2
 + mlflow==3.18.0
...
 + pandas==3.1.1
...
 + pydantic-settings==2.16.3
...
 + scikit-learn==1.9.1
...
This time uv prepared only 5 packages: the rest came from its cache, filled in Step 2.
| Package | Why the project needs it |
|---|---|
mlflow | Sends params, metrics, tags and charts to the tracking server |
scikit-learn | The dataset, the random forest and the error scores |
pandas | The data arrives as a pandas table |
matplotlib | Draws the chart |
pydantic-settings | Reads the server address from a settings file |
MLflow already depends on pandas, matplotlib and scikit-learn, but your code imports them directly, so they belong in your own list too. Your pyproject.toml now has:
dependencies = [
    "matplotlib>=3.11.2",
    "mlflow>=3.18.0",
    "pandas>=3.1.1",
    "pydantic-settings>=2.16.3",
    "scikit-learn>=1.9.1",
]
How to Add a Package to a Python Project with uv explains these version ranges and uv.lock.
Step 7: Point the Project at the Tracking Server
The training code needs two settings: where the server is, and which experiment to use. They differ from one computer to another, so they live in a settings file, not in the code.
Create .env.example in the project folder. It's the template you commit to Git:
# The MLflow tracking server this project sends its runs to.
MLFLOW_TRACKING_URI=http://127.0.0.1:8080
# The MLflow experiment that groups this project's runs.
MLFLOW_EXPERIMENT_NAME=house-price-prediction
Copy it to .env, your own working copy:
- macOS / Linux
- Windows (PowerShell)
cp .env.example .env
Copy-Item .env.example .env
MLFLOW_TRACKING_URI and MLFLOW_EXPERIMENT_NAME are MLflow's own standard names, so you never have to remember two names for the same setting.
.env holds settings for your computer only, so keep it out of Git. Add two lines at the end of .gitignore:
# Local settings (copy .env.example to .env)
.env
Now the code that reads the file. Create src/house_price_prediction/config.py:
"""Settings, read from environment variables and the .env file."""

from functools import lru_cache

from pydantic import Field
from pydantic_settings import BaseSettings, SettingsConfigDict


class Settings(BaseSettings):
    """Where the project sends its MLflow runs."""

    model_config = SettingsConfigDict(
        env_prefix="HOUSE_PRICES_",
        env_file=".env",
        env_file_encoding="utf-8",
        extra="ignore",
    )

    mlflow_tracking_uri: str = Field(
        default="http://127.0.0.1:8080",
        validation_alias="MLFLOW_TRACKING_URI",
        description="The address of the MLflow tracking server.",
    )
    mlflow_experiment_name: str = Field(
        default="house-price-prediction",
        min_length=1,
        validation_alias="MLFLOW_EXPERIMENT_NAME",
        description="The MLflow experiment that groups this project's runs.",
    )


@lru_cache
def get_settings() -> Settings:
    """Read the settings once, then reuse the same object everywhere."""
    return Settings()
BaseSettingsfills each field from an environment variable or from.env. An environment variable wins over the file, and the file wins over the default.validation_aliasreads each field from MLflow's standard name, such asMLFLOW_TRACKING_URI.env_prefix="HOUSE_PRICES_"applies to any setting without an alias, so a setting the project adds later can't clash with a variable another tool sets.min_length=1refuses an empty experiment name.get_settings()reads the settings once and reuses them.
How to Load Settings from Environment Variables and a .env File with pydantic-settings shows each rule live, including the errors you get for bad values.
Step 8: Load and Split the Data
Create src/house_price_prediction/data.py:
"""Load the California Housing data and split it for training and testing."""

from dataclasses import dataclass

import pandas as pd
from sklearn.datasets import fetch_california_housing
from sklearn.model_selection import train_test_split

TARGET = "MedHouseVal"


@dataclass(frozen=True)
class DataSplit:
    """The features and target values for training and for testing."""

    X_train: pd.DataFrame
    X_test: pd.DataFrame
    y_train: pd.Series
    y_test: pd.Series


def load_housing_data() -> pd.DataFrame:
    """Return the dataset as one table. The first call downloads it; later calls read a cache."""
    return fetch_california_housing(as_frame=True).frame


def split_data(frame: pd.DataFrame, test_size: float, random_state: int) -> DataSplit:
    """Hold back `test_size` of the rows to measure the model on data it never saw."""
    features = frame.drop(columns=TARGET)
    target = frame[TARGET]
    X_train, X_test, y_train, y_test = train_test_split(
        features, target, test_size=test_size, random_state=random_state
    )
    return DataSplit(X_train, X_test, y_train, y_test)
load_housing_data() returns the whole dataset as one table. split_data() keeps a share of the rows aside as a test set: the model never sees them while training, so its score on them is honest. The same random_state always picks the same rows. How to Load the California Housing Dataset in Python with scikit-learn and How to Split Data into Training and Test Sets with scikit-learn cover both in detail.
Step 9: Draw the Predicted vs Actual Chart
Numbers tell you how wrong a model is on average. A chart shows where it's wrong. Create src/house_price_prediction/plots.py:
"""Charts that show how good the model's predictions are."""

import numpy as np
from matplotlib.figure import Figure


def predicted_vs_actual(actual: np.ndarray, predicted: np.ndarray) -> Figure:
    """Plot each prediction against the true value. Perfect predictions sit on the dashed line."""
    figure = Figure(figsize=(6, 6), layout="constrained")
    axes = figure.subplots()
    axes.scatter(actual, predicted, s=4, alpha=0.3)
    low = min(np.min(actual), np.min(predicted))
    high = max(np.max(actual), np.max(predicted))
    axes.plot([low, high], [low, high], linestyle="--", color="gray", label="Perfect prediction")
    axes.set_xlabel("Actual median house value ($100,000s)")
    axes.set_ylabel("Predicted median house value ($100,000s)")
    axes.set_title("Predicted vs actual house values")
    axes.legend(loc="upper left")
    return figure
The function builds a Figure directly instead of using pyplot, so it never needs a window or a display, which matters on servers. How to Plot Predicted vs Actual Values with Matplotlib explains how to read the chart.
Step 10: Track the Training Run with MLflow
This is the file where MLflow does its work. Create src/house_price_prediction/train.py and build it up piece by piece.
The imports and a logger. Add:
"""Train a house price model and record the run in MLflow."""

import argparse
import logging
from collections.abc import Sequence

import mlflow
from sklearn.ensemble import RandomForestRegressor
from sklearn.metrics import mean_absolute_error, r2_score, root_mean_squared_error

from house_price_prediction.config import get_settings
from house_price_prediction.data import load_housing_data, split_data
from house_price_prediction.plots import predicted_vs_actual

logger = logging.getLogger("house_price_prediction")
The command-line options. Each run should be able to try different settings without editing the code, so they come from the command line. Add below the logger:
def parse_args(argv: Sequence[str] | None = None) -> argparse.Namespace:
    """Read the training options from the command line."""
    parser = argparse.ArgumentParser(
        prog="train",
        description="Train a model that predicts house prices, and track the run in MLflow.",
    )
    parser.add_argument(
        "--n-estimators", type=int, default=100, help="number of trees in the forest (default: 100)"
    )
    parser.add_argument(
        "--max-depth",
        type=int,
        default=None,
        help="how deep each tree may grow (default: no limit)",
    )
    parser.add_argument(
        "--test-size",
        type=float,
        default=0.2,
        help="share of the rows kept back for testing (default: 0.2)",
    )
    parser.add_argument(
        "--random-state",
        type=int,
        default=42,
        help="seed that makes the split and the model repeatable (default: 42)",
    )
    parser.add_argument(
        "--run-name", default=None, help="name shown in the MLflow UI (default: MLflow picks one)"
    )
    args = parser.parse_args(argv)
    if args.n_estimators < 1:
        parser.error("--n-estimators must be 1 or more")
    if args.max_depth is not None and args.max_depth < 1:
        parser.error("--max-depth must be 1 or more")
    if not 0 < args.test_size < 1:
        parser.error("--test-size must be between 0 and 1")
    return args
The last six lines refuse impossible values, such as zero trees, before anything is trained or logged.
Connect to the server and choose the experiment. Add the start of main():
def main(argv: Sequence[str] | None = None) -> int:
    """Train one model, measure it on the test rows and log everything to MLflow."""
    logging.basicConfig(
        level=logging.INFO,
        format="%(asctime)s %(levelname)s %(name)s: %(message)s",
        datefmt="%Y/%m/%d %H:%M:%S",
    )
    args = parse_args(argv)
    settings = get_settings()

    mlflow.set_tracking_uri(settings.mlflow_tracking_uri)
    mlflow.set_experiment(settings.mlflow_experiment_name)

    logger.info("Loading the California Housing data")
    data = split_data(load_housing_data(), args.test_size, args.random_state)
mlflow.set_tracking_uri()tells MLflow where to send everything: your server. Without it, MLflow would quietly create a separatemlflow.dbfile in the folder you run from, and nothing would appear in your UI. How to Set the MLflow Tracking URI in Python shows that trap live.mlflow.set_experiment()makeshouse-price-predictionthe active experiment, and creates it on the first run. How to Create and Set an MLflow Experiment covers the other ways to create one.- The log format matches MLflow's own, so all messages line up.
Open a run and record the settings. Add inside main():
    with mlflow.start_run(run_name=args.run_name) as run:
        mlflow.log_params(
            {
                "n_estimators": args.n_estimators,
                "max_depth": args.max_depth,
                "test_size": args.test_size,
                "random_state": args.random_state,
            }
        )
        mlflow.set_tags({"model_type": "random_forest", "dataset": "california_housing"})
mlflow.start_run()starts a run. Everything logged inside thewithblock belongs to it. When the block ends, MLflow marks the run Finished; if your code fails inside it, the run is marked Failed. With norun_name, MLflow invents a name such assmiling-moose-157. See How to Start, Name and End an MLflow Run.mlflow.log_params()records the settings that shape the result. MLflow stores params as text and never lets you change one after it's logged. See How to Log Parameters in MLflow.mlflow.set_tags()adds labels you can search and filter by. See How to Add Tags to an MLflow Run.
Train the model, then record the results. Add below the tags, still inside the with block:
        model = RandomForestRegressor(
            n_estimators=args.n_estimators,
            max_depth=args.max_depth,
            random_state=args.random_state,
            n_jobs=-1,
        )
        logger.info("Training on %d rows", len(data.X_train))
        model.fit(data.X_train, data.y_train)
        predictions = model.predict(data.X_test)

        metrics = {
            "mae": mean_absolute_error(data.y_test, predictions),
            "rmse": root_mean_squared_error(data.y_test, predictions),
            "r2": r2_score(data.y_test, predictions),
        }
        mlflow.log_metrics(metrics)
        figure = predicted_vs_actual(data.y_test.to_numpy(), predictions)
        mlflow.log_figure(figure, "plots/predicted_vs_actual.png")

        logger.info(
            "Run %s: MAE %.3f, RMSE %.3f, R2 %.3f",
            run.info.run_name,
            metrics["mae"],
            metrics["rmse"],
            metrics["r2"],
        )
    return 0
- The forest trains on the training rows and predicts the test rows.
n_jobs=-1uses all your processor cores. See How to Train a Random Forest Regression Model with scikit-learn. - The three scores measure the errors: MAE is the average miss, RMSE punishes big misses more, and R² says how much of the variation the model explains (1.0 is perfect). See How to Calculate MAE, RMSE and R² in scikit-learn.
mlflow.log_metrics()records the scores as numbers you can sort, chart and compare. See How to Log Metrics in MLflow.mlflow.log_figure()saves the chart as a PNG file in the run, inside aplotsfolder. See How to Log a Matplotlib Figure to MLflow.
The complete file:
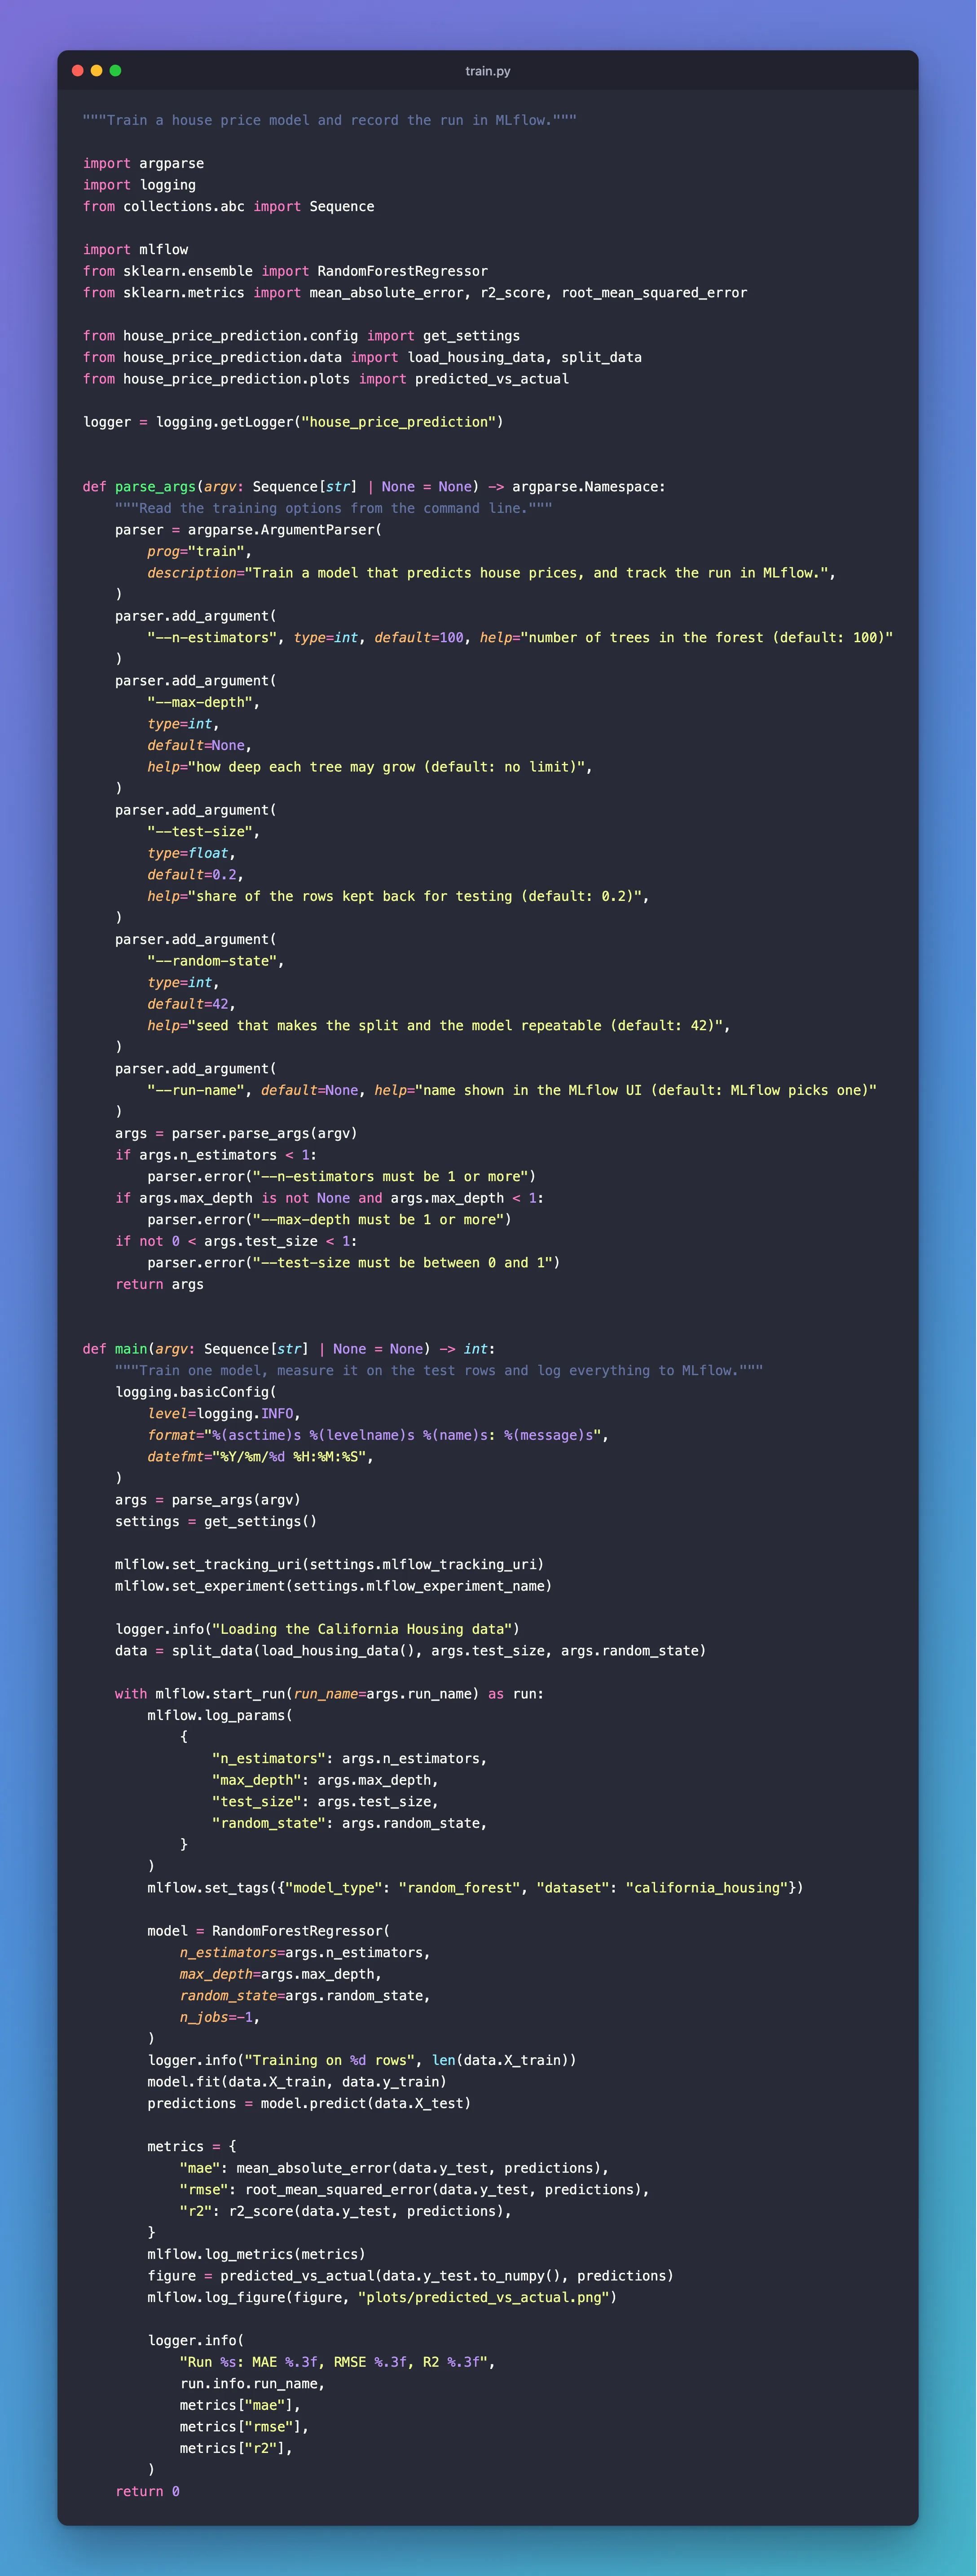
"""Train a house price model and record the run in MLflow."""

import argparse
import logging
from collections.abc import Sequence

import mlflow
from sklearn.ensemble import RandomForestRegressor
from sklearn.metrics import mean_absolute_error, r2_score, root_mean_squared_error

from house_price_prediction.config import get_settings
from house_price_prediction.data import load_housing_data, split_data
from house_price_prediction.plots import predicted_vs_actual

logger = logging.getLogger("house_price_prediction")


def parse_args(argv: Sequence[str] | None = None) -> argparse.Namespace:
    """Read the training options from the command line."""
    parser = argparse.ArgumentParser(
        prog="train",
        description="Train a model that predicts house prices, and track the run in MLflow.",
    )
    parser.add_argument(
        "--n-estimators", type=int, default=100, help="number of trees in the forest (default: 100)"
    )
    parser.add_argument(
        "--max-depth",
        type=int,
        default=None,
        help="how deep each tree may grow (default: no limit)",
    )
    parser.add_argument(
        "--test-size",
        type=float,
        default=0.2,
        help="share of the rows kept back for testing (default: 0.2)",
    )
    parser.add_argument(
        "--random-state",
        type=int,
        default=42,
        help="seed that makes the split and the model repeatable (default: 42)",
    )
    parser.add_argument(
        "--run-name", default=None, help="name shown in the MLflow UI (default: MLflow picks one)"
    )
    args = parser.parse_args(argv)
    if args.n_estimators < 1:
        parser.error("--n-estimators must be 1 or more")
    if args.max_depth is not None and args.max_depth < 1:
        parser.error("--max-depth must be 1 or more")
    if not 0 < args.test_size < 1:
        parser.error("--test-size must be between 0 and 1")
    return args


def main(argv: Sequence[str] | None = None) -> int:
    """Train one model, measure it on the test rows and log everything to MLflow."""
    logging.basicConfig(
        level=logging.INFO,
        format="%(asctime)s %(levelname)s %(name)s: %(message)s",
        datefmt="%Y/%m/%d %H:%M:%S",
    )
    args = parse_args(argv)
    settings = get_settings()

    mlflow.set_tracking_uri(settings.mlflow_tracking_uri)
    mlflow.set_experiment(settings.mlflow_experiment_name)

    logger.info("Loading the California Housing data")
    data = split_data(load_housing_data(), args.test_size, args.random_state)

    with mlflow.start_run(run_name=args.run_name) as run:
        mlflow.log_params(
            {
                "n_estimators": args.n_estimators,
                "max_depth": args.max_depth,
                "test_size": args.test_size,
                "random_state": args.random_state,
            }
        )
        mlflow.set_tags({"model_type": "random_forest", "dataset": "california_housing"})

        model = RandomForestRegressor(
            n_estimators=args.n_estimators,
            max_depth=args.max_depth,
            random_state=args.random_state,
            n_jobs=-1,
        )
        logger.info("Training on %d rows", len(data.X_train))
        model.fit(data.X_train, data.y_train)
        predictions = model.predict(data.X_test)

        metrics = {
            "mae": mean_absolute_error(data.y_test, predictions),
            "rmse": root_mean_squared_error(data.y_test, predictions),
            "r2": r2_score(data.y_test, predictions),
        }
        mlflow.log_metrics(metrics)
        figure = predicted_vs_actual(data.y_test.to_numpy(), predictions)
        mlflow.log_figure(figure, "plots/predicted_vs_actual.png")

        logger.info(
            "Run %s: MAE %.3f, RMSE %.3f, R2 %.3f",
            run.info.run_name,
            metrics["mae"],
            metrics["rmse"],
            metrics["r2"],
        )
    return 0
Step 11: Add the train Command
Two small edits make the code easy to run. First, replace everything in src/house_price_prediction/__init__.py (uv's sample main() function) with one line that describes the package:
"""Predict California house prices and track every training run with MLflow."""
Then open pyproject.toml and change two things: the placeholder description, and the [project.scripts] entry, so the command is called train and runs main() in train.py:
description = "Predict California house prices with scikit-learn and track every training run in MLflow."

[project.scripts]
train = "house_price_prediction.train:main"
Check the command:
uv run train --help
usage: train [-h] [--n-estimators N_ESTIMATORS] [--max-depth MAX_DEPTH] [--test-size TEST_SIZE]
             [--random-state RANDOM_STATE] [--run-name RUN_NAME]

Train a model that predicts house prices, and track the run in MLflow.

options:
  -h, --help            show this help message and exit
  --n-estimators N_ESTIMATORS
                        number of trees in the forest (default: 100)
  --max-depth MAX_DEPTH
                        how deep each tree may grow (default: no limit)
  --test-size TEST_SIZE
                        share of the rows kept back for testing (default: 0.2)
  --random-state RANDOM_STATE
                        seed that makes the split and the model repeatable (default: 42)
  --run-name RUN_NAME   name shown in the MLflow UI (default: MLflow picks one)
How to Run a Python Script with uv run explains how uv run finds the train command.
Step 12: Run Your First Experiment
Make sure the server is still running in the first terminal, then:
uv run train
      Built house-price-prediction @ file:///Users/you/source/dewiride-house-price-prediction
Uninstalled 1 package in 2ms
Installed 1 package in 3ms
2026/11/13 17:20:59 INFO mlflow.tracking.fluent: Experiment with name 'house-price-prediction' does not exist. Creating a new experiment.
2026/11/13 17:20:59 INFO house_price_prediction: Loading the California Housing data
2026/11/13 17:20:59 INFO sklearn.datasets._california_housing: Downloading Cal. housing from https://ndownloader.figshare.com/files/5976036 to /Users/you/scikit_learn_data
2026/11/13 17:21:01 INFO house_price_prediction: Training on 16512 rows
2026/11/13 17:21:03 INFO house_price_prediction: Run smiling-moose-157: MAE 0.328, RMSE 0.506, R2 0.804
🏃 View run smiling-moose-157 at: http://127.0.0.1:8080/#/experiments/1/runs/8dbe08fc91434c5b9b22456dcd740ebf
🧪 View experiment at: http://127.0.0.1:8080/#/experiments/1
Line by line:
Built,Uninstalled,Installed: you changedpyproject.toml, so uv reinstalled your project before running it. That's how the newtraincommand appeared.Creating a new experiment:set_experiment()didn't findhouse-price-prediction, so it created it, with ID 1.Downloading Cal. housing: scikit-learn downloaded the dataset once and cached it in your home folder. Later runs skip this line.Training on 16512 rows: 80% of the 20,640 rows. The other 4,128 are the test set.- The scores: on houses it never saw, the model misses by about 0.328 (×$100,000), so about $32,800 on average, and explains about 80% of the variation.
- The two links: MLflow prints them when a run ends. Your run ID will differ.
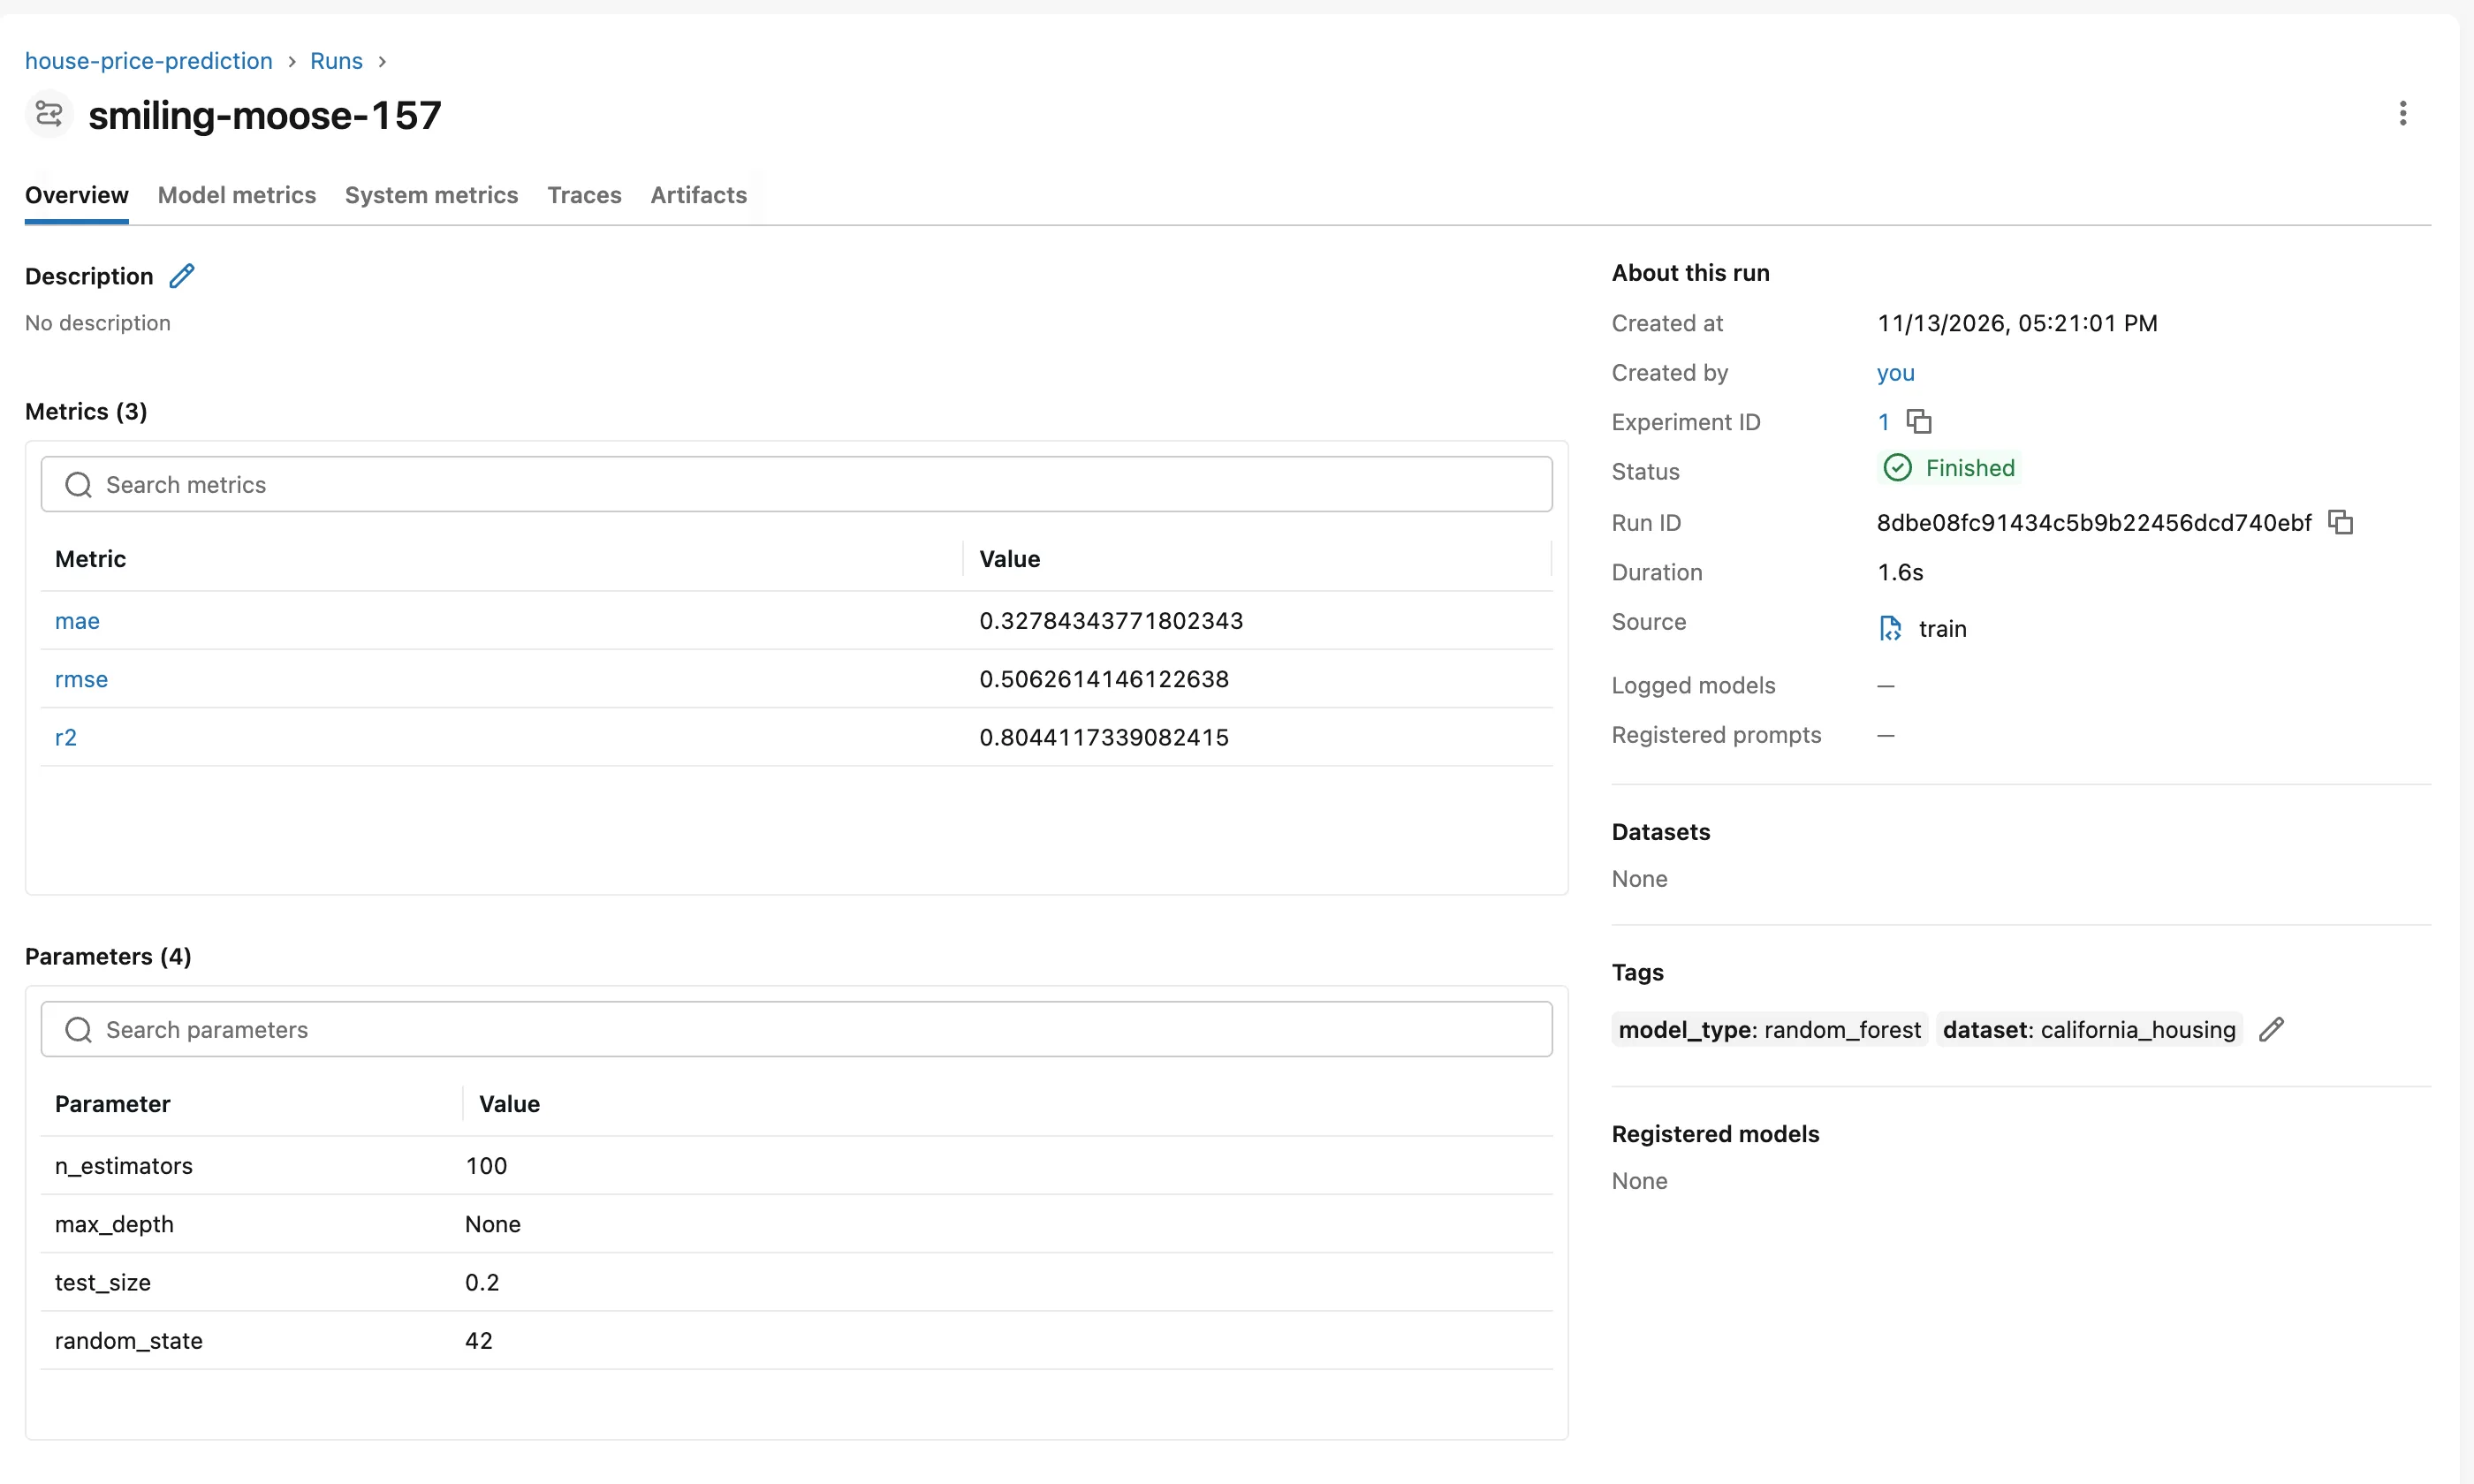
Open the first link. This is the run you just recorded:
Step 13: Look Around the Run
Everything on that page came from your code:
| Section | Where it came from |
|---|---|
| Metrics (3) | mlflow.log_metrics() |
| Parameters (4) | mlflow.log_params(). max_depth shows None because you didn't limit the depth |
| Tags | mlflow.set_tags() |
| Created by | Your computer's user name, which MLflow records by itself (you on this page) |
| Source | The command that ran: train |
| Status | Finished, because the with block ended without an error |
Click the Artifacts tab, open the plots folder and click predicted_vs_actual.png:
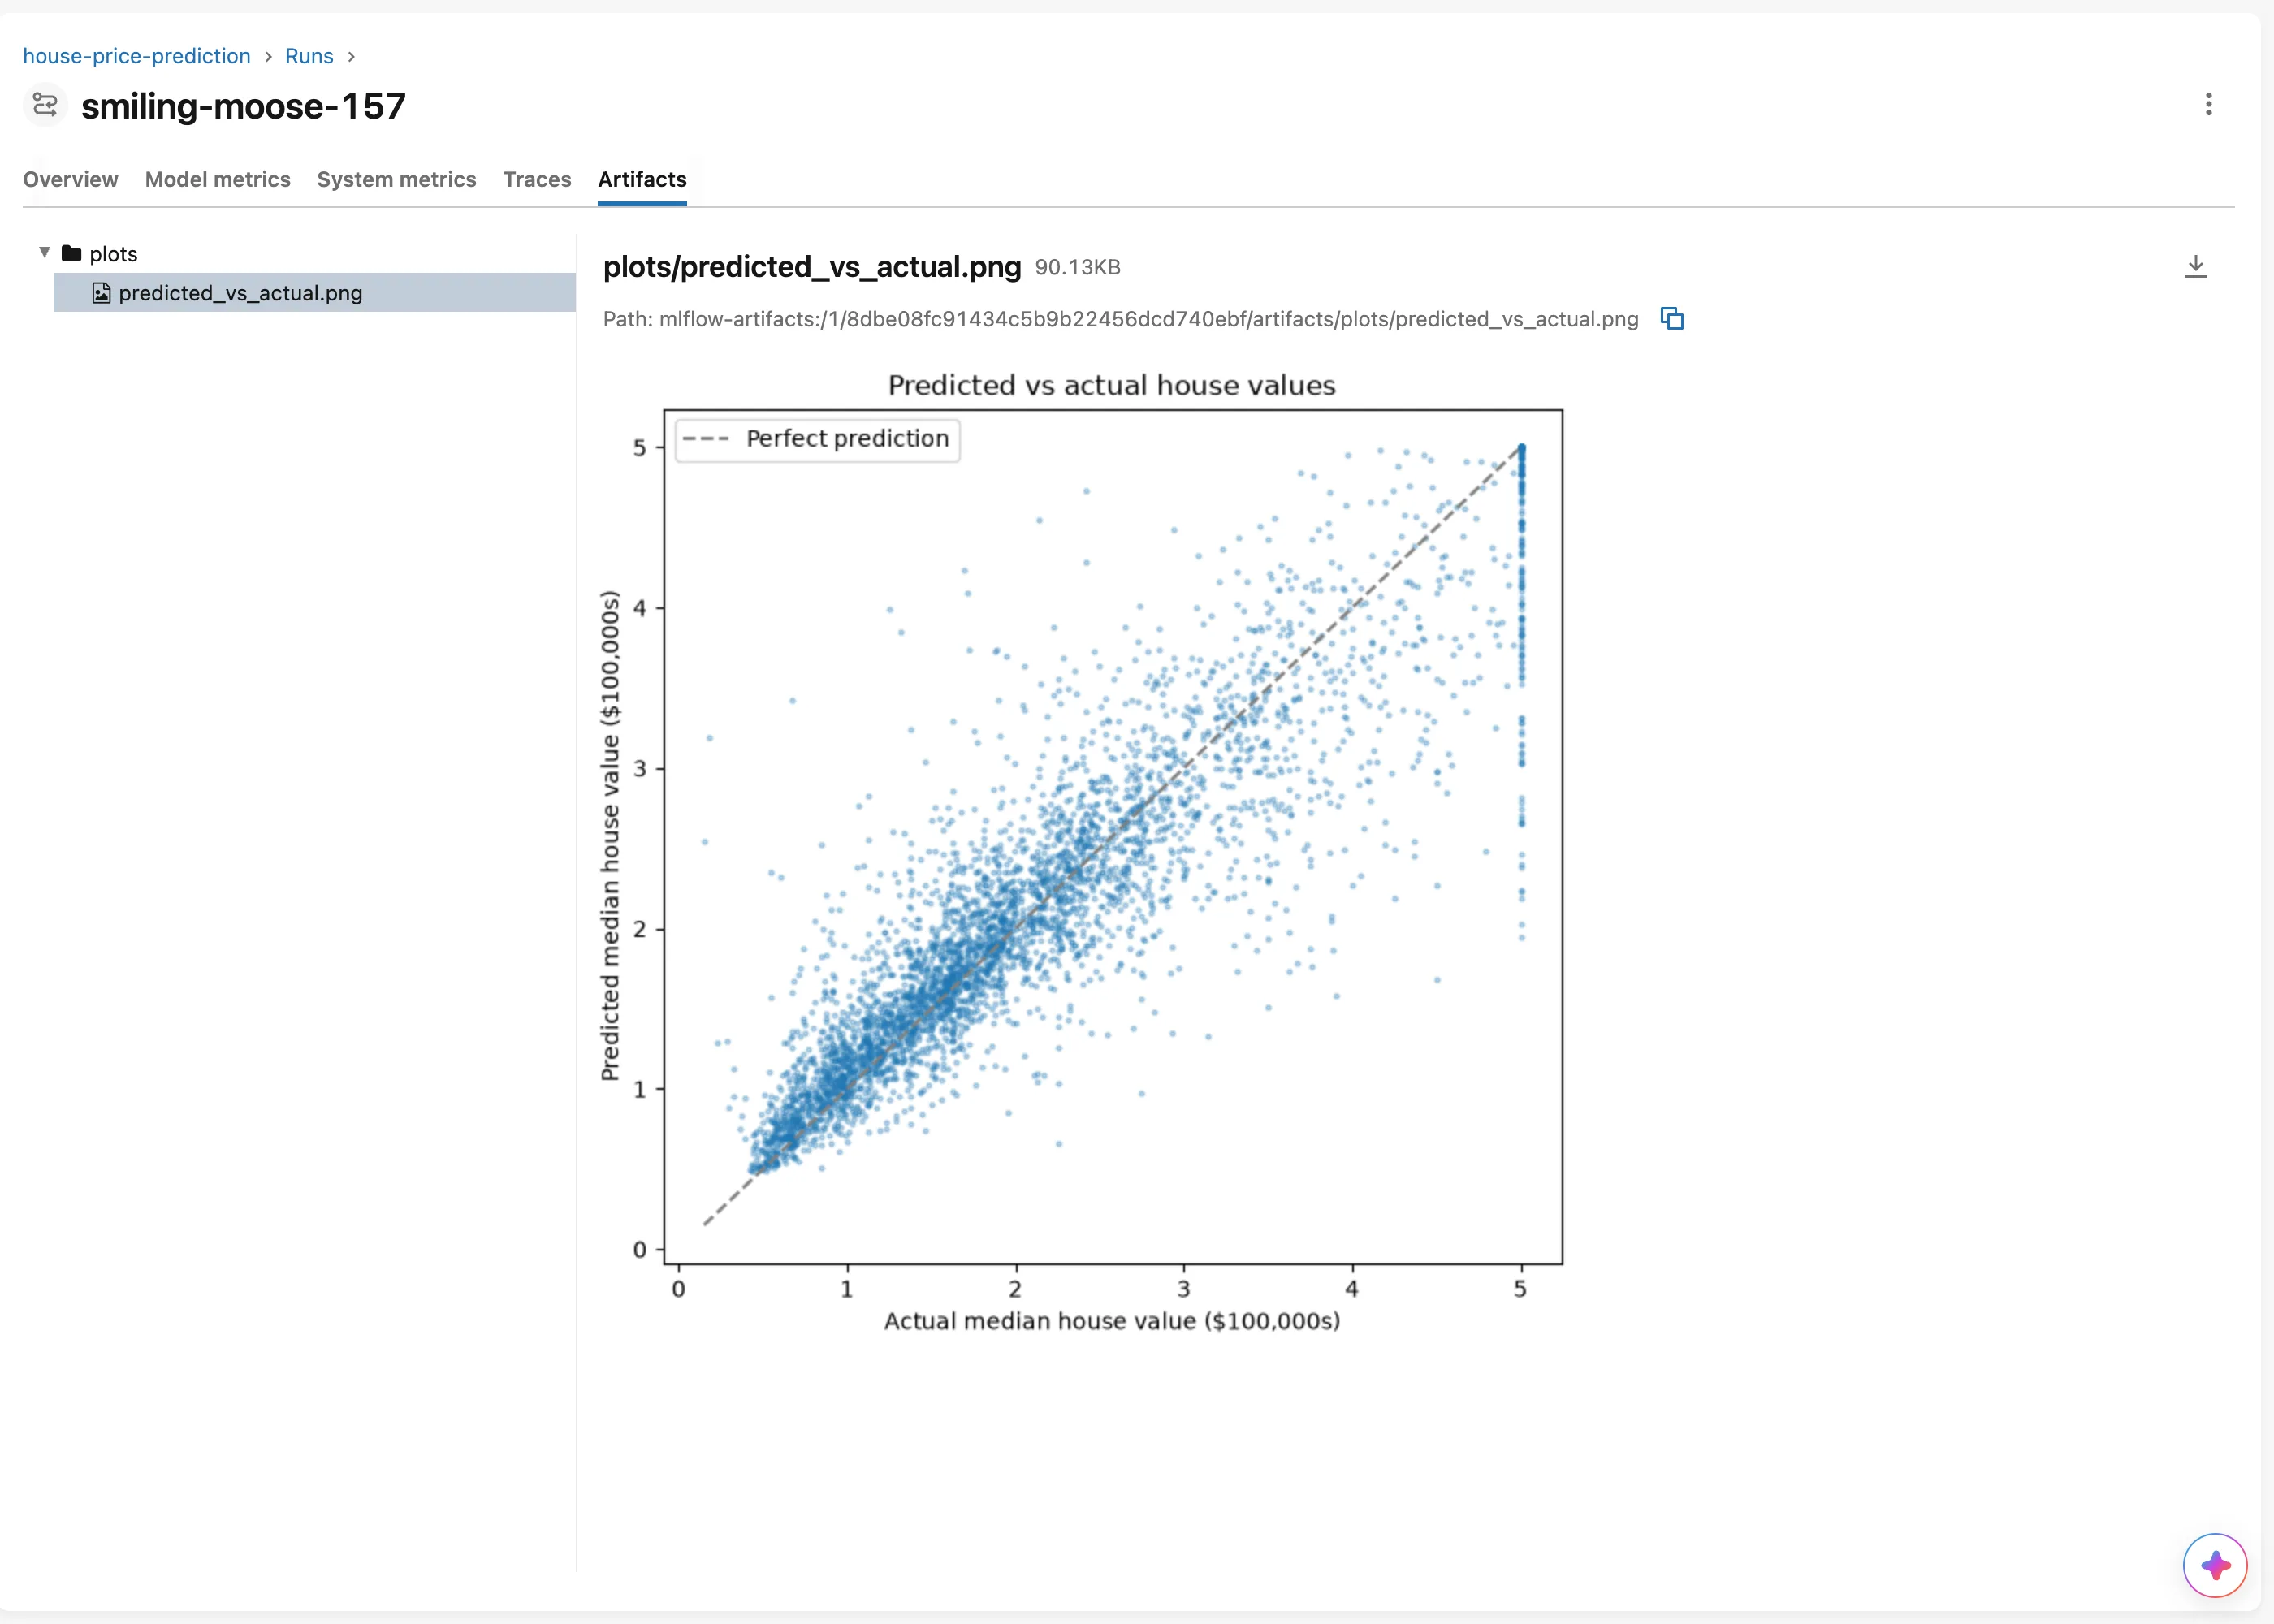
Most dots sit near the dashed line, so most predictions are close. The column of dots at the right edge is a quirk of the data: the dataset caps house values at 5.0 ($500,000), so every expensive district has the same "actual" value.
Step 14: Run More Experiments and Compare Them
One run tells you little. Try three more forests, each with a name you'll recognize later:
uv run train --n-estimators 50 --max-depth 8 --run-name 50-trees-depth-8
uv run train --n-estimators 200 --max-depth 16 --run-name 200-trees-depth-16
uv run train --n-estimators 300 --run-name 300-trees
2026/11/13 17:21:07 INFO house_price_prediction: Loading the California Housing data
2026/11/13 17:21:07 INFO house_price_prediction: Training on 16512 rows
2026/11/13 17:21:08 INFO house_price_prediction: Run 50-trees-depth-8: MAE 0.403, RMSE 0.585, R2 0.739
🏃 View run 50-trees-depth-8 at: http://127.0.0.1:8080/#/experiments/1/runs/ec7ccb942d66407490b3aee0cb4d9b62
🧪 View experiment at: http://127.0.0.1:8080/#/experiments/1
2026/11/13 17:21:11 INFO house_price_prediction: Loading the California Housing data
2026/11/13 17:21:11 INFO house_price_prediction: Training on 16512 rows
2026/11/13 17:21:15 INFO house_price_prediction: Run 200-trees-depth-16: MAE 0.330, RMSE 0.508, R2 0.803
🏃 View run 200-trees-depth-16 at: http://127.0.0.1:8080/#/experiments/1/runs/09c7c9012ca74eafaf16c8766226d6b7
🧪 View experiment at: http://127.0.0.1:8080/#/experiments/1
2026/11/13 17:21:19 INFO house_price_prediction: Loading the California Housing data
2026/11/13 17:21:19 INFO house_price_prediction: Training on 16512 rows
2026/11/13 17:21:23 INFO house_price_prediction: Run 300-trees: MAE 0.327, RMSE 0.504, R2 0.806
🏃 View run 300-trees at: http://127.0.0.1:8080/#/experiments/1/runs/7cb465b94f2e426f9af5a12c55326cbe
🧪 View experiment at: http://127.0.0.1:8080/#/experiments/1
There's no download line any more: the dataset came from the cache.
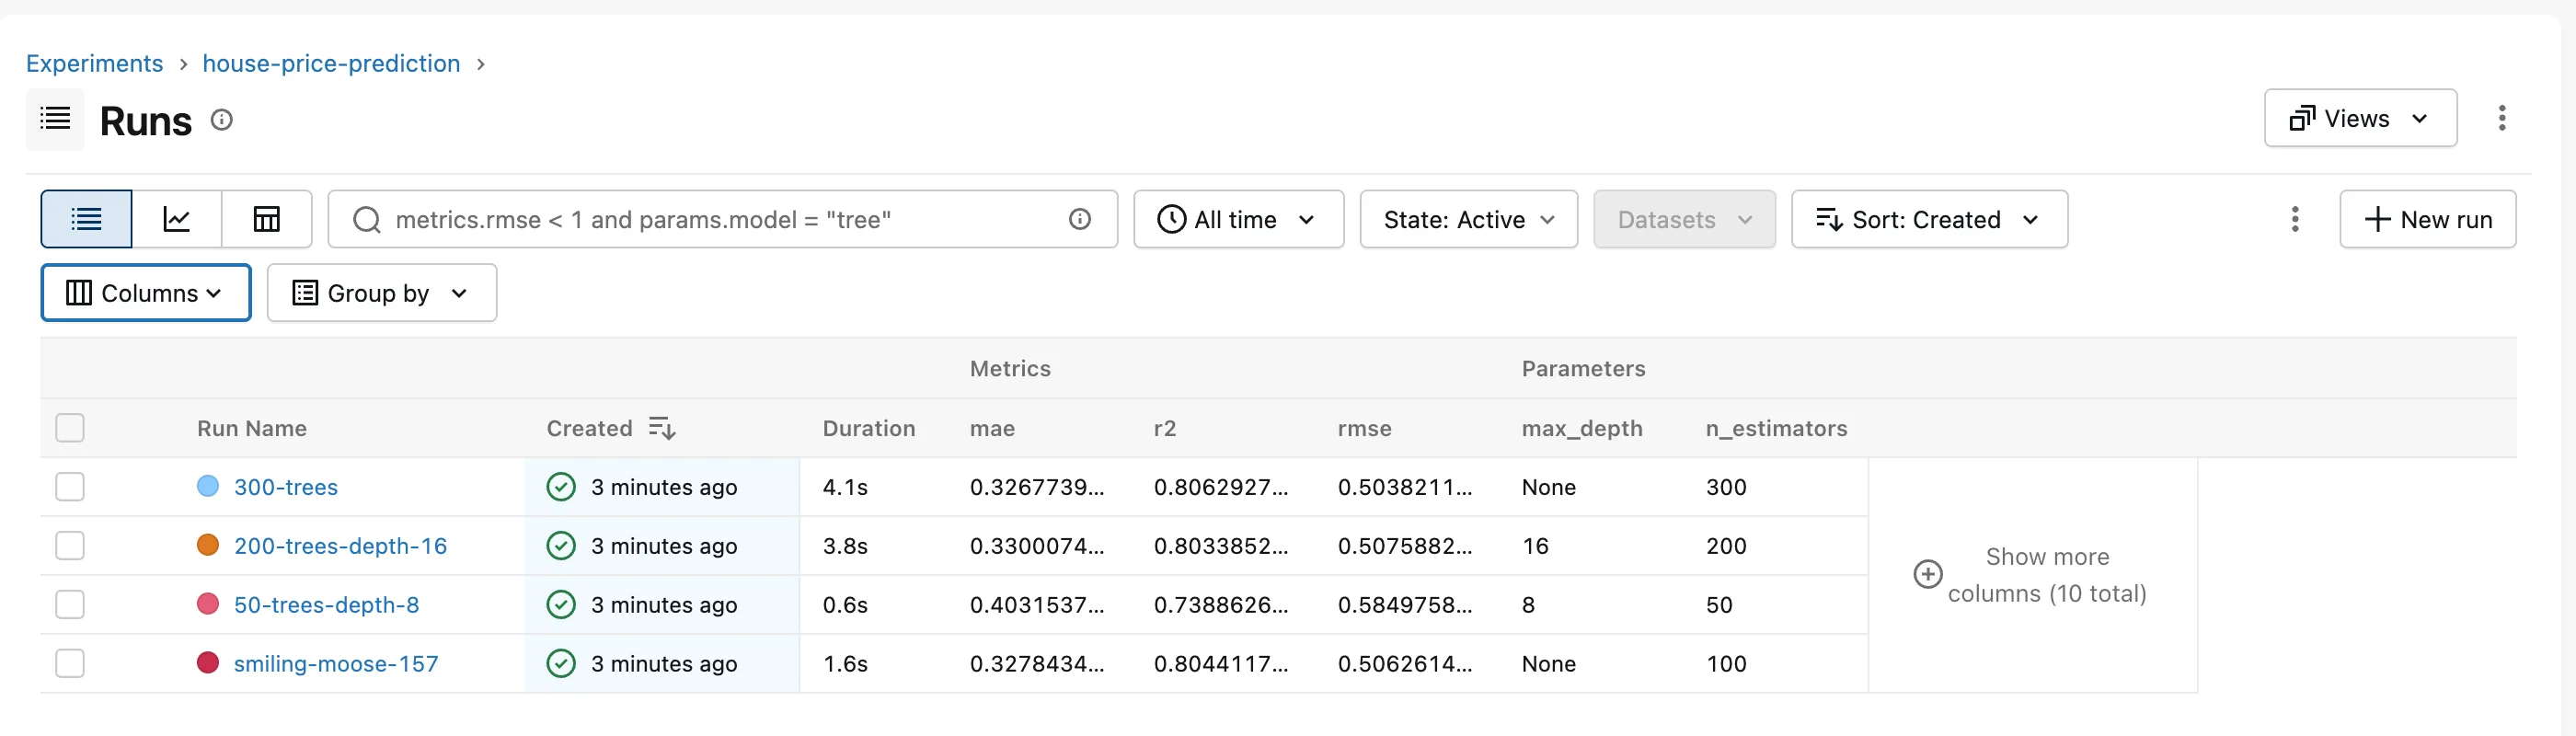
Now compare them. Open the house-price-prediction experiment. By default the runs table shows names and times, not results, so add the result columns: click Columns, tick mae, r2 and rmse under Metrics and max_depth and n_estimators under Parameters, and untick Dataset, Source and Models to make room:
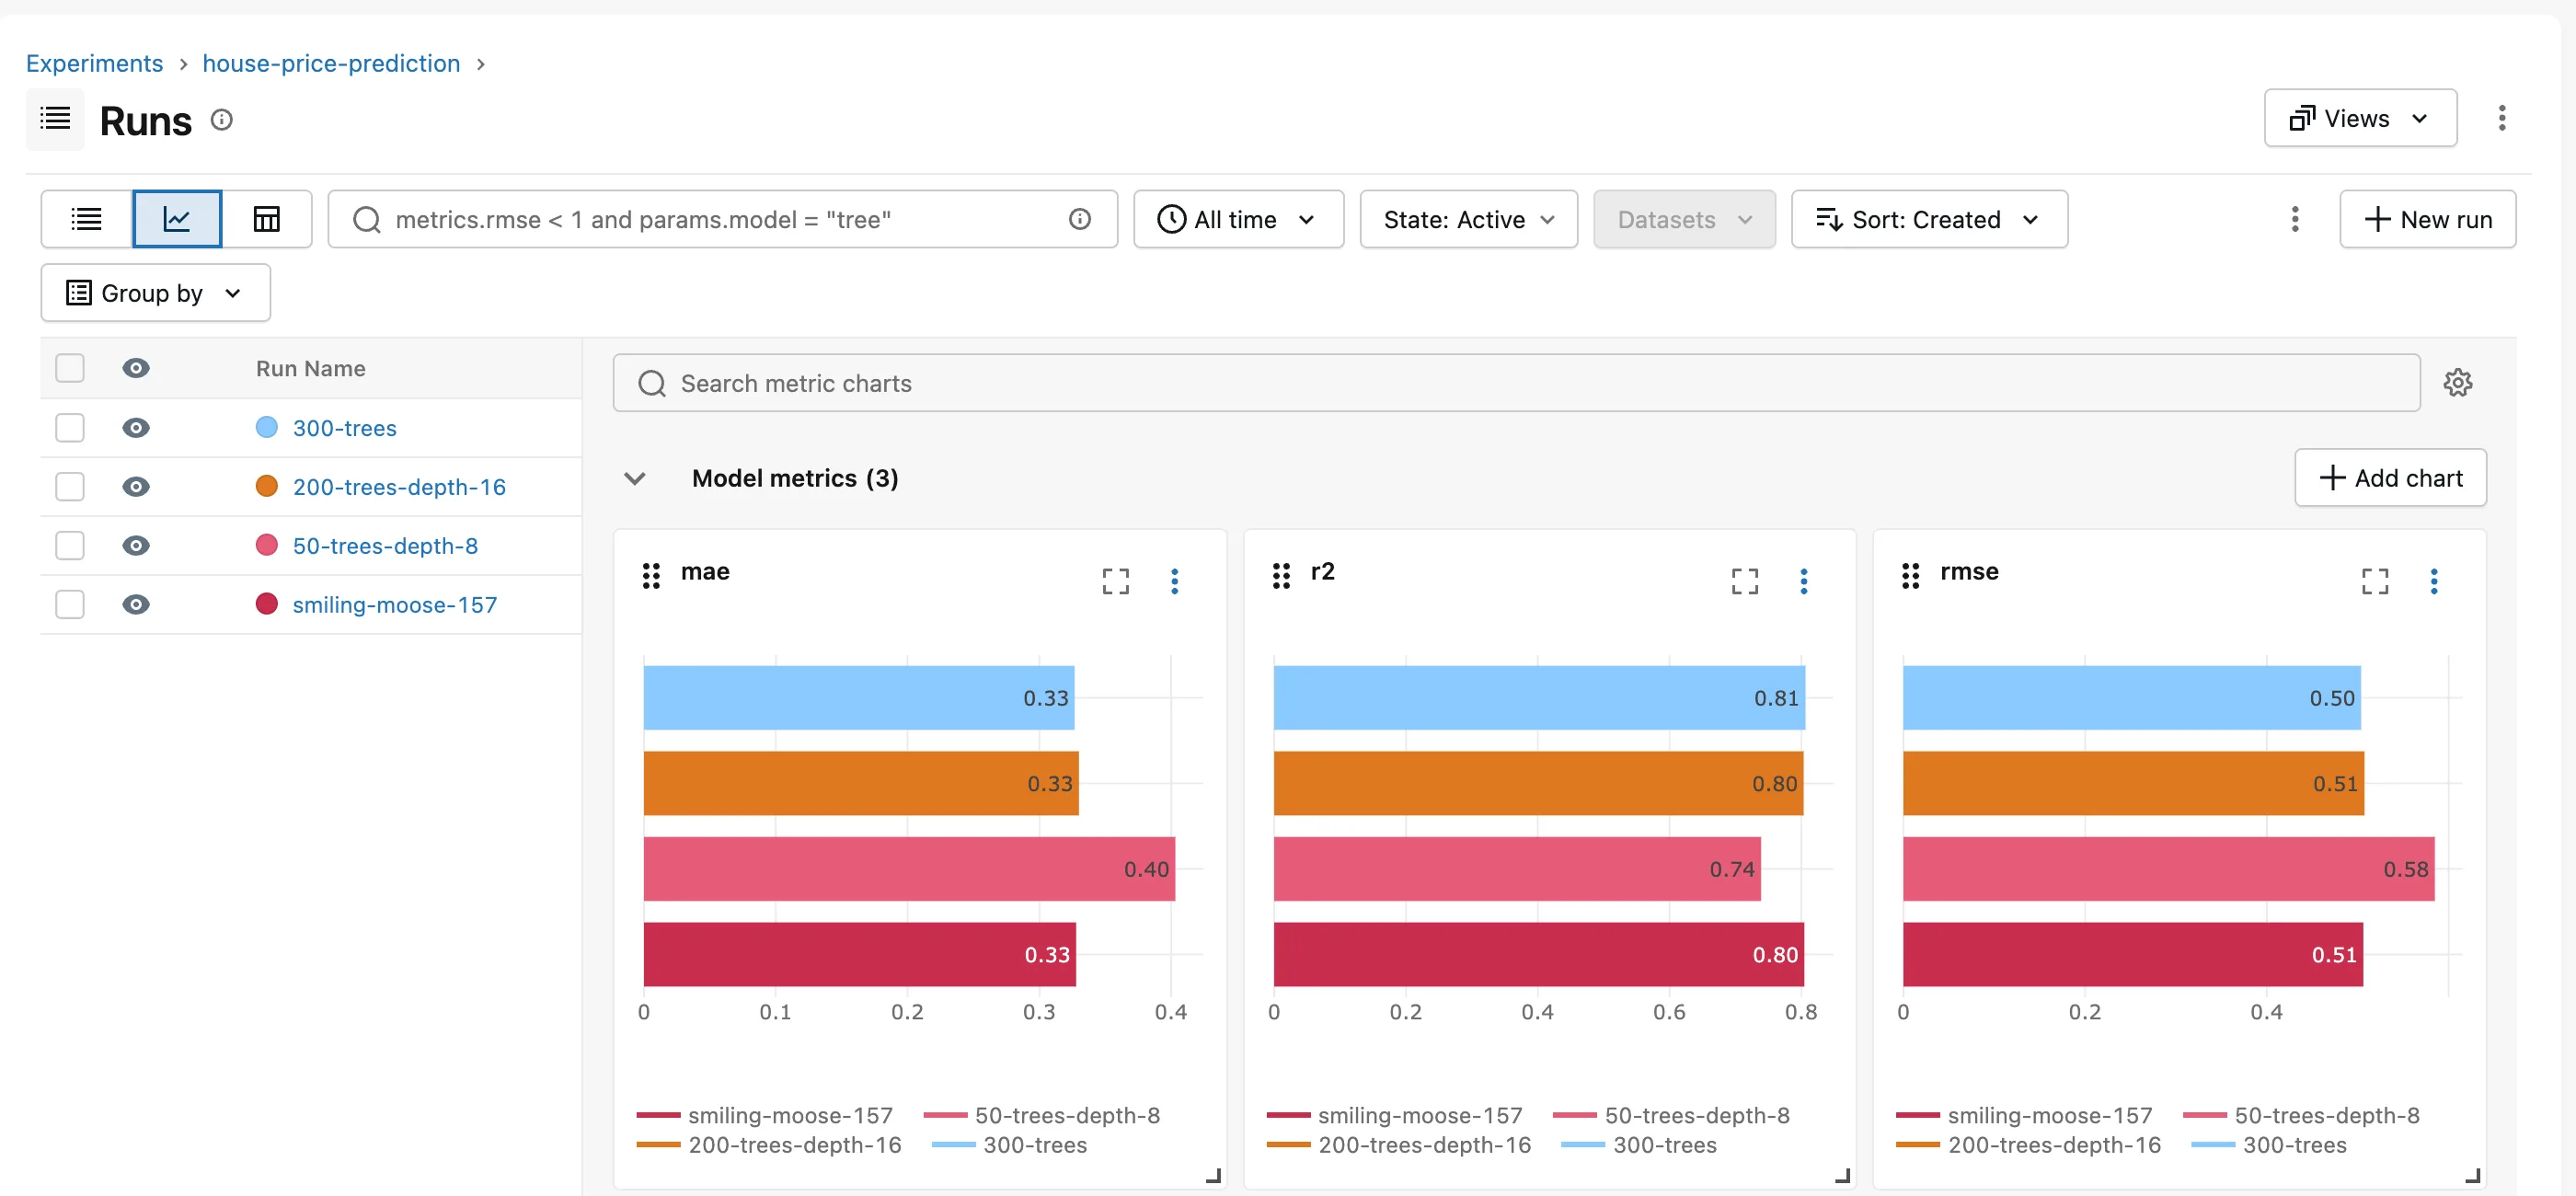
For a picture of the same results, click the chart icon, the second button above the table:
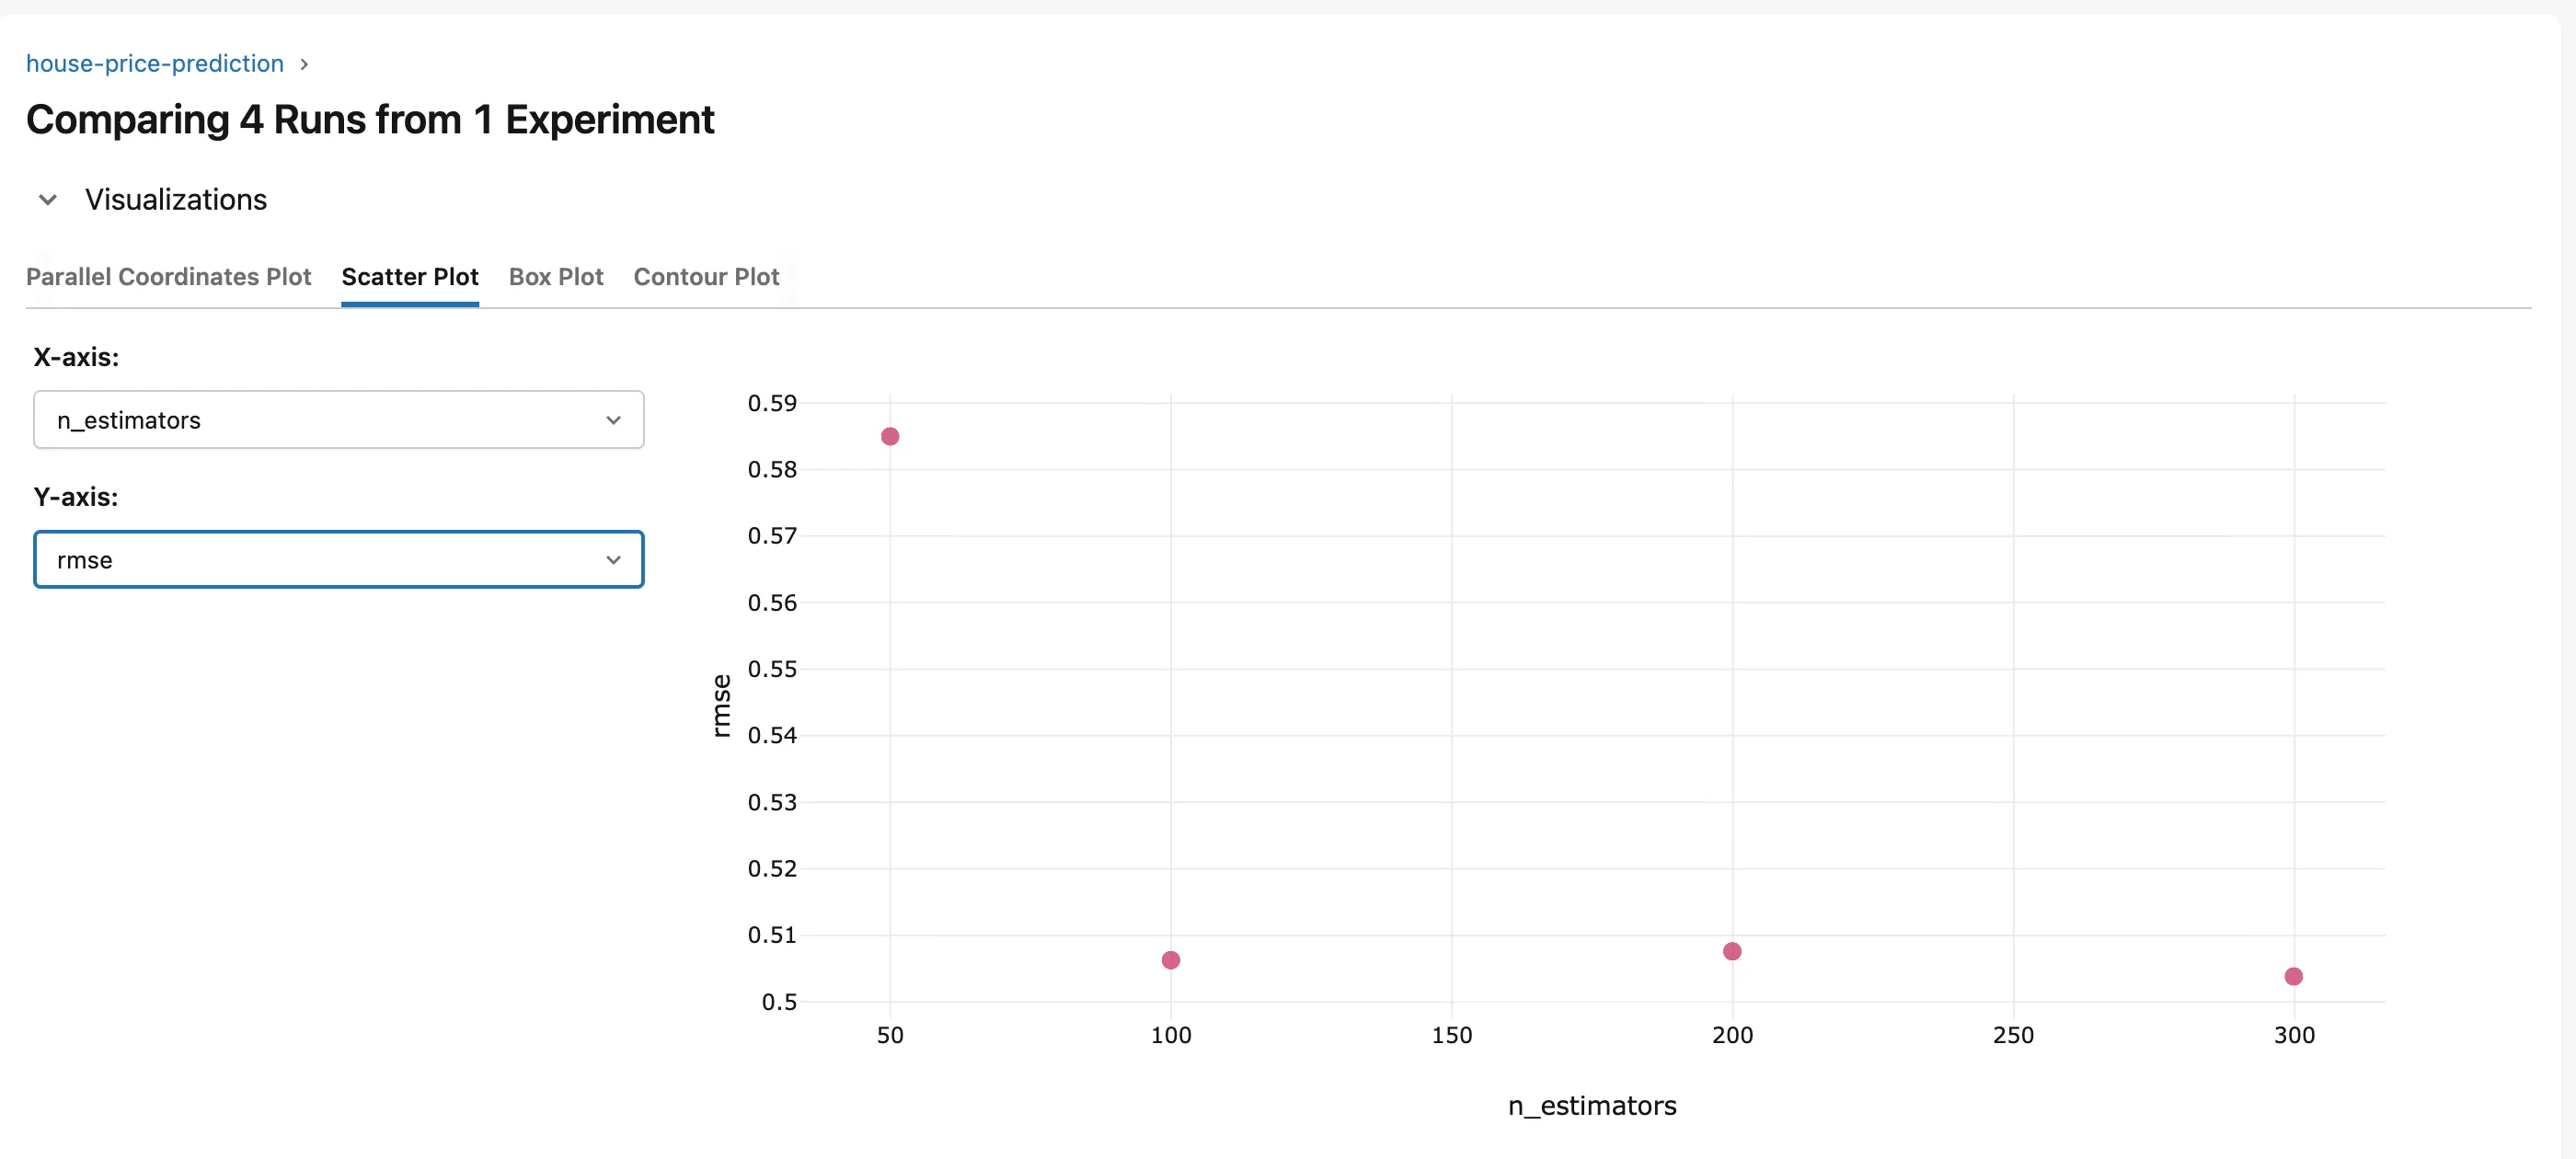
To see one setting's effect, tick all four runs, click Compare, open the Scatter Plot tab, and choose n_estimators for the X-axis and rmse for the Y-axis:
What the comparison tells you:
- The shallow forest is clearly worse.
50-trees-depth-8has the highest errors and explains only 74% of the variation. - More trees barely help after 100. 100, 200 and 300 trees all land near 0.505 RMSE, but the 300-tree run took 4.1 seconds against 1.6 seconds for 100 trees (the Duration column).
- So
smiling-moose-157, the default 100-tree forest, is a fair choice: nearly the best score at a fraction of the time.
That's the point of tracking: the decision comes from recorded evidence, not from memory. How to Compare Runs in the MLflow UI covers every comparison view, including search filters such as metrics.r2 > 0.8.
Step 15: See Where MLflow Stored Everything
The first terminal is busy running the server, so open a third terminal in the mlflow-server folder:
- macOS / Linux
- Windows (PowerShell)
ls -F
find mlartifacts -type f
Get-ChildItem -Name
Get-ChildItem mlartifacts -Recurse -File | Resolve-Path -Relative
mlartifacts/    mlflow.db       pyproject.toml  uv.lock
mlartifacts/1/09c7c9012ca74eafaf16c8766226d6b7/artifacts/plots/predicted_vs_actual.png
mlartifacts/1/7cb465b94f2e426f9af5a12c55326cbe/artifacts/plots/predicted_vs_actual.png
mlartifacts/1/8dbe08fc91434c5b9b22456dcd740ebf/artifacts/plots/predicted_vs_actual.png
mlartifacts/1/ec7ccb942d66407490b3aee0cb4d9b62/artifacts/plots/predicted_vs_actual.png
The server keeps files in mlartifacts/<experiment ID>/<run ID>/artifacts/, one folder per run. Everything else is in mlflow.db. Ask the database for the 300-trees run's params, metrics and tags with Python's built-in SQLite tool, which works the same in every shell:
uv run python -m sqlite3 mlflow.db "SELECT key, value FROM params WHERE run_uuid = '7cb465b94f2e426f9af5a12c55326cbe';"
uv run python -m sqlite3 mlflow.db "SELECT key, value, step FROM metrics WHERE run_uuid = '7cb465b94f2e426f9af5a12c55326cbe';"
uv run python -m sqlite3 mlflow.db "SELECT key, value FROM tags WHERE run_uuid = '7cb465b94f2e426f9af5a12c55326cbe';"
('n_estimators', '300')
('max_depth', 'None')
('test_size', '0.2')
('random_state', '42')
('mae', 0.3267739603762923, 0)
('rmse', 0.503821166676639, 0)
('r2', 0.8062927130336361, 0)
('mlflow.user', 'you')
('mlflow.source.name', '/Users/you/source/dewiride-house-price-prediction/.venv/bin/train')
('mlflow.source.type', 'LOCAL')
('mlflow.runName', '300-trees')
('model_type', 'random_forest')
('dataset', 'california_housing')
Use your own run ID from Step 14. Three things to notice:
- Params are stored as text:
'300', even'None'. Metrics are real numbers with a step (0 here; Part 2 logs metrics at many steps). - MLflow added its own tags, which start with
mlflow.: who ran it, the command and the run name. - Reading is safe; writing isn't. Never edit
mlflow.dbby hand. Change runs through MLflow.
How to See Where MLflow Stores Runs and Artifacts goes table by table.
Step 16: Save Your Work with Git
Back in the project terminal:
git status --short --untracked-files=all
?? .env.example
?? .gitignore
?? .python-version
?? README.md
?? pyproject.toml
?? src/house_price_prediction/__init__.py
?? src/house_price_prediction/config.py
?? src/house_price_prediction/data.py
?? src/house_price_prediction/plots.py
?? src/house_price_prediction/train.py
?? uv.lock
.env and .venv are missing from the list, as they should be: .gitignore keeps them out. Commit the rest:
git add .
git commit -m "Track house price training runs with MLflow"
[master (root-commit) 0369d78] Track house price training runs with MLflow
 11 files changed, 1887 insertions(+)
 create mode 100644 .env.example
 create mode 100644 .gitignore
 create mode 100644 .python-version
 create mode 100644 README.md
 create mode 100644 pyproject.toml
 create mode 100644 src/house_price_prediction/__init__.py
 create mode 100644 src/house_price_prediction/config.py
 create mode 100644 src/house_price_prediction/data.py
 create mode 100644 src/house_price_prediction/plots.py
 create mode 100644 src/house_price_prediction/train.py
 create mode 100644 uv.lock
New to Git? How to Create a Git Repository and Make Your First Commit and How to See What Changed in a Git Repository Before You Commit explain these commands. The tracking server's folder isn't a Git repository at all, and if MLflow ever writes its files inside a project, How to Keep MLflow Files Out of Git with .gitignore has the lines to add.
Your Folders Now Look Like This
source/
├── mlflow-server/
│   ├── .venv/
│   ├── mlartifacts/
│   ├── mlflow.db
│   ├── pyproject.toml
│   └── uv.lock
└── dewiride-house-price-prediction/
    ├── .venv/
    ├── src/
    │   └── house_price_prediction/
    │       ├── __init__.py
    │       ├── config.py
    │       ├── data.py
    │       ├── plots.py
    │       └── train.py
    ├── .env
    ├── .env.example
    ├── .gitignore
    ├── .python-version
    ├── README.md
    ├── pyproject.toml
    └── uv.lock
Do It with the CLI
The MLflow UI was the main route in this part, but the same records are a command away. The mlflow command reads the server address from the MLFLOW_TRACKING_URI environment variable:
- macOS / Linux
- Windows (PowerShell)
export MLFLOW_TRACKING_URI=http://127.0.0.1:8080
uv run mlflow experiments search
uv run mlflow runs list --experiment-id 1
$env:MLFLOW_TRACKING_URI = "http://127.0.0.1:8080"
uv run mlflow experiments search
uv run mlflow runs list --experiment-id 1
Experiment Id    Name                    Artifact Location
---------------  ----------------------  -------------------
0                Default                 mlflow-artifacts:/0
1                house-price-prediction  mlflow-artifacts:/1
Date                     Name                ID
-----------------------  ------------------  --------------------------------
2026-11-13 17:21:19 IST  300-trees           7cb465b94f2e426f9af5a12c55326cbe
2026-11-13 17:21:11 IST  200-trees-depth-16  09c7c9012ca74eafaf16c8766226d6b7
2026-11-13 17:21:07 IST  50-trees-depth-8    ec7ccb942d66407490b3aee0cb4d9b62
2026-11-13 17:21:01 IST  smiling-moose-157   8dbe08fc91434c5b9b22456dcd740ebf
The dates show your own time zone.
Stop the Server When You're Done
Go to the first terminal and press Ctrl+C. The server stops all four workers and exits. You may see a KeyboardInterrupt traceback that starts with Exception ignored on threading shutdown; the server still stopped cleanly, and Fixed: "Exception ignored on threading shutdown" KeyboardInterrupt When You Stop the MLflow Server explains it.
Your runs are safe in mlflow.db and mlartifacts/. Start the server again any time from the mlflow-server folder with uv run mlflow server --port 8080, and everything is still there.
Keep both folders for Part 2. If you ever want to remove everything this part created, stop the server first, then delete:
- the
mlflow-serverfolder (the server, its database and its files); - the
dewiride-house-price-predictionfolder (the project); - the
scikit_learn_datafolder in your home folder (the cached dataset).
Common Mistakes
| Mistake | What happens | Do this instead |
|---|---|---|
Opening http://localhost:5000 on a Mac | "Access to localhost was denied" (HTTP ERROR 403) from the AirPlay Receiver | Run the server on port 8080 and open http://127.0.0.1:8080 |
Running uv run train while the server is stopped | MLflow keeps retrying for about four minutes, then fails with MlflowException: API request to … failed … Max retries exceeded | Start the server first, and wait for Application startup complete: Fixed: "MlflowException: API request to … failed with exception … Max retries exceeded" Connection Refused in MLflow |
Forgetting mlflow.set_tracking_uri() | Runs go to a new mlflow.db in your project folder and never show in the UI | Set the tracking URI, as config.py and train.py do here |
Running the file with your system's python3 instead of uv run train | ModuleNotFoundError: No module named 'mlflow' | Use uv run, which uses the project's own environment |
| Logging a param twice with different values | MLflow refuses: params can't change once logged | Start a new run for new settings |
Committing .env | Your computer's settings land in Git | Keep .env in .gitignore and commit .env.example |
Troubleshooting
| Symptom | Likely cause | Fix |
|---|---|---|
[Errno 48] Address already in use when starting the server | Another program, or another MLflow server, already uses port 8080 | Stop it, or pick another port: Fixed: "[Errno 48] Address already in use" When You Start the MLflow Server |
| The UI shows only the Default experiment after a run | The run went to a different tracking URI | Check MLFLOW_TRACKING_URI in .env: How to Set the MLflow Tracking URI in Python |
| The UI looks different from the screenshots, with Traces and Evaluation menus | It's in GenAI mode | Click Model training at the top of the sidebar |
A StarletteDeprecationWarning at every start | MLflow 3.18.0 uses a Starlette module that Starlette marked as deprecated | Nothing to fix in your project: see the Fixed post linked in Step 3 |
FAQ
Do I need a tracking server, or can MLflow just write to a file?
MLflow can write straight to a mlflow.db file without a server, and that's what happens when you set no tracking URI at all. A server is better even on one computer: every project sends its runs to one place, the UI shows all of them, and your project folders stay free of MLflow's files.
Is mlflow ui the same as mlflow server?
In MLflow 3.18.0, yes: mlflow ui still works and takes exactly the same options. This series uses mlflow server, the name MLflow's documentation uses.
Why 127.0.0.1 and not localhost?
The server listens on 127.0.0.1, the IPv4 address of your own computer. localhost can mean the IPv6 address ::1 first, and on a Mac with AirPlay Receiver on, localhost:5000 reaches AirPlay instead of MLflow. Using 127.0.0.1 everywhere avoids any doubt.
Can other people on my network see my runs?
No. The server listens on 127.0.0.1 and only accepts connections from this computer (localhost-only). Part 8 covers the server's security settings.
Where's the trained model?
This part records the training runs, not the model itself. Part 4 saves the model in MLflow, ready to load and serve.
Does this work on Windows?
Yes. Every command is the same, except where a step shows a PowerShell tab.
Conclusion
You have your own MLflow tracking server running on http://127.0.0.1:8080, storing its records in mlflow.db and its files in mlartifacts/. Your training code connects to it with set_tracking_uri(), groups its runs in an experiment with set_experiment(), and records each run's settings, scores, labels and chart with log_params(), log_metrics(), set_tags() and log_figure(). Four runs later, the UI showed you which forest is worth keeping, with evidence instead of memory.
In Part 2 you'll log metrics that change during training, attach whole files and the exact dataset each run used, and search runs from Python.
Additional Resources
- MLflow Tracking Quickstart — MLflow's own introduction to logging params, metrics and models.
- MLflow Tracking Server — every way to run and configure
mlflow server. - Backend Stores — why SQLite is the default, and the other databases MLflow supports.
- mlflow Python API —
set_tracking_uri,set_experiment,start_run,log_params,log_metrics,set_tagsandlog_figure. - MLflow 3.18.0 release notes — what's new in the version this series uses.
- California Housing dataset — scikit-learn's description of the data.
Next → Part 2: Log Metrics Over Time, Artifacts and Datasets (coming soon)
