Install WordPress on Ubuntu Server with Docker — Part 2: Custom Domain, Free HTTPS, Redis Cache and Backups

Your WordPress site works, but only on your own network. This part puts it on the real internet with your own domain name and free HTTPS — using a Cloudflare Tunnel, so you never open a single port or touch your router. Then we add a Redis cache, set up backups, and finish with a clean removal.
This is Part 2 of a 2-part series.
- Part 1: Run WordPress with Docker Compose
- Part 2: Custom Domain, Free HTTPS, Redis Cache and Backups (you are here)
Introduction
At the end of Part 1 you had WordPress and MariaDB running in two containers, reachable at an address like http://192.168.1.50:8080. Fine for building. Not something you can hand to anyone.
To put a site online, the traditional advice is: point a domain at your server's public IP, open ports 80 and 443 on your router, and run something like Certbot to get a certificate. That works — on a rented cloud server with its own public address.
On a machine at home or in an office, it very often does not, for reasons that have nothing to do with your skill:
- Most home internet connections put you behind CGNAT, meaning you share one public address with many other customers. There is no address that belongs to you, so there is nothing to point a domain at.
- Many providers block incoming connections on ports 80 and 443 on residential plans.
- Even where it works, opening those ports exposes the machine to the entire internet's background noise of automated attacks.
A Cloudflare Tunnel sidesteps all three. Instead of the internet connecting in to your server, a small program on your server makes an outbound connection out to Cloudflare and holds it open. Visitors reach Cloudflare; Cloudflare passes requests down that existing connection. Your router needs no changes, and your server needs no open ports at all.
Everything in this guide was performed on a real Ubuntu 26.04 LTS server sitting on an ordinary home connection behind CGNAT, with no router configuration whatsoever. The site really did go live, and the screenshots are the actual results. Software versions: WordPress 7.0.4, MariaDB 11.8, Redis 8.10, PHP 8.4.24.
Throughout the commands you will see wp.example.com, which is a placeholder — swap in your own domain. The screenshots show the genuine domain used while testing, so the two will not match exactly. That is expected.
What You Will Build
By the end of this part:
- Your site will be live at your own domain over HTTPS, with a valid certificate.
- Your server will have zero ports exposed — even the
8080from Part 1 is closed. - You will reach your admin panel at
https://your-domain/wp-admin, and know how to recover it if you are ever locked out. - A Redis container will cache database queries so pages build faster.
- You will have WP-CLI available for maintenance tasks.
- You will have working backups of both the database and your files.
- You will know how to remove the whole thing without a trace.
Prerequisites
- Part 1 completed — WordPress running in Docker on your Ubuntu Server.
- A domain name you own. Any registrar is fine.
- A free Cloudflare account. No paid plan is needed for any of this.
- Your domain's DNS managed by Cloudflare. If it is not yet, add the site in the Cloudflare dashboard and change the nameservers at your registrar to the two Cloudflare gives you.
If your domain currently has DNSSEC enabled, turn it off at your existing DNS provider before moving nameservers to Cloudflare, and wait about an hour. Moving a signed domain without doing this makes the whole domain stop resolving — every subdomain, plus email. Cloudflare can re-enable DNSSEC for you afterwards.
How a Cloudflare Tunnel Works
Worth understanding before you click anything, because it explains why there is nothing to open.
Normally a visitor's browser connects to your server. Something must therefore accept incoming connections, which is what port forwarding arranges and what CGNAT prevents.
With a tunnel, a small program called cloudflared runs on your server and dials out to Cloudflare — the same kind of outbound connection your browser makes when loading any website. Outbound connections are never blocked by CGNAT and need no router rules. That connection stays open.
When someone visits your site:
- Their browser looks up your domain and gets a Cloudflare address.
- They connect to Cloudflare, which handles HTTPS and the certificate.
- Cloudflare sends the request down the already-open tunnel to
cloudflared. cloudflaredpasses it to your WordPress container and returns the reply.
Your server is never addressed directly from the internet. It is not merely firewalled — there is no route to it at all.
Step 1: Create the Tunnel in Cloudflare
Sign in at one.dash.cloudflare.com and go to Networks → Tunnels & Mesh, then click Create a tunnel.
Choose the Cloudflared option.
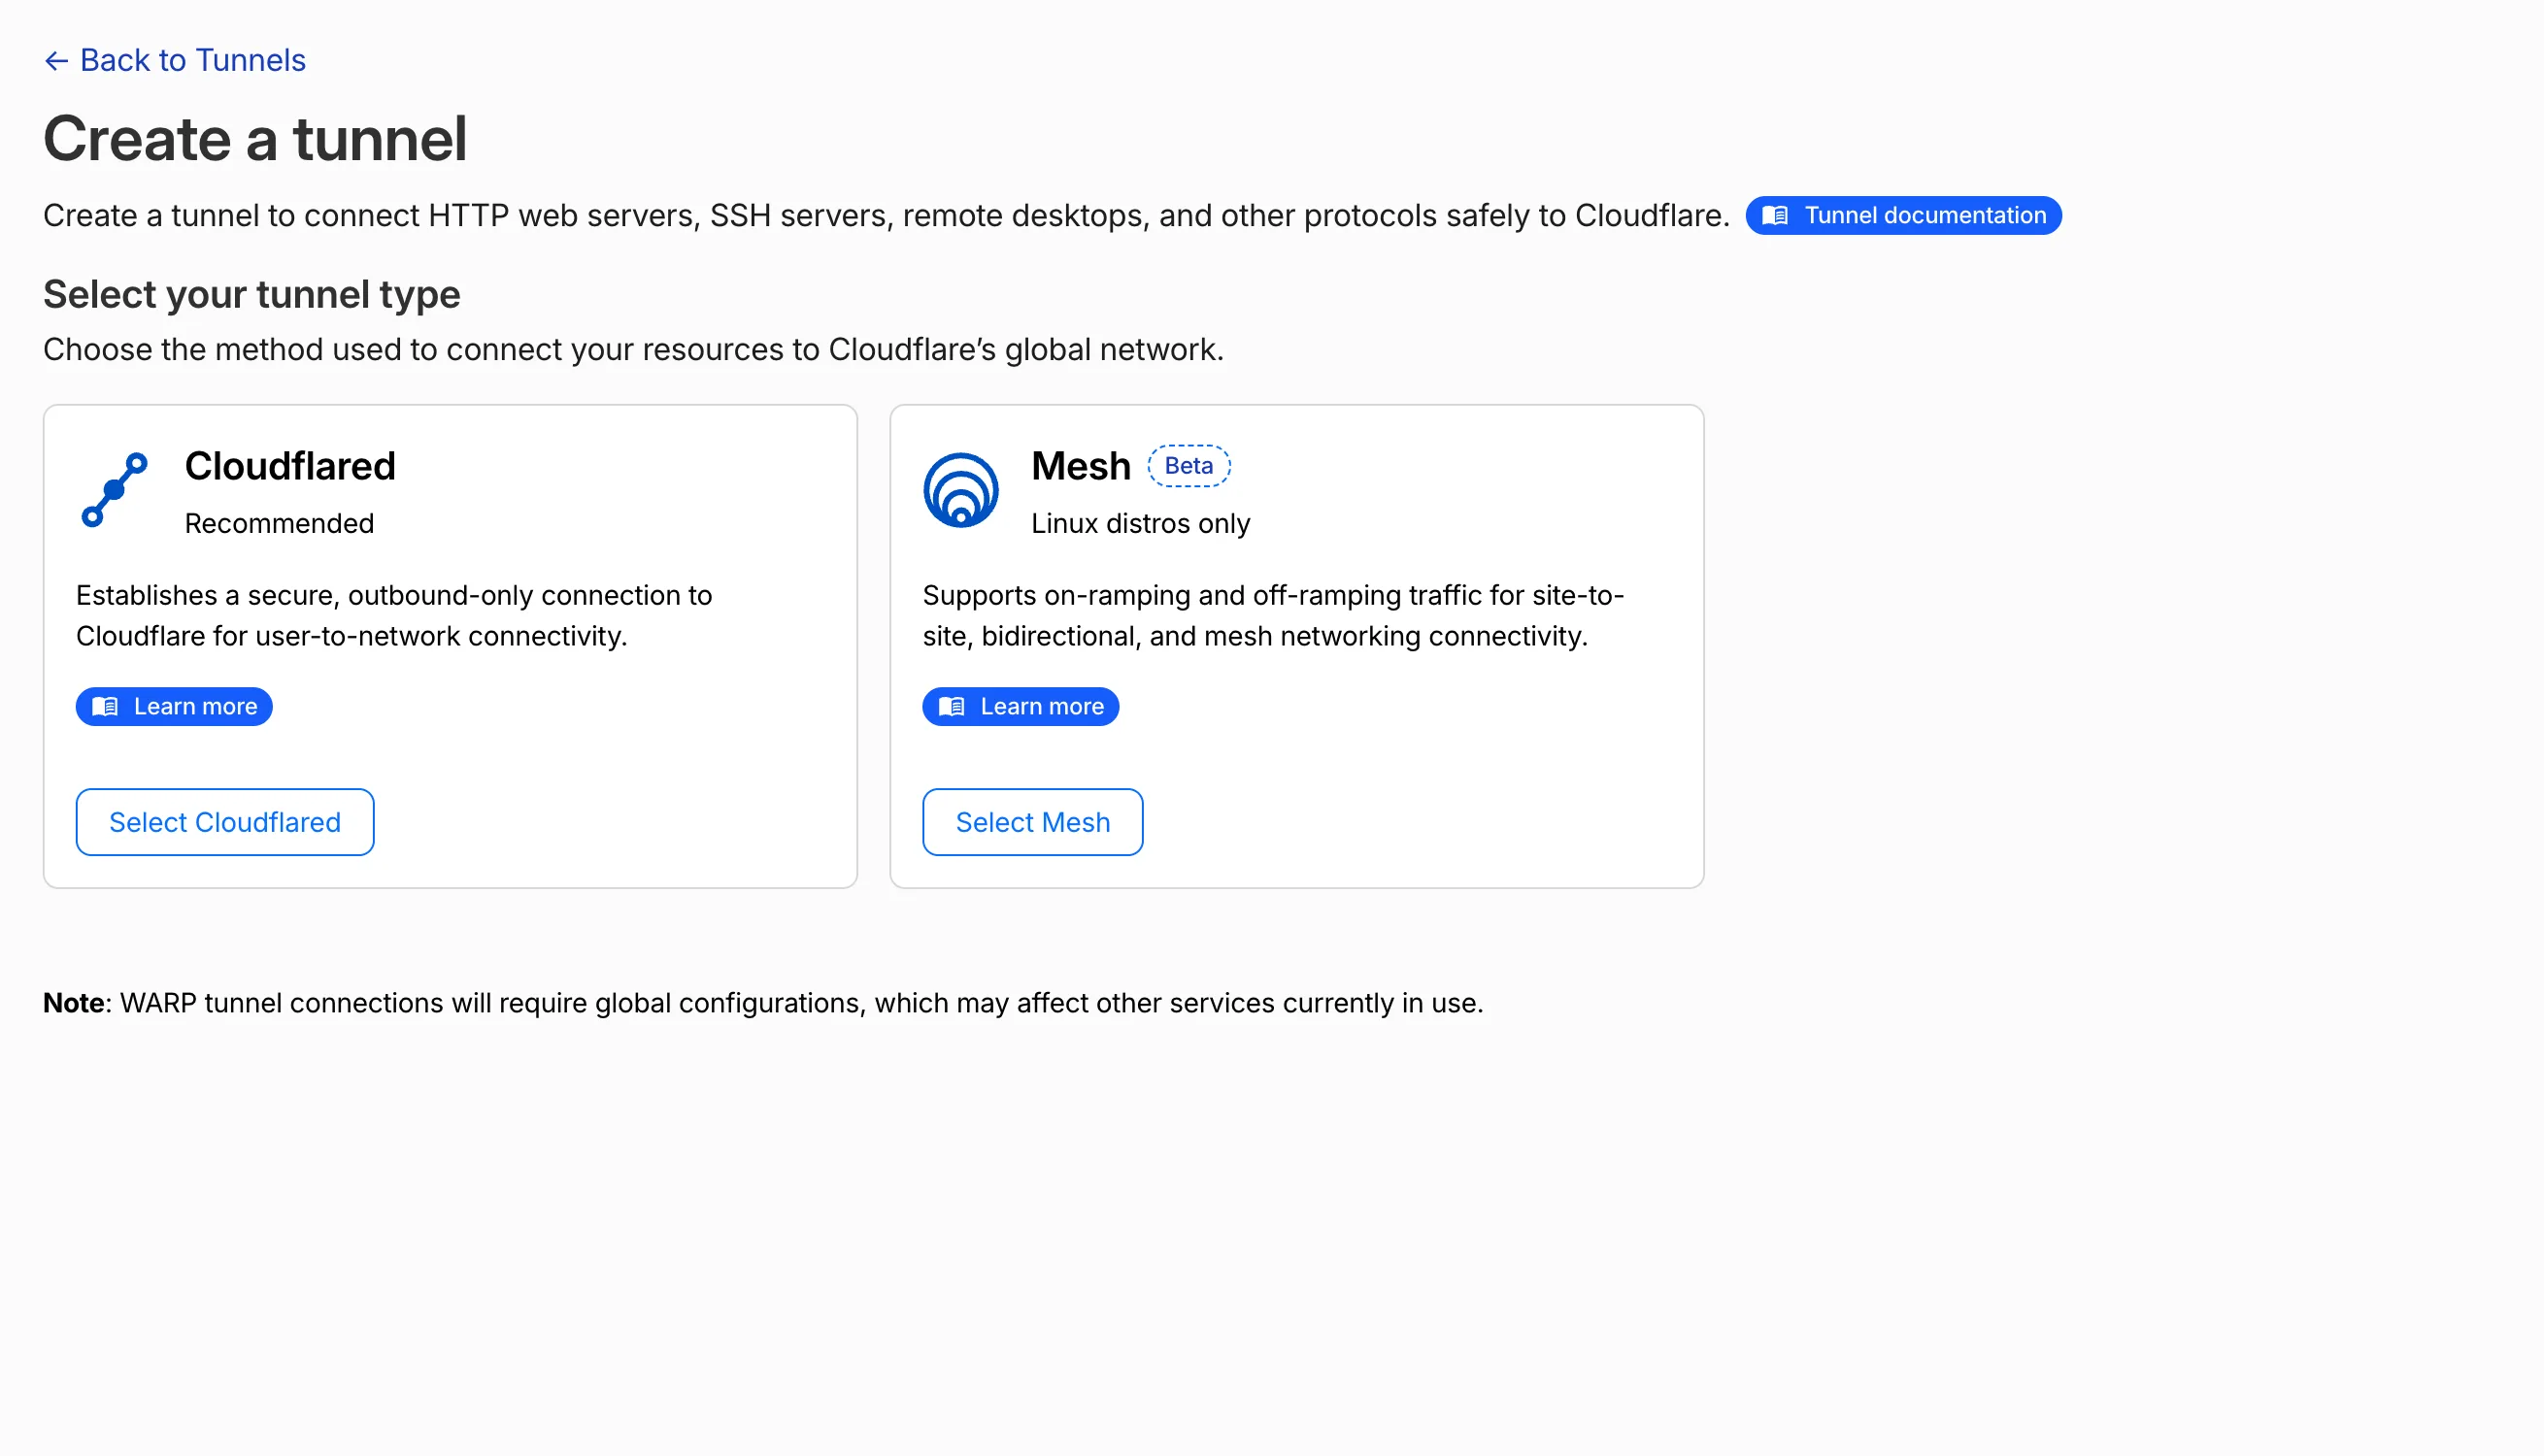
Give the tunnel a name you will recognise later — wordpress-blog is a good choice — and save it.
Cloudflare then shows you install commands for various systems. You do not need to run any of them. We are going to run cloudflared as a container instead. What you do need is the long string of letters after --token in that command. Click the copy button next to the command and keep it on your clipboard.
That token is a password for your tunnel. Anyone who has it can route traffic through it. Never paste it into a blog post, a screenshot, a public repository, or a support forum. We store it in the .env file, which stays on your server.
Step 2: Add the Token to Your .env File
Back on your server, in the ~/wordpress folder, add the token you just copied to your .env file:
cd ~/wordpress
nano .env
Add this line at the bottom, replacing the placeholder with your real token:
TUNNEL_TOKEN=paste-your-very-long-token-here
It will be a long, unbroken string of letters and numbers — several hundred characters. Paste it all on one line, with no spaces and no line breaks.
Save with Ctrl+O, Enter, then exit with Ctrl+X.
Confirm the file is still private to you:
chmod 600 .env
Step 3: Add cloudflared, Redis and WP-CLI to Your Stack
Open your Compose file:
nano compose.yaml
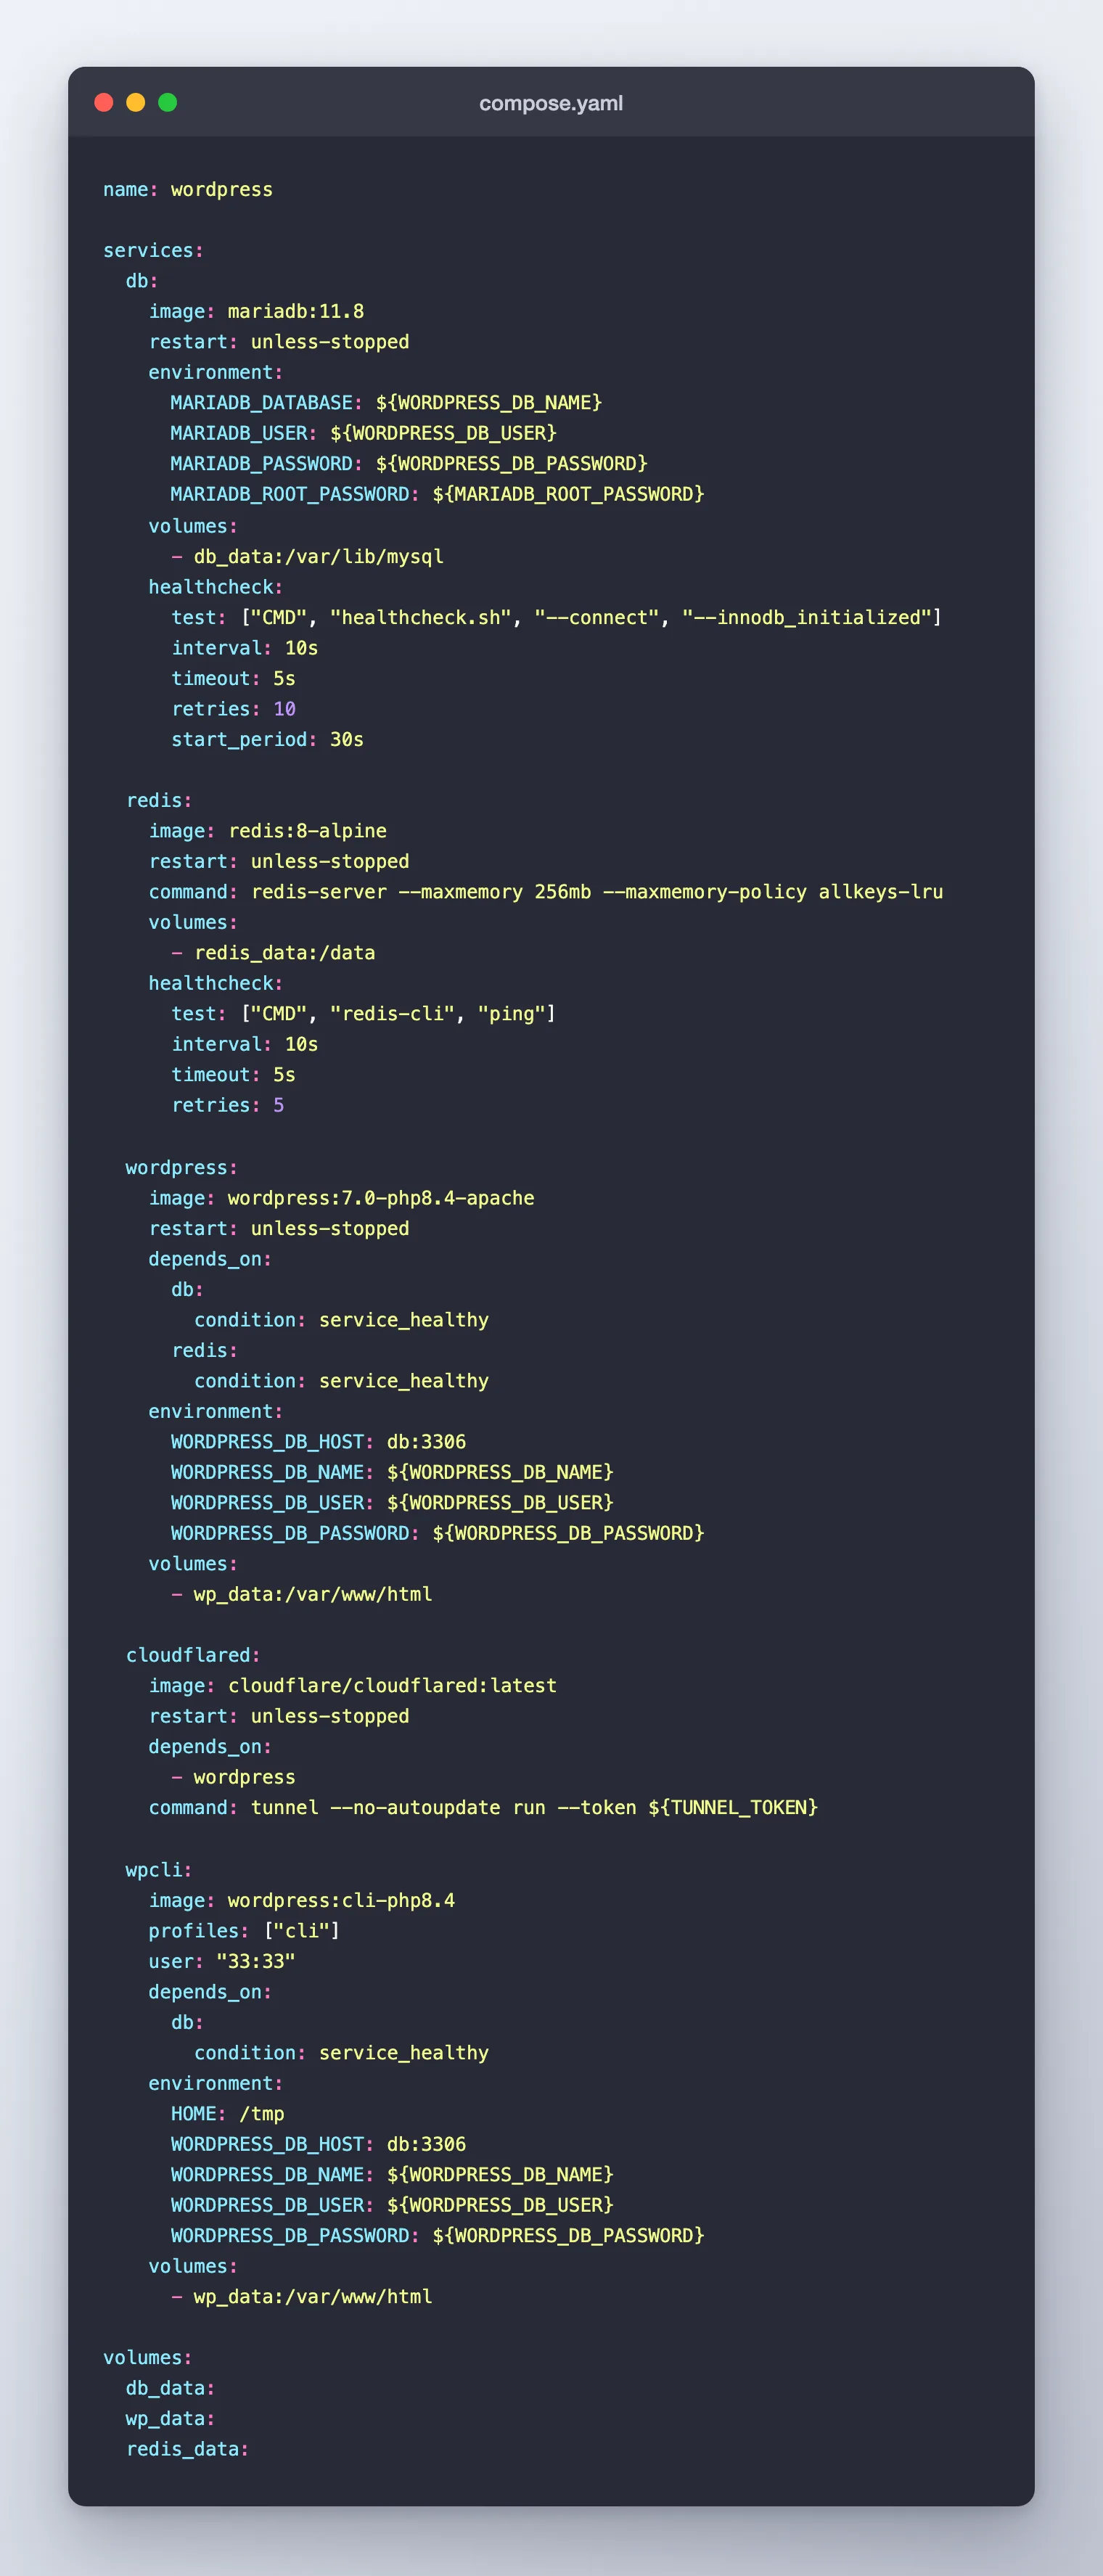
Replace the whole file with the version below. Three services are new, and there is one important deletion.
name: wordpress

services:
  db:
    image: mariadb:11.8
    restart: unless-stopped
    environment:
      MARIADB_DATABASE: ${WORDPRESS_DB_NAME}
      MARIADB_USER: ${WORDPRESS_DB_USER}
      MARIADB_PASSWORD: ${WORDPRESS_DB_PASSWORD}
      MARIADB_ROOT_PASSWORD: ${MARIADB_ROOT_PASSWORD}
    volumes:
      - db_data:/var/lib/mysql
    healthcheck:
      test: ["CMD", "healthcheck.sh", "--connect", "--innodb_initialized"]
      interval: 10s
      timeout: 5s
      retries: 10
      start_period: 30s

  redis:
    image: redis:8-alpine
    restart: unless-stopped
    command: redis-server --maxmemory 256mb --maxmemory-policy allkeys-lru
    volumes:
      - redis_data:/data
    healthcheck:
      test: ["CMD", "redis-cli", "ping"]
      interval: 10s
      timeout: 5s
      retries: 5

  wordpress:
    image: wordpress:7.0-php8.4-apache
    restart: unless-stopped
    depends_on:
      db:
        condition: service_healthy
      redis:
        condition: service_healthy
    environment:
      WORDPRESS_DB_HOST: db:3306
      WORDPRESS_DB_NAME: ${WORDPRESS_DB_NAME}
      WORDPRESS_DB_USER: ${WORDPRESS_DB_USER}
      WORDPRESS_DB_PASSWORD: ${WORDPRESS_DB_PASSWORD}
    volumes:
      - wp_data:/var/www/html

  cloudflared:
    image: cloudflare/cloudflared:latest
    restart: unless-stopped
    depends_on:
      - wordpress
    command: tunnel --no-autoupdate run --token ${TUNNEL_TOKEN}

  wpcli:
    image: wordpress:cli-php8.4
    profiles: ["cli"]
    user: "33:33"
    depends_on:
      db:
        condition: service_healthy
    environment:
      HOME: /tmp
      WORDPRESS_DB_HOST: db:3306
      WORDPRESS_DB_NAME: ${WORDPRESS_DB_NAME}
      WORDPRESS_DB_USER: ${WORDPRESS_DB_USER}
      WORDPRESS_DB_PASSWORD: ${WORDPRESS_DB_PASSWORD}
    volumes:
      - wp_data:/var/www/html

volumes:
  db_data:
  wp_data:
  redis_data:
What Changed, and Why
The deletion — the ports: block is gone. In Part 1 the wordpress service published "8080:80". It no longer publishes anything. Traffic now arrives through the tunnel, which reaches WordPress over Docker's internal network. Closing 8080 means that even on your own network, nothing can reach the site except through Cloudflare. This is the single biggest security improvement in this guide, and it costs one deleted line.
redis — an in-memory store. WordPress normally asks the database the same questions on every page load; Redis remembers the answers. --maxmemory 256mb caps its memory use, and allkeys-lru tells it to discard the least recently used entries when full, so it can never grow without limit.
cloudflared — the tunnel program. Its whole configuration is that one command: line. --no-autoupdate stops it updating itself inside the container; you update it like any other image, by pulling a new one.
wpcli — WP-CLI, the official command-line tool for WordPress. Note profiles: ["cli"], which means it does not run as a background service. It only runs when you explicitly ask for it, does its job, and exits. user: "33:33" runs it as the same web-server user that owns the files, so anything it creates has the right ownership.
You may have seen guides that set WORDPRESS_CONFIG_EXTRA in Compose to add settings like WP_HOME. That variable only takes effect when the image creates wp-config.php for the very first time. Because Part 1 already created that file, adding it now does nothing at all — a genuinely confusing failure, because Compose reports no error. Step 5 uses WP-CLI instead, which edits the real file and works every time.
Step 4: Start the New Stack
docker compose up -d
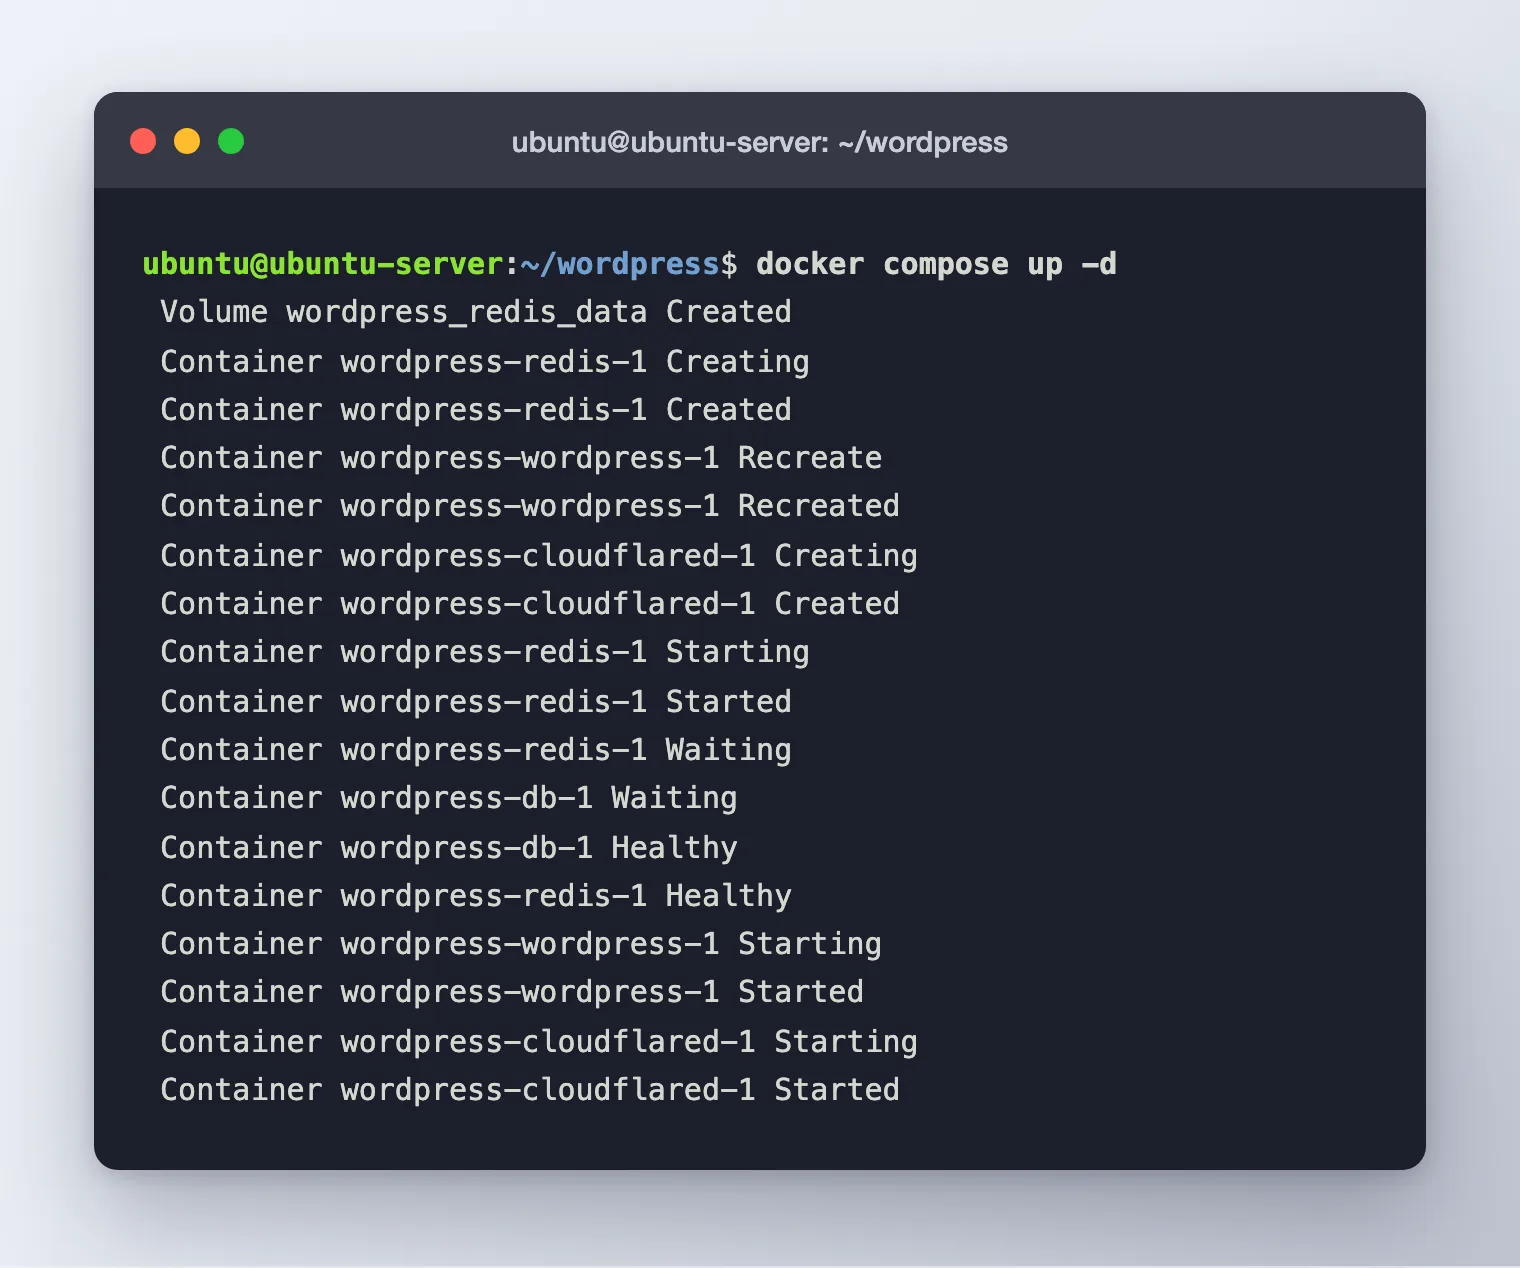
Check what is running:
docker compose ps
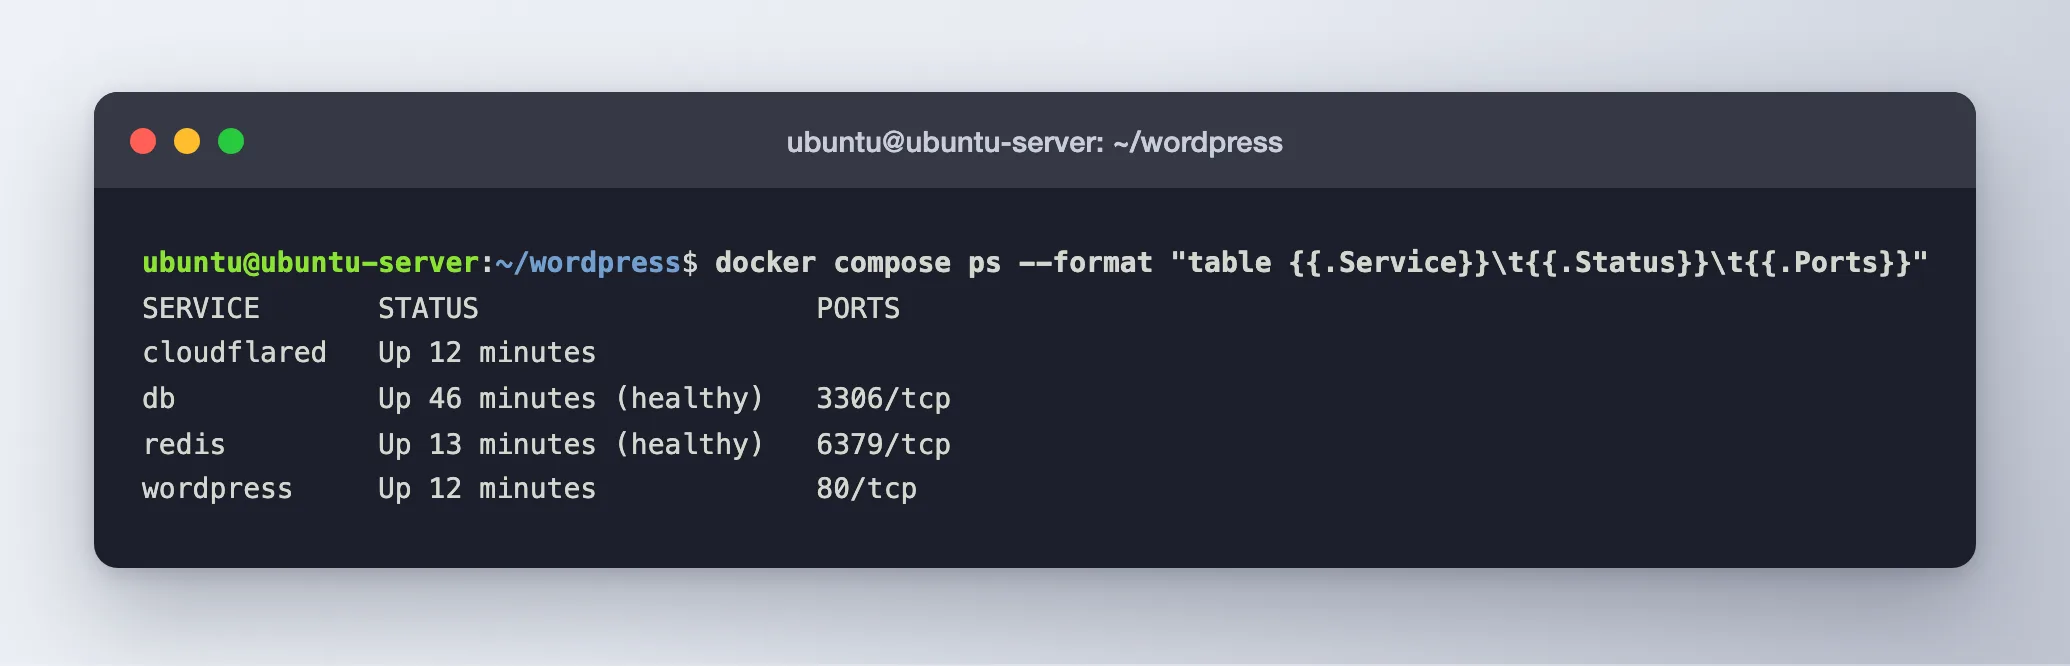
Look carefully at the PORTS column. Every entry is a bare internal port — 3306/tcp, 6379/tcp, 80/tcp — and not one has 0.0.0.0: in front of it. That prefix is what "published to the outside world" looks like, and it has gone. Your server is now running a public website with no open ports whatsoever.
Now confirm the tunnel actually connected:
docker compose logs cloudflared | grep "Registered tunnel connection"
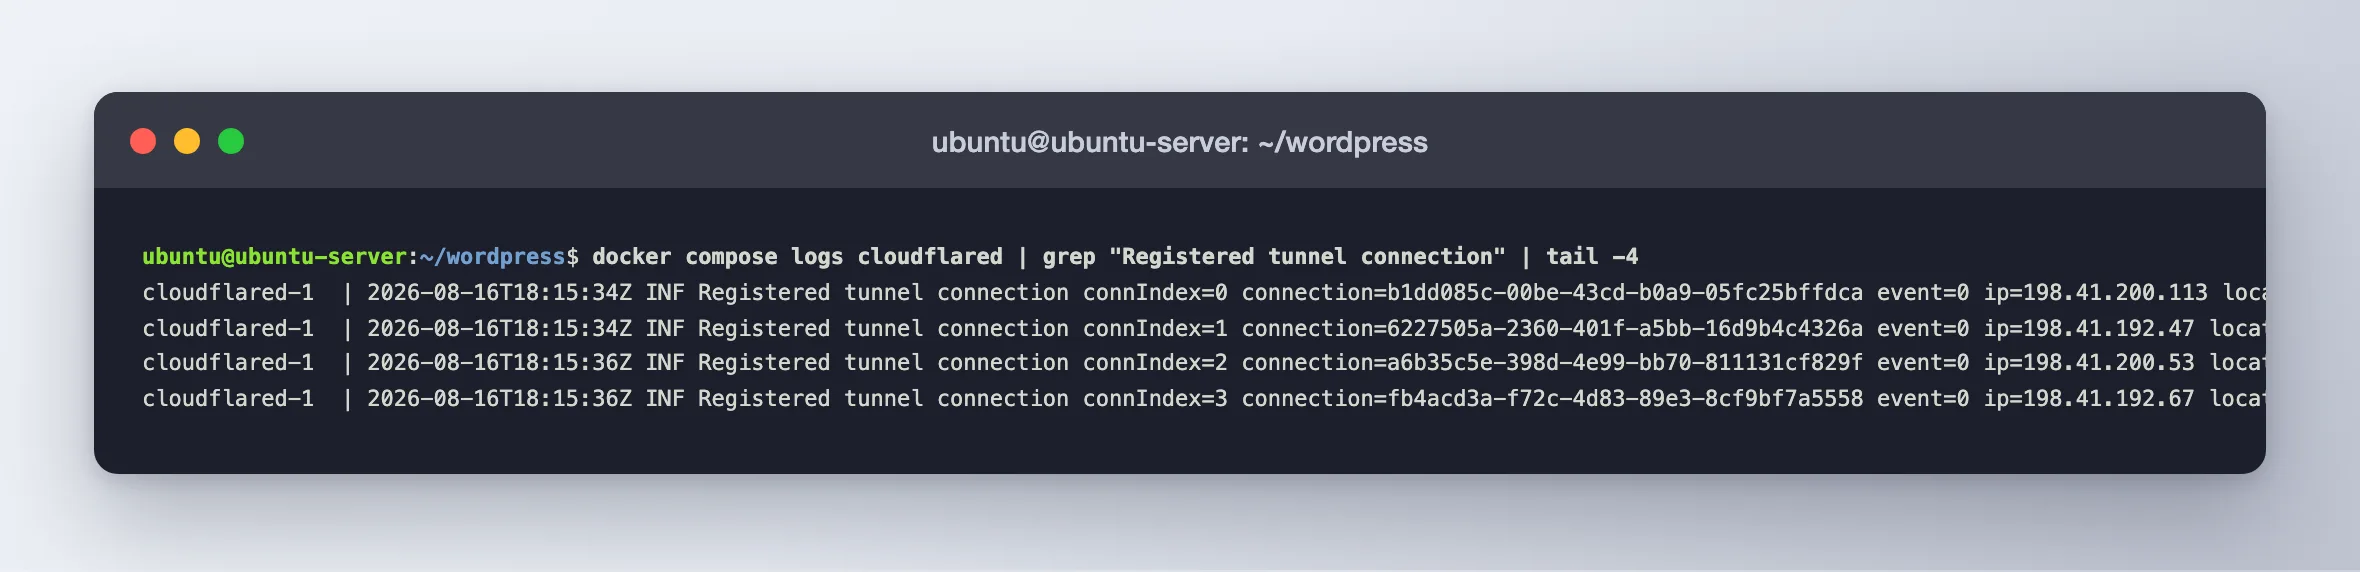
Four Registered tunnel connection lines is exactly right. cloudflared deliberately opens several connections to different Cloudflare data centres so your site stays up if one has a problem. If you see these, the hard part is done.
Step 5: Point Your Domain at the Tunnel
Back in the Cloudflare dashboard, open your tunnel and go to Published application routes, then Add a published application route.
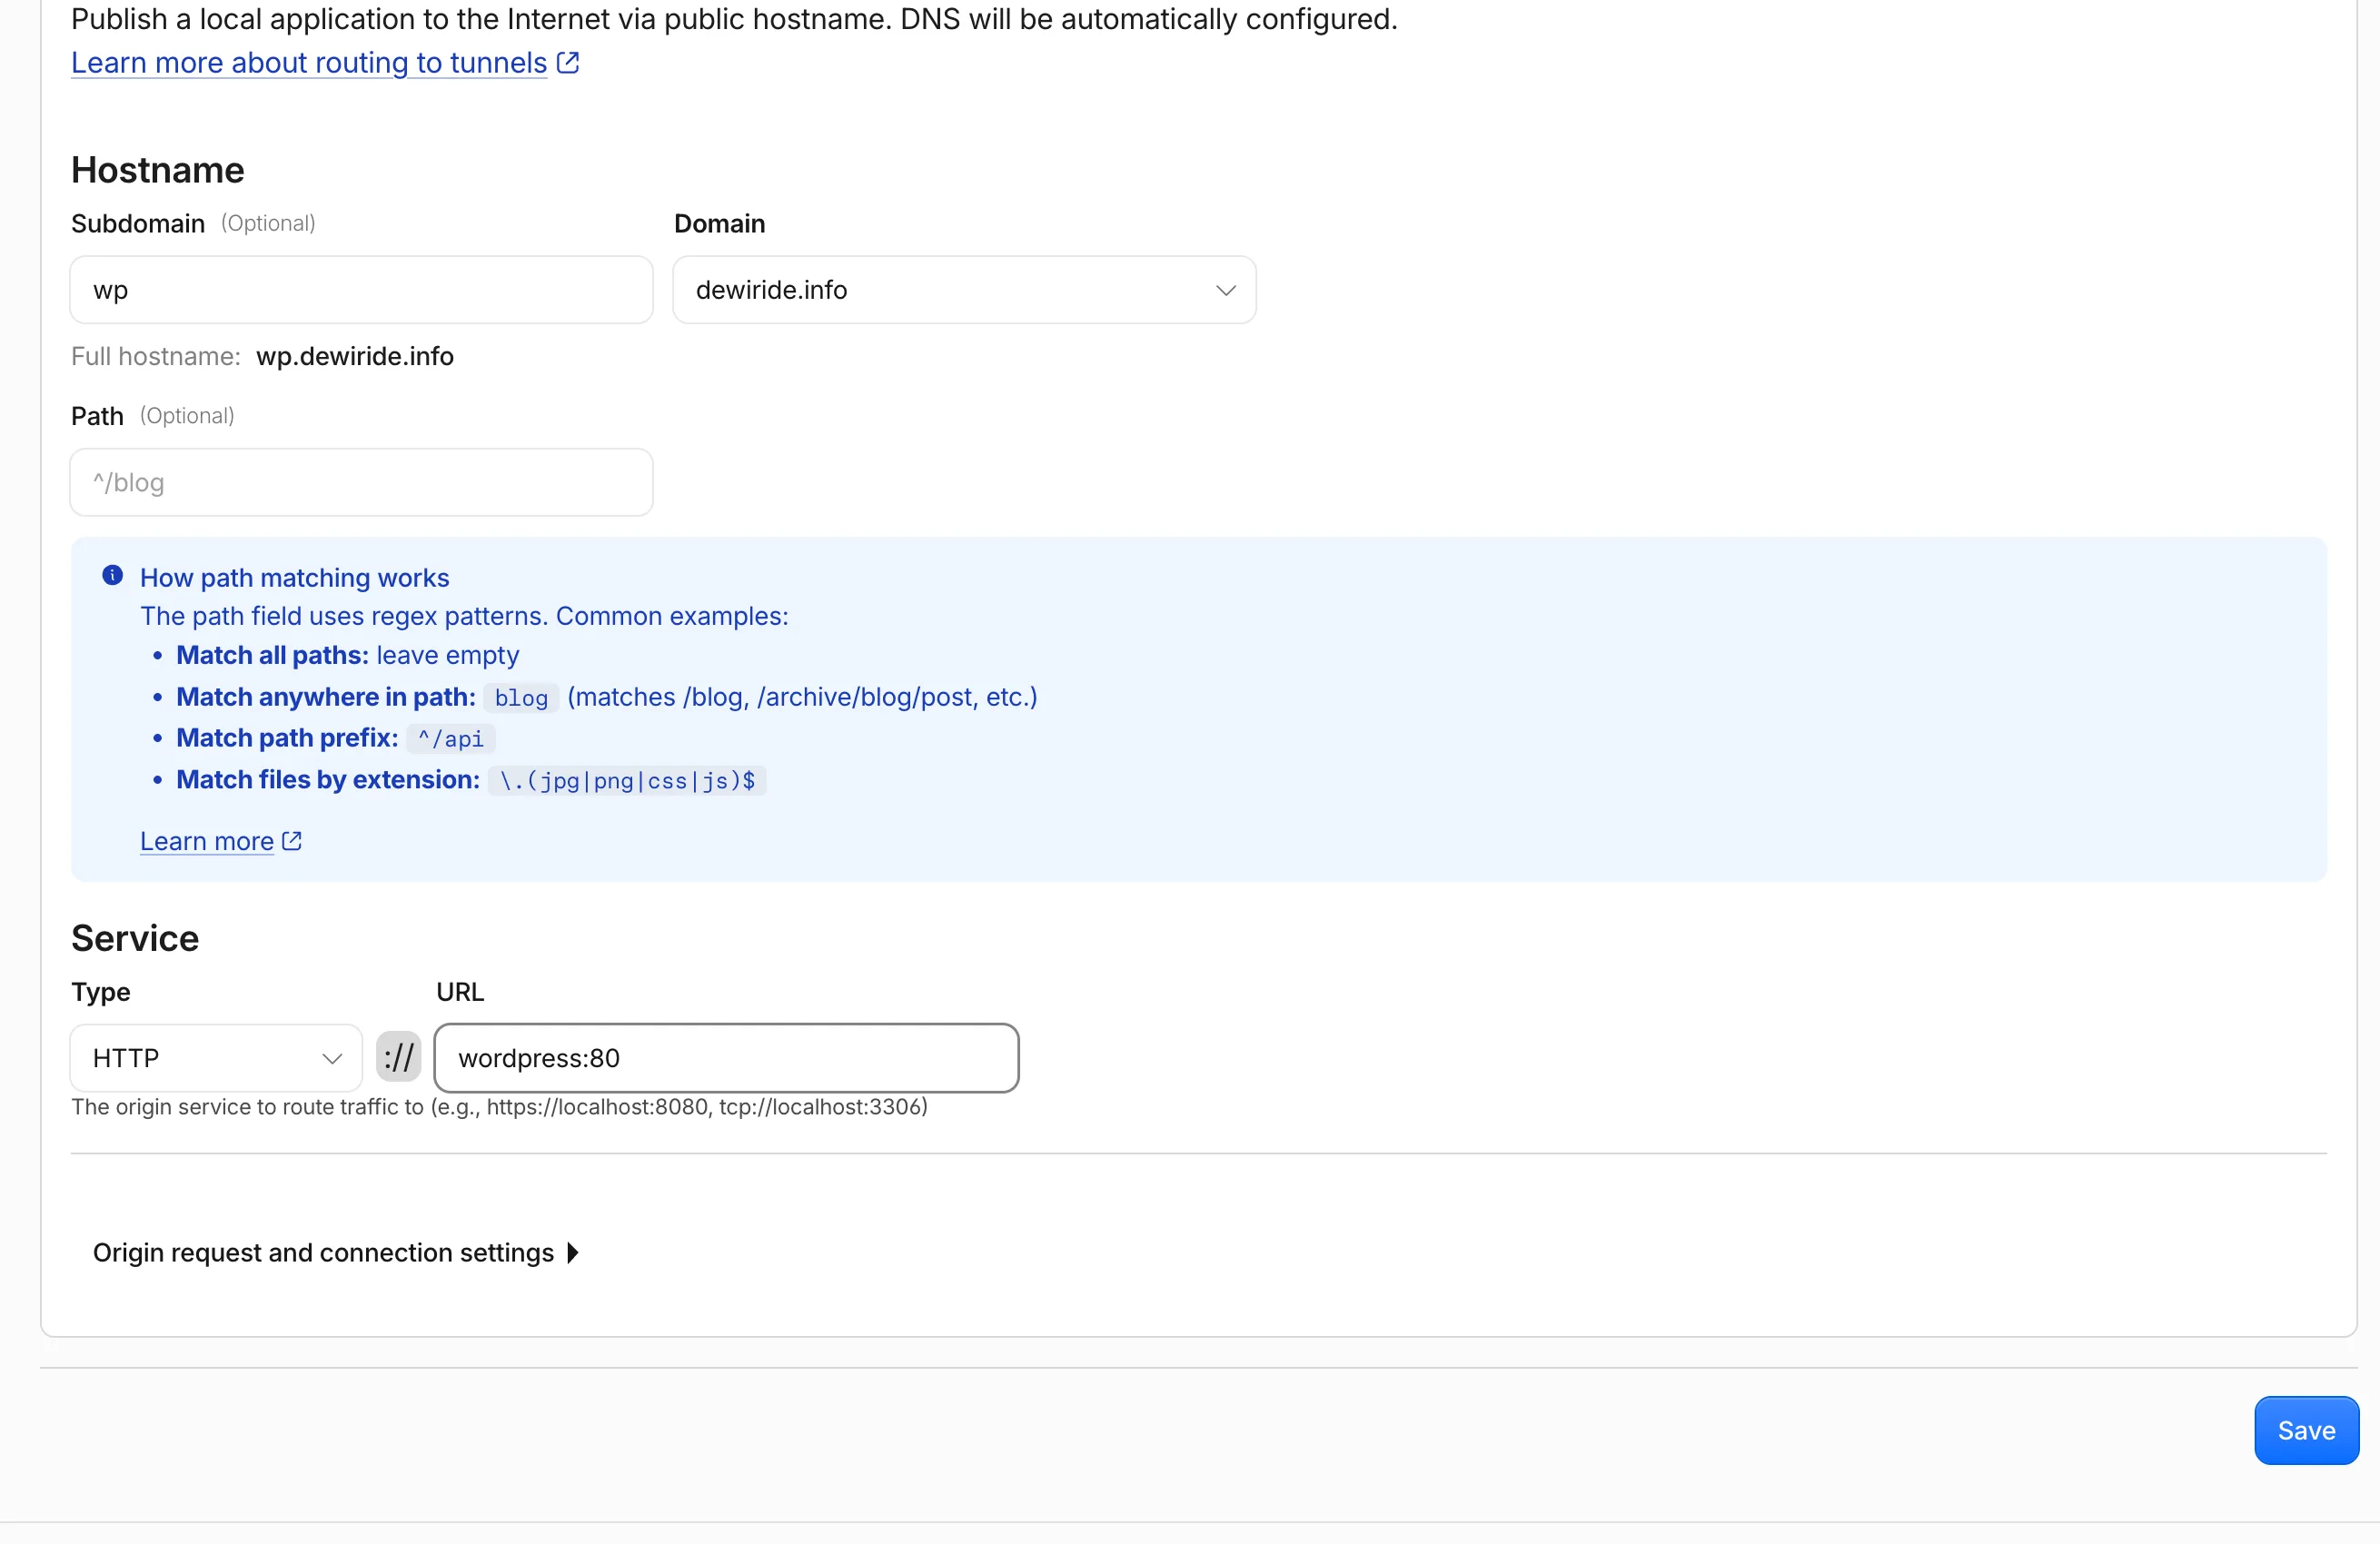
Fill it in:
- Subdomain —
wp(orwww, or leave blank to use the bare domain). - Domain — pick your domain from the list.
- Path — leave empty, so every page is served.
- Service Type —
HTTP. - URL —
wordpress:80.
That last field deserves a moment. It is not an internet address and not your server's IP. wordpress is the service name from your Compose file, and containers on the same Compose network find each other by service name. You are telling cloudflared to hand requests to its neighbour container.
Note that HTTP here is correct and safe: this is traffic inside your server between two containers, and it never leaves the machine. The public half of the journey is HTTPS, handled by Cloudflare.
Click Save.
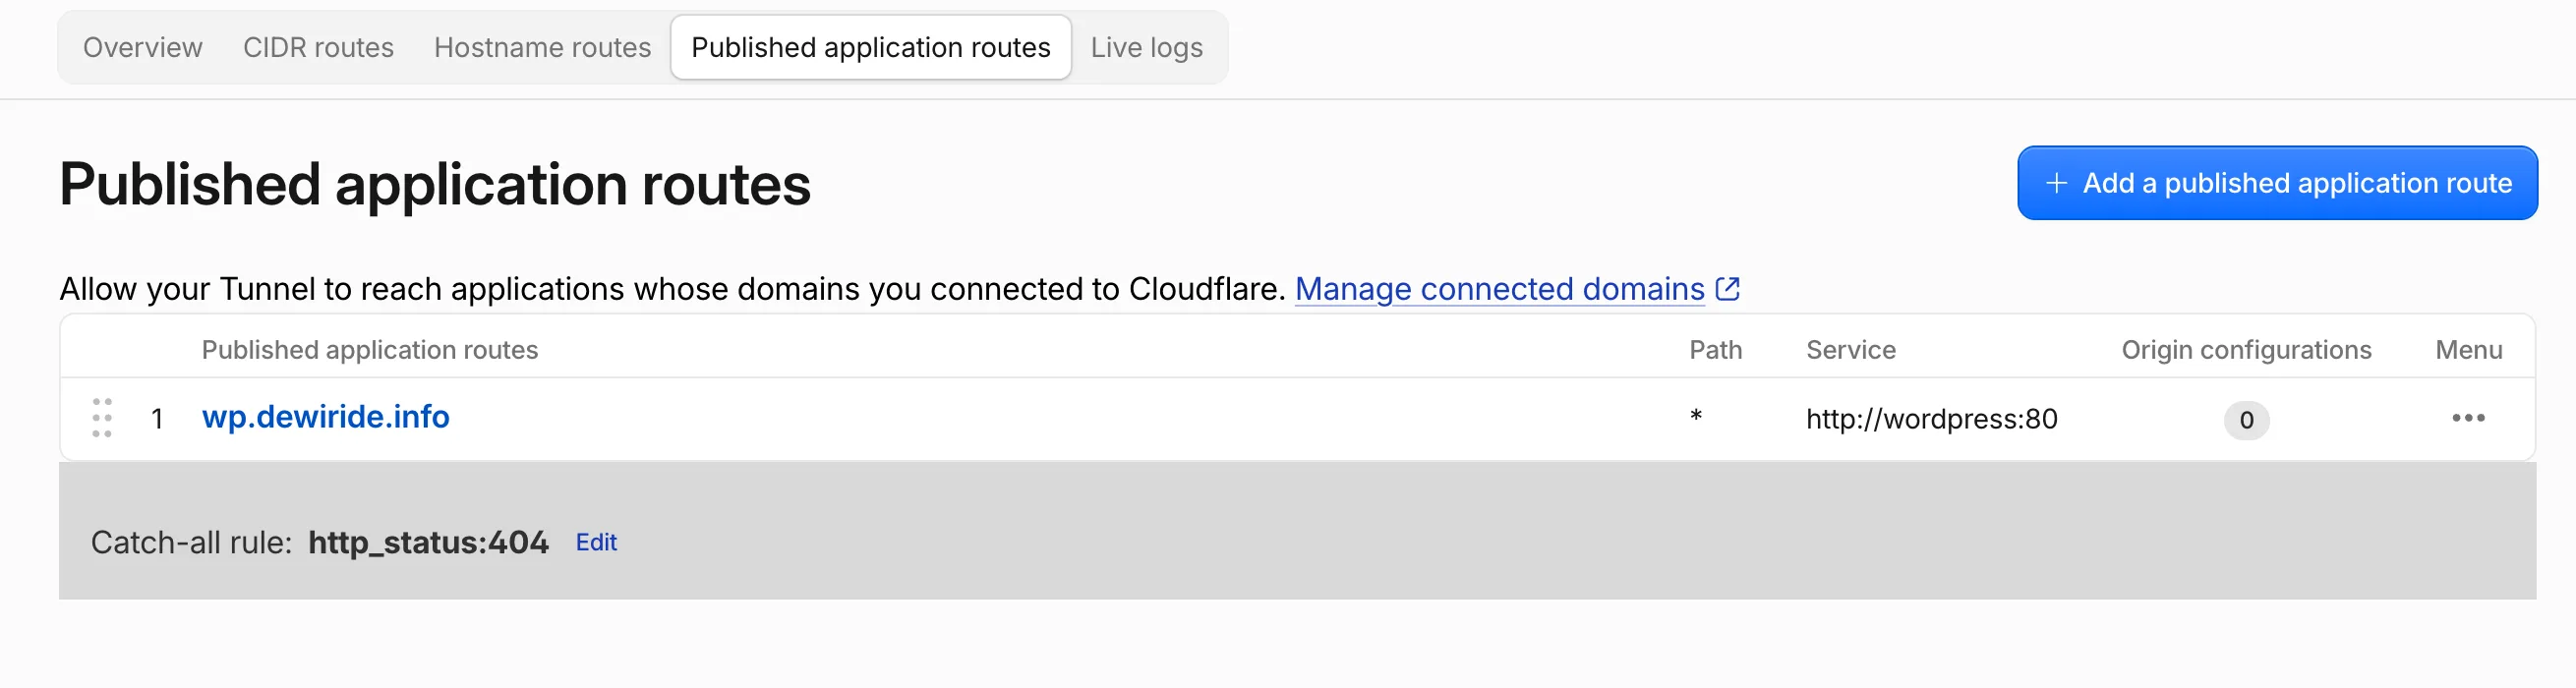
Cloudflare creates the DNS record for you automatically — there is no separate DNS step.
Step 6: Tell WordPress Its New Address
One thing still points at the old address. WordPress stored its own URL in the database during the Part 1 install, so it still believes it lives at http://192.168.1.50:8080. Left alone, logging in will bounce you back to the old address.
Fix it with WP-CLI. Replace wp.example.com with your real domain:
docker compose run --rm wpcli config set WP_HOME https://wp.example.com
docker compose run --rm wpcli config set WP_SITEURL https://wp.example.com
wp config set writes these as constants into wp-config.php. Constants beat the values stored in the database, which is the safer approach: if anything ever goes wrong with the domain you can change one line in a file rather than trying to log in to a site you cannot reach.
The first run downloads the WP-CLI image, so give it a moment. Each command prints a Success: line.
Step 7: Visit Your Live Site
Open your domain in a browser.
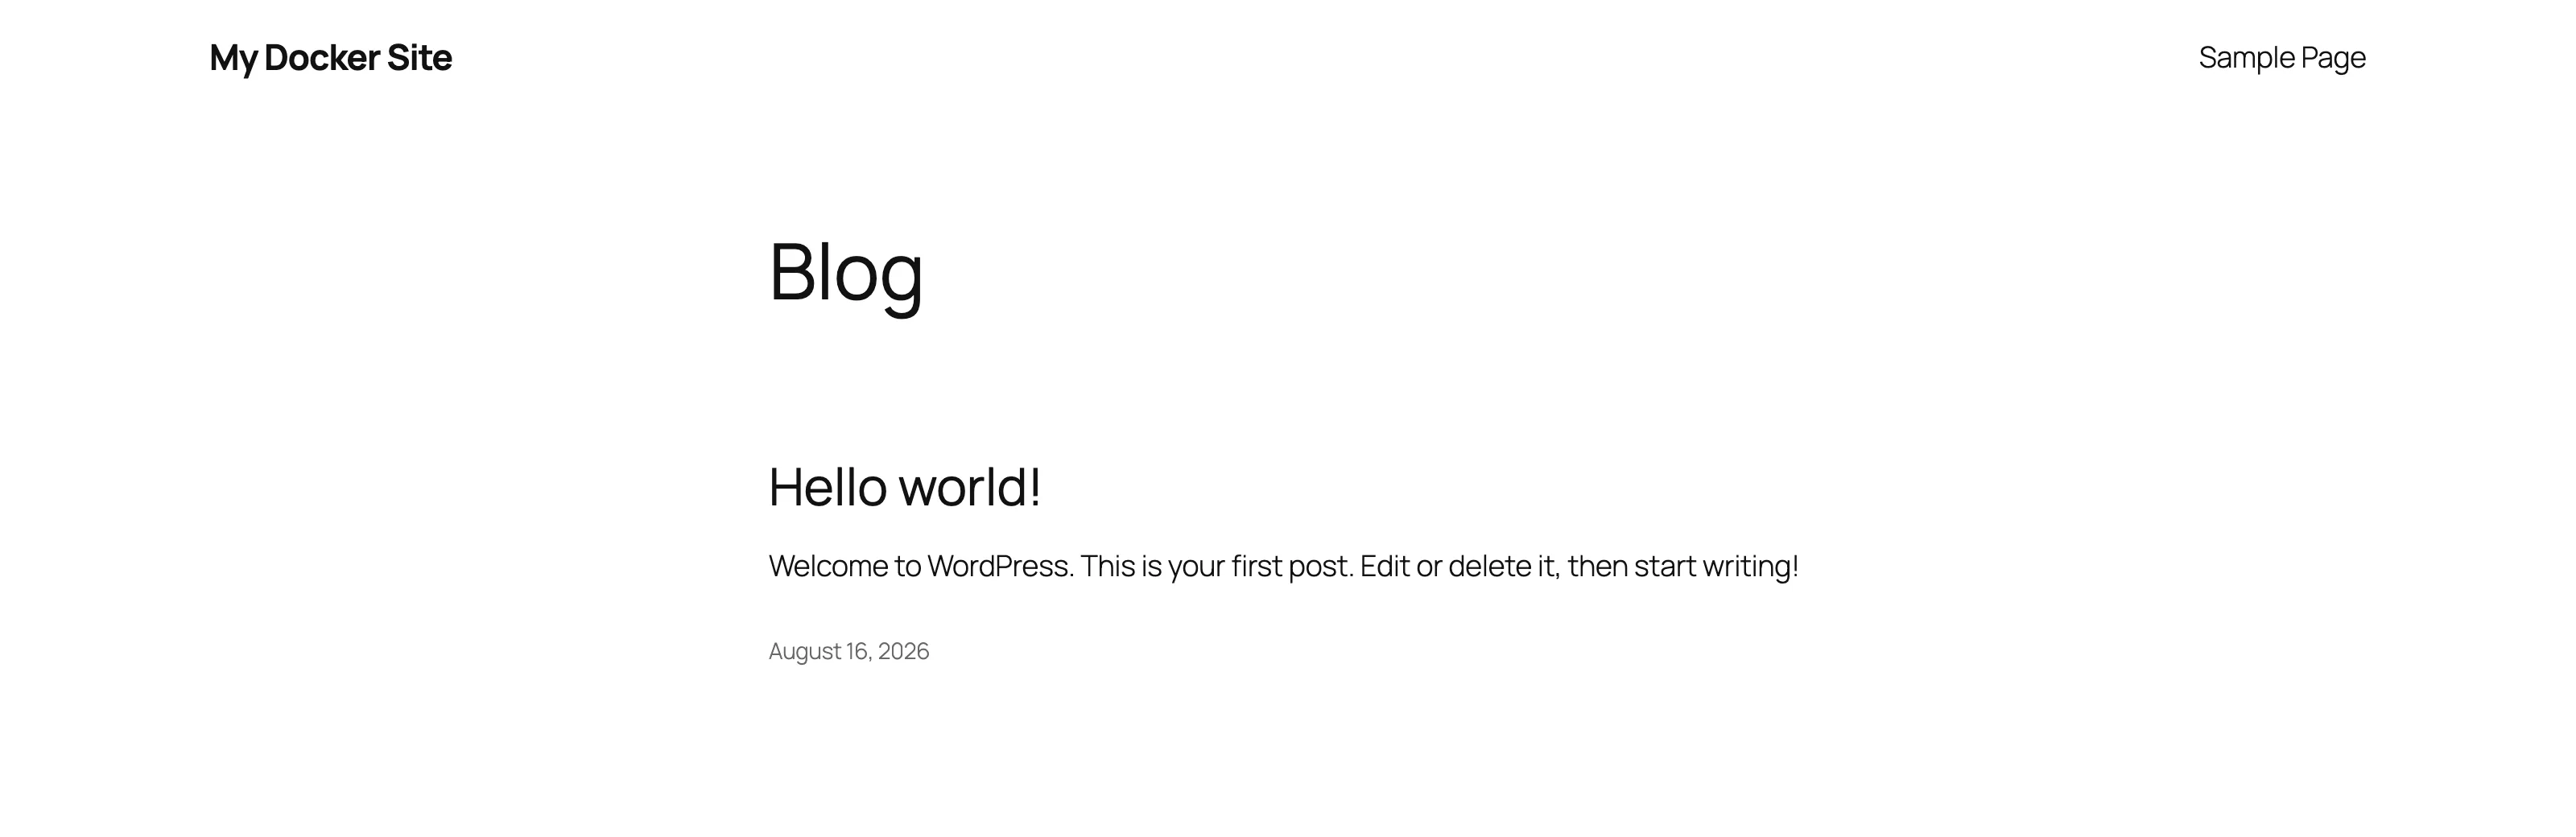
There is your site, on the public internet, at your own domain, with a padlock in the address bar.
You can confirm the details from the server too:
curl -sI https://wp.example.com | head -7
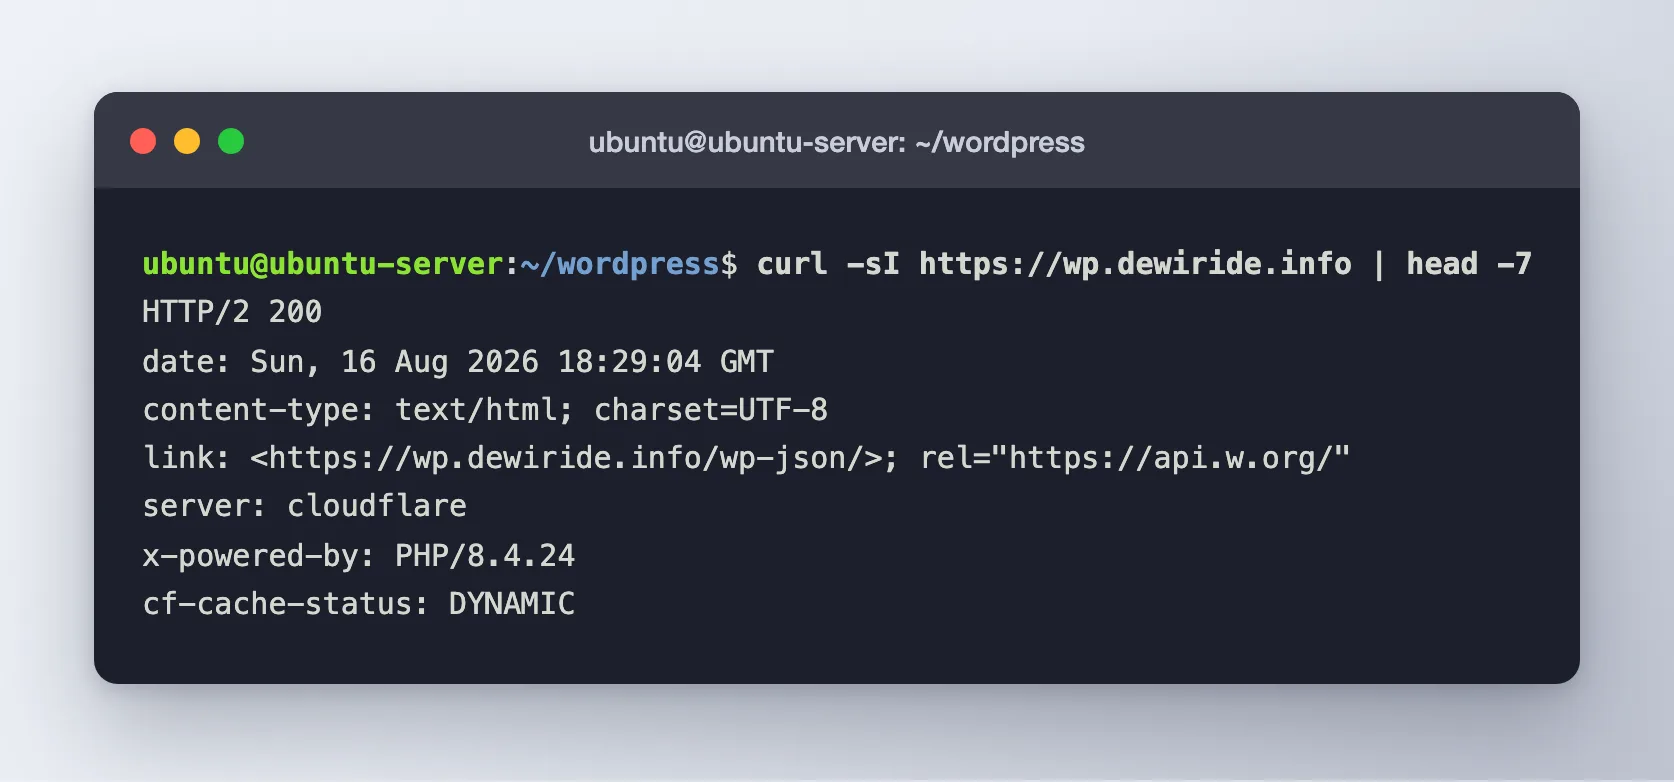
Three things worth reading in that response:
HTTP/2 200— success, over a modern encrypted connection.server: cloudflare— the request was served through Cloudflare's network.x-powered-by: PHP/8.4.24— and the page itself came from your container.
The certificate is issued and renewed by Cloudflare automatically. There is nothing to remember and nothing that expires on you.
Step 8: Log In to Your Admin Panel at the New Address
Your site moved, so the address you used to manage it has moved too. The old http://192.168.1.50:8080/wp-admin will no longer work — and that is deliberate, because you closed that door in Step 3.
From now on, the admin panel lives at your domain with /wp-admin on the end:
https://wp.example.com/wp-admin
Replace wp.example.com with your own domain. Two other addresses reach the same place, and all are worth knowing:
| Address | What it does |
|---|---|
https://wp.example.com/wp-admin | The dashboard. Sends you to the login page first if you are signed out |
https://wp.example.com/wp-login.php | The login page directly |
https://wp.example.com/wp-admin/options-general.php | Jumps straight to Settings → General |
Open the first one. Because you are signed out on this new address, WordPress shows the login screen.
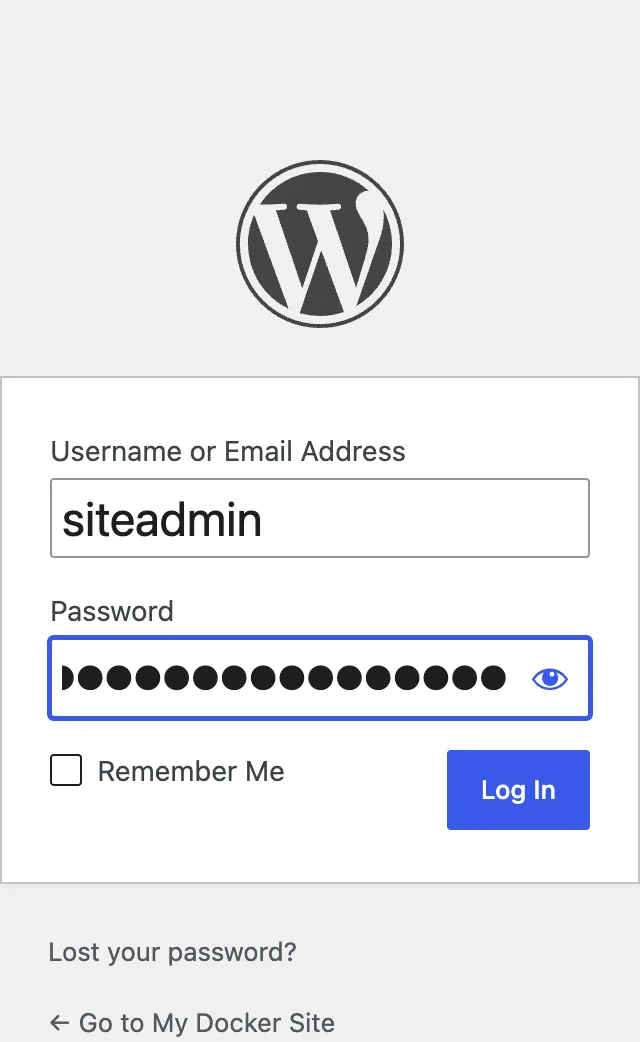
Enter the username and password you chose during the Part 1 installer — they have not changed. Moving the site to a new address does not affect your account, because the user record lives in the database, which we never touched.
Tick Remember Me if this is your own computer, then click Log In.
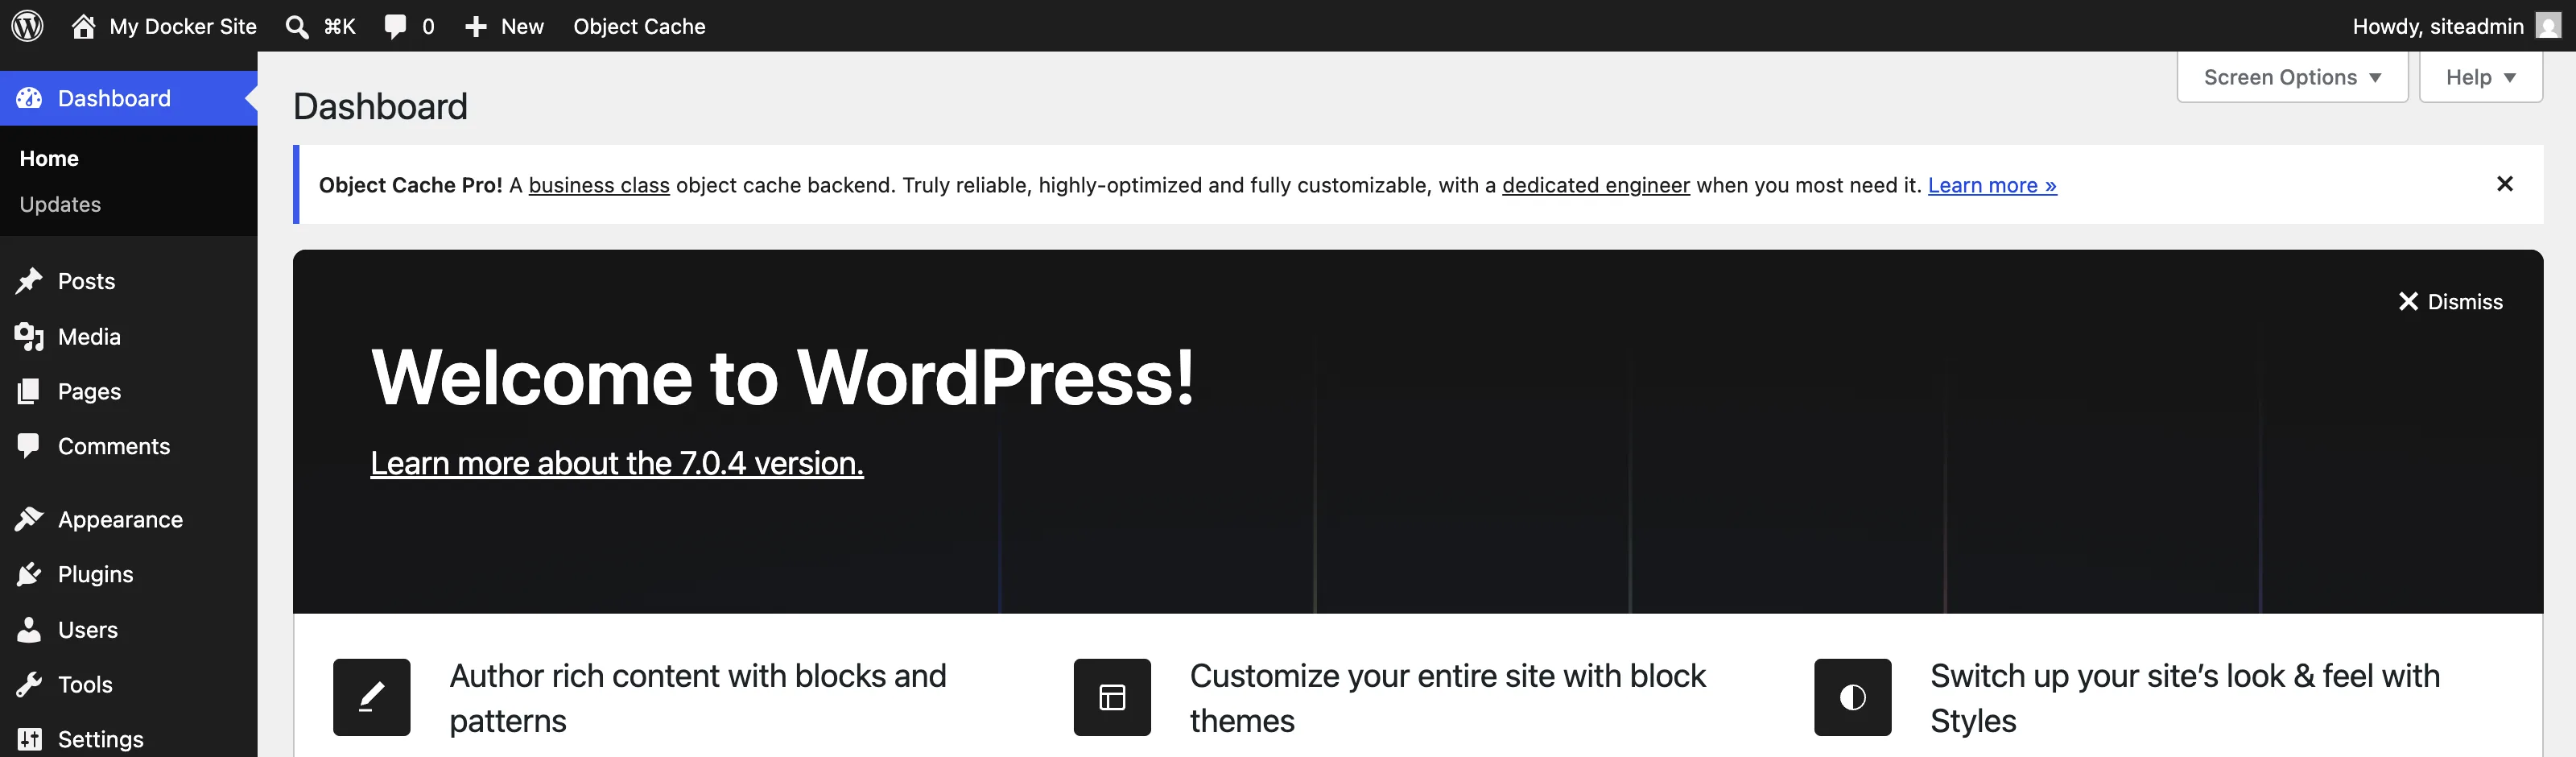
You are in, and this time over HTTPS at your own domain. This is where you write posts, add pages, install plugins and change your theme.
Bookmark https://wp.example.com/wp-admin now and delete any old bookmark pointing at the IP address. If you ever forget the address, it is always your site's address with /wp-admin added to the end.
If the Login Page Sends You in Circles
Two problems account for almost every login difficulty after a domain move, and both have quick answers:
-
You get bounced back to the old IP address.
WP_HOMEandWP_SITEURLwere not set. Re-run the twowp config setcommands from Step 6 and try again. -
You forgot the password. Lost your password? needs working email, which a fresh server does not have. Set a new one directly instead:
Ubuntu Server Terminaldocker compose run --rm wpcli user listdocker compose run --rm wpcli user update siteadmin --user_pass='YourNewStrongPassword'The first command lists your accounts so you can confirm the username; the second sets a new password immediately. This works even when email does not, which is why WP-CLI is worth having.
Confirming WordPress Knows Its Own Address
While you are here, go to Settings → General in the left-hand menu.
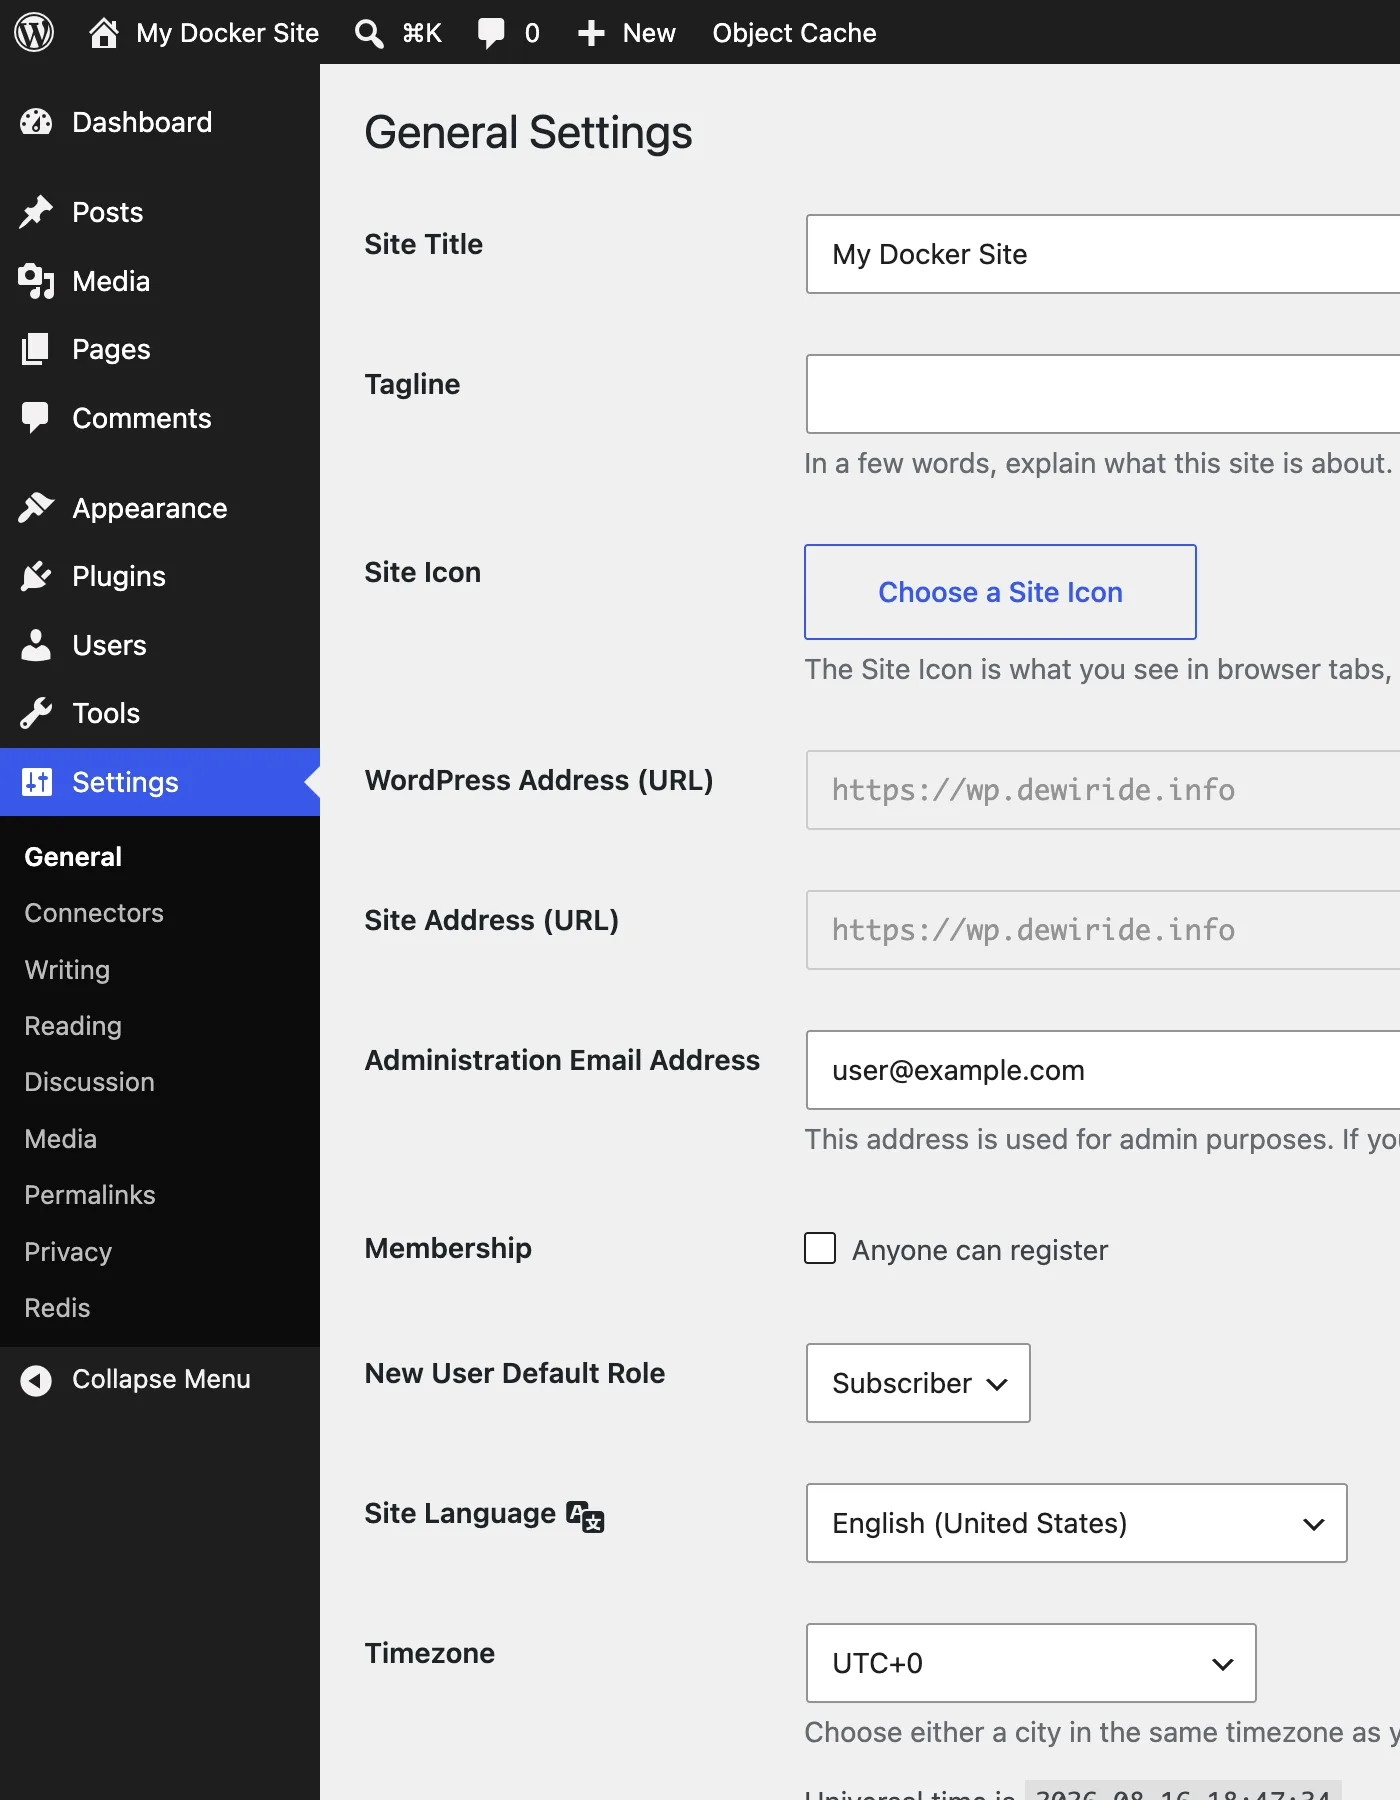
WordPress Address (URL) and Site Address (URL) should both show your https:// domain, and both will be greyed out so you cannot edit them. That is correct and is exactly what you want: because you set them as constants in wp-config.php in Step 6, they can no longer be changed by accident from the dashboard — which is a common way people lock themselves out of a WordPress site.
Notice also the Redis entry at the bottom of the Settings submenu in that screenshot. That appeared when you installed the plugin, and it is where the next step ends up.
Step 9: Turn On the Redis Cache
Redis is running, but WordPress does not use it until you install a plugin that knows how.
docker compose run --rm wpcli plugin install redis-cache --activate
Now tell WordPress where Redis is, and which client library to use:
docker compose run --rm wpcli config set WP_REDIS_HOST redis
docker compose run --rm wpcli config set WP_REDIS_CLIENT predis
WP_REDIS_HOST redis is the service name again. The second line matters more than it looks: the official WordPress image does not include PHP's compiled redis extension, so the plugin's default client cannot connect. predis is a pure-PHP client bundled with the plugin, and it works with the standard image and no custom build. If you skip this line you get a confusing "Redis server is unreachable" error even though Redis is running perfectly.
Now switch the cache on:
docker compose run --rm wpcli redis enable
And check it:
docker compose run --rm wpcli redis status
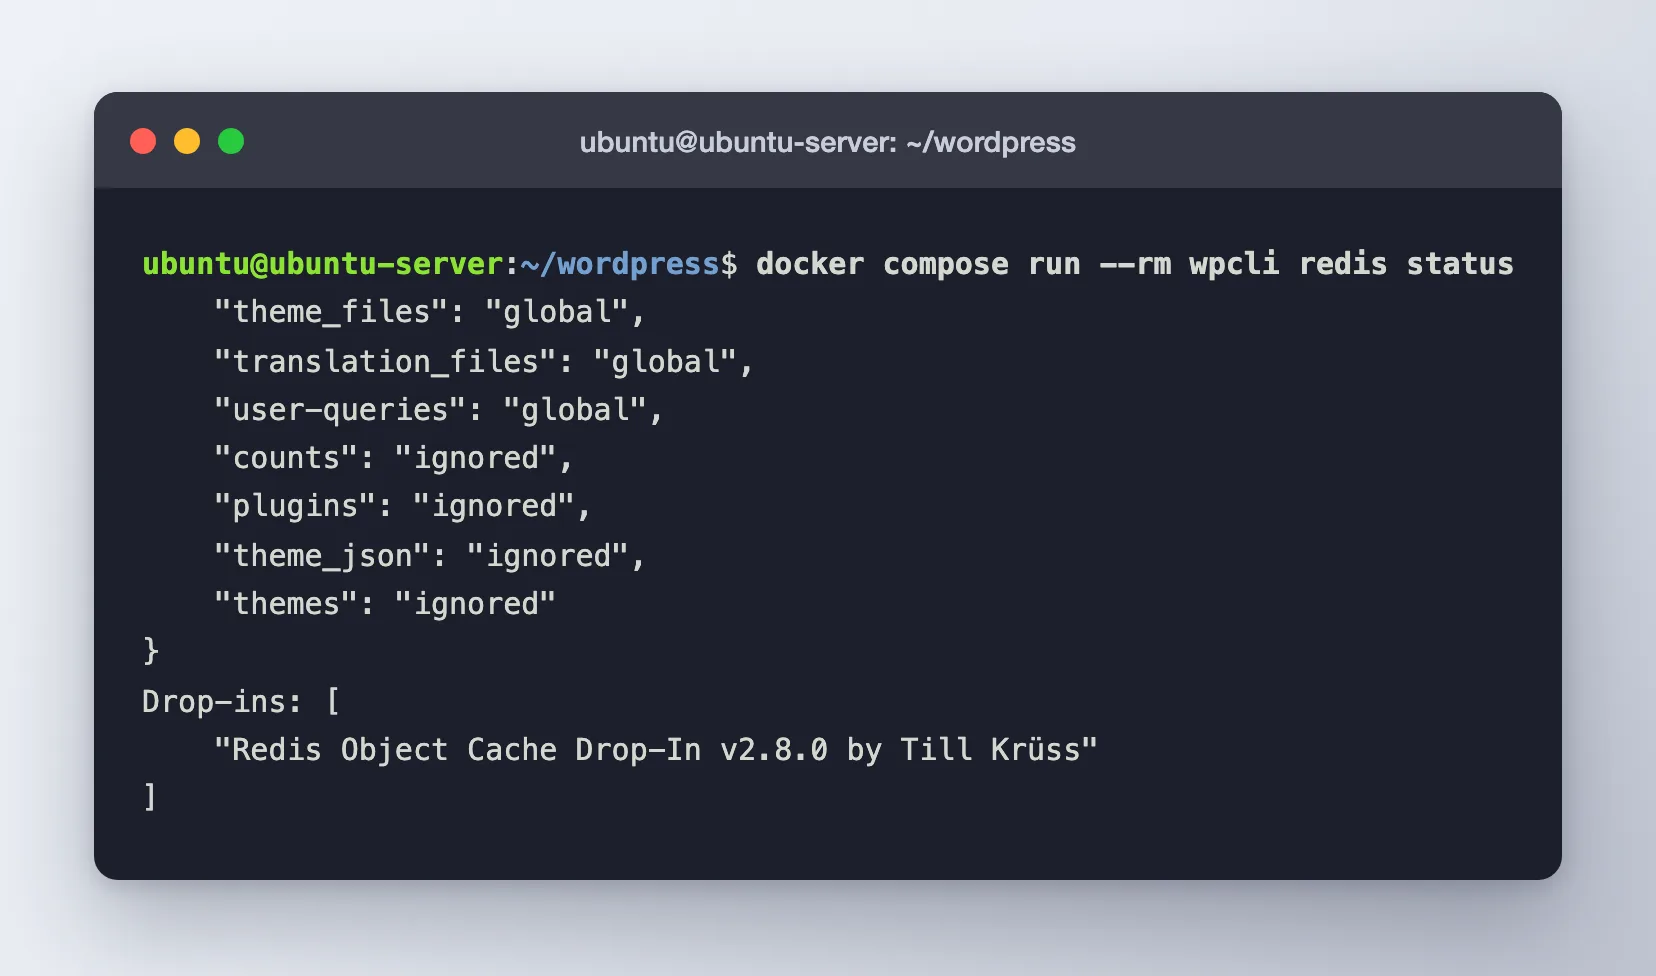
Status: Connected and Ping: PONG mean it is working.
You can confirm the same thing in the admin panel. Go to https://wp.example.com/wp-admin, then click Settings in the left-hand menu and choose Redis from the list that appears underneath it. (Direct link: https://wp.example.com/wp-admin/options-general.php?page=redis-cache.)
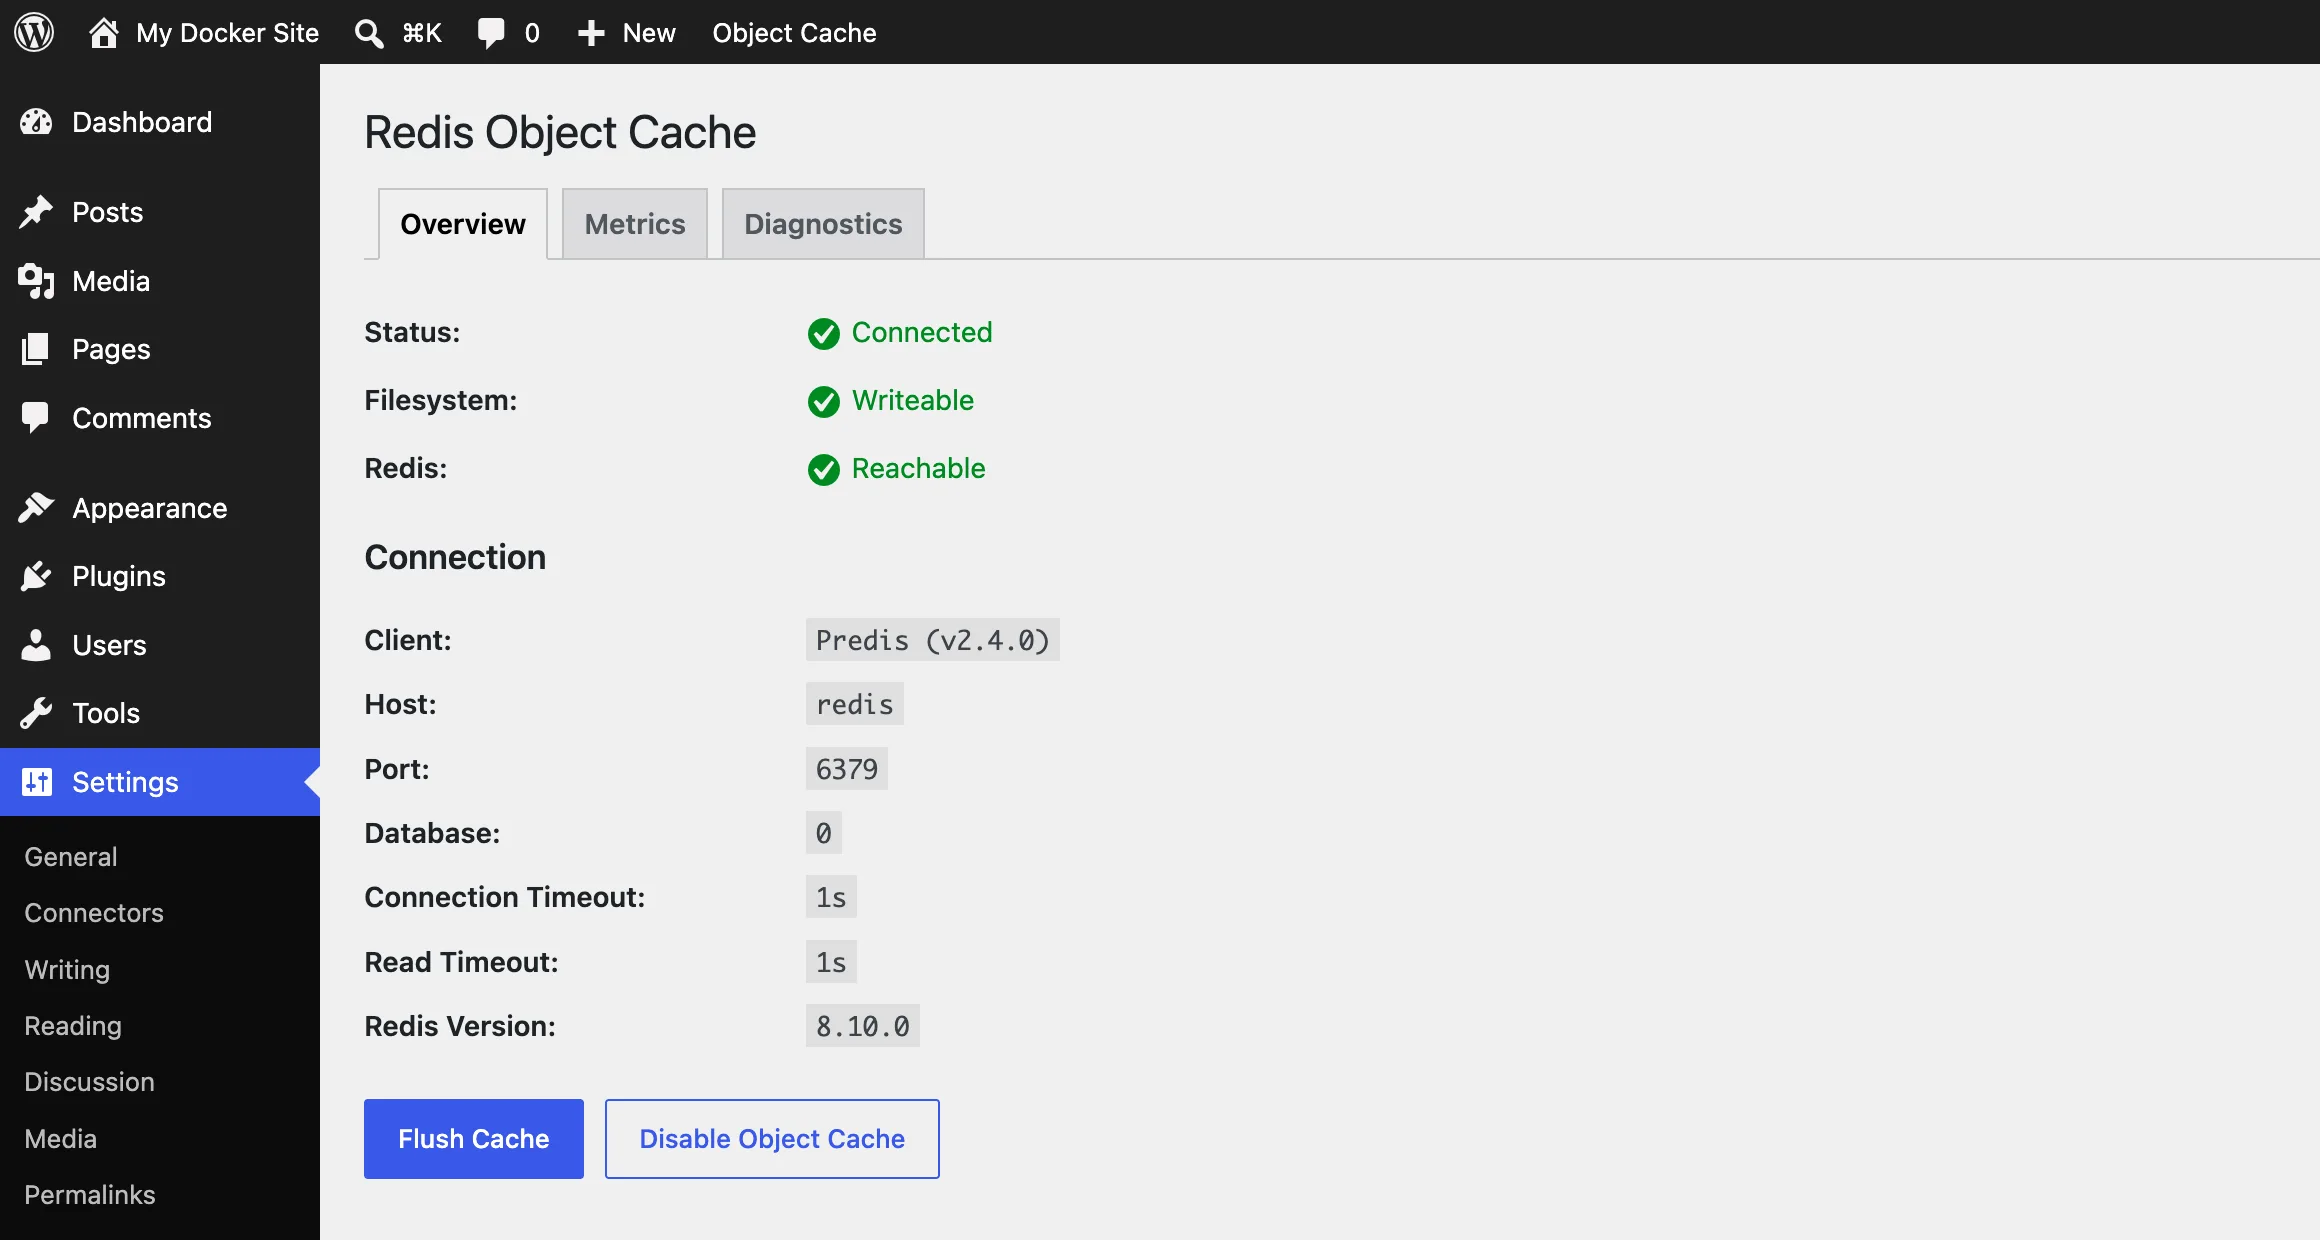
Three green ticks — Status: Connected, Filesystem: Writeable, Redis: Reachable — mean everything is wired up. Below them you can see the connection WordPress is using: client Predis, host redis, port 6379. The Flush Cache button empties the cache, which is occasionally useful after changing a theme if you see stale content.
Want proof it is really caching? Load your site, then count the stored entries:
docker compose exec redis redis-cli DBSIZE
A number in the dozens means WordPress is storing answers rather than re-asking the database every time.
Step 10: Set Up Backups
Containers are disposable. Your data is not, and Docker does not back it up for you. This section is the one to actually do rather than bookmark.
There are two things to save: the database and your files (uploads, themes, plugins).
Make a folder, then dump the database:
mkdir -p ~/backups

docker compose exec -T db sh -c 'exec mariadb-dump -u root -p"$MARIADB_ROOT_PASSWORD" --single-transaction --all-databases' > ~/backups/db-$(date +%F).sql
That command looks dense, so here it is in pieces:
docker compose exec -T dbruns a command inside the database container.sh -c '...'runs it through a shell inside the container. This matters: it means$MARIADB_ROOT_PASSWORDis read from the container's own environment, so your password never appears in your command history on the host.--single-transactiontakes a consistent snapshot without locking the site.> ~/backups/db-$(date +%F).sqlsaves it with today's date in the name.
Now the files:
docker run --rm -v wordpress_wp_data:/data:ro -v ~/backups:/backup alpine \
  tar czf /backup/files-$(date +%F).tar.gz -C /data .
This starts a tiny temporary container, attaches your WordPress volume read-only (:ro), compresses its contents into your backups folder, and disappears.
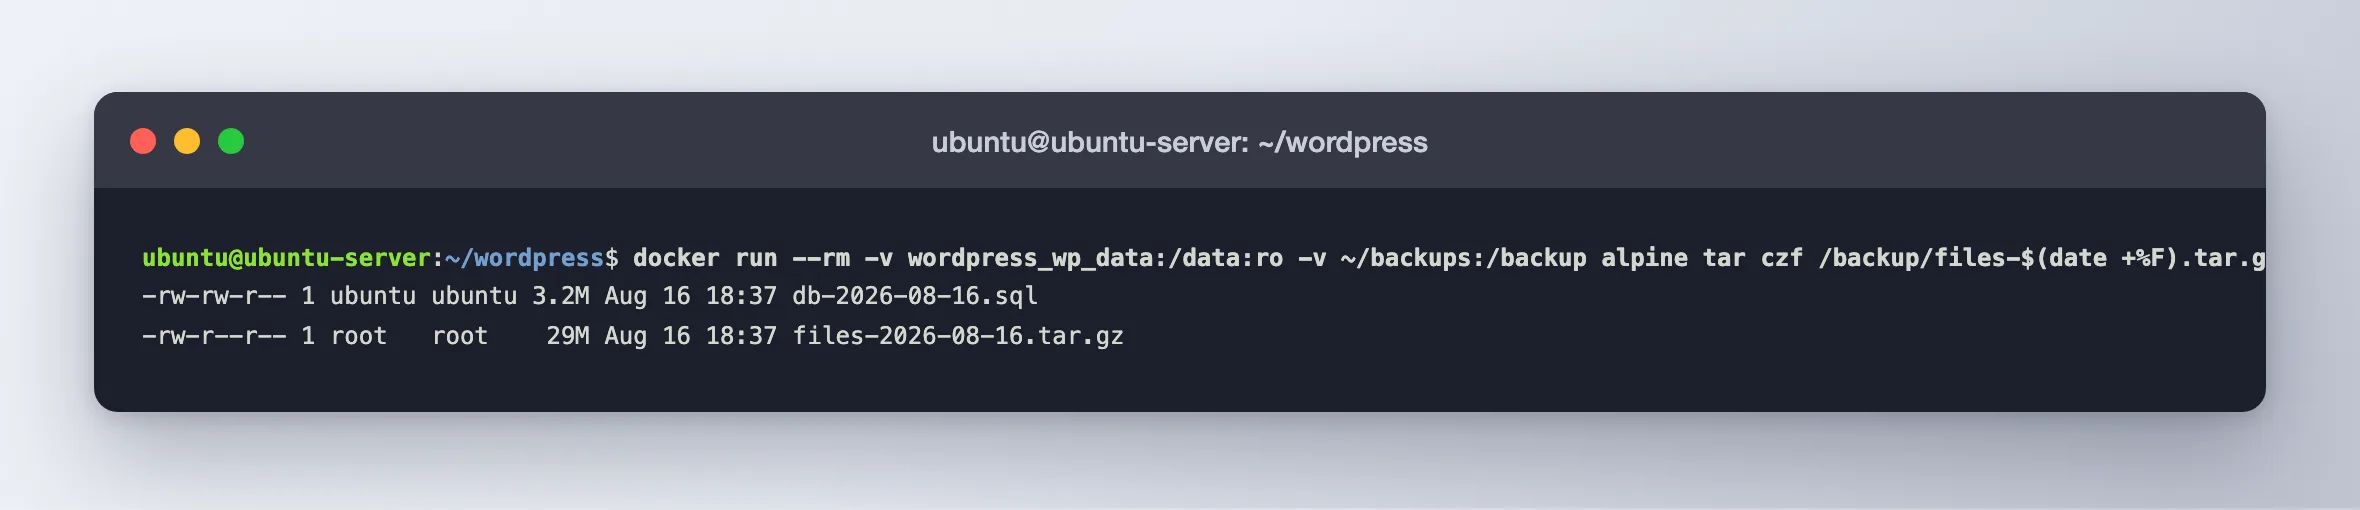
A backup sitting on the same server is not a backup — it dies with the machine. Copy these files somewhere else regularly, using scp, rsync, or any cloud storage tool. Test a restore at least once, because an untested backup is only a hope.
Restoring
To restore the database from a dump:
docker compose exec -T db sh -c 'exec mariadb -u root -p"$MARIADB_ROOT_PASSWORD"' < ~/backups/db-2026-08-17.sql
To restore the files:
docker run --rm -v wordpress_wp_data:/data -v ~/backups:/backup alpine \
  tar xzf /backup/files-2026-08-17.tar.gz -C /data
Then restart the site with docker compose restart.
Step 11: Keeping It Updated
Three separate things to keep current, in decreasing order of importance.
Plugins and themes — update from the WordPress dashboard as usual, or from the command line:
docker compose run --rm wpcli plugin update --all
docker compose run --rm wpcli theme update --all
WordPress, MariaDB, Redis — change the version in compose.yaml, then:
docker compose pull
docker compose up -d
cloudflared — it uses the latest tag, so:
docker compose pull cloudflared
docker compose up -d cloudflared
Always take a backup before changing a version. Your data lives in volumes and is not touched by an image swap, but "not touched" and "recoverable if something surprises you" are different guarantees.
Step 12: Removing Everything Cleanly
This was the original promise, so here it is in full.
Stop and remove the containers, keeping all your content:
cd ~/wordpress
docker compose down
Remove the containers and permanently delete the site and database:
docker compose down -v
Remove the downloaded images:
docker rmi wordpress:7.0-php8.4-apache mariadb:11.8 redis:8-alpine \
  cloudflare/cloudflared:latest wordpress:cli-php8.4
Remove the project folder:
cd ~ && rm -rf ~/wordpress
And in Cloudflare, delete the tunnel (Networks → Tunnels & Mesh → your tunnel → Delete) and remove the DNS record it created.
Your Ubuntu server is now exactly as it was before Part 1. No Apache, no PHP, no MySQL, no stray config files, no system users, and no ports opened.
docker compose down -v permanently deletes your database and uploaded files. There is no undo. Take a backup first unless you are certain.
Common Mistakes
| Mistake | What you'll see | Fix |
|---|---|---|
Leaving WORDPRESS_CONFIG_EXTRA in Compose and expecting it to work | No error, but the settings simply never appear | Use wpcli config set — the variable only applies when wp-config.php is first created |
Skipping WP_REDIS_CLIENT predis | Redis server is unreachable despite Redis running fine | The official image has no redis PHP extension; Predis is bundled with the plugin |
Putting localhost:8080 in the Cloudflare service URL | 502 errors from Cloudflare | Use wordpress:80 — the service name, not localhost, because cloudflared is its own container |
Forgetting to update WP_HOME / WP_SITEURL | Login redirects you back to the old IP address | Run the wp config set commands in Step 6 |
| Pasting the tunnel token into a public place | Anyone can route traffic through your tunnel | Keep it in .env; if exposed, use Refresh token in Cloudflare |
| Moving nameservers to Cloudflare with DNSSEC still on | The entire domain stops resolving | Disable DNSSEC first, wait an hour, then move |
Troubleshooting
| Problem | Cause | Fix |
|---|---|---|
| Cloudflare shows Error 1033 | The tunnel is not connected | docker compose logs cloudflared and look for Registered tunnel connection; check the token in .env |
| 502 Bad Gateway | cloudflared cannot reach WordPress | Confirm the service URL is wordpress:80 and that docker compose ps shows wordpress running |
| Site loads but CSS and images are missing | WordPress still thinks it lives at the old address | Re-run the Step 6 wp config set commands |
| Redirect loop on the login page | WordPress cannot tell the request arrived over HTTPS | The official image handles this via X-Forwarded-Proto; make sure WP_HOME/WP_SITEURL both start with https:// |
Old admin bookmark http://SERVER_IP:8080/wp-admin no longer opens | Correct — port 8080 was closed in Step 3 | Use https://your-domain/wp-admin and update your bookmark |
| Forgot the admin password, and password reset email never arrives | A fresh server cannot send email | Set a new password directly: docker compose run --rm wpcli user update USERNAME --user_pass='NewPassword' |
| Forgot which username you created | It is stored in the database, not in any file | docker compose run --rm wpcli user list shows every account |
| Site Address fields are greyed out in Settings → General | Expected — they are set as constants in wp-config.php | To change them, use wpcli config set WP_HOME ... and WP_SITEURL |
wp redis status says unreachable | Missing Predis client setting | docker compose run --rm wpcli config set WP_REDIS_CLIENT predis |
| DNS record exists but the domain does not load | DNS still propagating, or the record is not proxied | Wait a few minutes; the record Cloudflare creates should be proxied (orange cloud) |
WP-CLI warns it cannot write /.wp-cli/cache/ | The CLI container has no home directory | Add HOME: /tmp to the wpcli service, as in the file above |
Frequently Asked Questions
Does a Cloudflare Tunnel cost anything?
No. Tunnels are included on Cloudflare's free plan, with no bandwidth charge for normal website traffic. You only need to own a domain.
Is this less secure than opening ports myself?
It is considerably more secure for a home server. Your machine accepts no incoming connections at all, so the constant background scanning of the internet cannot reach it. Cloudflare also absorbs denial-of-service traffic before it ever gets near you. The trade-off is that your traffic passes through Cloudflare, who can therefore see it — the same trade-off as using any CDN.
Will this work behind CGNAT, or on mobile broadband?
Yes. That is the main reason to choose it. The tunnel only needs an outbound connection, which is exactly what CGNAT permits. This guide was written on a CGNAT connection where port forwarding was impossible.
How do I get into the WordPress admin panel now?
Add /wp-admin to your site's address — https://your-domain/wp-admin — and sign in with the username and password you created during the Part 1 installer. Those credentials did not change when the site moved. The old http://SERVER_IP:8080/wp-admin no longer works, because that port is now closed.
Can I use the bare domain instead of a subdomain?
Yes — leave the Subdomain field empty when creating the route and it will serve example.com directly.
Can I host several sites through one tunnel?
Yes. Add another published application route with a different hostname, pointing at a different container. One cloudflared can serve many sites.
Do I still need to back up if Cloudflare is in front?
Absolutely. Cloudflare delivers your site; it does not store it. Your posts, images and database live only in your Docker volumes. If those are lost and you have no backup, the site is gone.
Is Redis worth it for a small site?
For a brand-new site with a handful of posts, honestly, you would struggle to notice. It becomes worthwhile as your content and plugin count grow, and it costs very little to have running from the start.
What happens if my home internet restarts?
cloudflared reconnects by itself, and restart: unless-stopped means Docker restarts the containers when the machine boots. The site returns without you doing anything.
Conclusion
Across both parts you have built something genuinely respectable: a real WordPress site, running in containers on your own hardware, published to the internet at your own domain with valid HTTPS, cached with Redis, backed up, and — crucially — removable with a single command.
You did it without installing Apache, PHP, or MySQL on the host. Without a control panel. Without opening a single port on your router. And without paying for hosting.
The pattern generalises, too. Any web application you can run in a container can be published the same way: add a service, add a route, and it is online.
Previous: ← Part 1: Run WordPress with Docker Compose
The full series:
- Run WordPress with Docker Compose
- Custom Domain, Free HTTPS, Redis Cache and Backups
Additional Resources
- Cloudflare Tunnel documentation
- Running cloudflared in Docker
- WP-CLI command reference
- Redis Object Cache plugin
- Official WordPress Docker image
- How to install Docker on Ubuntu Server
Video Tutorial
Coming soon!
