How to Send Email from a Distribution List in Outlook on the Web

Team addresses such as support@ or sales@ are often distribution lists, and a customer should get the answer from that address — not from whichever teammate happened to pick the message up. Outlook on the web can send from the list, but the From line you need is hidden until you ask for it.
What You Will Do
In this guide you will send a message from a team distribution list, such as support@contoso.com, in Outlook on the web. You will:
- Turn on the hidden From field in a new message.
- Choose the distribution list as the sender.
- Send the message — and understand what the recipient sees, where the replies go, and where your copy of the sent message ends up.
A distribution list (Microsoft's admin tools also call it a distribution group) is a single email address that copies every message it receives to a list of people. It has no mailbox of its own: no inbox, no Sent Items folder, nothing to sign in to. Everything sent to it lands in each member's own inbox. Keep that in mind, because it explains most of what happens after you select Send.
The new Outlook for Windows is built on Outlook on the web and uses the same message window, so every step below works there unchanged. Classic Outlook for Windows is different; it is covered in the FAQ.
Prerequisites
Before you start, make sure that you have:
- A Microsoft 365 work or school account with an Exchange Online mailbox, and Outlook on the web open at outlook.office.com. Distribution lists belong to an organization, so a personal Outlook.com or Hotmail account cannot do this.
- A distribution list that already exists in your organization. Admins create these in the Microsoft 365 admin center or the Exchange admin center. A contact list you made yourself in Outlook's People page is something else: it is only a saved set of recipients for your own convenience, and you cannot send from it.
- Send As or Send on Behalf permission on that list, granted to your account by an Exchange or Microsoft 365 admin. This is the one people miss. Being a member of the list does not let you send as it: membership decides who receives the list's mail, the permission decides who may send as it. Without it, every step below still appears to work — and then the message bounces back to you.
Granting that permission is an admin task, done in the Exchange admin center under the list's Settings tab → Manage delegates. If you are the admin, or want to show yours exactly what to do, How to Create a Distribution List and Grant Send As Permission in Microsoft 365 walks through creating the list and granting the permission, step by step.
Nothing here costs extra. Distribution lists are included with Exchange Online and do not need a license of their own — the only license involved is the normal Microsoft 365 license behind your own mailbox.
Send As or Send on Behalf: What the Recipient Sees
The steps in Outlook are identical for both permissions. What differs is how the message appears to the person who receives it — and you do not choose that in Outlook. It follows whichever permission your admin granted.
| Permission | What the recipient sees | Good for |
|---|---|---|
| Send As | Only the list: Contoso Support support@contoso.com. Nothing shows which teammate sent it. | Team addresses where the customer deals with "the team", such as support or billing |
| Send on Behalf | The list and you. In Outlook it reads Your Name on behalf of Contoso Support. | Cases where the recipient should know who wrote it, such as an assistant writing for a department |
If an admin grants you both, Send As is the one that applies.
Step 1: Start a New Message
Sign in to Outlook on the web and select New mail at the top left. A blank message opens.
The same steps work when you reply to or forward a message — the From field is available on the Options tab of any message you are writing. That matters for a support address, where you usually start by replying to a customer rather than writing from scratch.
Step 2: Show the From Field
The From line is hidden by default, because most people only ever send as themselves. In the new message, select the Options tab on the ribbon. In the Show fields group, tick Show From.
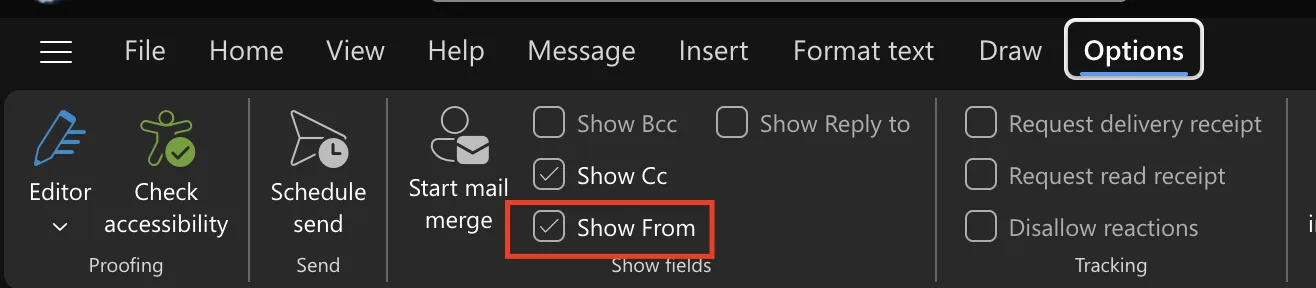
A From field appears next to the Send button, with your own address in it.
If you send from the list regularly, make the field permanent instead of ticking the box each time: select Settings (the gear icon at the top right), then Mail → Compose and reply, tick Always show From, and select Save. Reports differ on whether the ribbon checkbox sticks for future messages; this setting does.
Step 3: Choose the Distribution List as the Sender
Select From (or the small arrow next to it). The drop-down shows your own address and an Other email address… option. Choose Other email address…, and the From line turns into a text box.
Start typing the distribution list's address. You rarely need all of it: typing support@ was enough for Outlook to suggest the support list, with its display name and full address. Select the suggestion.

The suggestions come from your organization's Global Address List — the company-wide directory of every person and group, which Outlook searches as you type. Picking the list from there, rather than typing out the whole address, means the address is spelled exactly as the directory has it, so a typo cannot slip into the From line.
Step 4: Write and Send the Message
The From line now shows the list's address instead of yours. Add your recipients in To and Cc, write a subject and the message as usual, and select Send.
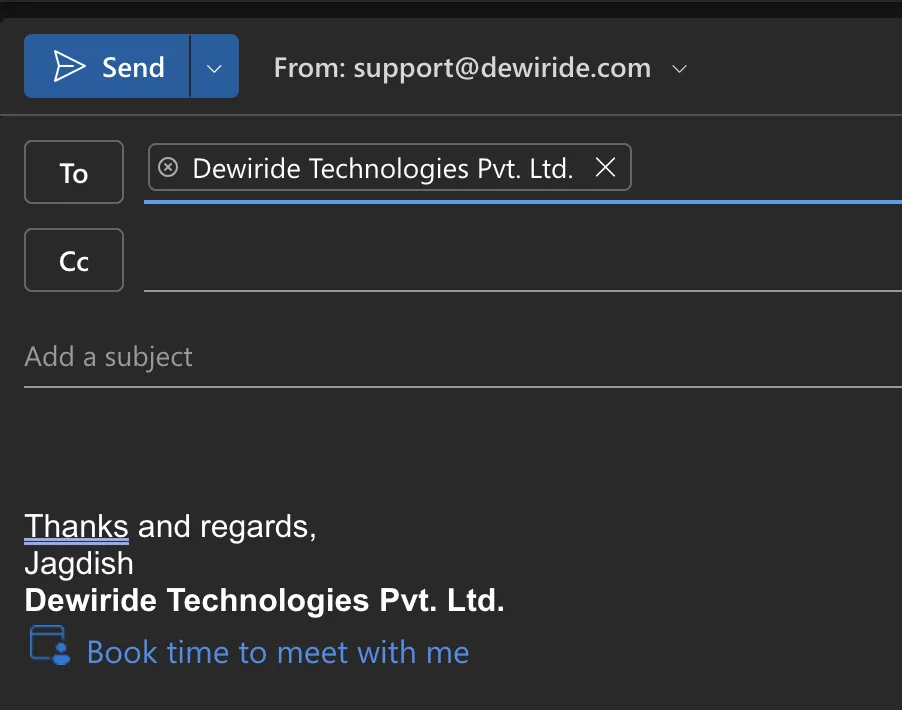
Look at the bottom of that screenshot: Outlook still added the sender's personal signature. It does not know you are writing as the team. On a support address a personal sign-off is often fine, since customers like knowing who helped them. If your team prefers a neutral one, create a second signature under Settings → Accounts → Signatures (you can keep several), and switch to it in any message from the Message tab → Signature.
Once the list is in your From drop-down, it is one click away — which also makes it easy to pick by mistake. Glance at the From line before you select Send. A personal note sent from the team address, or a team reply sent from your own, is the most common slip.
What Happens After You Send
- The recipient sees the list, not you — or you on behalf of the list, if your permission is Send on Behalf.
- Replies go to the list. When the recipient selects Reply, the answer goes to the list's address, and the list copies it to every member, including you if you are one. That is the point of a team address, but it also means two teammates can answer the same customer. Agree on who owns a conversation.
- Your copy is in your own Sent Items. The list has no mailbox, so there is no shared Sent Items folder where the rest of the team can see what went out. If they need a record, add the list itself on Cc or Bcc — every member then gets a copy of what you sent.
- Next time is quicker. Outlook remembers the address: the list now appears in your From drop-down, so you can pick it directly without going through Other email address… again.
A distribution list accepts mail only from people inside your organization unless an admin changes it — that is Exchange Online's default. If you send as the list to a customer and nobody has changed that setting, the customer's reply is rejected with a bounce (error 550 5.7.133) and never reaches your team. Before you use a list to email anyone outside the company, ask your admin to allow messages from people inside and outside the organization on that list — Step 6 of the setup guide shows the option.
Common Mistakes
| Mistake | What happens | Do this instead |
|---|---|---|
| Putting the list's address in To instead of From | The message goes to every member of the list instead of coming from it | Put the list in From and the customer in To |
| Assuming list membership is enough | The message bounces back with a permission error | Ask an admin for Send As or Send on Behalf on the list |
| Trying to send from a contact list in People | Not possible — a contact list is only a saved set of recipients | Use an organization distribution list created by an admin |
| Leaving the list in From for a personal email | A private message goes out under the team's name | Check the From line before every send |
| Expecting teammates to see what you sent | They cannot — it is only in your own Sent Items | Cc or Bcc the list, or use a shared mailbox if the team needs a shared history |
| Emailing customers from a list that only accepts internal mail | Customer replies bounce with 550 5.7.133 | Ask your admin to allow senders from outside the organization on the list |
Troubleshooting
| Symptom | Likely cause | Fix |
|---|---|---|
| You cannot find Show From on the ribbon | The Options tab only appears while you are writing a message, and a compact ribbon shows fewer controls | Open a message for editing and select Options — or skip the ribbon and turn on Always show From in Settings → Mail → Compose and reply |
| The list does not appear in the suggestions | It is hidden from the address list, or it was created very recently and has not reached the directory yet | Type the full address; if that fails, ask your admin whether the list is hidden from address lists |
An "Undeliverable" bounce saying you do not have permission to send on behalf of the specified user (the details may mention SendAsDenied) | You have neither Send As nor Send on Behalf on the list, or it was granted very recently | Ask your admin to check the list's delegates. Permission changes can take a while to reach every part of Exchange Online, so if yours was just granted, wait and try again |
| The recipient sees "Your Name on behalf of Contoso Support", but you wanted only the list | Your permission is Send on Behalf, not Send As | Ask your admin to grant Send As instead |
A customer says their reply bounced with 550 5.7.133 | The list accepts mail from inside the organization only — the default | Admin: in the list's delivery management settings, allow messages from people inside and outside the organization |
| Sending as the list works in Outlook on the web but fails in classic Outlook for Windows | Classic Outlook's offline copy of the address book is out of date | In classic Outlook select Send / Receive → Send/Receive Groups → Download Address Book, then pick the list from the address book instead of typing its address |
FAQ
Can I send from a distribution list if I am only a member?
No. Membership controls who receives the list's mail, not who can send as it. You need Send As or Send on Behalf on the list, granted by an admin. Without it, Outlook lets you write the message, but it comes back as undeliverable with a permission error.
What is the difference between Send As and Send on Behalf?
With Send As, the recipient sees only the list — nothing shows which teammate sent the message. With Send on Behalf, they see your name on behalf of the list. The steps in Outlook are the same for both; the permission your admin granted decides the result, and if you have both, Send As applies.
Can replies come to me instead of the whole list?
Yes. On the same Options tab, tick Show Reply to and enter your own address in the reply-to line that appears. The message still comes from the list, but when the recipient selects Reply, the answer goes to the address you entered instead of to every member.
Why can't my teammates see the message I sent from the distribution list?
A distribution list has no mailbox, so it has no Sent Items folder. Your copy is saved in your own Sent Items, where only you can see it. To give the team a record, add the list on Cc or Bcc, or have your admin use a shared mailbox for the team address instead.
Should a team address be a distribution list or a shared mailbox?
It depends on how the team works. A distribution list copies each message into every member's own inbox and keeps no history of its own — simple, and good when the aim is that everyone receives the mail. A shared mailbox has its own inbox and Sent Items that everyone with access opens together, so the team can see who answered what. For a busy support address where several people reply to customers, a shared mailbox is usually the better fit.
Does this work in the new Outlook for Windows?
Yes. The new Outlook for Windows uses the same message window as Outlook on the web: Options → Show From, then From → Other email address…, then pick the list.
How do I send from a distribution list in classic Outlook for Windows?
Select New Email. If you do not see a From button, go to the Options tab and select From in the Show Fields group. Then select From → Other E-mail Address…, type the list's address or pick it from the address book, and select OK. The same Send As or Send on Behalf permission is needed.
Can I send as a distribution list from code?
Yes, through Microsoft Graph. An app signed in as a user, with the delegated Mail.Send.Shared permission, can set the message's from to the list's address — provided that user has Send As or Send on Behalf on the list. Microsoft's guide to sending mail from another user covers the details, including the error you get without permission.
How do I make the From field show on every new message?
Select Settings → Mail → Compose and reply, tick Always show From, and select Save. The Show From checkbox on the Options tab only guarantees it for the message you are writing.
Conclusion
Sending from a distribution list in Outlook on the web comes down to one hidden field: tick Show From on the Options tab, choose Other email address…, pick the list from the suggestions, and send. What makes it succeed happens beforehand — an admin has to grant you Send As or Send on Behalf, and that choice decides whether recipients see the team, or you on behalf of the team.
After you send, remember what a distribution list is: an address with no mailbox. Replies go out to every member, your sent copy stays in your own Sent Items, and unless an admin changes the default, people outside your organization cannot reply to it at all. Settle the permission and the external-sender setting with your admin once, and the team address behaves the way your customers expect.
Additional Resources
- How to Create a Distribution List and Grant Send As Permission in Microsoft 365 — the admin side of this post: creating the list, allowing outside senders and granting Send As.
- Send email as a distribution list — Microsoft's own steps for Outlook and Outlook on the web.
- Create and manage distribution lists in Exchange Online — the admin side: delegates (Send As and Send on Behalf) and the sender options that decide who can email the list.
- Send Outlook messages from another user — how the two permissions look in Microsoft Graph, and why a distribution list has no Sent Items.
- Fix NDR error "550 5.7.133" in Exchange Online — what an admin changes when people outside the organization cannot email a group.
- How to add and change an email signature in Outlook — setting up a second, team signature.
- Search for users (V2) Example in Power Automate — another Microsoft 365 walkthrough on this site.
