How to Expose an API Scope in Microsoft Entra ID

A registered API still can't be asked for a token: apps need a name to ask for and a permission to ask with. Both live on the registration's Expose an API page. This guide sets the API's Application ID URI and adds its first scope in the Microsoft Entra admin center, then does the same with the Azure CLI.
What a Scope Is
A scope is a permission your API defines, such as call this API as the signed-in user. An app that wants to call your API asks Microsoft Entra ID for a token with that scope, and the token lists the scopes it was granted in its scp claim. Your API checks the claim on every request, and does only what the token allows. Scopes of this kind are delegated permissions: the app acts for a signed-in person, never on its own.
The scope's full name joins two things:
| Part | Example | What it is |
|---|---|---|
| Application ID URI | api://22222222-2222-2222-2222-222222222222 | The API's name in tokens. Every token for the API carries it as its audience, the aud claim |
| Scope name | access_as_user | The permission |
| Full scope | api://22222222-2222-2222-2222-222222222222/access_as_user | What an app asks for |
The examples on this page expose a scope on a registration called Dewiride Service Desk API. If your API isn't registered yet, start with How to Register a Web API in Microsoft Entra ID.
Prerequisites
- Permission to change the API's registration: you're listed under its Owners, or you have a role such as Cloud Application Administrator.
- For the Azure CLI route: the Azure CLI signed in to the API's tenant (
az login).
Step 1: Open Expose an API
In the Microsoft Entra admin center, browse to Entra ID > App registrations and open your API's registration. Under Manage, select Expose an API. On a new registration, all three parts of the page are empty:
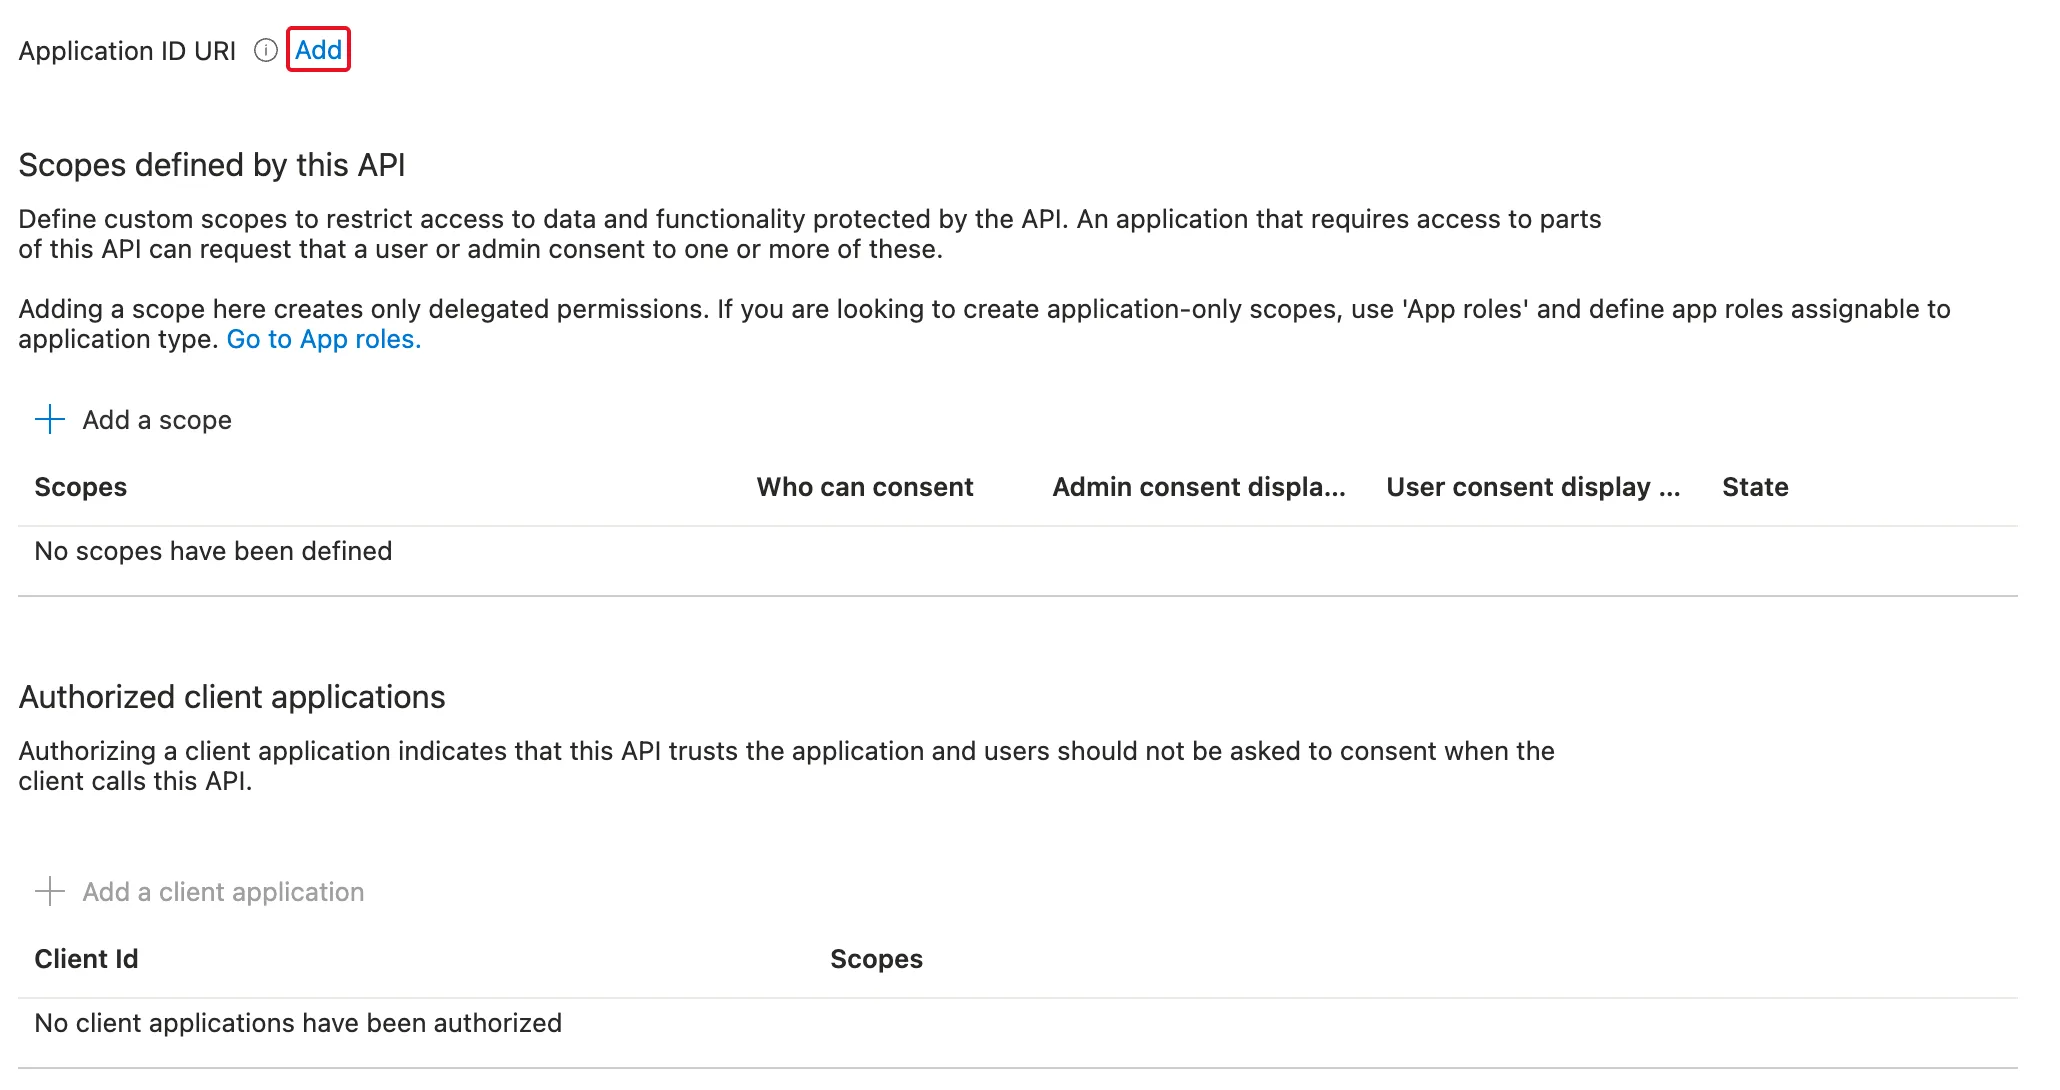
Add a client application is dimmed: a client app can only be authorized for a scope, and there is none yet.
Step 2: Set the Application ID URI
Select Add next to Application ID URI. The portal proposes api:// followed by the registration's client ID:
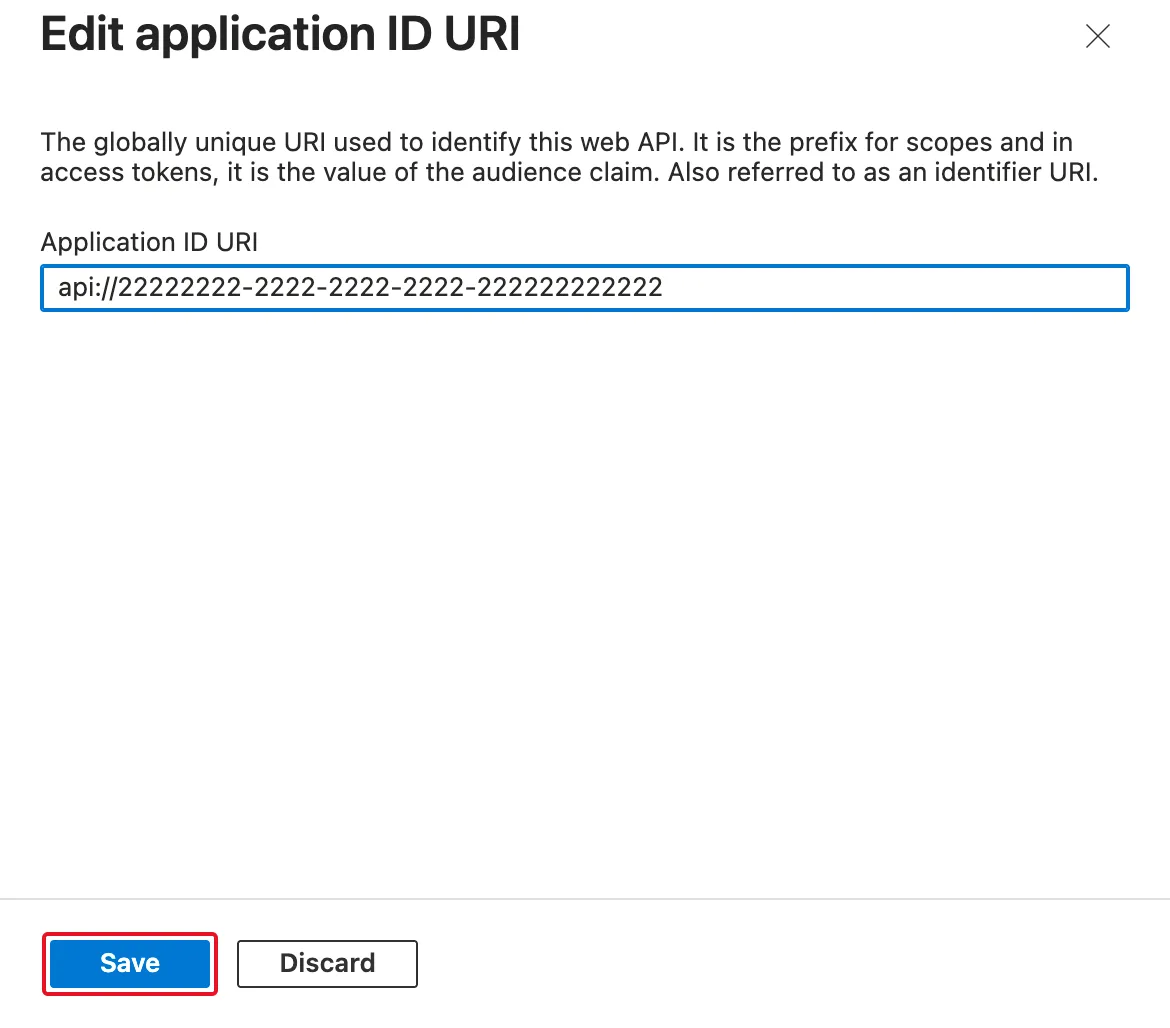
The panel says what the URI is for: it's the prefix for scopes and in access tokens, it is the value of the audience claim. Keep the proposed value and select Save. It's unique by construction, and Microsoft's guide says an Application ID URI must be globally unique. You can choose a readable one instead, such as https://contoso.com/api, but then your API's code must be told to accept it: in an ASP.NET Core API that uses Microsoft.Identity.Web, that's an extra Audience setting the default URI doesn't need.
Step 3: Add a Scope
Select Add a scope and fill in the panel:
| Field | Value | What it's for |
|---|---|---|
| Scope name | access_as_user | The permission's name in tokens. No spaces; at most 120 characters |
| Who can consent? | Admins and users | Whether people may agree to it for themselves, or only an administrator, for everyone |
| Admin consent display name | Access the Dewiride Service Desk API as a user | The title administrators see when they consent for the whole organization |
| Admin consent description | Allows the app to call the Dewiride Service Desk API on behalf of the signed-in user. | The longer text administrators see |
| User consent display name | Access the Dewiride Service Desk API as you | The title people see when they consent for themselves |
| User consent description | Allows the app to call the Dewiride Service Desk API on your behalf. | The longer text people see |
| State | Enabled | Whether apps can ask for the scope |
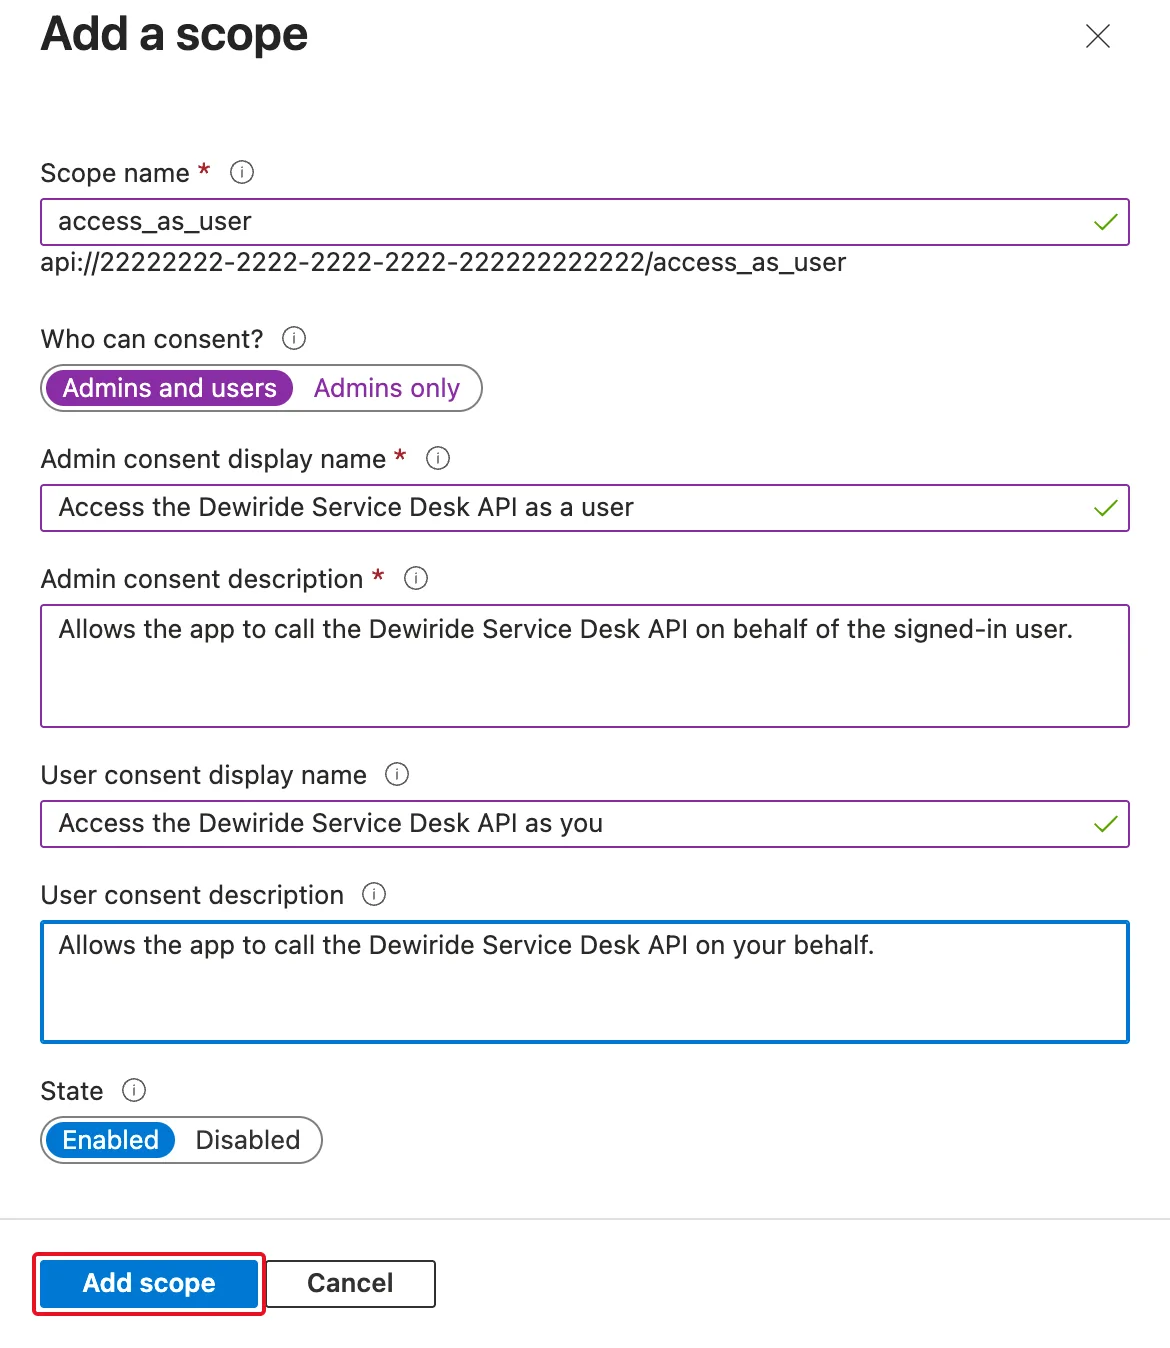
Below the name, the panel shows the full scope as you type: api://<client ID>/access_as_user. That is the string apps ask for.
Who can consent? decides who may say yes when an app asks for the scope. Microsoft recommends Admins only for higher-privileged permissions. With Admins and users, people can agree for themselves, if your organization's consent settings allow it; the user consent texts appear only then. access_as_user lets an app do only what the signed-in person could do anyway, so Admins and users fits. The name follows a common convention for an API's main delegated permission; Microsoft's guide also suggests resource.operation.constraint names, such as Employees.Read.All, when an API has several.
Select Add scope. The page now shows the URI and the scope:
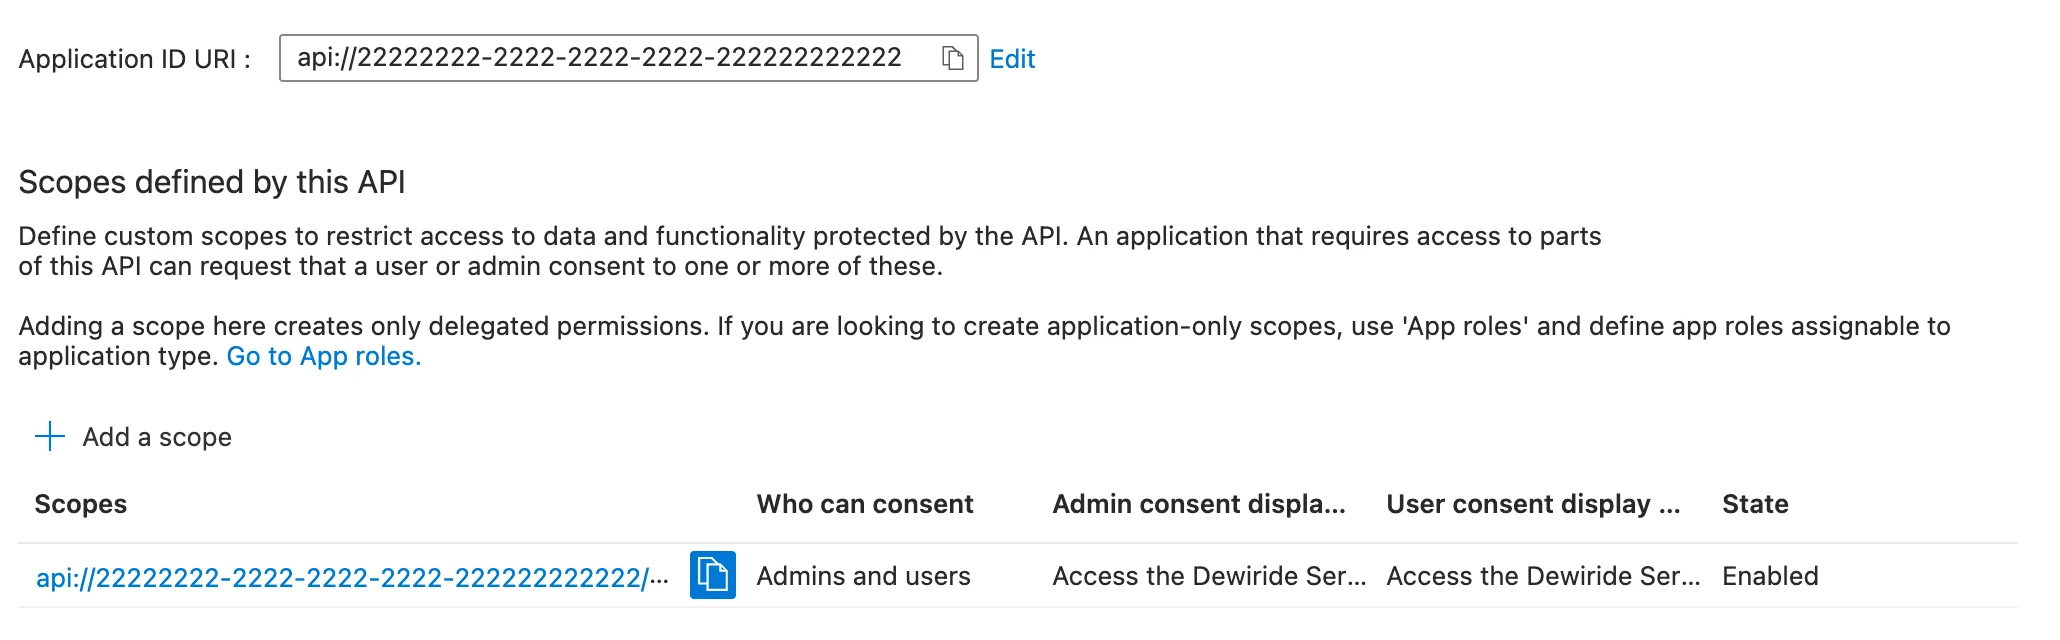
Apps can now ask for the scope. Two things decide whether someone is asked to consent when they do: the app's own registration lists the permission (How to Add an API Permission to an App Registration in Microsoft Entra ID), and the API can trust apps you choose so their users are never asked (How to Pre-Authorize a Client Application for Your API in Microsoft Entra ID).
Do It with the Azure CLI
The examples below work on a registration called My Web API. First, keep its client ID in a variable:
- macOS / Linux
- Windows (PowerShell)
API_APP_ID=$(az ad app list --display-name "My Web API" --query "[0].appId" --output tsv)
$apiAppId = az ad app list --display-name "My Web API" --query "[0].appId" --output tsv
Set the Application ID URI
az ad app update sets it, and prints nothing when it succeeds:
- macOS / Linux
- Windows (PowerShell)
az ad app update --id $API_APP_ID --identifier-uris "api://$API_APP_ID"
az ad app update --id $apiAppId --identifier-uris "api://$apiAppId"
Add the Scope
az ad app has no option for scopes, so this step goes to Microsoft Graph, the API behind the admin center, with az rest. A scope needs an ID of its own, a new GUID that you make up. The commands below create one, write the scope into a file named api.json, and send the file:
- macOS / Linux
- Windows (PowerShell)
SCOPE_ID=$(uuidgen)
cat > api.json <<EOF
{
  "api": {
    "oauth2PermissionScopes": [
      {
        "id": "$SCOPE_ID",
        "value": "access_as_user",
        "type": "User",
        "isEnabled": true,
        "adminConsentDisplayName": "Access My Web API as a user",
        "adminConsentDescription": "Allows the app to call My Web API on behalf of the signed-in user.",
        "userConsentDisplayName": "Access My Web API as you",
        "userConsentDescription": "Allows the app to call My Web API on your behalf."
      }
    ]
  }
}
EOF
az rest --method PATCH --uri "https://graph.microsoft.com/v1.0/applications(appId='$API_APP_ID')" --body @api.json
$scopeId = [guid]::NewGuid().Guid
@"
{
  "api": {
    "oauth2PermissionScopes": [
      {
        "id": "$scopeId",
        "value": "access_as_user",
        "type": "User",
        "isEnabled": true,
        "adminConsentDisplayName": "Access My Web API as a user",
        "adminConsentDescription": "Allows the app to call My Web API on behalf of the signed-in user.",
        "userConsentDisplayName": "Access My Web API as you",
        "userConsentDescription": "Allows the app to call My Web API on your behalf."
      }
    ]
  }
}
"@ | Set-Content api.json
az rest --method PATCH --uri "https://graph.microsoft.com/v1.0/applications(appId='$apiAppId')" --body "@api.json"
az rest prints nothing when the update works. The file's fields are the panel's fields under their Microsoft Graph names:
Field in api.json | In the admin center |
|---|---|
id | Not shown: the scope's own ID, which other apps' registrations refer to |
value | Scope name |
type | Who can consent?: User is Admins and users, Admin is Admins only |
isEnabled | State |
The four …ConsentDisplayName and …ConsentDescription fields | The four consent texts |
uuidgen prints the GUID in capitals on macOS; Microsoft Graph accepted it and stored it in lowercase. Check the result:
- macOS / Linux
- Windows (PowerShell)
az ad app show --id $API_APP_ID --query "{identifierUris:identifierUris, scopes:api.oauth2PermissionScopes[].{id:id, value:value, type:type, isEnabled:isEnabled}}"
az ad app show --id $apiAppId --query "{identifierUris:identifierUris, scopes:api.oauth2PermissionScopes[].{id:id, value:value, type:type, isEnabled:isEnabled}}"
{
  "identifierUris": [
    "api://44444444-4444-4444-4444-444444444444"
  ],
  "scopes": [
    {
      "id": "66666666-6666-6666-6666-666666666666",
      "isEnabled": true,
      "type": "User",
      "value": "access_as_user"
    }
  ]
}
api.json holds nothing secret; delete it or keep it with your other setup scripts.
Common Mistakes
| Mistake | What happens | Do this instead |
|---|---|---|
| Changing the Application ID URI after apps use it | Apps asking for the old full scope get no token, and the API refuses tokens with the old audience | Choose the URI once. Keep the proposed api://<client ID> unless you need a readable one |
Asking for the scope name alone, access_as_user | The request doesn't name your API, so it can't get a token for it | Ask for the full scope, api://<client ID>/access_as_user |
| Admins only on a scope people should consent to themselves | People can't agree to it for themselves: an administrator has to consent for the whole organization first | Admins and users for permissions that only act as the signed-in person |
| Removing an enabled scope in one step | Microsoft Graph requires a scope to be disabled before it's removed | First set isEnabled to false, then remove the scope in a second update. Keep the scope's id whenever you only change its texts |
Troubleshooting
| Symptom | Likely cause | Fix |
|---|---|---|
| Add a client application is dimmed | The API has no scope yet | Add a scope first |
An app gets a token, but the API answers 401 | The token's audience isn't the Application ID URI your API expects | Check that the app asks for the full scope, and that the API's settings match the URI |
The API answers 403 Forbidden | The token doesn't carry the scope the API requires | Ask for the exact full scope the API checks for |
FAQ
What's the difference between a scope and an app role?
A scope is a delegated permission: an app acts for a signed-in person. An app role can also be granted to an application that runs on its own, without anyone signed in. The Expose an API page creates scopes only; app roles have their own page, App roles.
How many scopes should an API have?
As few as it needs. One scope that lets an app act as the signed-in person suits most APIs used by their own apps. Add more when different apps should be able to do different things.
Do people see the consent texts?
Only when someone is asked to consent. When an API pre-authorizes an app, its users are never asked, so they never see them.
Conclusion
The Expose an API page turns a registered API into one apps can ask for. Set the Application ID URI, keeping the proposed api://<client ID>, and add a scope such as access_as_user that Admins and users can consent to. Apps then ask for the full scope, api://<client ID>/access_as_user, and your API checks the token's scp claim. With the Azure CLI, az ad app update sets the URI, and az rest adds the scope through Microsoft Graph.
Additional Resources
- Configure an application to expose a web API — Microsoft's guide to the page.
- permissionScope resource type — every field of a scope in Microsoft Graph.
- az rest — calling Microsoft Graph from the Azure CLI.
Related
- How to Register a Web API in Microsoft Entra ID
- How to Pre-Authorize a Client Application for Your API in Microsoft Entra ID
- How to Add an API Permission to an App Registration in Microsoft Entra ID
- How to Get an Access Token for Your Own API with the Azure CLI
- How to Protect an ASP.NET Core Minimal API with Microsoft.Identity.Web
