How to Enable Word Wrap in Visual Studio (Step-by-Step)

Word wrap makes long lines in Visual Studio continue onto the next line instead of disappearing off the right edge of the editor. You can toggle it in one keystroke, or set it permanently in Tools > Options — and there is one setting that catches almost everybody out.
Introduction
By default, Visual Studio does not wrap long lines. A 200-character string, a deeply nested LINQ chain, or a long comment simply runs off the side of the window and you scroll horizontally to read it. Word wrap turns that off: the line continues on the next display line, the horizontal scrollbar stops being your main navigation tool, and everything stays visible.
In this guide you will learn how to:
- Toggle word wrap instantly with the Ctrl+E, Ctrl+W keyboard shortcut.
- Turn word wrap on permanently for all languages through Tools > Options.
- Turn it on for one language only, such as C# or Visual Basic.
- Understand why the all-languages setting does not apply to some languages — the single most common reason people think word wrap is broken.
- Control the return-arrow indicators and the indentation of wrapped lines.
This guide is about Visual Studio, the full IDE on Windows. If you are looking for the editor with the blue infinity-style icon, that is a different product — see How to Enable Word Wrap in VS Code instead. The two use completely different settings.
Prerequisites
- Visual Studio installed on Windows — any edition (Community, Professional, or Enterprise).
- A file open in the editor. Some of the settings below are only meaningful with a document open, and the keyboard shortcut does nothing without one.
What Word Wrap Actually Does
When word wrap is off, each line of code occupies exactly one display line, however long it is. When word wrap is on, any part of a line that extends past the visible width of the editor is displayed on the next line down.
Two things are worth knowing before you turn it on:
- The wrapped portion is a display-only change. Visual Studio does not insert line breaks into your file, and nothing about the saved bytes changes.
- Word wrap and virtual space are mutually exclusive. Visual Studio turns virtual space off while word wrap is on, so if you rely on clicking past the end of a line to place trailing comments, that behaviour stops.
Step 1: Toggle Word Wrap with the Keyboard Shortcut
The fastest way is the built-in shortcut. With a file open in the editor, press:
Ctrl+E, Ctrl+W
That is a chord — hold Ctrl and press E, then still holding Ctrl press W. It is not two separate shortcuts, and pressing Ctrl+E on its own will appear to do nothing while Visual Studio waits for the second key.
The command behind it is Edit.ToggleWordWrap. If the chord does not work, another extension may have claimed it — you can check and reassign it under Tools > Options > Environment > Keyboard by searching for that command name.
This toggle applies to the editor immediately, but it is a session-level switch. To make word wrap the permanent default, use the Options dialog below.
Step 2: Open Tools > Options
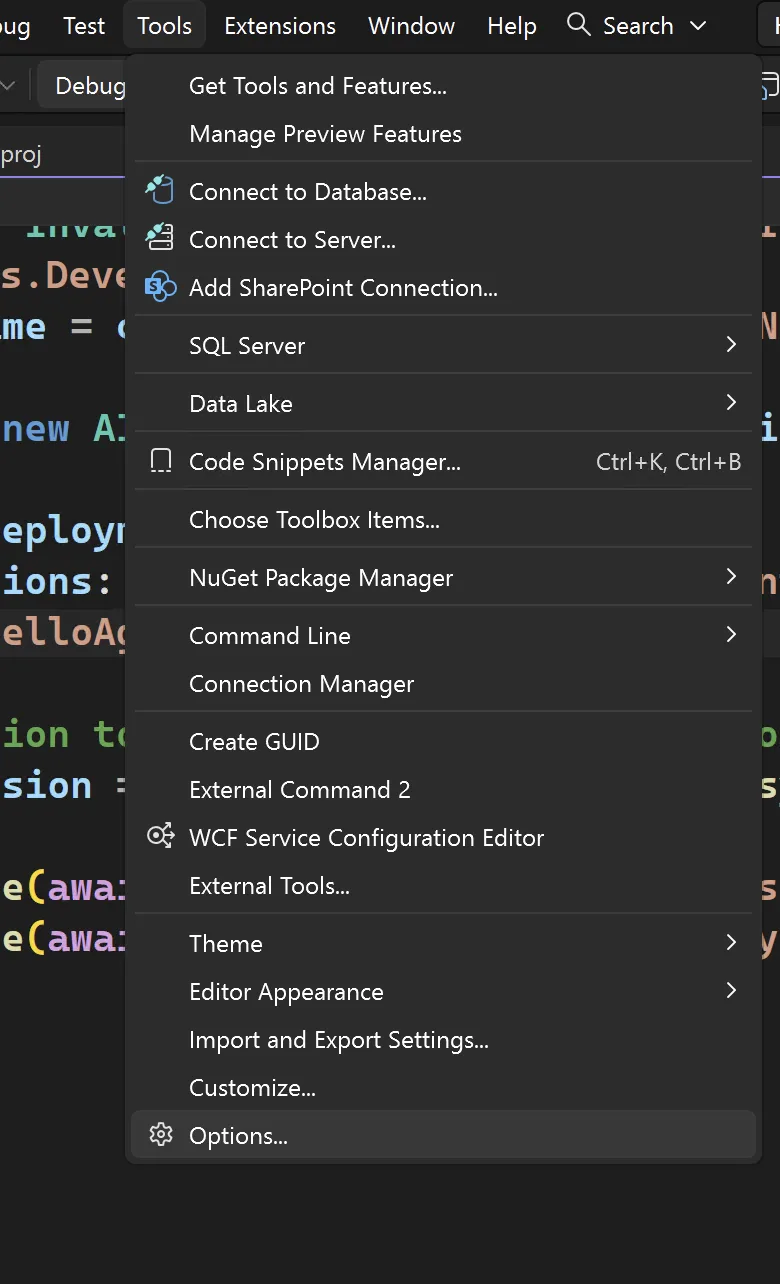
On the Visual Studio menu bar, select Tools, then Options at the bottom of the menu.
The Options dialog is where every editor preference lives. It is a large tree, so rather than hunting through it, use the search box in the top-left corner — that is what the next step does.
Step 3: Turn On Word Wrap for All Languages
In the Options search box, type word wrap. Visual Studio filters the tree to matching pages. Expand Languages > Defaults > General and tick the Word wrap checkbox.

The full path, if you prefer to navigate rather than search, is:
Tools > Options > All Settings > Languages > Defaults > General > Word wrap
Notice that Show visual glyphs for word wrap became ticked at the same time. Visual Studio enables it automatically whenever you turn word wrap on. It draws a small return-arrow at the point where a line wraps, so you can tell a wrapped line from a real newline at a glance. The arrows are display-only — they are never added to your code and they do not print. Clear the checkbox if you find them noisy.
The Defaults page sets the baseline for every language at once. Changing an option here resets the corresponding General option in all languages. If you have previously customised word wrap for one specific language, that customisation is overwritten.
Step 4: Turn On Word Wrap for a Single Language
If you only want wrapping in, say, C# files and not everywhere, set it on that language instead of on Defaults:
Tools > Options > All Settings > Languages > C# > General > Word wrap
Swap C# for Visual Basic, Python, XAML, or whichever language you are targeting. Each language page carries its own copy of the General options, and the per-language value wins over the Defaults value.
In the Options tree, a greyed-out checkmark on the Defaults page means the option is on for some languages but not others. It is a mixed state, not a bug — it is telling you that per-language overrides exist.
Why Word Wrap Sometimes Appears Not to Work
This is the part that trips people up, and it is visible right in the screenshot above. Under the two checkboxes, Visual Studio prints this note:
Not applied to Visual Basic, C#, CSS, F#, HTML, JSON, LESS, Plain Text, Razor (ASP.NET Core), Rest, SCSS, SQL Server Tools, T-SQL90, ASP.NET Web Forms, XAML, or YAML because those languages have different default values.
Read that carefully, because it explains the most common complaint about this feature. You tick Word wrap on the Defaults page, you go back to your C# file, and nothing wraps. The setting did apply — just not to C#, because C# ships with its own default value and therefore ignores the Defaults page.
The fix is Step 4: set word wrap on the specific language page. The exact list of exempt languages varies by Visual Studio version and by which workloads you have installed, so trust the note in your own Options dialog over any list published elsewhere, including this one.
Control the Indentation of Wrapped Lines
Starting with Visual Studio 2022 version 17.13, you can choose whether a wrapped line is indented to line up with the line it continues from, or starts flush at the left margin. The setting is:
Tools > Options > All Settings > Text Editor > General > Display > Automatically indent when word wrap is enabled
It is enabled by default. Indented wrapping usually reads better for code because the continuation visually belongs to its parent line. Clear it if you prefer wrapped lines hard against the margin, which some people find easier to scan in long string literals.
Visual Studio 2022 and Earlier: The Text Editor Path
The Options dialog was reorganised in recent Visual Studio releases. The screenshots above show the current layout, where language settings live under All Settings > Languages. On Visual Studio 2022 and earlier, the same settings sit under Text Editor:
| Goal | Visual Studio 2022 and earlier |
|---|---|
| All languages | Tools > Options > Text Editor > All Languages > General > Word wrap |
| One language | Tools > Options > Text Editor > C# > General > Word wrap |
| Wrap indentation (17.13+) | Tools > Options > Text Editor > General > Display > Automatically indent when word wrap is enabled |
The keyboard shortcut, Ctrl+E, Ctrl+W, is the same in every version. On the older dialog you also need to click OK to commit the change; the current settings pane saves as you go.
Common Mistakes
| Mistake | What happens | Fix |
|---|---|---|
Pressing Ctrl+E and Ctrl+W as separate shortcuts | Nothing wraps; Visual Studio is waiting for the second key of the chord | Hold Ctrl down for both keys: Ctrl+E, Ctrl+W |
| Setting word wrap on Defaults and expecting it everywhere | Languages with their own default values ignore it | Set it on the specific language page instead |
| Expecting wrapping to change the file | It never does — wrapping is display-only | Use a formatter or an editorconfig max_line_length rule if you want real line breaks |
Looking for VS Code's editor.wordWrap in Visual Studio | There is no such setting; they are different products | Use Tools > Options, or see the VS Code guide |
| Changing Defaults after customising one language | The per-language customisation is silently reset | Re-apply the per-language setting afterwards |
Troubleshooting
| Symptom | Likely cause | What to do |
|---|---|---|
| Word wrap is ticked but C# still does not wrap | C# has its own default value and ignores the Defaults page | Tick Word wrap under Languages > C# > General |
The Ctrl+E, Ctrl+W chord does nothing | No document is open, or an extension has rebound the chord | Open a file; check Tools > Options > Environment > Keyboard for Edit.ToggleWordWrap |
| Return arrows appear at the end of wrapped lines | Show visual glyphs for word wrap was auto-enabled with word wrap | Clear that checkbox — it is directly under the Word wrap option |
| Wrapped lines are indented and you do not want that | Automatically indent when word wrap is enabled is on by default (17.13+) | Clear it under Text Editor > General > Display |
| Clicking past the end of a line no longer works | Virtual space is disabled while word wrap is on | Turn word wrap off if you need virtual space; the two cannot both be active |
| The setting reverts after restarting | Settings sync is pulling an older value from another machine | Check the Sync control at the top of the Options pane |
Frequently Asked Questions
What is the keyboard shortcut for word wrap in Visual Studio?
Ctrl+E, Ctrl+W, pressed as a chord — hold Ctrl, press E, then press W. The underlying command is Edit.ToggleWordWrap, and you can rebind it under Tools > Options > Environment > Keyboard.
Does word wrap change my source file?
No. Word wrap only affects how lines are drawn on screen. No characters are inserted, the file on disk is untouched, and your version control diff stays empty. If you want lines physically broken, that is a job for a code formatter or an .editorconfig rule.
Why does word wrap work in one file type but not another?
Because word wrap is a per-language setting, and several languages ship with their own default that overrides the shared Defaults page. Your Options dialog lists exactly which ones on the Defaults > General page. Set the option on the individual language page to force it.
Is this the same as word wrap in VS Code?
No. Visual Studio and Visual Studio Code are separate products with separate settings systems. VS Code uses an editor.wordWrap setting in JSON and the Alt+Z shortcut; Visual Studio uses the Options dialog and Ctrl+E, Ctrl+W. The VS Code guide covers that side.
Can I turn off the little arrows at the end of wrapped lines?
Yes. They come from Show visual glyphs for word wrap, which Visual Studio ticks automatically when you enable word wrap. Clear that checkbox and the arrows disappear while wrapping stays on.
Does word wrap affect printing?
No. Neither the wrapping nor the return-arrow glyphs are included when you print from Visual Studio — both are screen-only.
Conclusion
Word wrap in Visual Studio is a one-keystroke toggle and a two-click permanent setting, but its per-language behaviour is what makes it feel unreliable. If you remember one thing from this guide, make it this: the Defaults page does not govern languages that carry their own default value, and the Options dialog tells you exactly which ones those are.
Use Ctrl+E, Ctrl+W when you just need to read one long line, and set the option under Languages > <your language> > General when you want it to stick.
Additional Resources
- Manage word wrap in the editor — Microsoft's reference page, including known differences from other editors.
- Customize language options in the Text Editor — every option on the General page explained.
- Keyboard shortcuts in Visual Studio — the full command and shortcut reference.
- How to Enable Word Wrap in VS Code — the same task in Visual Studio Code.
