How to Create a Distribution List and Grant Send As Permission in Microsoft 365

A team address like support@ is usually a distribution list — and creating the list is only half the job. Until someone has Send As permission on it, the team can receive mail at that address but cannot reply from it, and that permission lives in a different admin center from the one where you create the list.
What You Will Build
In this guide you will set up a team address from scratch, as an admin:
- Create a distribution list —
support@contoso.comin the examples — in the Microsoft 365 admin center, with an owner, a member, and permission for people outside your organization to email it. - Grant a teammate Send As permission on the list in the Exchange admin center, so they can send email that comes from the list instead of from themselves.
This is the admin half of a two-part setup. Once it is done, the person you gave permission follows How to Send Email from a Distribution List in Outlook on the Web to actually send from it.
A distribution list (Microsoft also calls it a distribution group) is an email address that copies every message it receives to a list of people. It has no mailbox of its own: nothing to sign in to, no shared inbox, no Sent Items folder. It is the simplest way to give a team one address.
Why two admin centers? The Microsoft 365 admin center is the general console for users, licenses and groups. It creates lists quickly but only shows their basic settings. The Exchange admin center is the email-specific console, and that is where delegate permissions such as Send As live. You will use the first to create the list, then follow its own link into the second.
Prerequisites
- An admin account with the Exchange Administrator role. It covers both halves of this guide: managing groups, and setting up Send As and Send on Behalf delegates. Global Administrator works too, but Microsoft recommends keeping that highly privileged role for emergencies and using the least-privileged role that does the job — here, Exchange Administrator.
- The people you will add must already exist in your organization: the owner and the teammate who will send as the list need Microsoft 365 accounts, and members can be accounts or contacts.
- At least one email domain added to your organization, such as
contoso.com. If you have several, you will choose which one the list uses.
Nothing here costs extra. Distribution lists do not use a license, so creating one adds nothing to your bill.
Step 1: Open Teams & Groups in the Microsoft 365 Admin Center
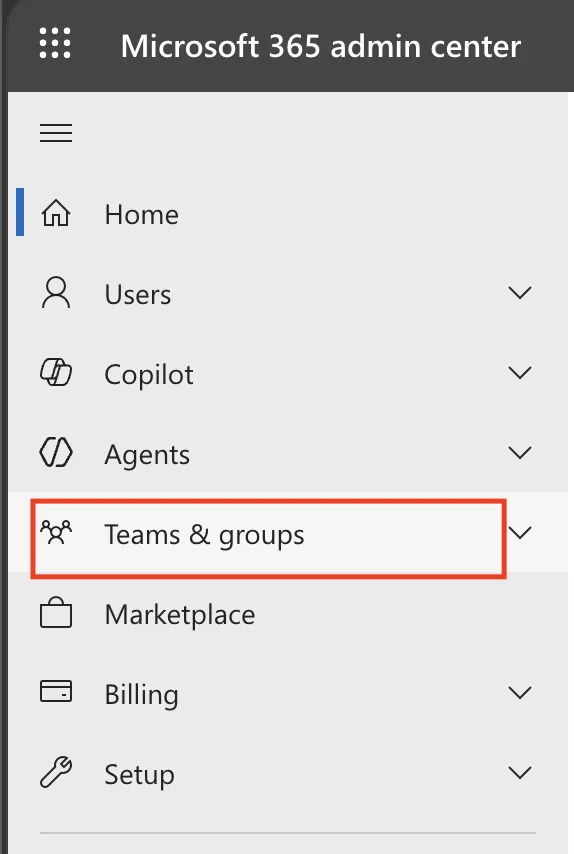
Sign in to the Microsoft 365 admin center with your admin account and select Teams & groups in the left-hand navigation. If it is not in the menu, select … Show all at the bottom to reveal every section.
Step 2: Start a New Distribution List
Under Teams & groups, select Active teams & groups, open the Distribution list tab, and select Add a distribution list.
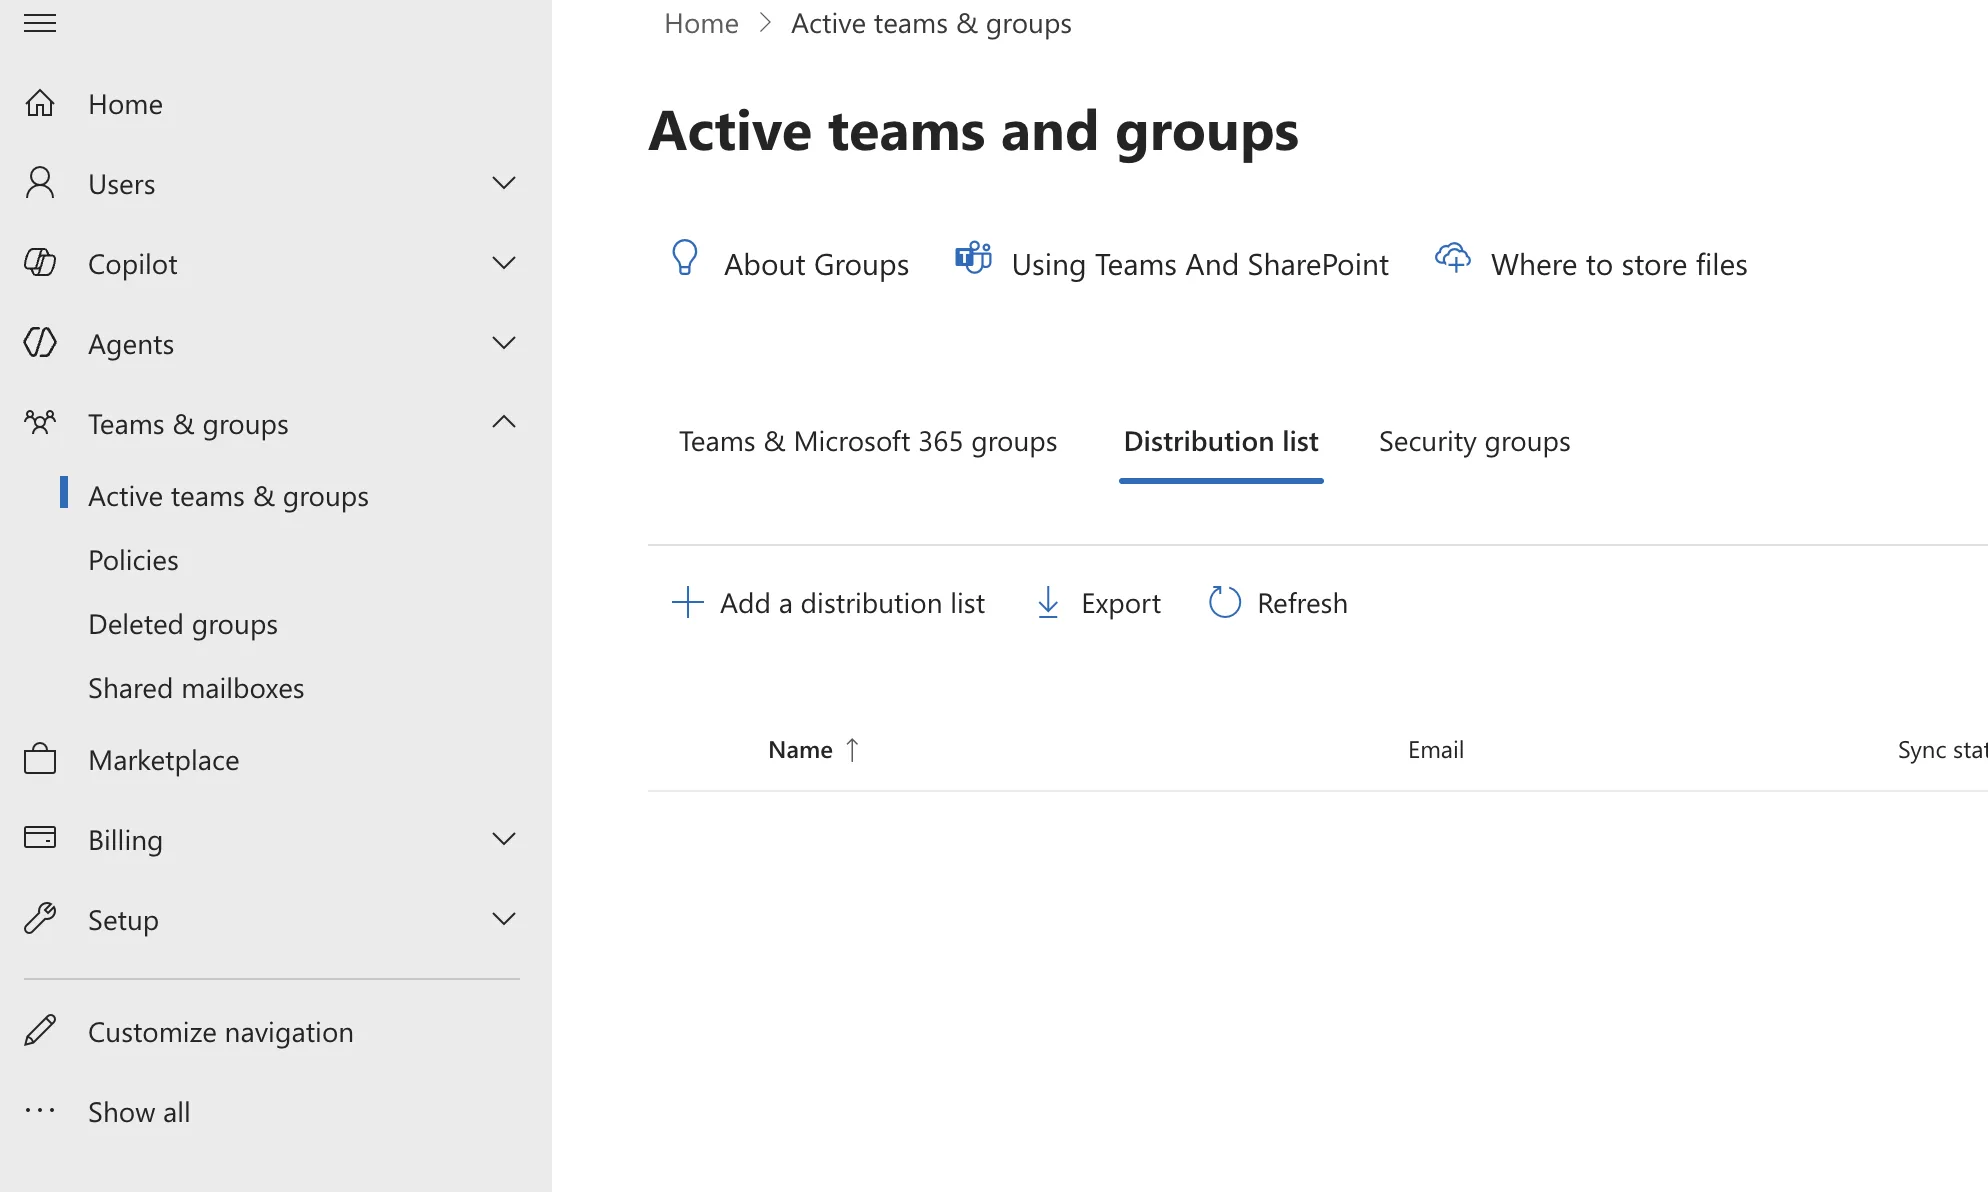
The page has a tab for each kind of group, and it matters which one you pick. A Microsoft 365 group comes with its own group mailbox, calendar and file storage. A distribution list is only an address that forwards to its members. For a plain team address, the distribution list is the lighter and simpler choice.
Step 3: Name the List
The wizard opens on Set up the basics. Enter a Name — the display name people see in the address book and, when someone sends as the list, in the recipient's inbox. The examples use Contoso Support. The Description is optional, but one line about what the list is for saves the next admin a guess.
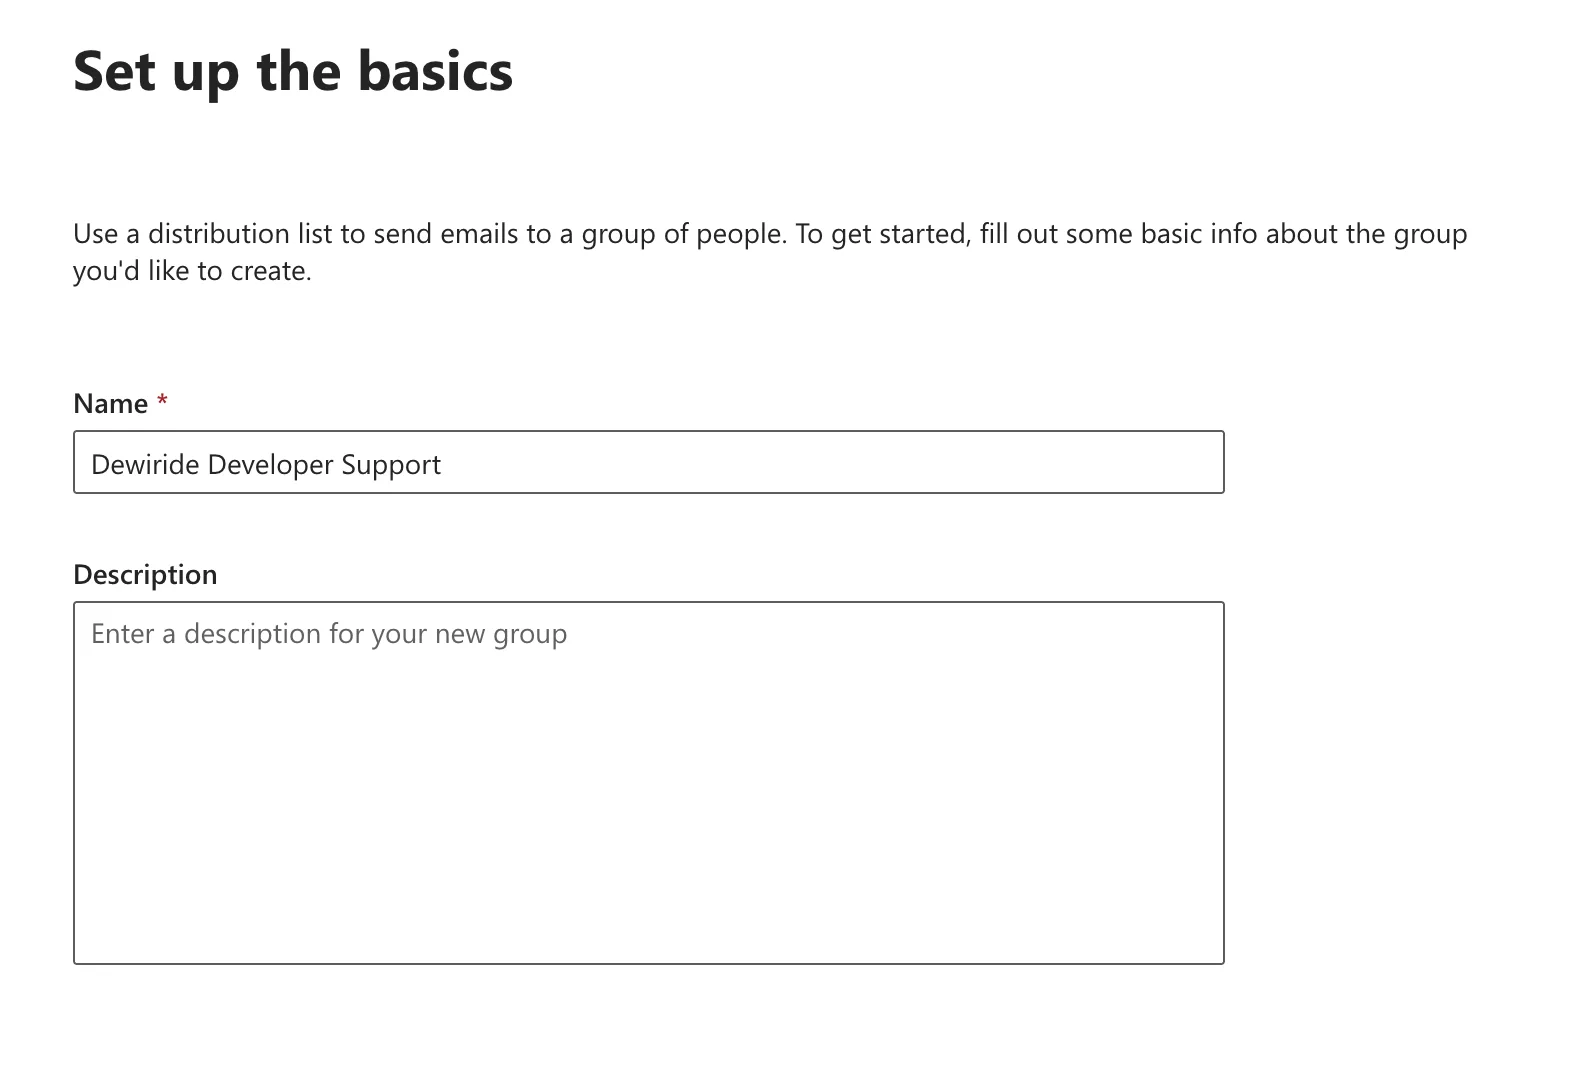
Name the list after the job it does, not the people in it — "Support", "Billing", "Careers" — so the name still makes sense when the team changes. Select Next.
Step 4: Assign Owners
Owners manage the list: they can add and remove members, change its settings, rename it and update its description. Select Assign owners, tick one or more people in the Assign owners pane, select Add, and then select Next.
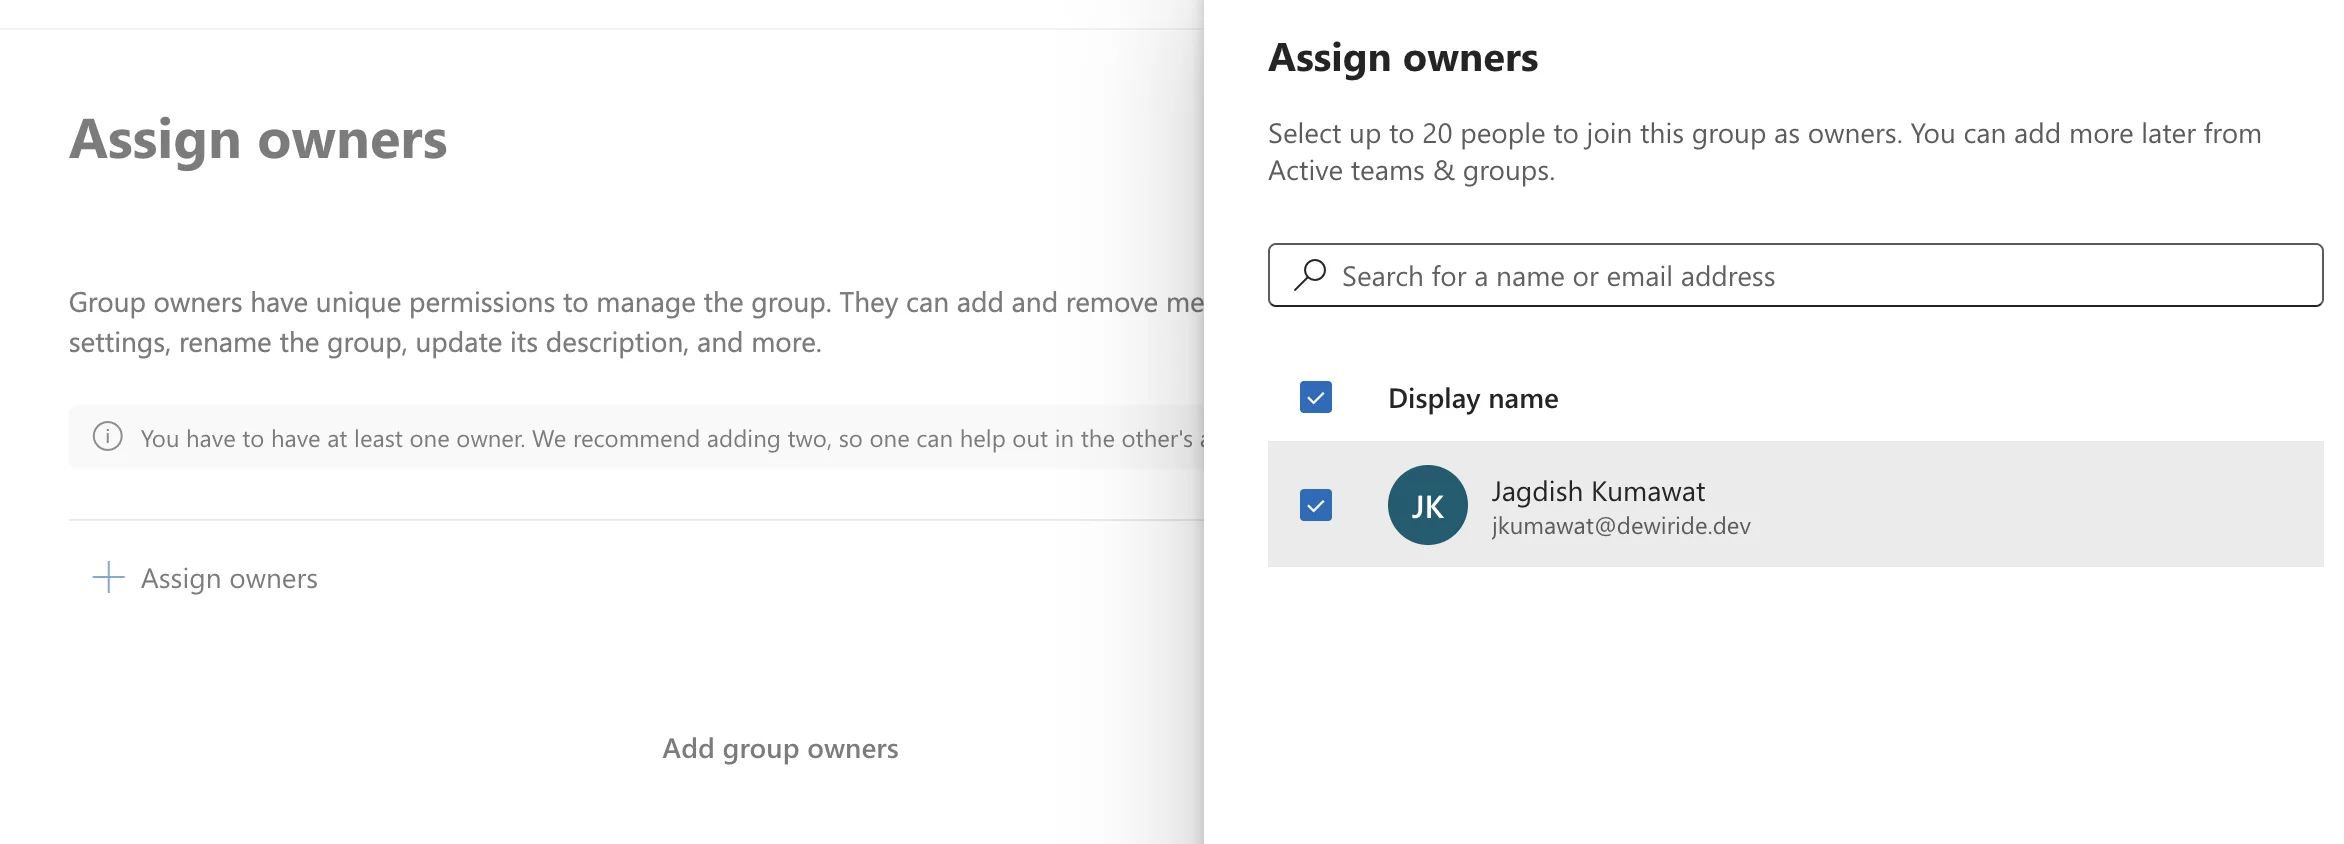
The page itself tells you that a list needs at least one owner, and recommends two so that one can cover for the other. Being an owner does not make someone a member, though: owners manage the list, members receive its mail. That is why the same person appears again on the next page.
Step 5: Add Members
Members are the people who receive every message sent to the list. Select Add members, tick the people in the Add members pane, select Add, and then select Next. The pane takes up to 20 people at a time; you can add more later from Active teams & groups.
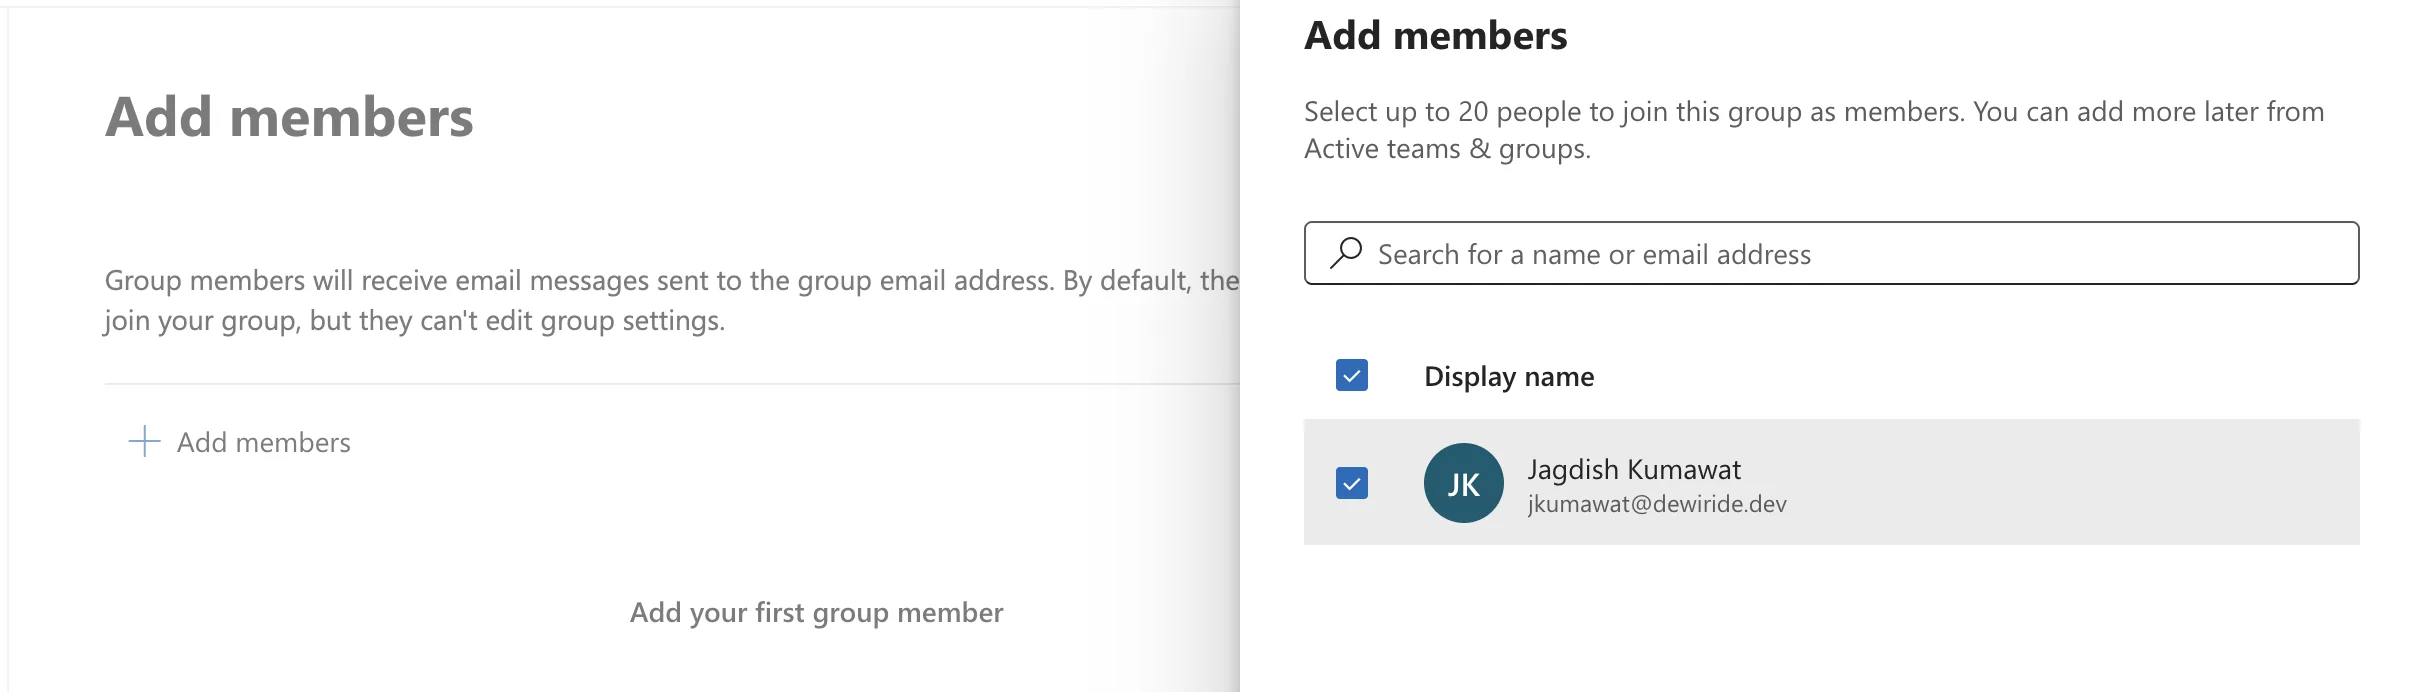
Membership only decides who receives the list's mail. It does not let anyone send as the list — that is the Send As permission you will grant in Step 12.
Step 6: Set the Email Address and Allow Outside Senders
On Edit settings, type the part of the address before the @ in Group email address — support here — and choose the domain in Domains.
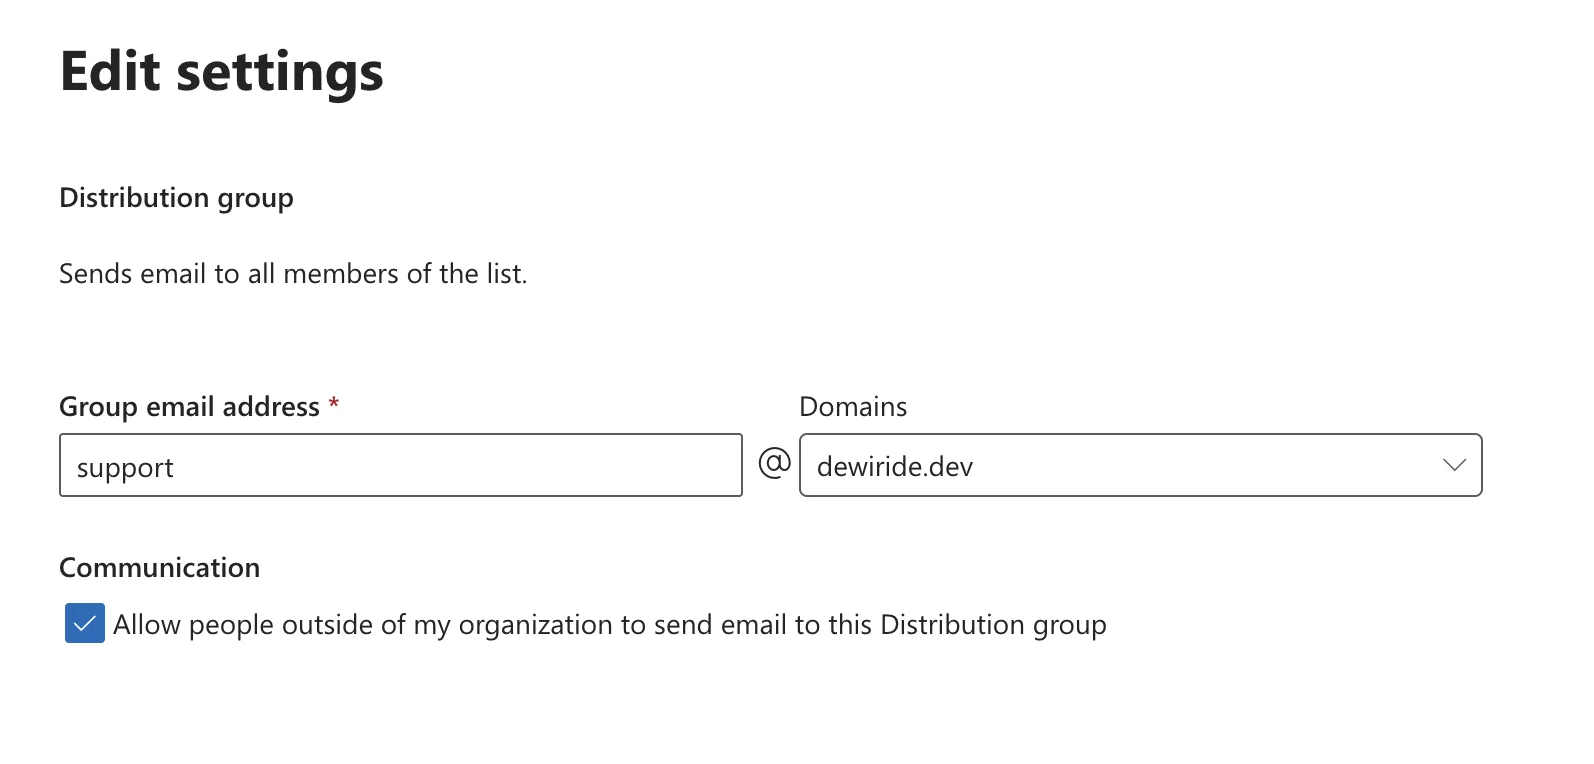
Then decide on Allow people outside of my organization to send email to this Distribution group. Tick it for any address that customers, partners or suppliers will write to — which includes replying to mail your team sends as the list. Leave it clear for internal-only lists, such as an all-staff list, so that nobody on the internet can email your whole company through one address. Select Next.
A list that only accepts mail from inside the organization rejects everything else with the bounce 550 5.7.133. That includes a customer's reply to a message your team sent as the list: the reply bounces, and nobody on the team ever sees it. You can change the setting later — Step 9 shows where — but it is easiest to get right now.
Step 7: Review and Create the List
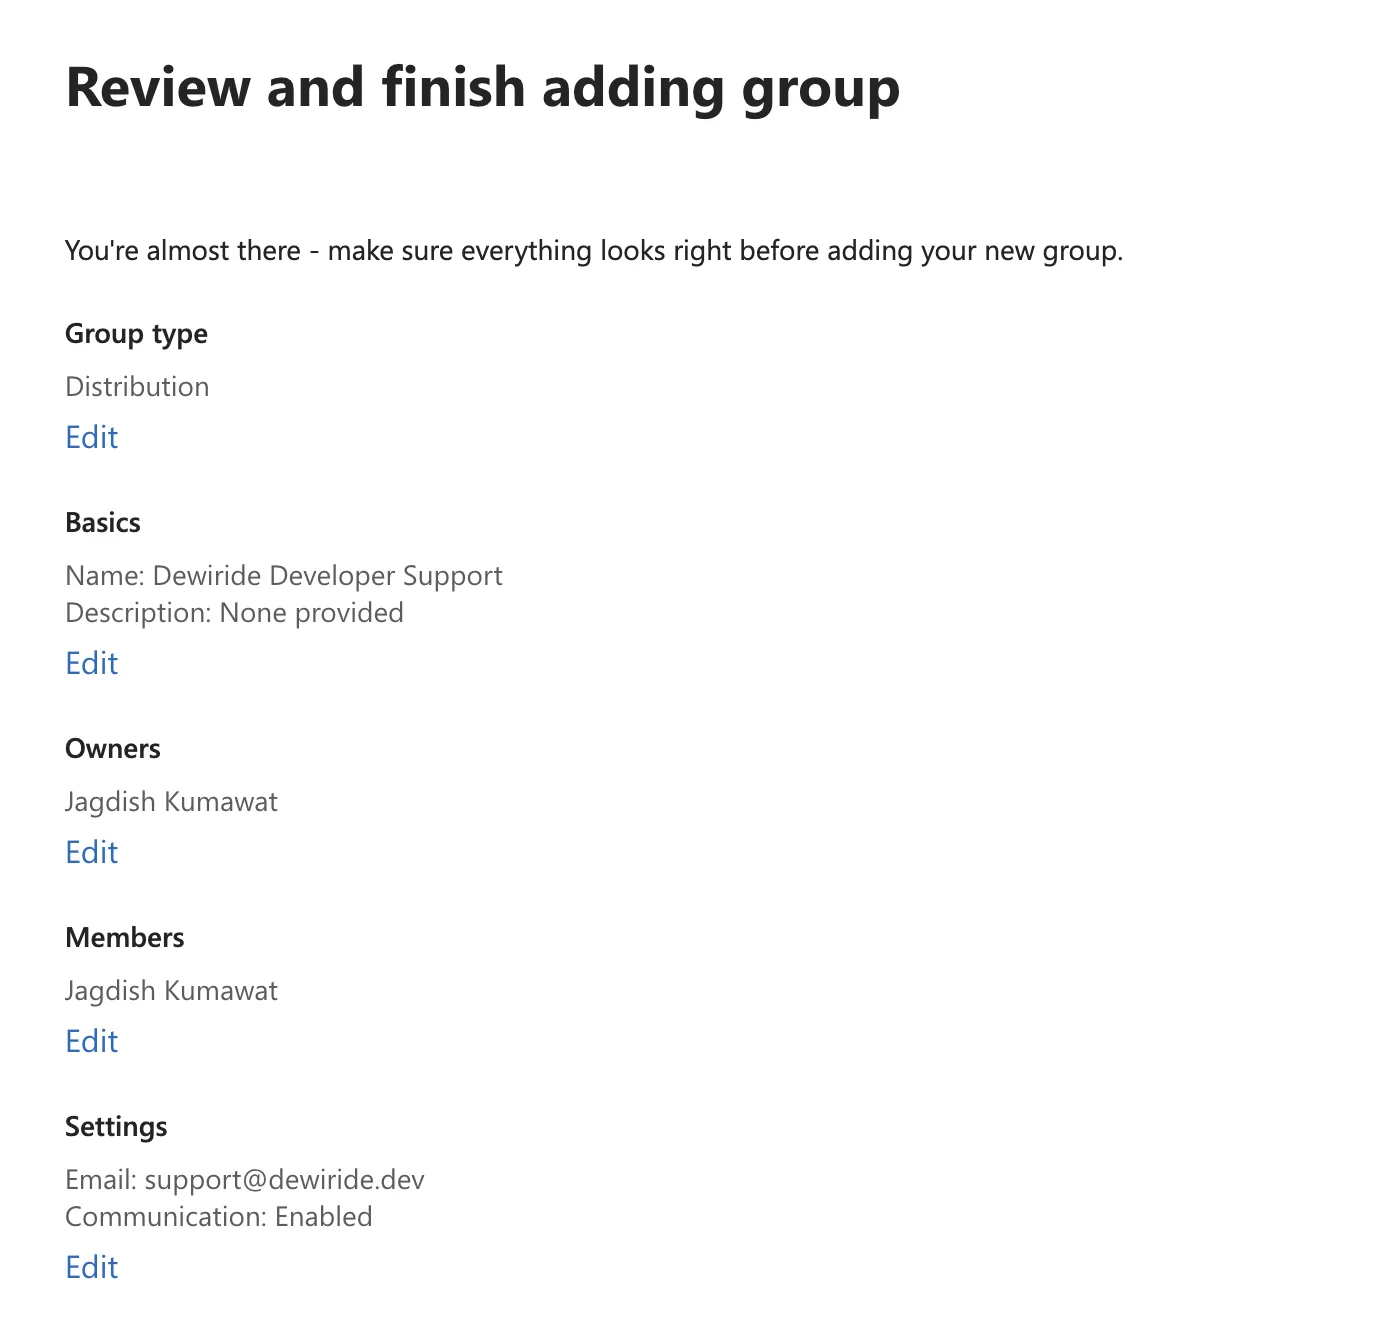
Review and finish adding group sums up everything: the group type (Distribution), the name and description, the owners and members, the email address, and Communication: Enabled if you allowed outside senders. Each section has an Edit link if something is wrong. When it all looks right, select Create group.
Step 8: Wait for the List to Appear
The confirmation page says the group was created — and warns that it can take up to an hour to show up in your Active teams & groups list.
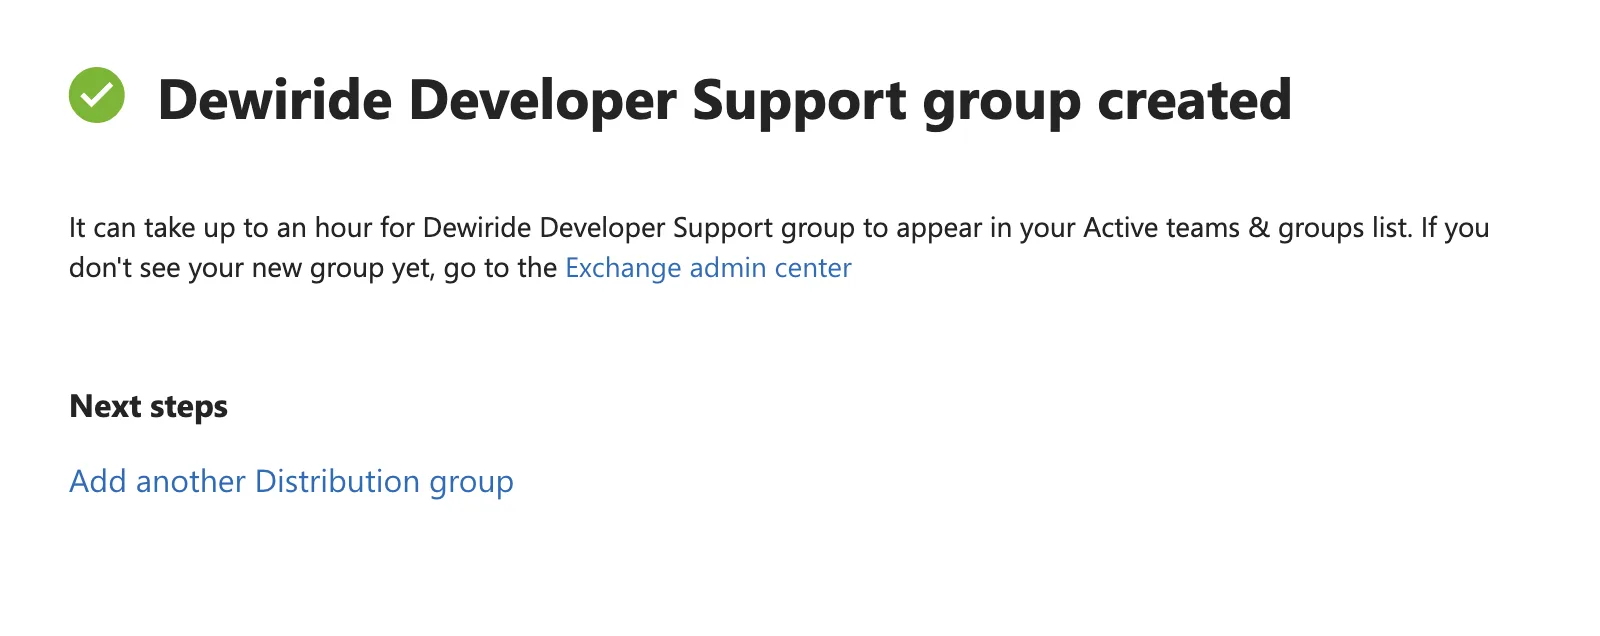
The list is created at this point; it is the Active teams & groups view that can lag behind. That is why the page suggests the Exchange admin center if you do not see the list yet — which is where you are heading next anyway.
Step 9: Open the List's Settings
Once the list appears on the Distribution list tab, select its name to open its details pane, and then select the Settings tab.
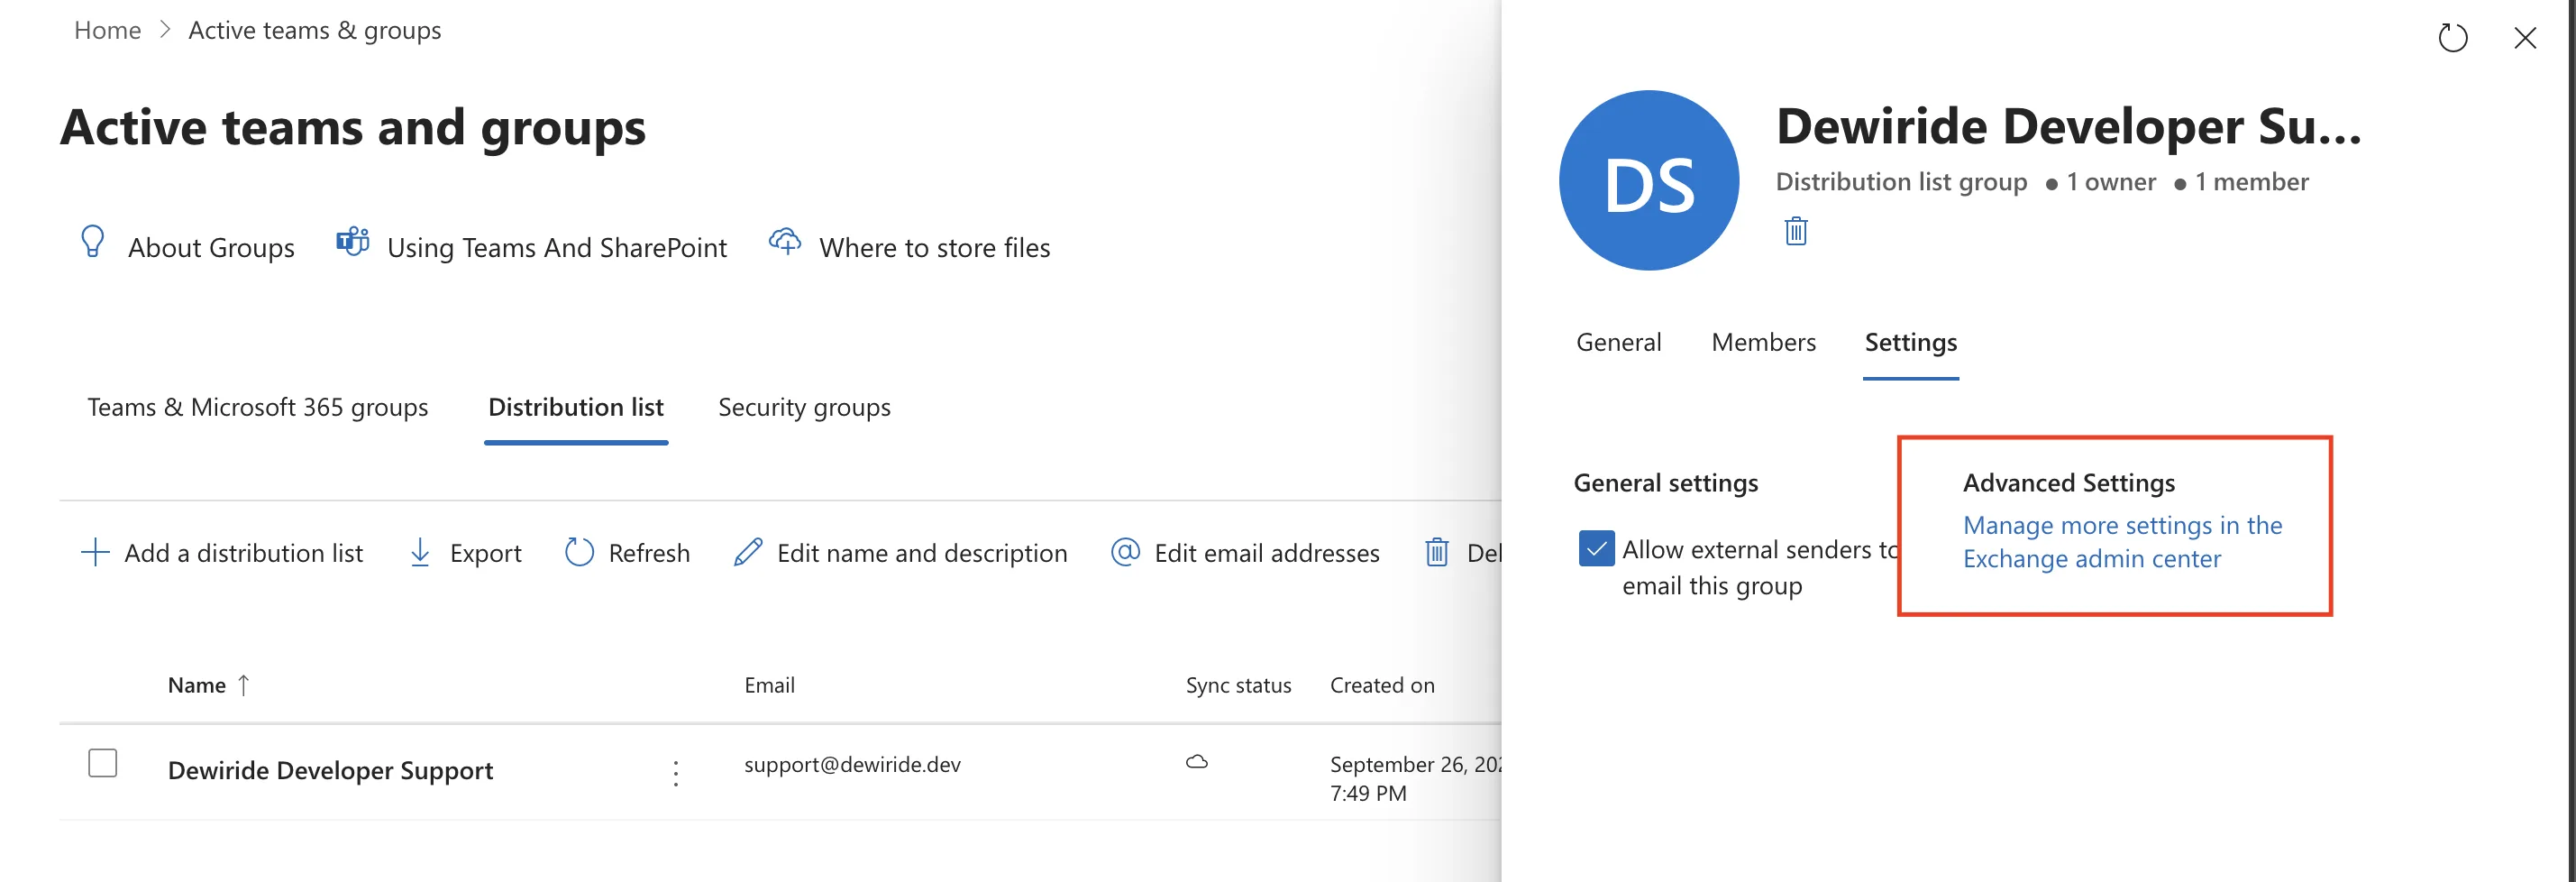
Two things are here. Allow external senders to email this group is the same outside-senders option as in Step 6 — tick or clear it here if you change your mind later. And under Advanced Settings is a link, Manage more settings in the Exchange admin center. The settings on this tab do not include delegates, so select that link.
Step 10: Find the List in the Exchange Admin Center
In the Exchange admin center, go to Recipients → Groups, select the Distribution list tab, and select the list's name.
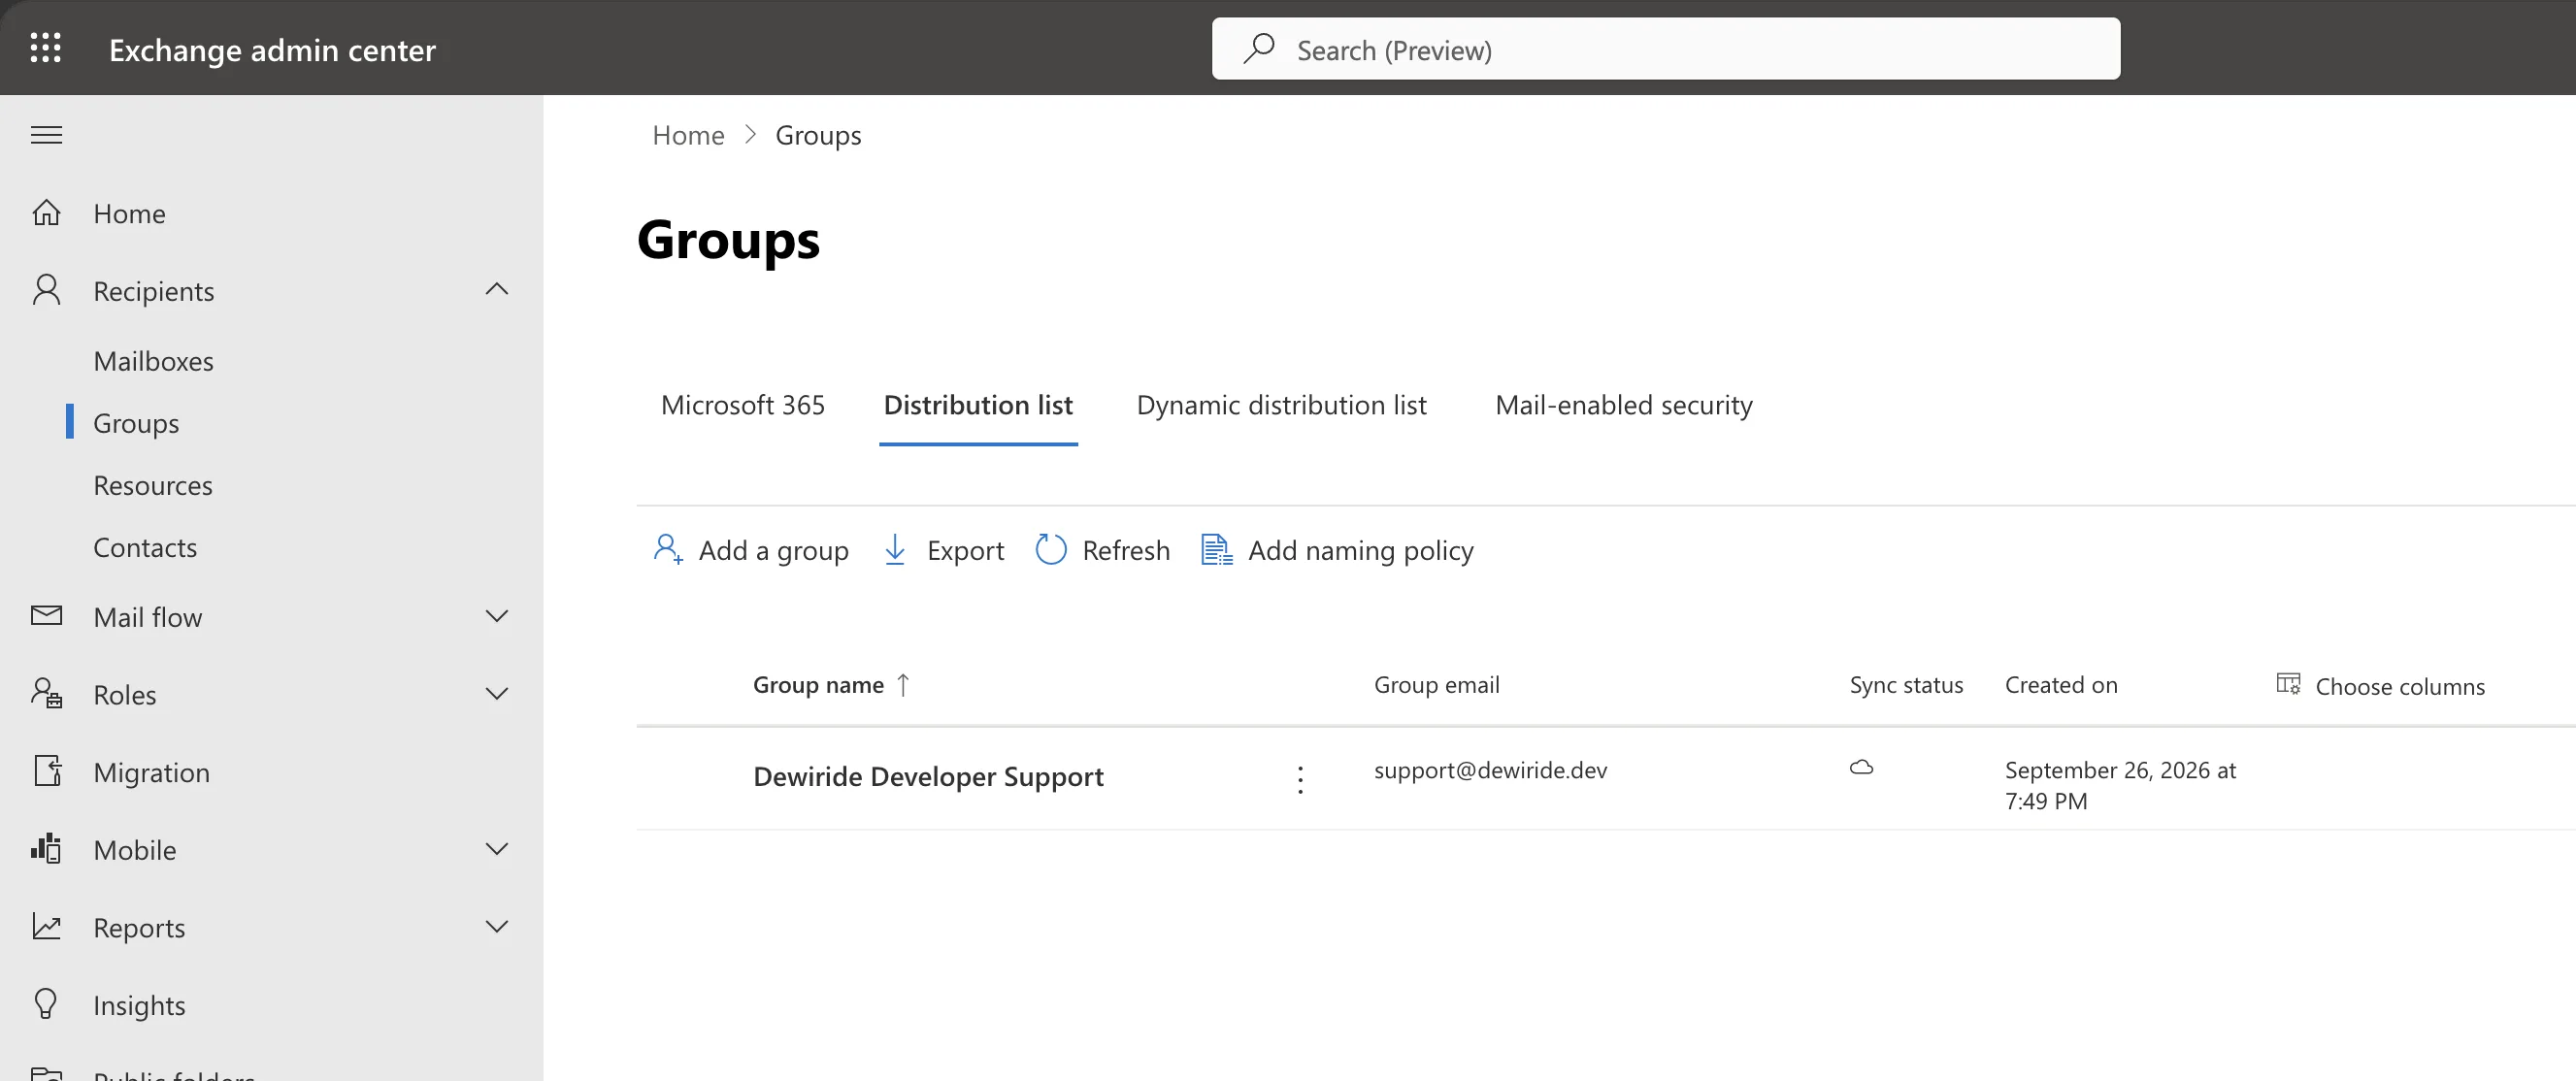
The tabs here split groups more finely than the Microsoft 365 admin center does — Microsoft 365, Distribution list, Dynamic distribution list and Mail-enabled security — but it is the same list you just created. You could have created it here too: Add a group starts an equivalent wizard.
Step 11: Open Manage Delegates
The list's details pane opens. Select the Settings tab.
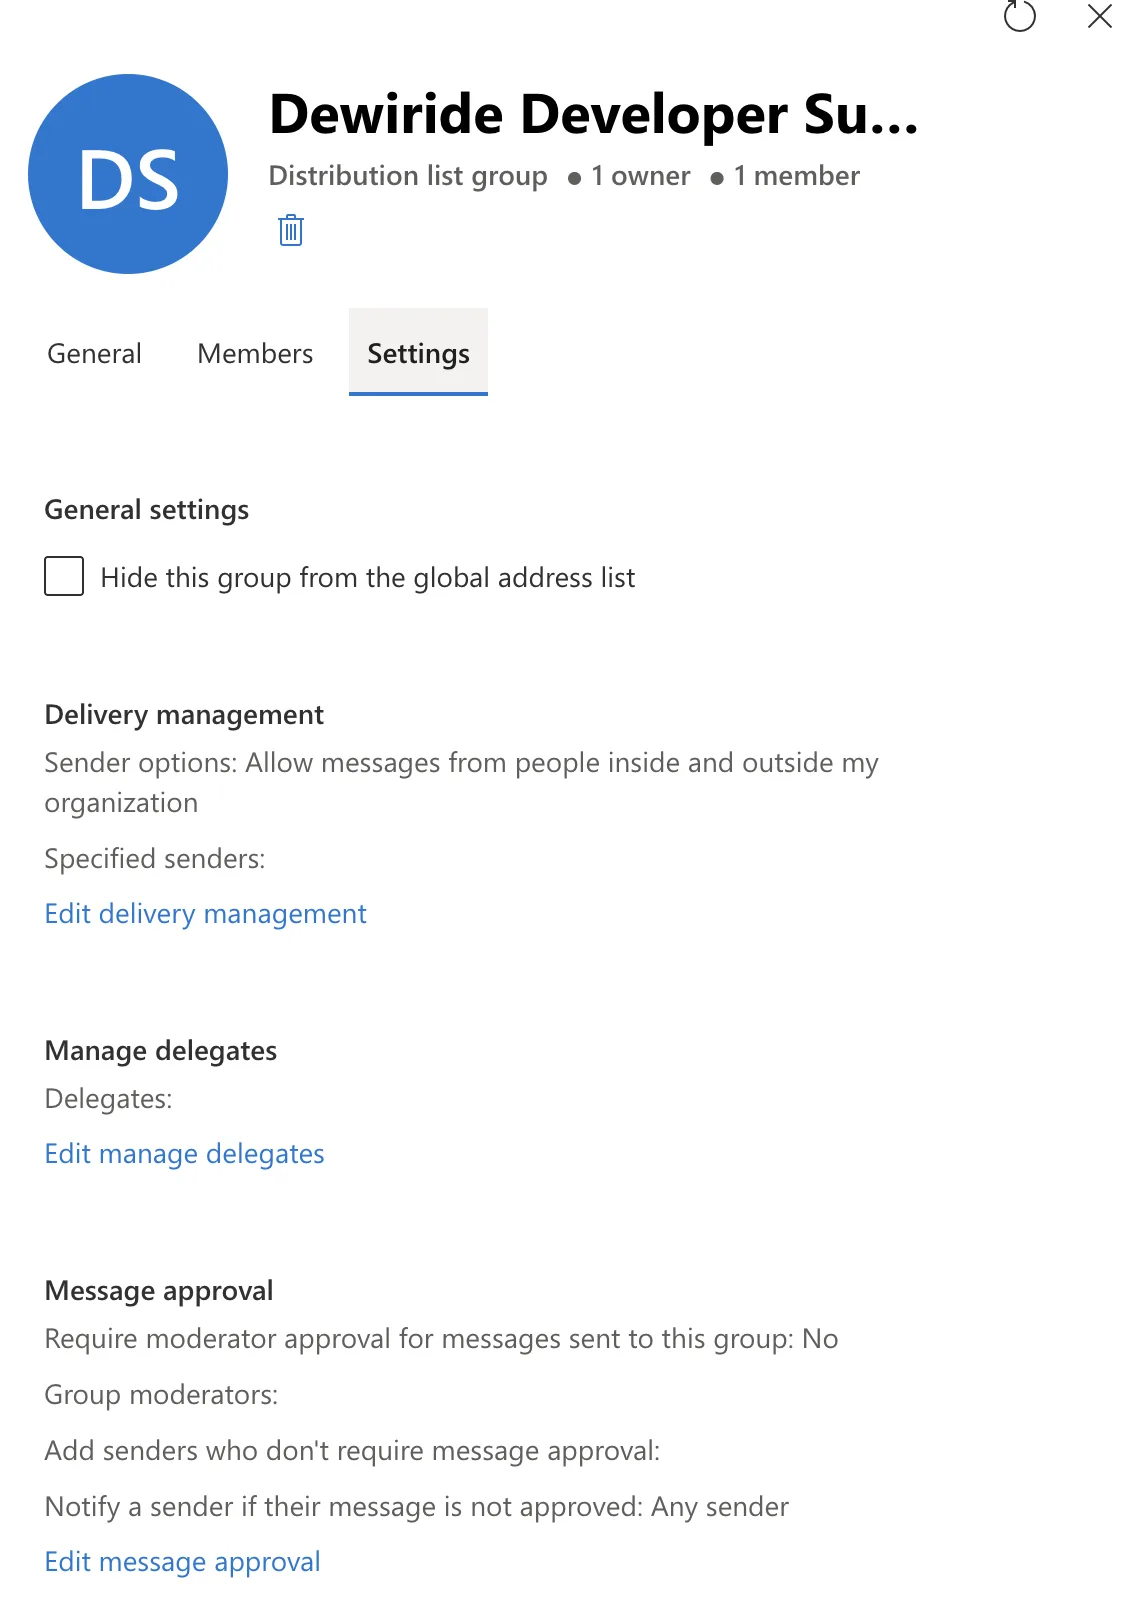
Check three things on the way down:
- Hide this group from the global address list should stay clear. The global address list is the company directory that Outlook searches as you type. People can still email a hidden list by typing its full address, but they will not find it in the suggestions — including the From suggestions your teammate will use to send as the list.
- Delivery management should read Allow messages from people inside and outside my organization if you ticked the outside-senders option. If it does not, Edit delivery management is where to change it.
- Manage delegates lists nobody yet. Select Edit manage delegates.
Step 12: Grant Send As Permission
The Edit delegates panel explains the two permission types in a line each. Under Add a delegate, search for your teammate by name or email address and select them. They appear in the table below: set Permission type to Send as, and then select Save changes.
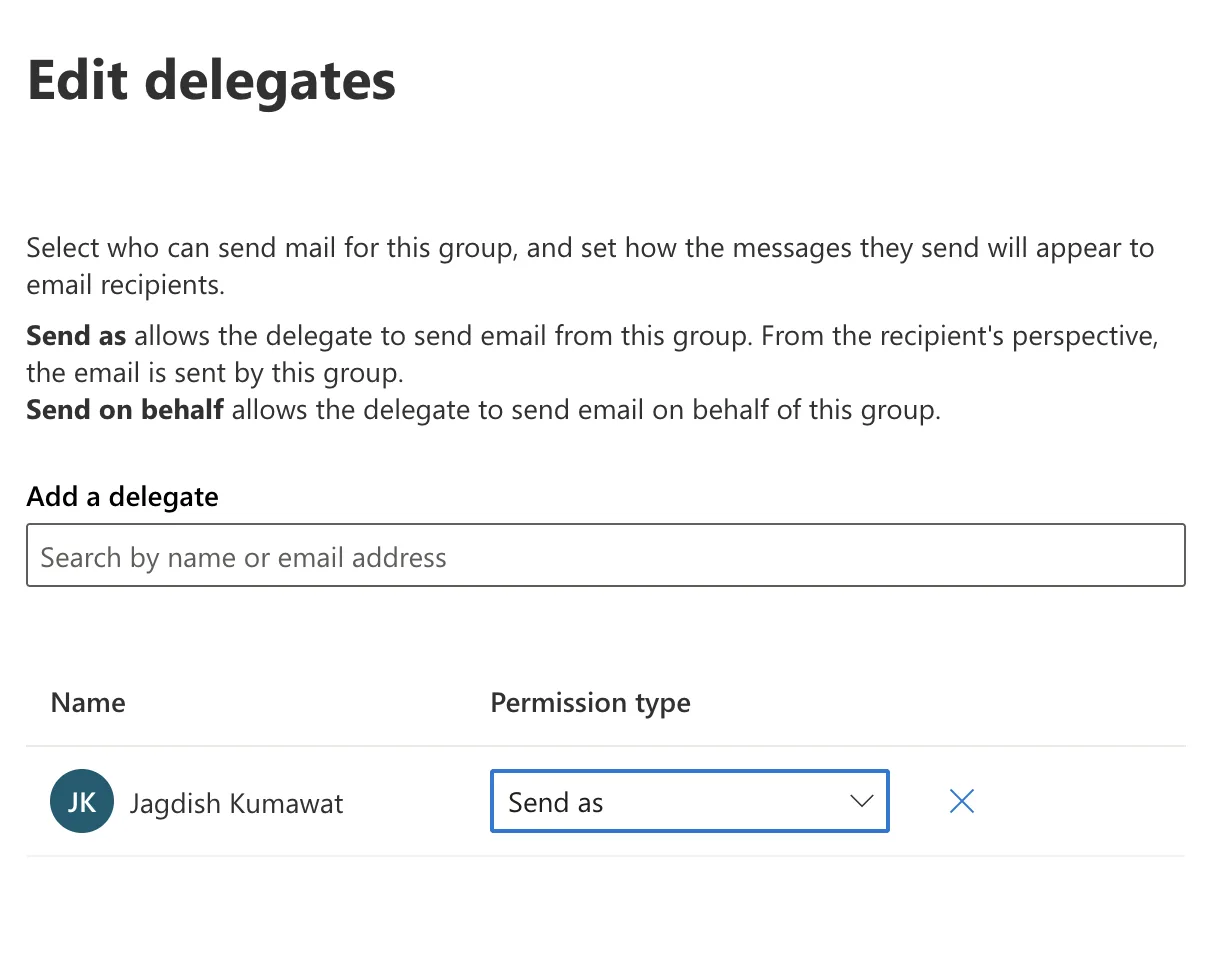
Which permission to choose:
| Permission | What recipients see | Choose it when |
|---|---|---|
| Send as | Only the list. Nothing shows which teammate sent the message. | The team should speak with one voice — support, billing, careers |
| Send on behalf | The teammate on behalf of the list | Recipients should know who wrote it, such as an assistant writing for a department |
If a person ends up with both, Send As is the one that applies. The Outlook guide's section on what the recipient sees shows each option from the other side.
A delegate does not have to be a member of the list. But a delegate who is not a member never sees the replies that come back to it, so in practice make every delegate a member too. And permission changes can take a while to reach every part of Exchange Online: if your teammate's first attempt bounces with a permission error, give it some time and try again.
Do It with PowerShell
The walkthrough above used the admin centers, and every screenshot comes from that run. The commands below are Microsoft's documented Exchange Online PowerShell equivalents, for admins who prefer scripting. They were not run for this post, so there is no captured output to show.
Exchange Online PowerShell does the same job in a few commands, which helps when you need to create many lists or repeat the setup exactly. First install Microsoft's Exchange Online module and sign in:
Install-Module -Name ExchangeOnlineManagement -Scope CurrentUser
Connect-ExchangeOnline -UserPrincipalName admin@contoso.com
Install-Module downloads the module from the PowerShell Gallery for your user account only, so it needs no administrator rights on the computer. Connect-ExchangeOnline opens a sign-in window for your Microsoft 365 admin account.
Create the list with an owner and a member, and allow outside senders:
New-DistributionGroup -Name "Contoso Support" -Alias support -PrimarySmtpAddress support@contoso.com -ManagedBy admin@contoso.com -Members alex@contoso.com -RequireSenderAuthenticationEnabled $false
-ManagedBysets the owners and-Membersthe members. As in the wizard, owners are not members unless you add them — or pass-CopyOwnerToMemberto do it for you.-RequireSenderAuthenticationEnabled $falseis the outside-senders option from Step 6. The default is$true, which accepts mail only from inside your organization.
Grant Send As, then check that it is there:
Add-RecipientPermission -Identity support@contoso.com -Trustee alex@contoso.com -AccessRights SendAs
Get-RecipientPermission -Identity support@contoso.com
For Send on Behalf instead, the permission is a property of the list itself:
Set-DistributionGroup -Identity support@contoso.com -GrantSendOnBehalfTo @{Add="alex@contoso.com"}
The @{Add=...} form adds a delegate without replacing any who are already there.
Removing Access, or the List
When someone leaves the team, take away their Send As permission as well as their membership. Removing them from the list stops the mail reaching them, but on its own it does not stop them sending as the team address:
- Exchange admin center: open the list, select Settings → Edit manage delegates, select the × next to the person, and select Save changes. Then remove them on the Members tab.
- PowerShell: remove the permission with the command below.
Remove-RecipientPermission -Identity support@contoso.com -Trustee alex@contoso.com -AccessRights SendAs
To delete a list you created only to try this out, open it in Active teams & groups and select the bin icon under its name in the details pane — or, in the Exchange admin center, select it on the Distribution list tab and choose Delete group. Once it is gone, mail sent to its address bounces, so check that nobody still depends on the address first.
Common Mistakes
| Mistake | What happens | Do this instead |
|---|---|---|
| Creating a Microsoft 365 group when you wanted a plain team address | You get a group mailbox, calendar and file storage you did not need | Use the Distribution list tab |
| Leaving outside senders off on a customer-facing list | Outside mail, including replies to your team, bounces with 550 5.7.133 | Tick the option in Step 6, or change it later on the list's Settings tab |
| Assuming owners are members | Owners do not receive the list's mail | Add owners as members too if they should get it |
| Assuming members can send as the list | Their messages bounce with a permission error | Grant Send as in the Exchange admin center |
| Hiding the list from the global address list | Delegates cannot find it in Outlook's From suggestions | Leave Hide this group from the global address list clear |
| Granting Send As to someone who is not a member | They can send as the list but never see the replies | Make every delegate a member |
| Leaving Send As in place when someone leaves the team | They can still send as the team address | Remove them from Manage delegates as well as from Members |
Troubleshooting
| Symptom | Likely cause | Fix |
|---|---|---|
| The new list is not in Active teams & groups | It can take up to an hour to appear there | Wait, or find it in the Exchange admin center under Recipients → Groups → Distribution list |
| Teams & groups is not in the navigation | The menu is showing only some sections | Select … Show all |
| There is no Send As option in the Microsoft 365 admin center | Delegates for distribution lists are set in the Exchange admin center | On the list's Settings tab, select Manage more settings in the Exchange admin center |
| The wizard will not accept the email address you want | Every address in the organization must be unique, and a user, group or mailbox already has it | Choose a different address, or find out what owns it first |
| Your teammate's message bounces with a permission error | The delegate was not saved, or the change has not applied yet | Check that Manage delegates lists them; if it does, wait and try again |
Outside senders get the bounce 550 5.7.133 | The list accepts mail only from inside the organization | Tick Allow external senders to email this group in the Microsoft 365 admin center, or allow senders inside and outside the organization in Delivery management |
| The list is missing from your teammate's From suggestions | It is hidden from the global address list, or was created very recently | Clear Hide this group from the global address list; meanwhile, type the full address |
Add-RecipientPermission is not recognized | PowerShell is not connected to Exchange Online | Install the module and run Connect-ExchangeOnline first |
FAQ
What is the difference between a distribution list and a Microsoft 365 group?
A distribution list is only an address that forwards every message to its members. A Microsoft 365 group also has a group mailbox with its own conversation history, a calendar and file storage, and can be connected to a Microsoft Teams team. Choose a distribution list for a plain team address, and a Microsoft 365 group when the team also needs a shared place to work.
Can I create the distribution list in the Exchange admin center instead?
Yes. In the Exchange admin center go to Recipients → Groups → Distribution list, select Add a group, choose Distribution on the first page, and follow the wizard. The result is the same kind of list.
Who can grant Send As permission on a distribution list?
An admin with the Exchange Administrator role (or Global Administrator), either in the Exchange admin center as shown in Step 12 or with Add-RecipientPermission in Exchange Online PowerShell.
Can I give Send As to everyone on the list at once?
Not by naming the list itself. A distribution list is not a security principal — it cannot hold permissions — so it cannot be a delegate. Grant Send As to each person, or to a mail-enabled security group that contains them, which Exchange Online does accept as a delegate.
How long does Send As take to start working?
It is not always instant. Permission changes have to spread across Exchange Online, so a delegate's first try can still bounce shortly after you save. Wait a while and try again before assuming something is wrong.
Does a distribution list need a license?
No. Distribution lists are free in Exchange Online; only the people who use them need their normal Microsoft 365 licenses.
Conclusion
You now have a working team address: a distribution list created in the Microsoft 365 admin center, with an owner to manage it, members to receive its mail and outside senders allowed, plus a teammate with Send As permission granted in the Exchange admin center. The two admin centers split the work — the Microsoft 365 admin center for creating the list and its basic settings, the Exchange admin center for delegates — and the link on the list's Settings tab takes you from one to the other.
The details that decide whether it works in real life are small: allow outside senders on any customer-facing list, keep the list visible in the address book, make delegates members so they see the replies, and take Send As away when people leave. With that in place, your teammate can follow How to Send Email from a Distribution List in Outlook on the Web and start sending as the team.
Additional Resources
- How to Send Email from a Distribution List in Outlook on the Web — the next step: sending from the list you just set up.
- Create distribution groups in the Microsoft 365 admin center — Microsoft's own version of Steps 1–7.
- Create and manage distribution lists in Exchange Online — every setting on the list's General, Members and Settings tabs.
- Manage permissions for recipients in Exchange Online — Send As, Send on Behalf and Full Access, in the admin center and in PowerShell.
- About the Exchange Administrator role — what the role can do, and how to assign it.
- Connect to Exchange Online PowerShell — installing the module and signing in.
