How to Create an Item in a SharePoint List in Power Automate

Create item, from the SharePoint connector, adds one item to a list: the designer shows a field for each of the list's columns, and the action returns the new item, with its ID, for the actions after it.
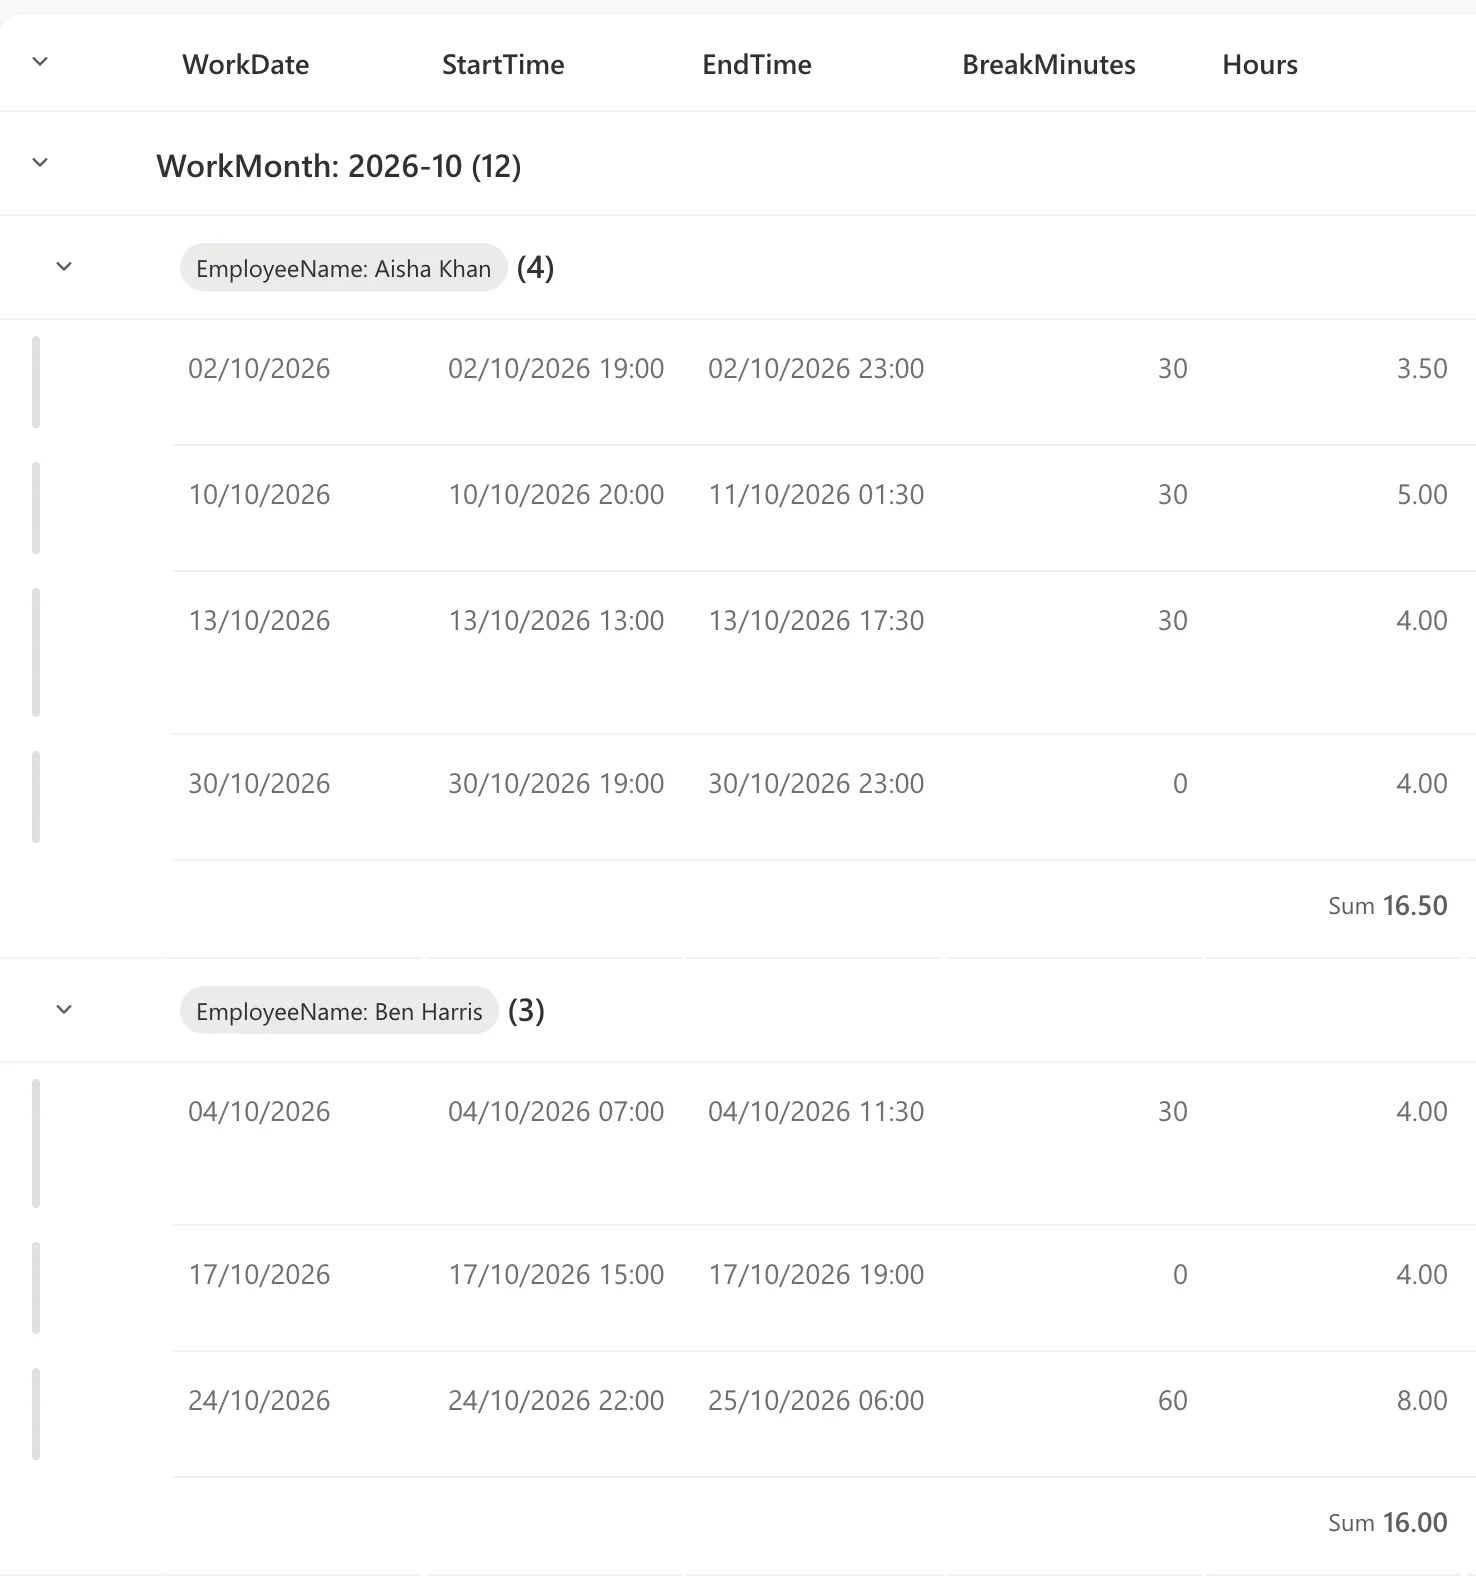
The example is Import Old Overtime Timesheet, a flow of the Overtime Timesheet app. For each row of an old Excel timesheet, it creates an item in the OvertimeEntries list, with the shift's date, start and end, break, hours, department, reason, person and decision.
Prerequisites
- Permission to add items to the list for the account the flow's SharePoint connection uses. The item is created as that account.
Step 1: Add the Action
Select + where the item should be created, Add an action, search for Create item, and select it under SharePoint. In the example, it's inside the loop over the rows, and I named it Create the entry, so later expressions read outputs('Create_the_entry').
Step 2: Choose the Site and the List
Fill Site Address and List Name. Pick them from the drop-downs, or, in a flow that moves between environments, use environment variables: Enter custom value, then the variables from dynamic content (How to Use Environment Variables in a Power Automate Flow).
Once the list is chosen, the pane shows a field for each of its columns. The required columns, marked with an asterisk, are at the top.
Step 3: Fill the Columns
Put a value in each field, typed, from dynamic content or as an expression (How to Add an Expression in Power Automate). The example's required columns:
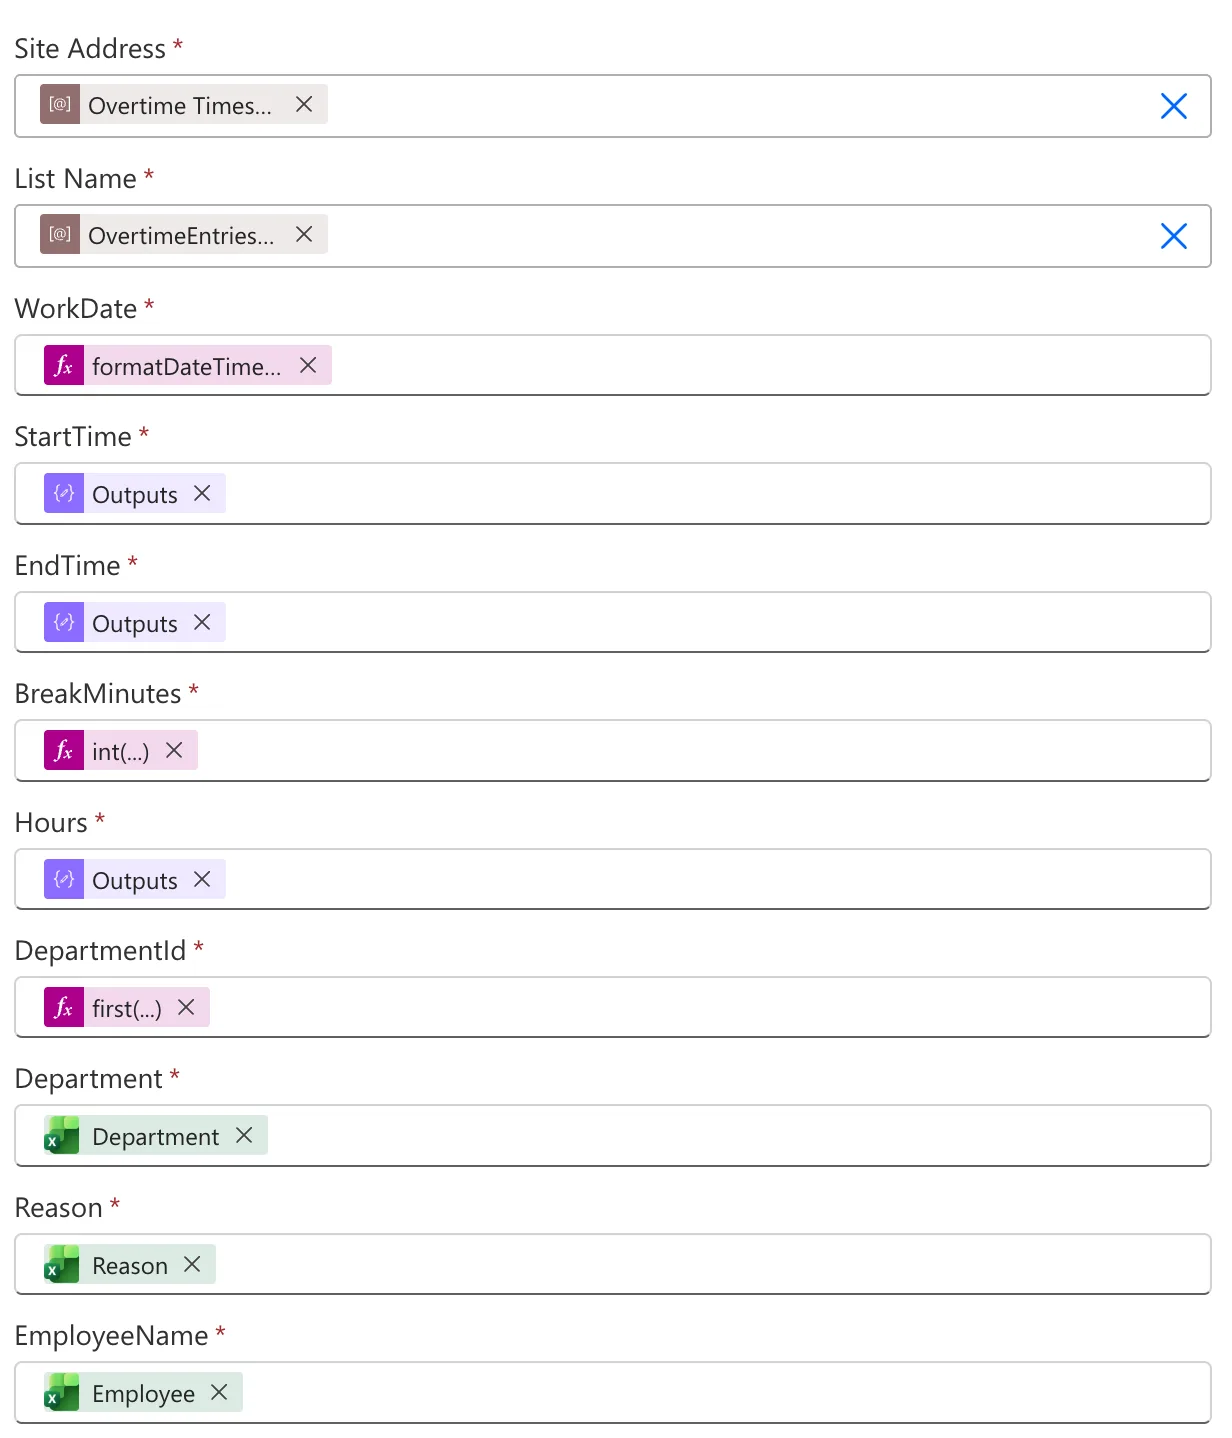
| Column | Type | Value |
|---|---|---|
| WorkDate | Date only | formatDateTime(items('For_each_old_row')?['Date'], 'yyyy-MM-dd') |
| StartTime | Date and time | Outputs of Shift start, a UTC time |
| EndTime | Date and time | Outputs of Shift end |
| BreakMinutes | Number | int(items('For_each_old_row')?['Break (mins)']) |
| Hours | Number | Outputs of Hours |
| DepartmentId | Number | first(body('Matching_department'))?['ID'] |
| Department | Single line of text | Department from the Excel row |
| Reason | Multiple lines of text | Reason from the Excel row |
| EmployeeName | Single line of text | Employee from the Excel row |
| WorkMonth | Single line of text | formatDateTime(items('For_each_old_row')?['Date'], 'yyyy-MM') |
What each type takes:
- Date and time columns take an ISO date and time, such as
2026-10-02T18:00:00.0000000Z. A UTC time is shown in the site's time zone (How to Convert Local Time to UTC in Power Automate with convertToUtc). - Date only columns take a date, such as
2026-10-02. - Number columns take a number.
int()turns the workbook's break into a whole number.
Step 4: Fill the Optional Columns
Optional columns are under Advanced parameters. Pick the ones you need from its list, or select Show all:
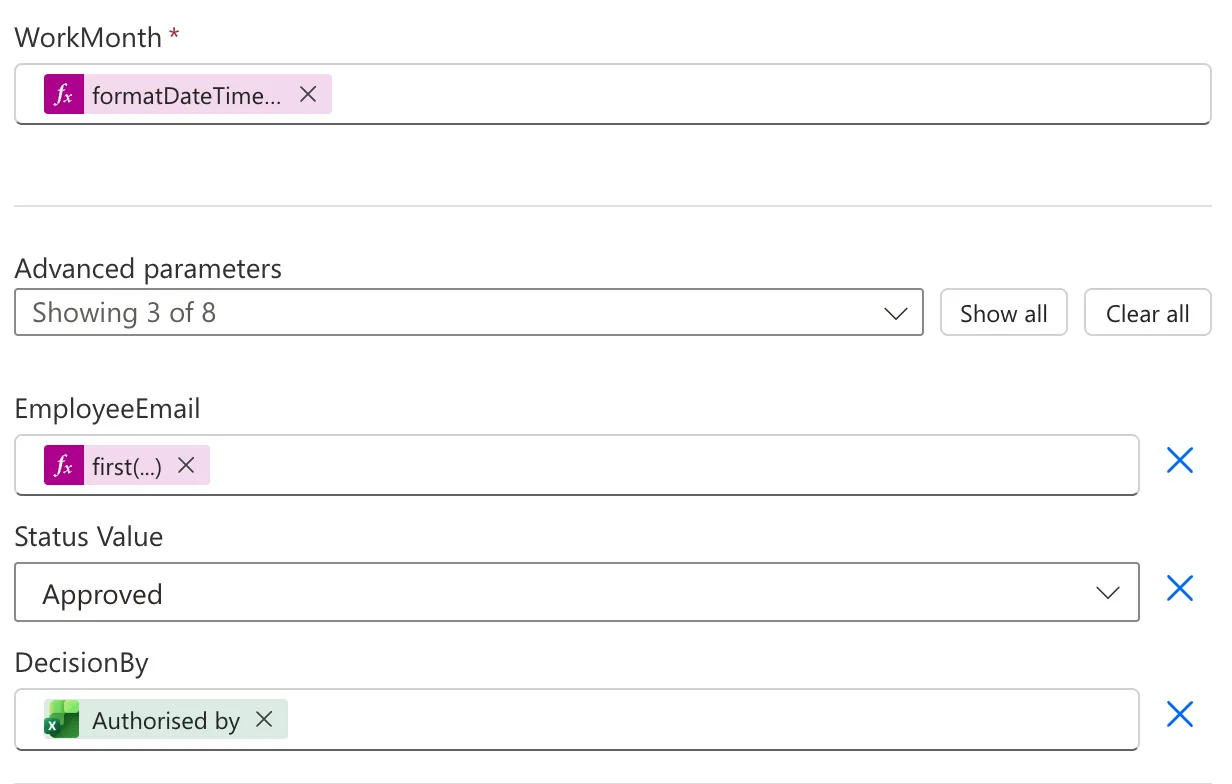
| Column | Type | Value |
|---|---|---|
| EmployeeEmail | Single line of text | first(body('Exact_name_matches'))?['Mail'] |
| Status Value | Choice | Approved, picked from the column's choices |
| DecisionBy | Single line of text | Authorised by from the Excel row |
A Choice column appears with Value after its name, here Status Value, with the column's choices in a drop-down.
Step 5: Use the New Item
Create item returns the item it created. The next actions read its fields from the action's outputs, for example its ID and its ETag, the version SharePoint uses to check nothing changed it in between:
outputs('Create_the_entry')?['body/ID']
outputs('Create_the_entry')?['body/@odata.etag']
In the example, Approve the entry uses both to approve the item that was just created (How to Approve or Reject a SharePoint Item in Power Automate).
The Result
After the run, the list had an item for each imported row, with the times in UK time:
Common Mistakes
| Mistake | What happens | Do this instead |
|---|---|---|
| Leaving a required field empty | The designer marks it as required | Fill every field marked with an asterisk |
| A local time in a date and time column | Times are an hour out in summer | Convert to UTC first |
| Looking for an optional column in the main list | It's under Advanced parameters | Pick it there, or Show all |
| Expecting the item's Created By to be the person in the row | It's the account of the flow's connection | Store the person in a column of your own |
Troubleshooting
| Symptom | Likely cause | Fix |
|---|---|---|
| A choice isn't offered | It isn't one of the column's choices | Add it to the column's choices in SharePoint |
| The time is wrong in SharePoint | A local time was saved as if it were UTC | convertToUtc() |
| The next action can't find the ID | It's in body/ID | outputs('<action>')?['body/ID'] |
FAQ
Who is the item's Created By?
The account the action's SharePoint connection uses. In the example, that's the flow's owner, for every imported row.
Can I create several items at once?
Create item creates one. Put it in an Apply to each loop to create one per row (How to Loop Through an Array with Apply to Each in Power Automate).
How do I change an item later?
With Update item and the item's ID (How to Update a SharePoint List Item in Power Automate).
Conclusion
Create item adds one item to a list: choose the site and list, fill a field per column, with UTC times for date and time columns and optional columns under Advanced parameters, and read the new item's ID and ETag from its outputs.
Additional Resources
- Microsoft SharePoint Connector in Power Automate: Create item and the other actions
- SharePoint connector reference
