How to Create a New User in Linux Ubuntu Server with Sudo and SSH Access

Learn how to create a new user in Linux Ubuntu Server, grant it sudo administrator rights, set up SSH key login, add it to groups, and control password expiry — with every command run on a real Ubuntu 26.04 LTS server and the actual output shown.
To create a new user on Ubuntu Server, run sudo adduser username, type a password when prompted, then press Enter through the optional detail fields. To let that user run administrative commands, add them to the sudo group with sudo usermod -aG sudo username. Confirm both with id username.
sudo adduser jdbots
sudo usermod -aG sudo jdbots
id jdbots
Introduction
Creating a user account is the first thing you should do on a new Ubuntu server, and the last thing most people get around to. Logging in as root works, so it is tempting to leave it at that.
It is worth doing properly for two reasons. A named account tells you who did something — root logins are anonymous in your logs, so when three people share the server you have no audit trail. And a named account can be revoked on its own; you can delete one person's access without changing a password that four other systems depend on.
This guide walks through the whole account, not just the first command: creating it, giving it administrator rights, setting up key-based SSH login, adding it to groups, controlling password expiry, and removing it cleanly when the time comes.
Every command below was run on a real Ubuntu 26.04 LTS server and the screenshots are the actual output. Versions in play: adduser 3.153ubuntu1 and sudo-rs 0.2.13 (Ubuntu 26.04 replaced the classic C sudo with a Rust reimplementation — more on that below).
The same steps work unchanged on Ubuntu 24.04 LTS and 22.04 LTS. Where 26.04 behaves differently from older releases, it is called out inline.
What You Will Have at the End
- A named user account —
jdbotsin this guide — with its own home directory and shell. - Administrator rights through the
sudogroup, verified rather than assumed. - Passwordless SSH key login for that account, with the file permissions OpenSSH actually requires.
- The account in an extra group, so it can share files without needing
sudo. - A password ageing policy you understand, and the commands to change it.
- A clean removal procedure for when the account is no longer needed.
Prerequisites
- An Ubuntu Server — 26.04, 24.04 or 22.04 LTS.
- An existing account that can run
sudo— orrootaccess. On a fresh cloud VM this is usuallyrootor a provider-created account likeubuntu. - SSH access to the server.
- A terminal on your own computer. macOS and Linux have one built in; on Windows use PowerShell or WSL.
Connect to your server, replacing username and server_ip with your own:
ssh username@server_ip
Step 1: Confirm You Can Create Users
Creating a user needs root privileges. Check what you are working with before you start:
whoami
If that prints root, you can run every command below without the sudo prefix. If it prints anything else, confirm that account has administrator rights:
sudo -v
If it accepts your password without complaint, you are set. If you get user is not in the sudoers file, you do not have the rights to create users — you will need to log in as root or ask whoever administers the server.
It is also worth seeing who already exists, so you do not collide with a name:
awk -F: '$3>=1000 && $3<65534 {print $1, $3, $6}' /etc/passwd
/etc/passwd holds one line per account, colon-separated. Field 3 is the numeric user ID and field 6 is the home directory. Real human accounts start at UID 1000 on Ubuntu (set by UID_MIN in /etc/login.defs); everything below that is a system account created by a package. Filtering on that range hides the ~30 service accounts you do not care about.
Step 2: Create the User with adduser
This is the command that does the work:
sudo adduser jdbots
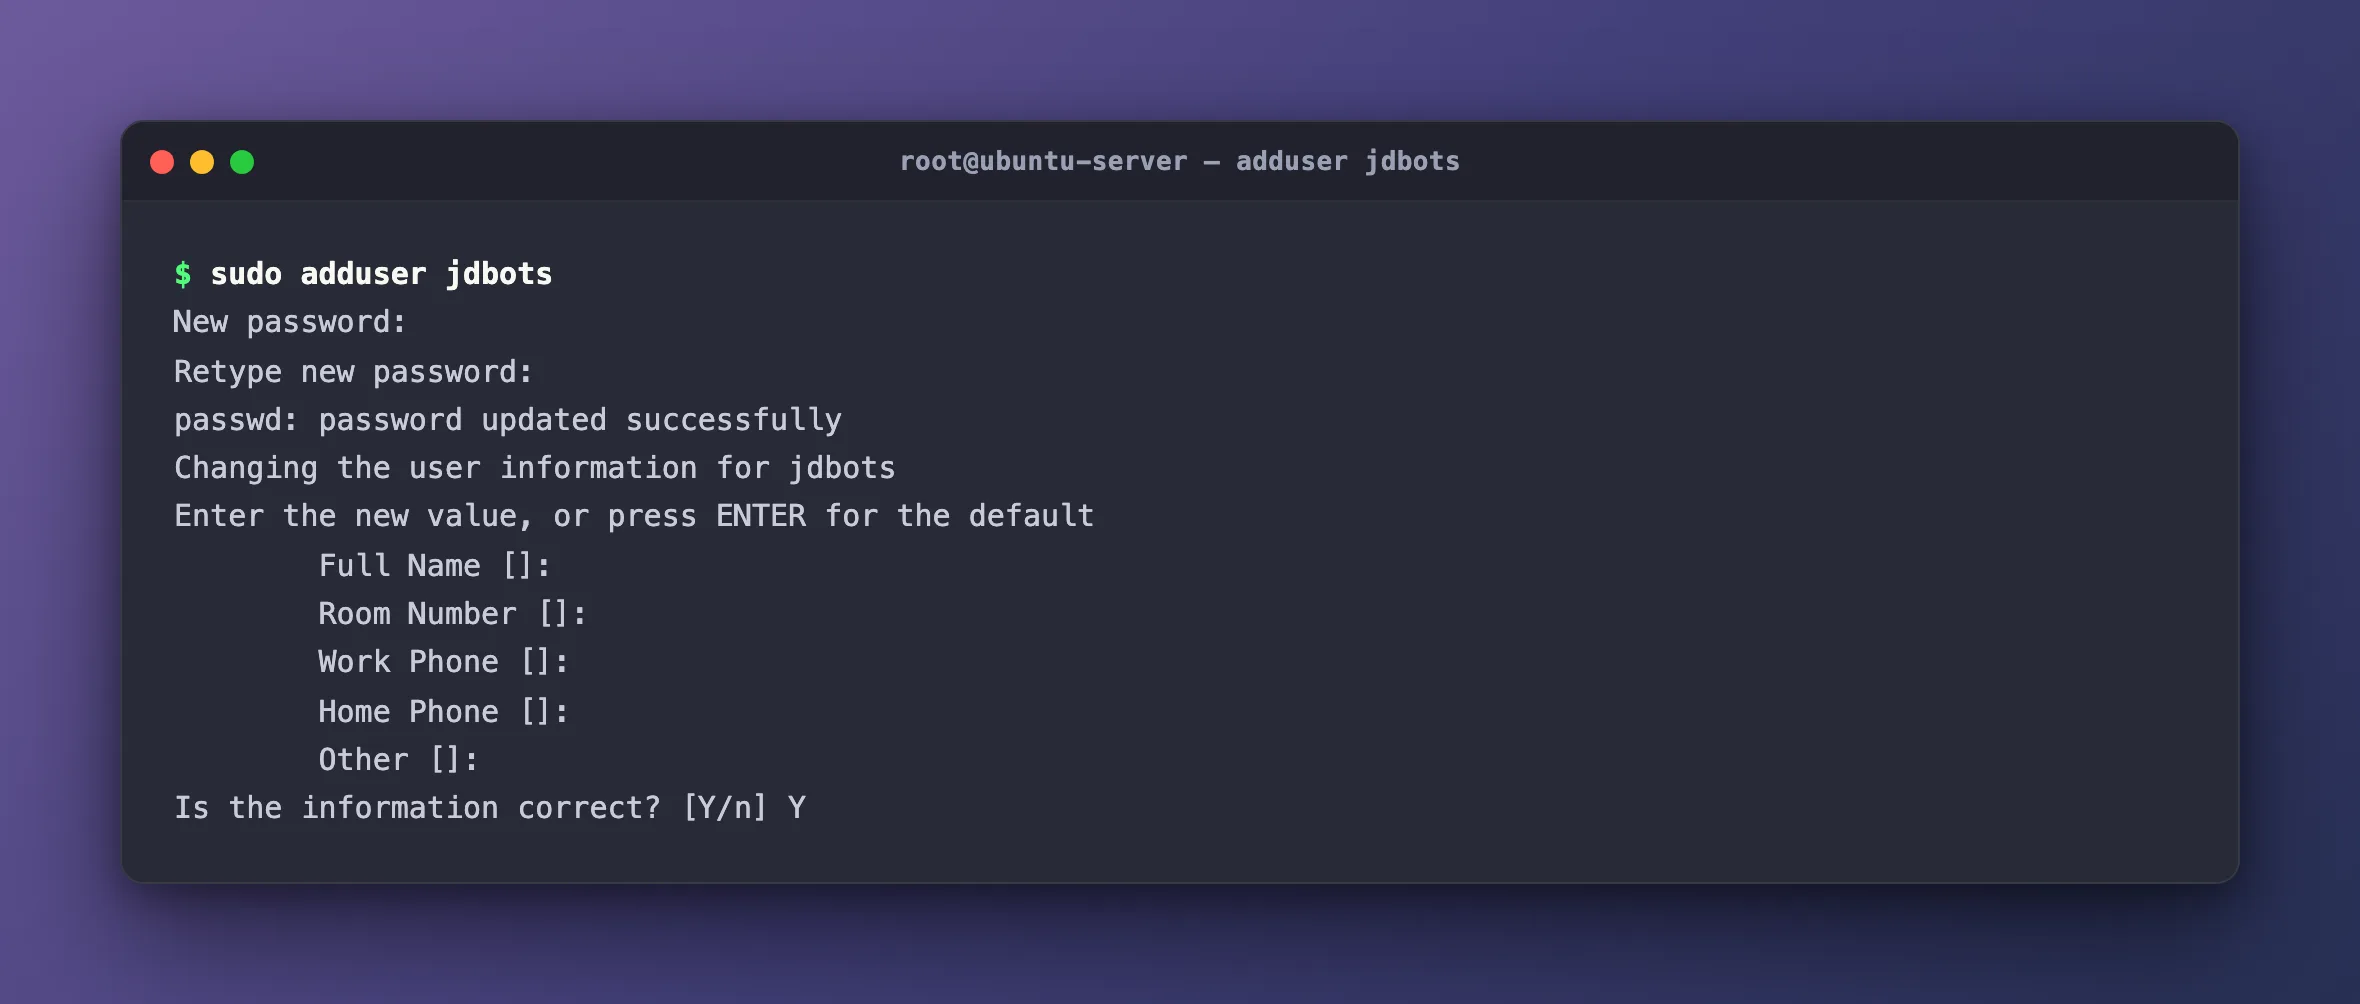
You are asked for two things:
- A password, twice. Nothing appears as you type — no dots, no asterisks. That is deliberate, not a broken keyboard. Choose a real password even if the account will log in with an SSH key, because
sudowill ask for it later. - Optional details — Full Name, Room Number, Work Phone, Home Phone, Other. These write to the fifth field of
/etc/passwdand are a leftover from shared university machines in the 1990s. Press Enter through all five. Nothing on a modern server reads them.
Finally it asks Is the information correct? [Y/n]. Type Y and press Enter.
That single command did six separate things: created the account, created a matching group, created /home/jdbots, copied the default dotfiles from /etc/skel, set the login shell to /bin/bash, and set the password.
Why adduser and Not useradd?
Both exist on every Ubuntu system and they are not the same tool. This is the single most common source of confusion on this topic:
adduser | useradd | |
|---|---|---|
| What it is | A friendly Perl script, specific to Debian and Ubuntu | The low-level binary, present on every Linux distribution |
| Home directory | Created automatically | Only if you pass -m |
Default dotfiles (/etc/skel) | Copied automatically | Only with -m |
| Password | Prompts you interactively | Not set — the account is locked until you run passwd |
| Login shell | /bin/bash, from /etc/adduser.conf | /bin/sh, from /etc/default/useradd |
| Matching user group | Always created | Depends on USERGROUPS_ENAB |
| Best for | Human accounts, set up by hand | Scripts, automation, cross-distribution portability |
The trap is that sudo useradd jdbots appears to succeed and leaves you with an account that has no home directory, no password and a shell most people do not expect. If you are typing the command yourself on Ubuntu, use adduser.
Where Did the Output Go? (Ubuntu 26.04)
If you have created users on Ubuntu before, you will notice something missing. Older releases printed a running commentary:
info: Adding new group `jdbots' (1001) ...
info: Adding new user `jdbots' (1001) with group `jdbots' ...
info: Creating home directory `/home/jdbots' ...
info: Copying files from `/etc/skel' ...
On Ubuntu 26.04 those lines are gone. The account is still created correctly — the messages are simply suppressed. adduser 3.153 introduced per-destination message levels, and /etc/adduser.conf documents the new defaults:
# STDERRMSGLEVEL, STDOUTMSGLEVEL, and LOGMSGLEVEL set the minimum
# priority for messages logged to syslog/journal and the console,
# respectively.
# Values are trace, debug, info, warn, err, and fatal.
#STDOUTMSGLEVEL=warn
#STDERRMSGLEVEL=warn
#LOGMSGLEVEL=info
Those info: lines are info-level, and the console threshold is now warn — so they never reach your screen. Ask for them explicitly and they come straight back:
sudo adduser --stdoutmsglevel=info jdbots
--quiet and --verbose still work but are now documented as deprecated synonyms for --stdoutmsglevel=warn and --stdoutmsglevel=info. If you have provisioning scripts that parse adduser output, this is the change that will have quietly broken them. Note that LOGMSGLEVEL still defaults to info, so the full detail is in the system journal even when your terminal shows nothing.
Step 3: Verify the Account Was Created
Never assume a command worked. Three checks, each answering a different question:
id jdbots
getent passwd jdbots
ls -la /home/jdbots
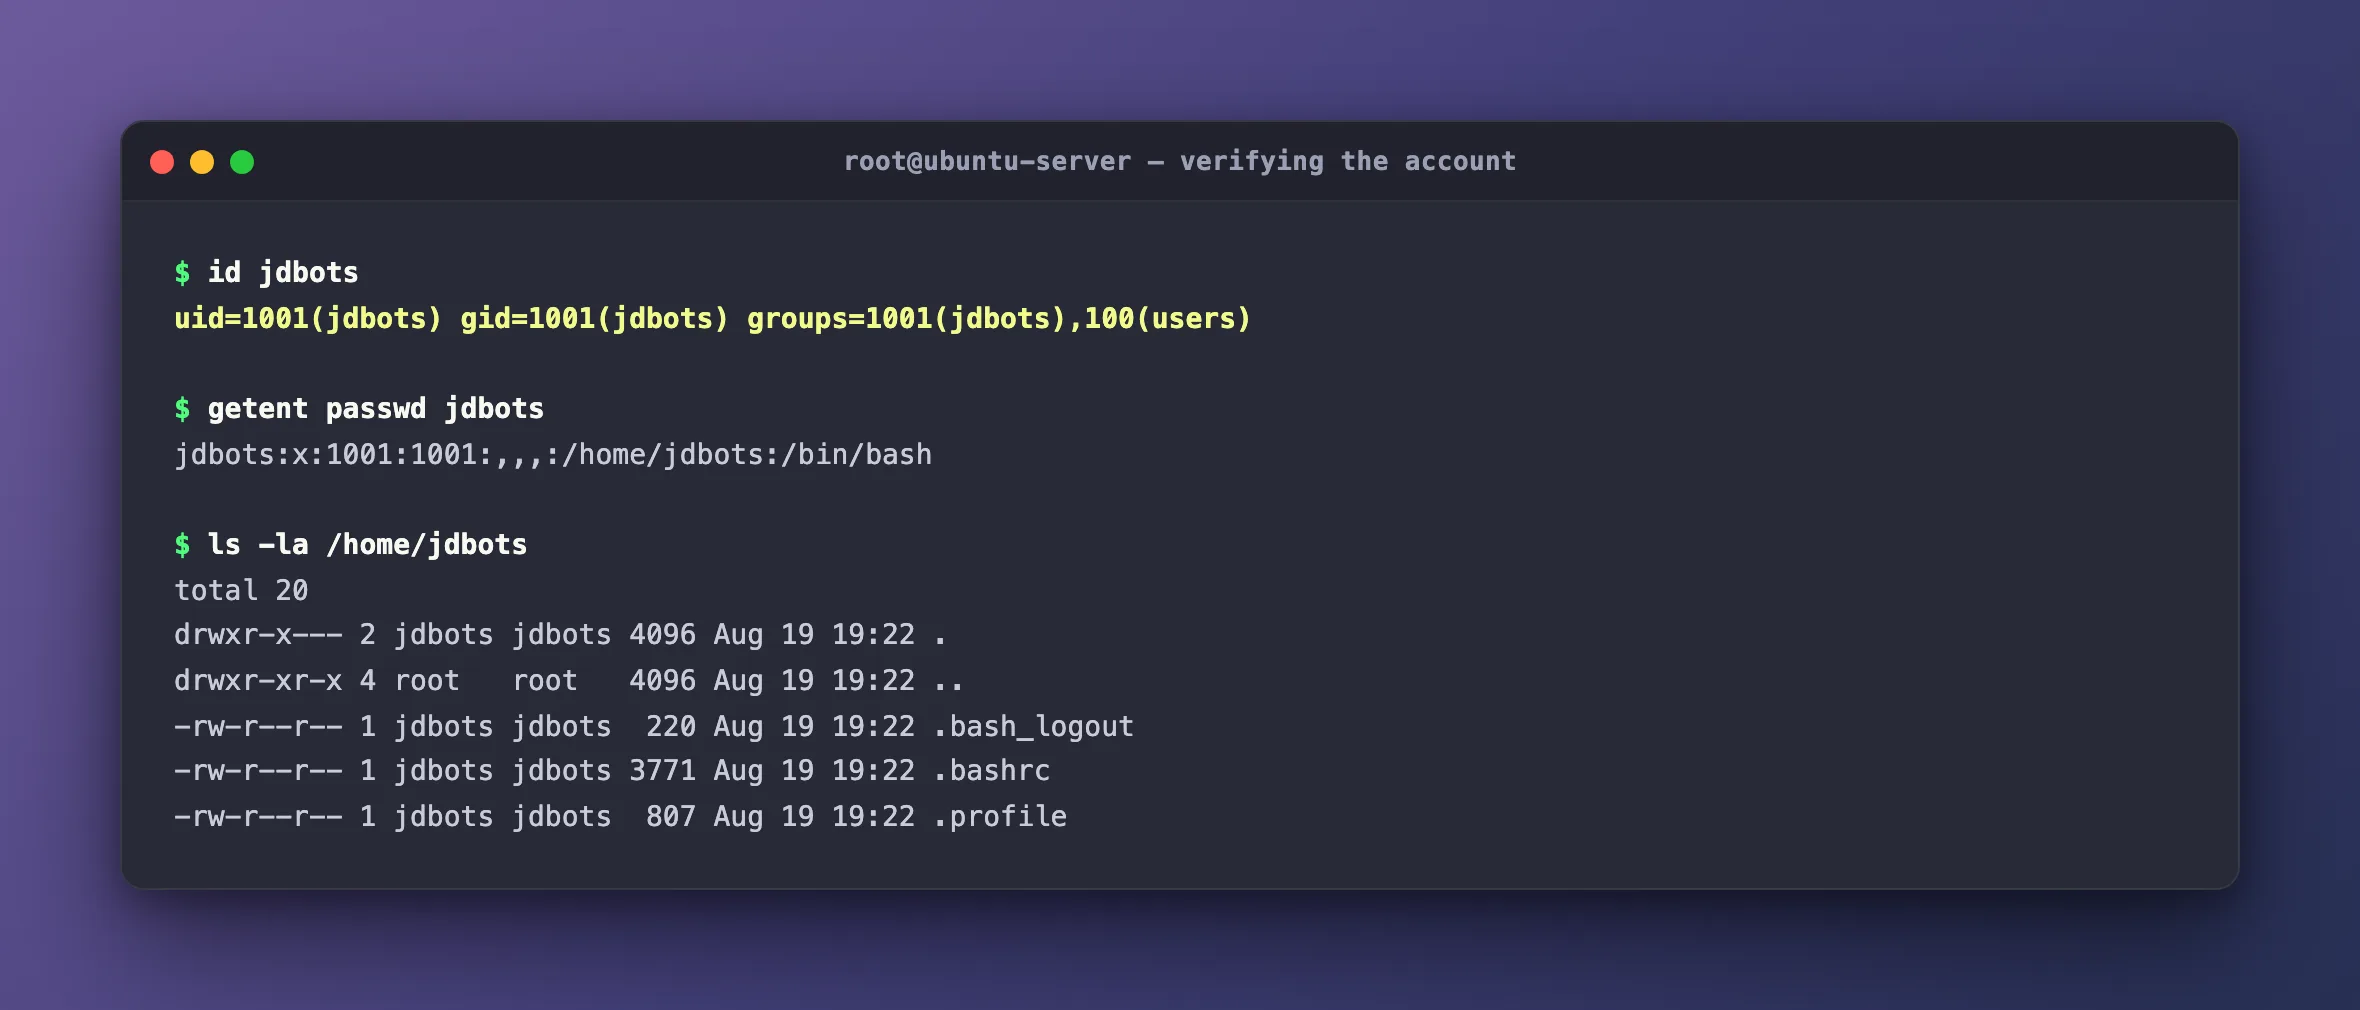
Reading the output:
id jdbots→uid=1001(jdbots) gid=1001(jdbots) groups=1001(jdbots),100(users). The account exists, it got UID 1001 (the next free number afterubuntuat 1000), and it belongs to its own group plususers.getent passwd jdbots→jdbots:x:1001:1001:,,,:/home/jdbots:/bin/bash. Thexmeans the password hash lives in/etc/shadow, not here. The,,,is those empty detail fields. The last two fields are the home directory and the login shell.ls -la /home/jdbots→.bash_logout,.bashrcand.profile, copied from/etc/skel. Note the directory mode isdrwxr-x---(750) and owned byjdbots— other users cannot read inside it.
getent is worth knowing over grep jdbots /etc/passwd: it queries the full name-service stack, so it also finds accounts that come from LDAP or Active Directory rather than the local file.
Step 4: Grant Sudo (Administrator) Access
A brand-new account is deliberately powerless. It cannot install packages, edit system files, or restart services. To make it an administrator, add it to the sudo group:
sudo usermod -aG sudo jdbots
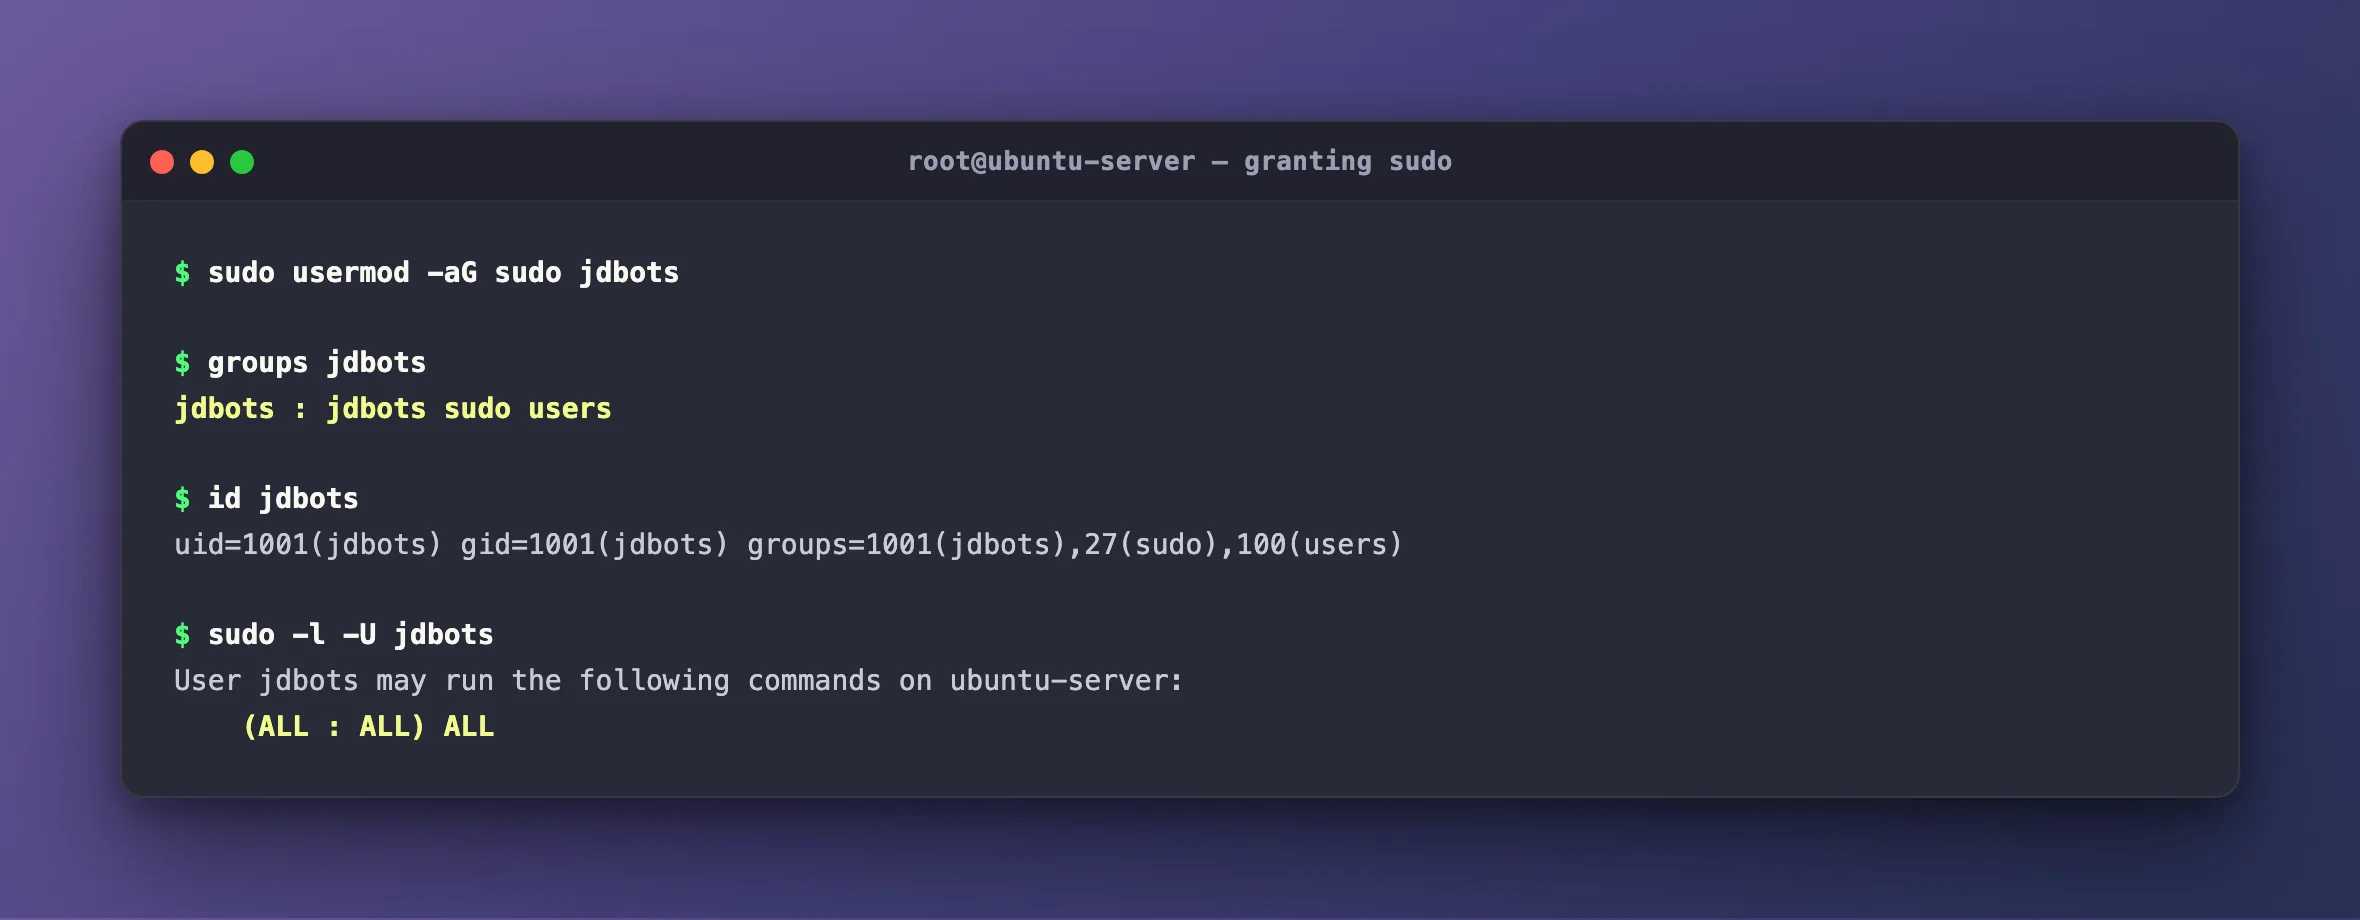
The -a is the most important character in that command. -G sets the user's secondary groups, and on its own it replaces the entire list. -a makes it append instead. Run usermod -G sudo jdbots without the -a and you silently remove the account from every other group it belonged to. This is the classic way to lock someone out of docker, www-data or a shared project group without noticing.
Confirm it landed:
groups jdbots
sudo -l -U jdbots
groups now lists sudo. The second command is the better check — it asks sudo itself what the rules resolve to, and prints:
User jdbots may run the following commands on ubuntu-server:
    (ALL : ALL) ALL
Read (ALL : ALL) ALL as three separate permissions: as any user (ALL) : as any group (ALL) : run any command (ALL). That rule comes from the line %sudo ALL=(ALL:ALL) ALL in /etc/sudoers — the % marks it as applying to a group rather than a single user.
Group membership is read at login, not continuously. If jdbots is already logged in when you run usermod, that session will keep saying "not in the sudoers file" until they log out and back in. This trips up almost everyone once. id jdbots run by another user will show the new group immediately, which makes it look like the problem is somewhere else.
ALL where you canFull sudo is right for an administrator, but not for an account that only needs to restart one service. For that, create a file in /etc/sudoers.d/ granting exactly the commands needed:
jdbots ALL=(root) /usr/bin/systemctl restart nginx
Always edit these with sudo visudo -f /etc/sudoers.d/jdbots-nginx. visudo checks the syntax before saving — a malformed sudoers file can lock every account out of sudo at once, and fixing it needs single-user or console access.
Step 5: Set Up SSH Key Login
Passwords over SSH get brute-forced constantly on any public server. Key-based login is both safer and more convenient. If you do not already have a key on your own machine, generate one:
ssh-keygen -t ed25519 -C "jdbots@laptop"
ed25519 is the modern default — shorter, faster and stronger than the older RSA keys. Accept the default path and set a passphrase when asked. This creates a private key (~/.ssh/id_ed25519, never leaves your machine) and a public key (~/.ssh/id_ed25519.pub, safe to hand out).
The easy way to install it is from your own machine:
ssh-copy-id -i ~/.ssh/id_ed25519.pub jdbots@server_ip
That prompts once for the account's password and sets everything up correctly. If password login is already disabled, do it manually on the server instead:
sudo install -d -m 700 -o jdbots -g jdbots /home/jdbots/.ssh
echo "ssh-ed25519 AAAAC3Nza... jdbots@laptop" | sudo tee -a /home/jdbots/.ssh/authorized_keys
sudo chmod 600 /home/jdbots/.ssh/authorized_keys
sudo chown jdbots:jdbots /home/jdbots/.ssh/authorized_keys
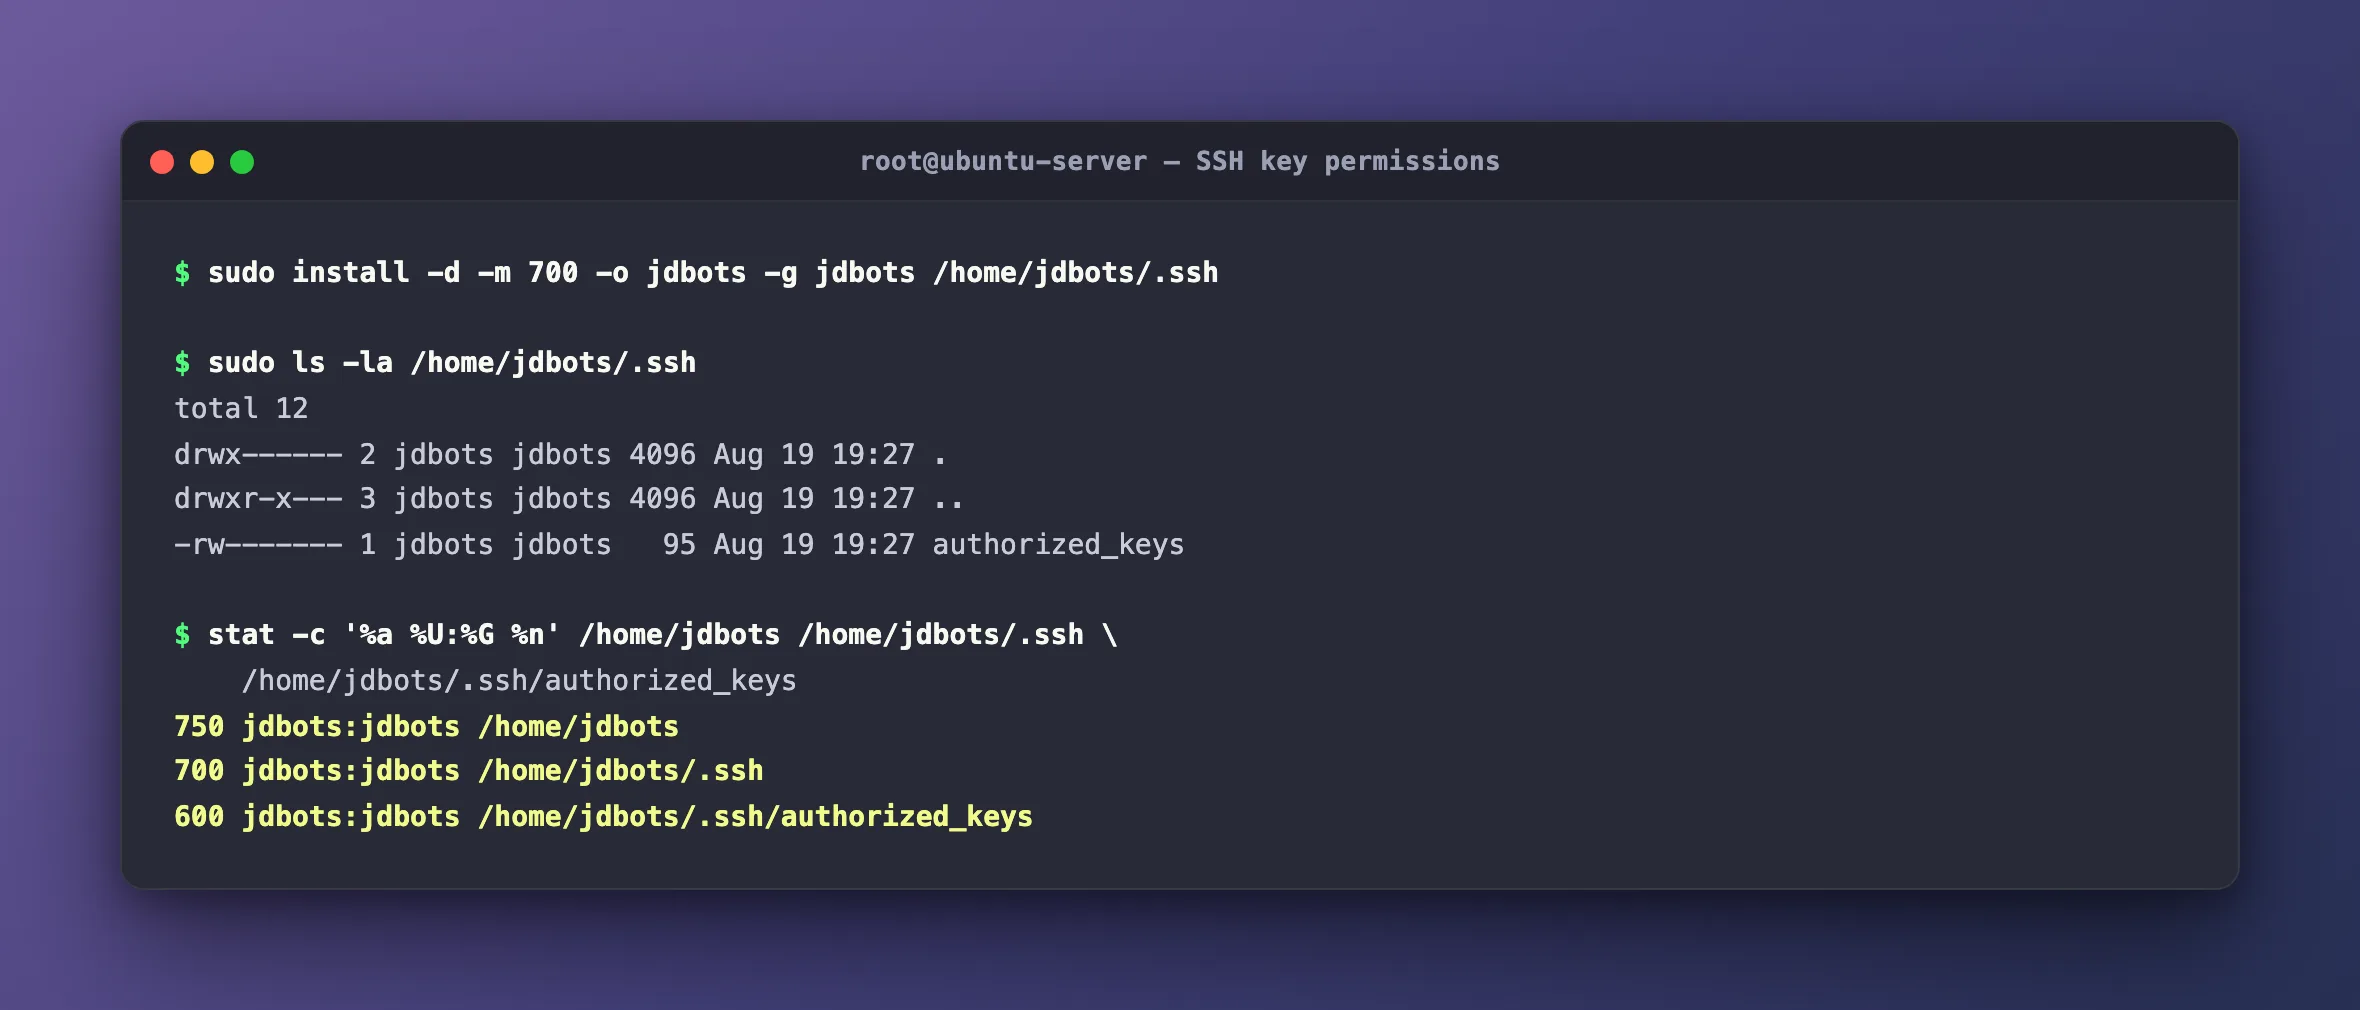
install -d creates a directory and sets its mode and ownership in one step, which avoids the window where a new .ssh directory briefly exists with the wrong permissions.
The permissions are not optional. OpenSSH refuses to use a key if the files are too readable, and — this is the cruel part — it fails silently, falling back to asking for a password with no explanation:
| Path | Mode | Meaning |
|---|---|---|
/home/jdbots | 750 | Owner full access, group read, others nothing |
/home/jdbots/.ssh | 700 | Owner only |
/home/jdbots/.ssh/authorized_keys | 600 | Owner read/write only |
Everything must also be owned by the user, not by root. Creating authorized_keys with sudo and forgetting the chown is the single most common reason "the key doesn't work".
Step 6: Add the User to Other Groups
Groups are how Linux shares access to files and devices without handing out sudo. A common example: several people who need to write to the same web directory.
sudo addgroup --stdoutmsglevel=info webdev
sudo adduser --stdoutmsglevel=info jdbots webdev
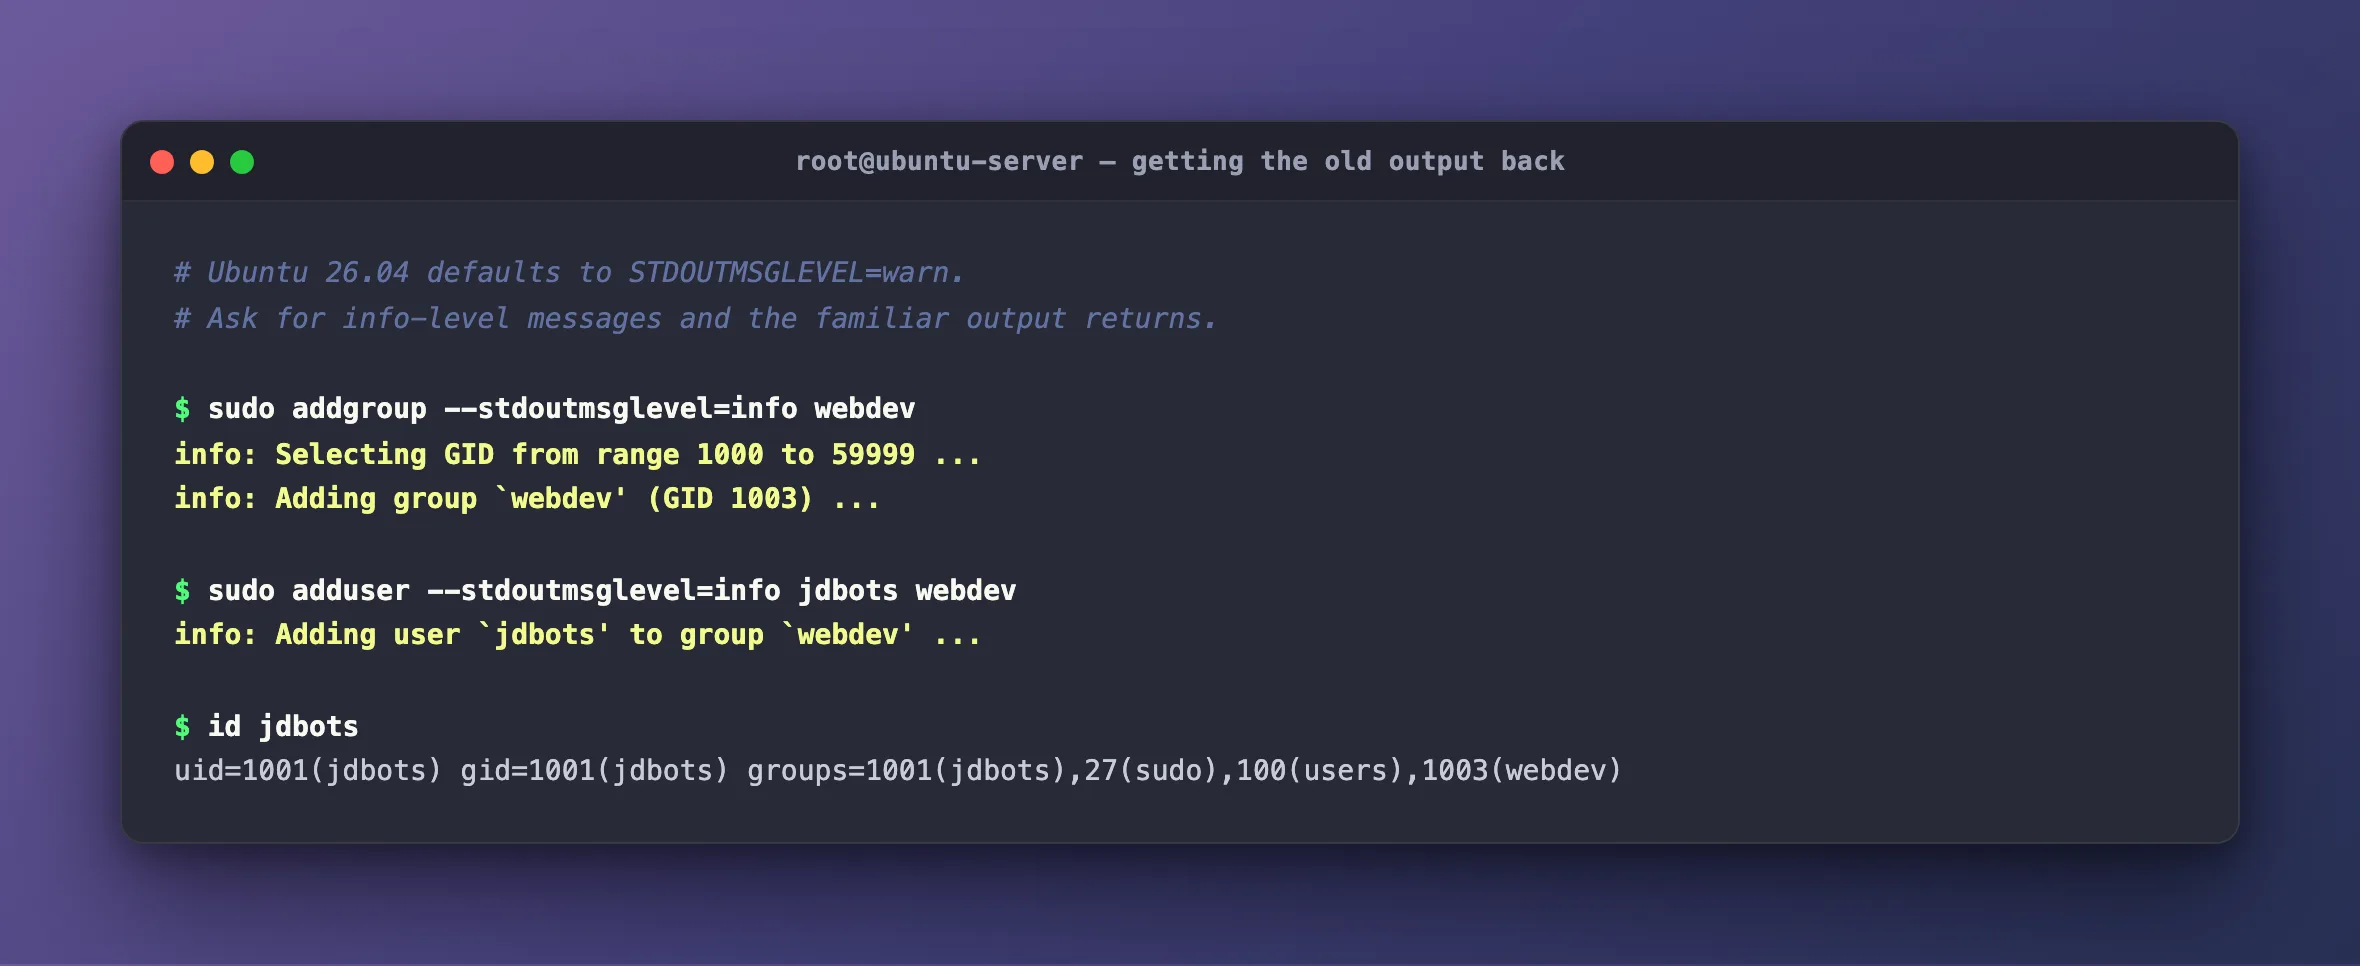
Note the two-argument form: adduser <user> <group> adds an existing user to an existing group. It is the readable equivalent of usermod -aG webdev jdbots, and it cannot bite you the way a forgotten -a can.
A group only becomes useful once it owns something. To let everyone in webdev write to a shared directory:
sudo chgrp -R webdev /var/www/project
sudo chmod -R 2775 /var/www/project
The leading 2 is the setgid bit, and it is what makes this work long-term: new files created inside inherit the webdev group instead of the creator's personal group. Without it, permissions drift the moment someone adds a file.
Useful group commands:
groups jdbots              # groups this user belongs to
getent group webdev        # members of this group
getent group               # every group on the system
sudo deluser jdbots webdev # remove from one group, keep the account
Step 7: Test the Account End to End
An account you have not tested is an account you are guessing about. Log in as the new user from your own machine:
ssh -i ~/.ssh/id_ed25519 jdbots@server_ip
Then, in that session:
whoami
id
sudo whoami
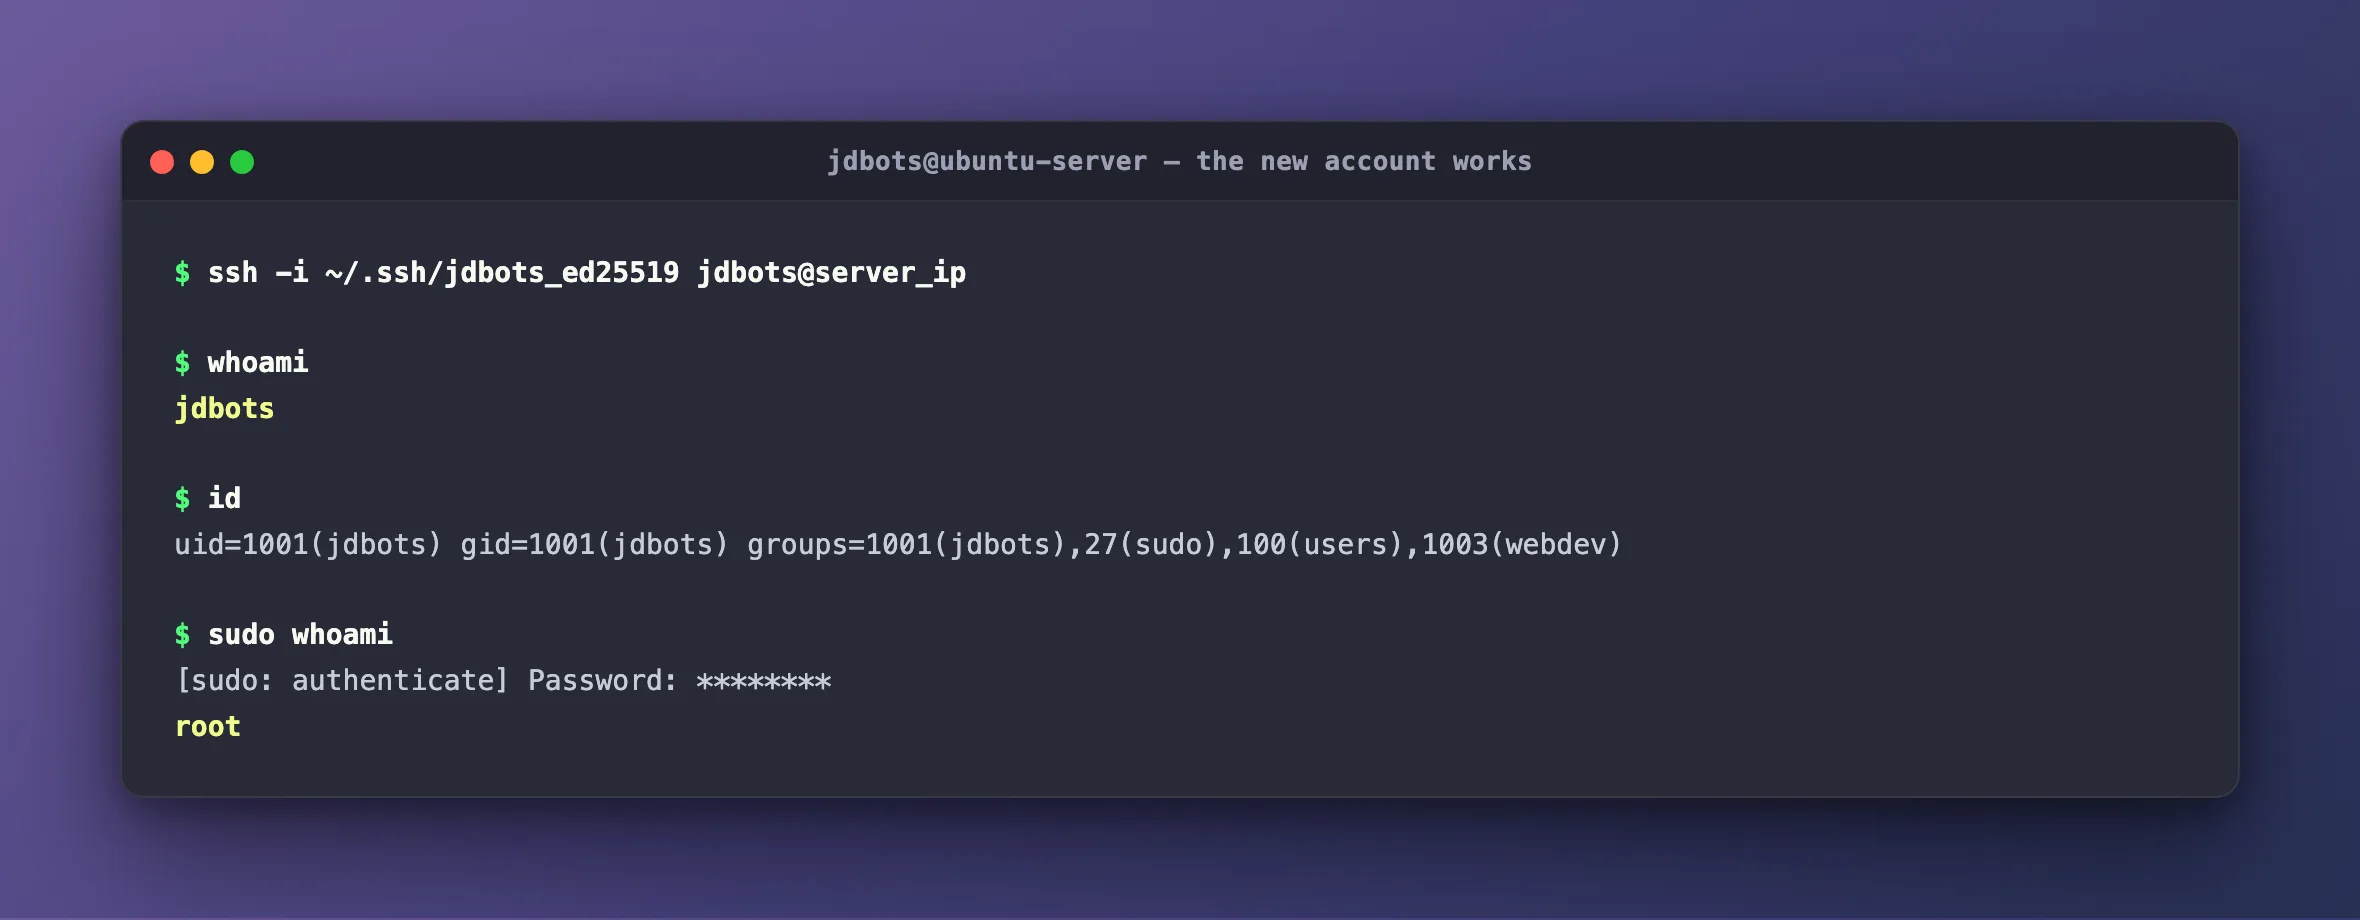
sudo whoami returning root is the proof that matters. The login works, the key works, and the sudo rights work.
The sudo Prompt Looks Different on Ubuntu 26.04
Notice the wording: [sudo: authenticate] Password: — and that asterisks appear as you type. Earlier Ubuntu releases showed [sudo] password for jdbots: and echoed nothing at all.
That is because Ubuntu 26.04 replaced the original C sudo with sudo-rs, a memory-safe reimplementation in Rust, as part of Canonical's push to replace core C utilities. Practical differences:
Classic sudo | sudo-rs (Ubuntu 26.04) | |
|---|---|---|
| Password prompt | [sudo] password for user: | [sudo: authenticate] Password: |
| Typing feedback | Nothing echoed | Asterisks echoed |
Non-interactive failure (sudo -n) | sudo: a password is required | sudo: interactive authentication is required |
sudoers syntax | — | Unchanged |
Your commands and /etc/sudoers rules work exactly as before. What breaks is scripts that match on sudo's output text — if you have automation grepping for a password is required, it will not match on 26.04.
Step 8: Control Password Expiry with chage
chage ("change age") manages how long a password stays valid. Start by looking at the current settings:
sudo chage -l jdbots
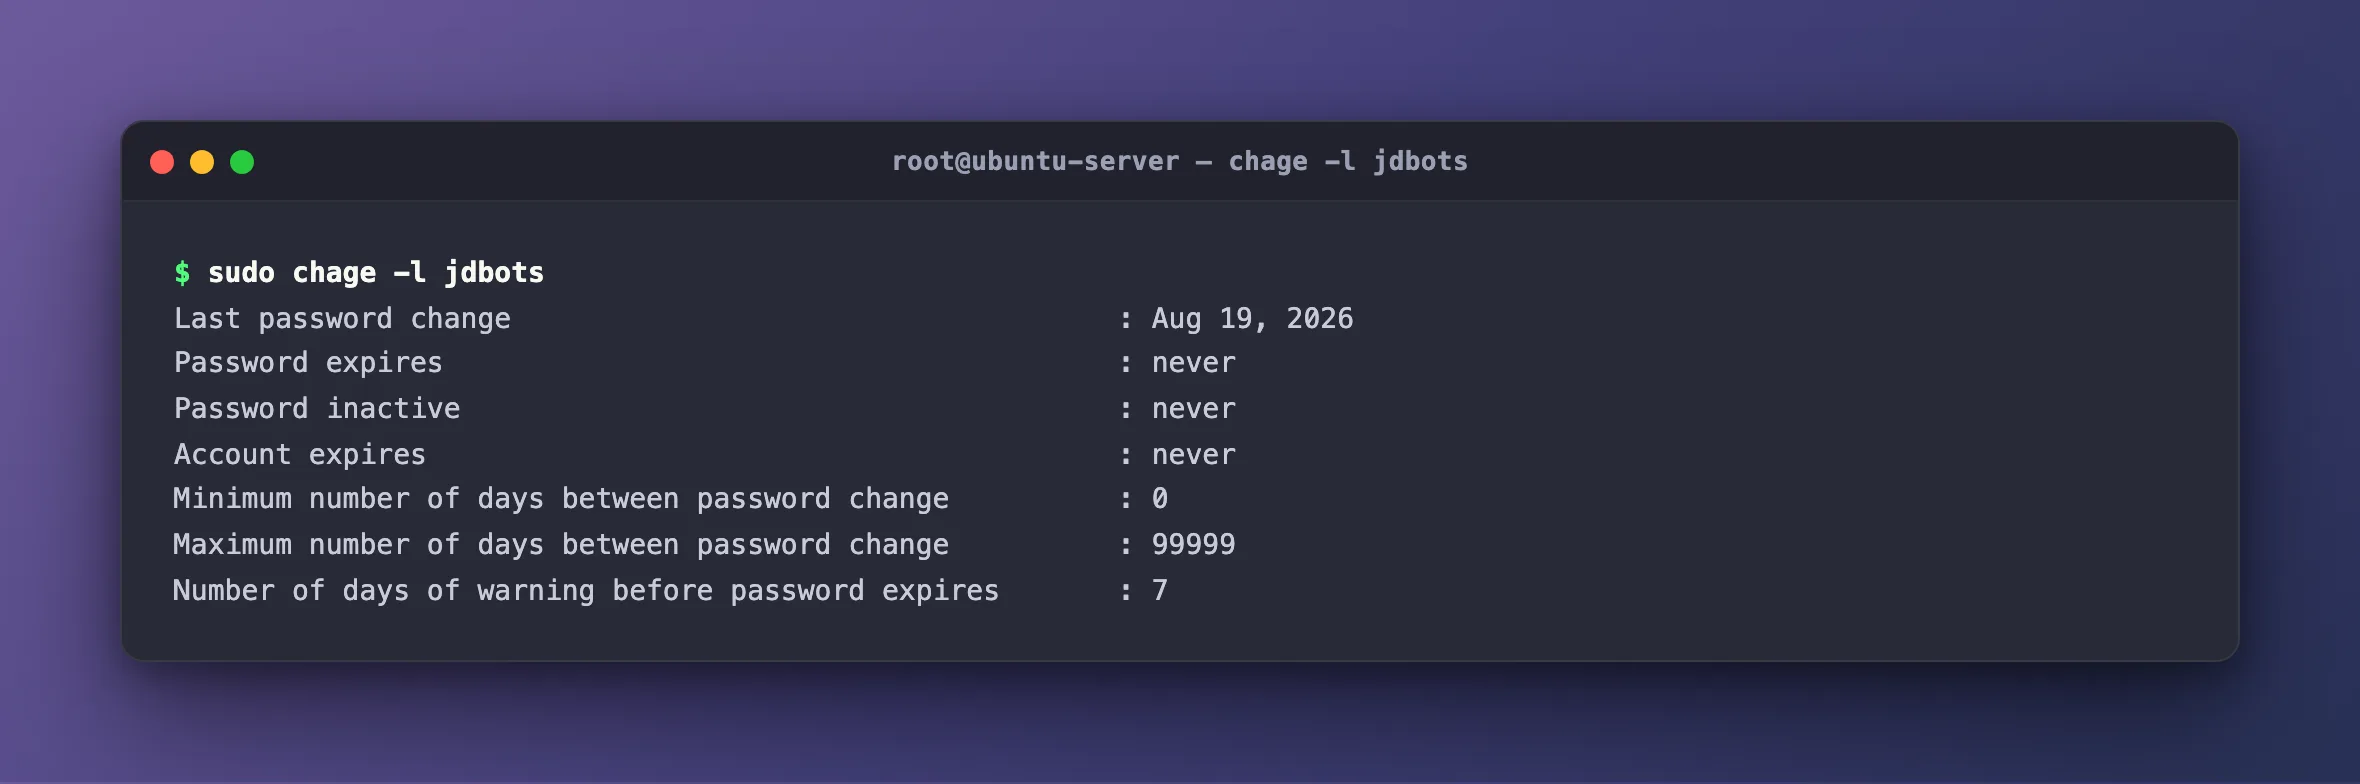
The defaults come from /etc/login.defs, and on a stock Ubuntu server they mean nothing ever expires: PASS_MAX_DAYS is 99999 — about 273 years.
To change that:
sudo chage -M 90 jdbots      # password expires after 90 days
sudo chage -W 14 jdbots      # start warning 14 days before it does
sudo chage -m 1 jdbots       # must wait 1 day between changes
sudo chage -d 0 jdbots       # force a password change at next login
sudo chage -E 2027-03-31 jdbots  # disable the whole account on a date
sudo chage -M -1 jdbots      # remove expiry again
chage -d 0 is the useful one when you create an account for someone else: you set a temporary password, hand it over, and they are forced to replace it the first time they log in — so you never know their real password.
chage -E is the one to remember for contractors. Set the end date when you create the account and it disables itself, whether or not anyone remembers.
Mandatory 90-day rotation is a compliance habit that NIST no longer recommends, because it pushes people toward predictable passwords. It also has a specific failure mode here: if the account logs in by SSH key, nothing prompts them to change the password before it expires — and an expired password means sudo stops working, with a confusing error, at the worst possible moment.
For a key-based administrator, a long or non-expiring password plus a strong SSH key is usually the better trade. Use expiry where a policy requires it, or where people actually log in with passwords.
How to Change or Remove a User Later
Everyday maintenance, all reversible:
sudo passwd jdbots                  # set a new password
sudo usermod -l newname jdbots      # rename the login
sudo usermod -s /usr/sbin/nologin jdbots   # block interactive login
sudo usermod -L jdbots              # lock the password
sudo usermod -U jdbots              # unlock it again
sudo deluser jdbots sudo            # revoke admin rights, keep the account
sudo deluser jdbots sudo is worth singling out. When someone changes role, removing them from the sudo group is almost always the right move — you keep their files, their history and their audit trail, and only take away the privilege.
When an account genuinely needs to go:
# 1. See what they are running
ps -u jdbots

# 2. Stop those processes
sudo pkill -u jdbots

# 3a. Remove the account, keep /home/jdbots
sudo deluser jdbots

# 3b. Or remove the account and its home directory
sudo deluser --remove-home jdbots
deluser --remove-home permanently deletes the user's home directory, including anything only they had. There is no undo. Back up /home/jdbots first if there is any doubt, and check for files they own outside their home directory before deleting the account:
sudo find / -xdev -user jdbots -not -path "/home/jdbots/*" 2>/dev/null
Files left behind keep the old numeric UID. If you later create another user, it can inherit that UID and silently gain ownership of them.
Do It All Non-Interactively
For provisioning scripts and cloud-init, adduser's prompts get in the way. This does the same job without asking anything:
USERNAME=jdbots
PUBKEY="ssh-ed25519 AAAAC3Nza... jdbots@laptop"

# Create the account with no password prompt and no detail fields
sudo adduser --disabled-password --gecos "" "$USERNAME"

# Set a password from a variable (or skip for a key-only account)
echo "$USERNAME:$(openssl rand -base64 18)" | sudo chpasswd

# Administrator rights
sudo usermod -aG sudo "$USERNAME"

# SSH key
sudo install -d -m 700 -o "$USERNAME" -g "$USERNAME" "/home/$USERNAME/.ssh"
echo "$PUBKEY" | sudo tee -a "/home/$USERNAME/.ssh/authorized_keys" > /dev/null
sudo chmod 600 "/home/$USERNAME/.ssh/authorized_keys"
sudo chown "$USERNAME:$USERNAME" "/home/$USERNAME/.ssh/authorized_keys"
--disabled-password creates the account without prompting and without a usable password — the account can still log in by SSH key. --gecos "" skips the five detail questions. Note this leaves the account unable to use sudo until a password is set, which is what chpasswd handles above.
Command Reference
| Task | Command |
|---|---|
| Create a user (interactive) | sudo adduser jdbots |
| Create a user (scripted) | sudo adduser --disabled-password --gecos "" jdbots |
| Set or change a password | sudo passwd jdbots |
| Grant admin rights | sudo usermod -aG sudo jdbots |
| Revoke admin rights | sudo deluser jdbots sudo |
| Check a user's sudo rules | sudo -l -U jdbots |
| Show UID, GID and groups | id jdbots |
| List a user's groups | groups jdbots |
| Create a group | sudo addgroup webdev |
| Add a user to a group | sudo adduser jdbots webdev |
| Remove from one group | sudo deluser jdbots webdev |
| List all human accounts | awk -F: '$3>=1000 && $3<65534 {print $1}' /etc/passwd |
| Show password ageing | sudo chage -l jdbots |
| Force password change at next login | sudo chage -d 0 jdbots |
| Lock / unlock an account | sudo usermod -L jdbots / -U jdbots |
| Switch to the user | sudo su - jdbots |
| Delete a user, keep home | sudo deluser jdbots |
| Delete a user and home | sudo deluser --remove-home jdbots |
Common Mistakes
| Mistake | What happens | Fix |
|---|---|---|
usermod -G sudo without -a | Silently removes the user from every other group | Always usermod -aG |
Using useradd instead of adduser | No home directory, no password, /bin/sh shell | Use adduser for interactive setup, or useradd -m |
Testing sudo in an already-open session | Still says "not in the sudoers file" | Log out and back in — groups are read at login |
authorized_keys owned by root | Key login fails silently, falls back to password | chown jdbots:jdbots, and chmod 600 |
.ssh directory mode 755 | OpenSSH refuses the key without explaining | chmod 700 ~/.ssh |
Editing /etc/sudoers with nano | A typo can lock everyone out of sudo | sudo visudo — it validates before saving |
Expecting adduser output on 26.04 | Looks like nothing happened | Nothing is wrong; add --stdoutmsglevel=info |
| Forcing password expiry on a key-only account | sudo breaks with no warning | sudo chage -M -1 jdbots |
| Deleting a user with processes running | Orphaned processes keep running under a dead UID | sudo pkill -u jdbots first |
Troubleshooting
| Problem | Cause | Fix |
|---|---|---|
jdbots is not in the sudoers file | Not in sudo group, or session predates the change | sudo usermod -aG sudo jdbots, then log out and back in |
Permission denied (publickey) | Wrong key, wrong permissions, or wrong owner | Check with stat -c '%a %U:%G %n' ~/.ssh ~/.ssh/authorized_keys; test with ssh -v |
| SSH keeps asking for a password | OpenSSH rejected the key file quietly | Modes must be 700 on .ssh and 600 on authorized_keys, both owned by the user |
adduser: The user 'jdbots' already exists | Name is taken | id jdbots to inspect it, or pick another name |
Your account has expired at login | chage -E date has passed | sudo chage -E -1 jdbots |
sudo: interactive authentication is required | sudo -n used with no cached credentials | Run without -n, or add a NOPASSWD rule in /etc/sudoers.d |
su: Authentication failure | su needs the target user's password | Use sudo su - jdbots, which asks for your password |
New user sees $ instead of a coloured prompt | Shell is /bin/sh, not /bin/bash | sudo usermod -s /bin/bash jdbots |
useradd: cannot create directory /home/jdbots | Ran useradd without -m, then logged in | sudo usermod -m -d /home/jdbots jdbots |
Frequently Asked Questions
What is the difference between adduser and useradd?
adduser is a high-level Perl script specific to Debian and Ubuntu. It creates the home directory, copies /etc/skel, creates a matching group, and prompts for a password. useradd is the low-level binary found on every Linux distribution and creates only the account entry unless you pass flags like -m. Use adduser when typing by hand on Ubuntu; use useradd in scripts that must run on other distributions too.
Why does adduser print nothing on Ubuntu 26.04?
Because adduser 3.153 defaults to STDOUTMSGLEVEL=warn, and the familiar Adding user... lines are info-level. The account is created correctly. Run sudo adduser --stdoutmsglevel=info jdbots to see them, or check the journal — LOGMSGLEVEL still defaults to info.
How do I give a user sudo access?
sudo usermod -aG sudo jdbots. The -a appends; without it you replace all their other groups. The user must log out and back in for it to take effect. Verify with sudo -l -U jdbots.
Why does my sudo prompt say [sudo: authenticate]?
Ubuntu 26.04 ships sudo-rs, a memory-safe Rust reimplementation of sudo, in place of the original C version. It words its prompts differently and echoes asterisks as you type. Your sudoers rules and commands are unchanged; only scripts that parse sudo's output text need attention.
Do I still need a password if the user logs in with an SSH key?
Yes, if the account uses sudo. The SSH key authenticates the login; sudo separately asks for the account's own Unix password. An account with no password cannot authenticate to sudo at all. For automation accounts, add a NOPASSWD rule in /etc/sudoers.d rather than leaving the password unset.
How do I create a user without a home directory?
sudo adduser --no-create-home --shell /usr/sbin/nologin svcaccount. This suits accounts that exist only to own files or run a service. /usr/sbin/nologin refuses interactive login while still allowing the account to run processes.
What is the difference between su - jdbots and sudo su - jdbots?
su - jdbots asks for jdbots's password. sudo su - jdbots asks for your own and works without knowing theirs. On a server you administer, the second is nearly always what you want. sudo -u jdbots -i does the same thing more directly.
How do I list all real users on the server?
awk -F: '$3>=1000 && $3<65534 {print $1}' /etc/passwd. Filtering on UID ≥ 1000 excludes the system accounts created by packages. getent passwd is the more complete alternative when accounts come from LDAP or Active Directory.
Can I change a user's username after creating it?
Yes: sudo usermod -l newname oldname, plus sudo usermod -d /home/newname -m newname to move the home directory and sudo groupmod -n newname oldname to rename their group. The user must be fully logged out. Renaming does not change the UID, so file ownership follows automatically.
How do I remove sudo access without deleting the account?
sudo deluser jdbots sudo. This removes them from the sudo group only — files, home directory and login all stay intact. It is the right move when someone changes role rather than leaves.
What UID will my new user get?
The next free number from 1000 upward, as set by UID_MIN in /etc/login.defs. On a fresh cloud server where ubuntu holds 1000, your first new account gets 1001. Force a specific one with sudo adduser --uid 1500 jdbots when you need UIDs to line up across machines for NFS.
Is it safe to delete the default ubuntu cloud account?
Only once you have confirmed your new account works — log out, log back in as it, and successfully run sudo whoami. Some cloud images also recreate the default account on reboot via cloud-init; if yours does, set preserve_hostname and disable the default user in /etc/cloud/cloud.cfg instead of just deleting it.
Cleanup
If you created the account only to follow along, remove it. Check what it owns first:
ps -u jdbots
sudo find / -xdev -user jdbots -not -path "/home/jdbots/*" 2>/dev/null
Then remove the account, its home directory, and the demo group:
sudo pkill -u jdbots
sudo deluser --remove-home jdbots
sudo delgroup webdev
If instead you are keeping the account as your admin login, do the opposite — verify it fully before you rely on it. Open a second SSH session as jdbots, run sudo whoami, and confirm it prints root before closing your original root session. Locking yourself out of a remote server is a genuinely bad afternoon.
Conclusion
Creating a user on Ubuntu Server is one command. Creating one you can actually rely on takes a few more: adduser for the account, usermod -aG sudo for administrator rights, an authorized_keys file with the right permissions for key-based login, and chage when a policy demands password expiry.
The parts worth carrying forward are the ones that bite quietly. The -a in usermod -aG. Group membership only applying after a fresh login. authorized_keys failing silently when the ownership is wrong. And on Ubuntu 26.04, adduser succeeding without printing a word, while sudo-rs words its prompts differently from every guide written before 2026.
Test the account before you depend on it, and prefer removing a group membership over deleting an account when someone's role changes.
Related Guides
- Disable Password Authentication and Use SSH Keys on Linux Ubuntu Server — the natural next step once your new user's key login works
- Changing the Default SSH Port 22 on Linux Ubuntu Server — cut brute-force noise in your logs
- How to Upgrade to the Latest LTS Version of Linux Ubuntu Server
- How to Install Docker on Ubuntu Server — where the
dockergroup matters for exactly the reasons above - Deploy .NET App on Ubuntu with Nginx and SSL Certificate
- Install WordPress on Ubuntu Server with Docker
Additional Resources
addusermanual page — Ubuntuusermodmanual page — Ubuntuchagemanual page — Ubuntusudoersmanual page — sudo project- sudo-rs on GitHub — the Rust sudo shipped in Ubuntu 26.04
- Ubuntu Server documentation: user management
- NIST SP 800-63B Digital Identity Guidelines — on why forced password rotation fell out of favour
