How to Assign an Azure RBAC Role in the Portal and Azure CLI (Step-by-Step)

Being Owner of an Azure subscription does not let you read a single secret in a Key Vault you just created. The fix is one role assignment — and once you understand its three parts, you can grant exactly the access you mean, to a person or to an app, in about a minute.
What a Role Assignment Is
Azure decides who can do what with role-based access control (RBAC). Every permission you will ever grant is a role assignment, and every role assignment has three parts:
| Part | The question it answers | Example |
|---|---|---|
| Security principal | Who gets access? | A user, a group, a service principal (an app) or a managed identity |
| Role definition | What can they do? | Key Vault Secrets Officer — read, write and delete secrets |
| Scope | Where does it apply? | One resource, a resource group, a subscription or a management group |
Access flows downward. A role assigned on a subscription applies to every resource group and resource inside it. A role assigned on one Key Vault applies to that vault and nothing else. That is why the smallest scope that does the job is always the safest choice.
Why Owner Is Not Enough
Azure splits permissions into two kinds:
- Control plane — managing the resource itself: create it, configure it, delete it. Owner and Contributor live here.
- Data plane — working with the data inside it: secrets in a Key Vault, files in Storage, calls to an AI model.
A Key Vault that uses the Azure RBAC permission model (the default for new vaults) refuses data-plane requests unless you hold a data role — even if you created the vault and own the subscription. Here is the real error, captured seconds after creating a vault (IDs replaced with placeholders):
az keyvault secret list --vault-name kv-maf-servicedesk-4224
ERROR: (Forbidden) Caller is not authorized to perform action on resource.
If role assignments, deny assignments or role definitions were changed recently, please observe propagation time.
Caller: appid=04b07795-8ddb-461a-bbee-02f9e1bf7b46;oid=22222222-2222-2222-2222-222222222222;iss=https://sts.windows.net/11111111-1111-1111-1111-111111111111/
Action: 'Microsoft.KeyVault/vaults/secrets/readMetadata/action'
Resource: '/subscriptions/00000000-0000-0000-0000-000000000000/resourcegroups/rg-maf-servicedesk/providers/microsoft.keyvault/vaults/kv-maf-servicedesk-4224'
Assignment: (not found)
DenyAssignmentId: null
DecisionReason: null
Vault: kv-maf-servicedesk-4224;location=eastus2
...
Inner error: {
    "code": "ForbiddenByRbac"
}
Read it line by line and it tells you everything. appid=04b07795-… is the Azure CLI itself, oid is you, Action is the exact permission you lacked, and Assignment: (not found) means no role assignment grants it. The rest of this guide adds that missing assignment.
Before You Start
- Permission to assign roles at the scope you choose. That means Owner, User Access Administrator or Role Based Access Control Administrator. Contributor cannot assign roles.
- The resource already exists. This guide uses a Key Vault named
kv-maf-servicedesk-4224; use your own. - The person, group or managed identity already exists in your Microsoft Entra tenant.
- For the CLI route: the Azure CLI installed and signed in. How to Create a Resource Group in Microsoft Azure using Azure CLI walks through
az login.
The example gives yourself the Key Vault Secrets Officer role on one vault. Swap in your own resource, role and person — the screens are identical for every resource type.
Step 1: Open Access Control (IAM)
- In the Azure portal, open the resource. The quickest way is to type its name into the search bar at the top.
- In the left menu, select Access control (IAM).
- Select + Add, then Add role assignment.
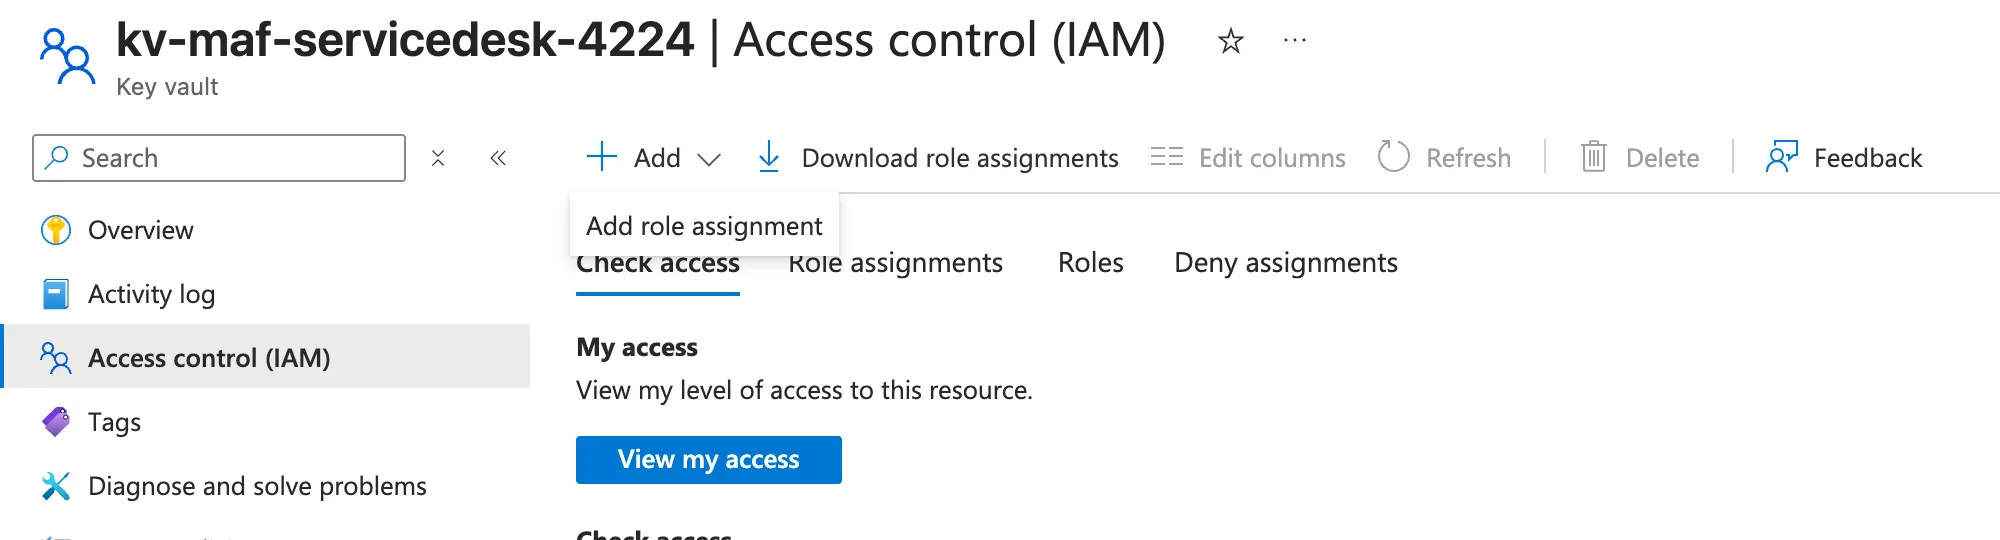
Every resource, resource group and subscription has its own Access control (IAM) page, and where you open it is the scope. Open it on the vault and the role applies to that vault only. Open it on the subscription and it applies to everything in the subscription.
Step 2: Choose the Role
- On the Role tab, stay on Job function roles. The other tab, Privileged administrator roles, holds Owner, Contributor, User Access Administrator and Role Based Access Control Administrator — roles with broad power over resources or over access itself. Leave those alone unless you truly need them.
- Type the role name into the search box, for example
Key Vault Secrets Officer. - Click the row whose Name column matches exactly. The row turns grey to show it is selected.
- Select Next at the bottom of the page.
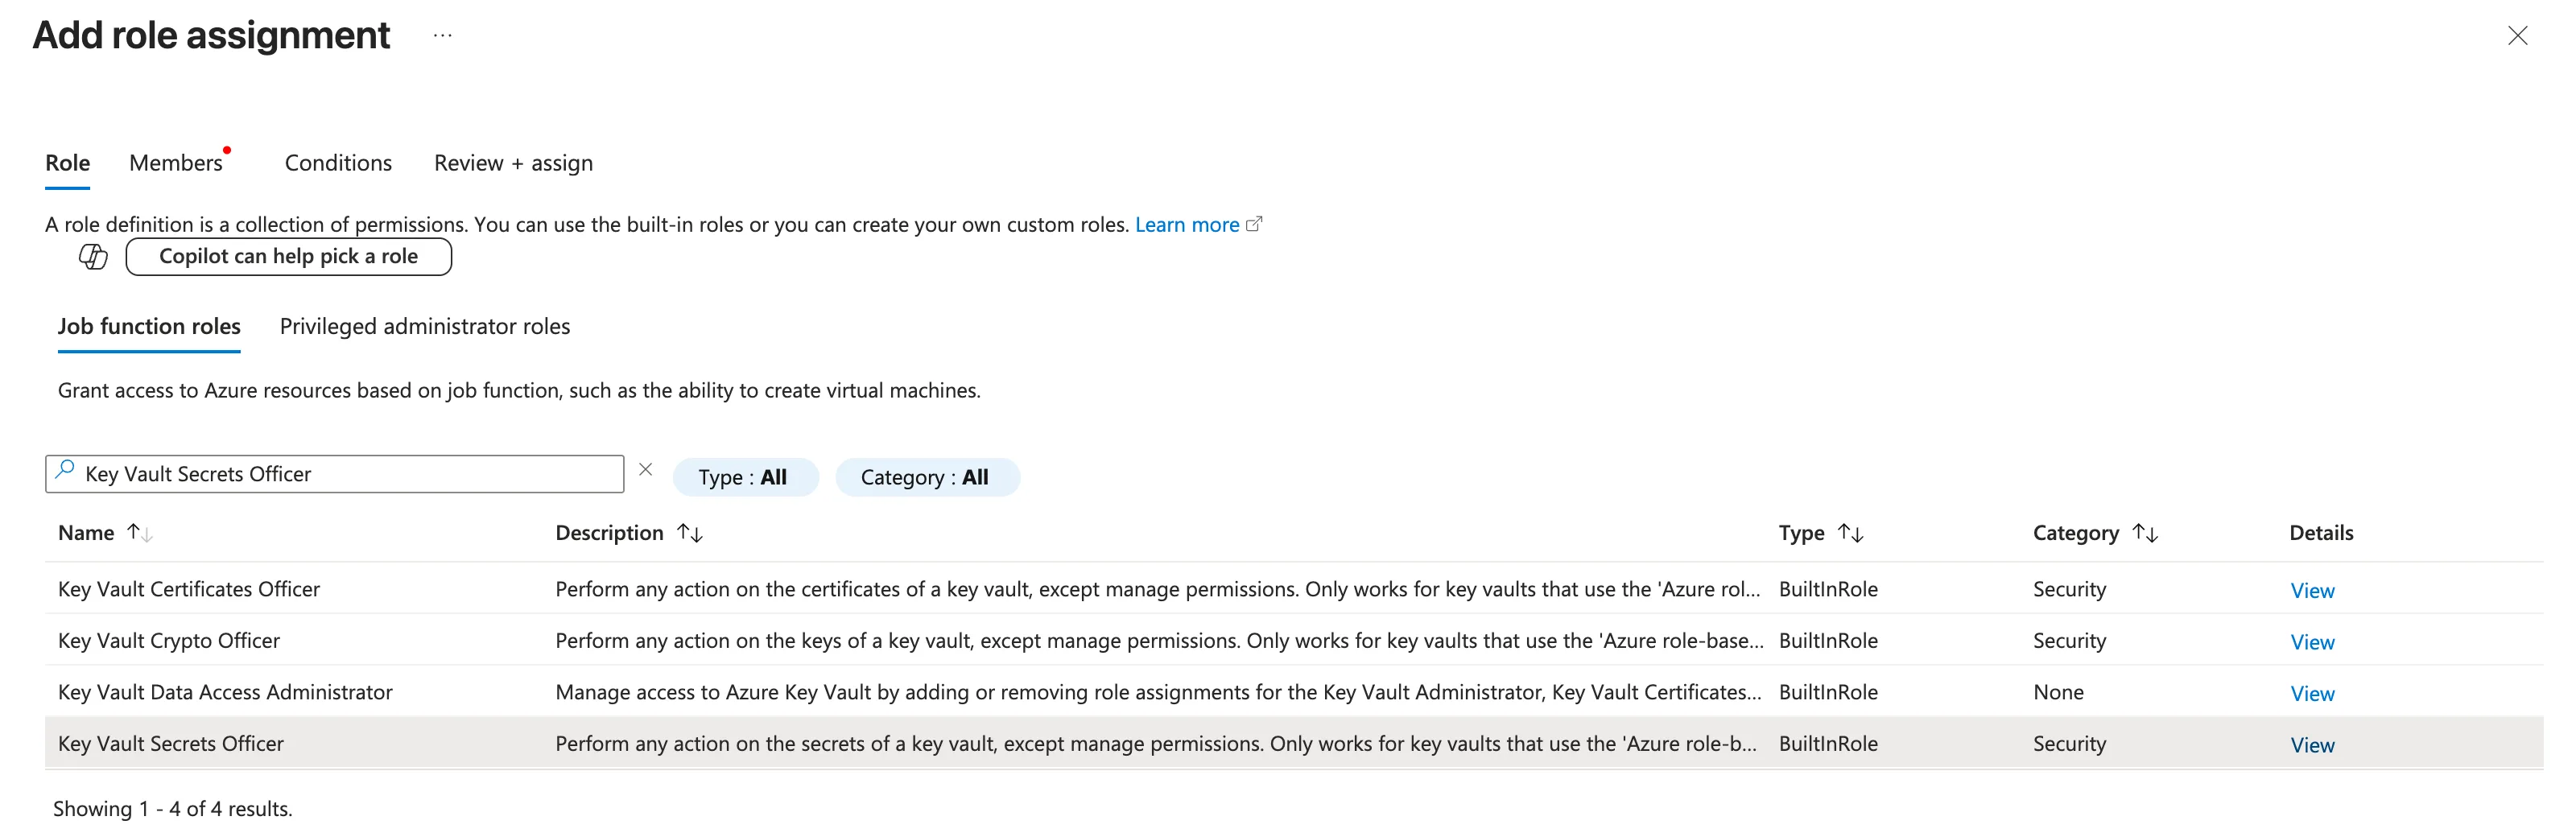
The search is fuzzy — it matches words in role descriptions too. Searching Key Vault Secrets Officer also lists Key Vault Data Access Administrator, because that role's description mentions the Secrets Officer role. Always check the Name column before you continue: Data Access Administrator can hand out Key Vault roles to other people, which is far more power than reading secrets.
Not sure what a role allows? Select View in its Details column to see the exact list of actions before you pick it.
Step 3: Choose Who Gets Access
- On the Members tab, choose what you are giving access to:
- User, group, or service principal — people, groups and app registrations.
- Managed identity — the built-in identity of an Azure resource, such as a Container App or a Function App.
- Select + Select members.
- In the Select members panel, type the person's full email address (or name).
- Click the matching result. It appears under Selected members.
- Select Select at the bottom of the panel.
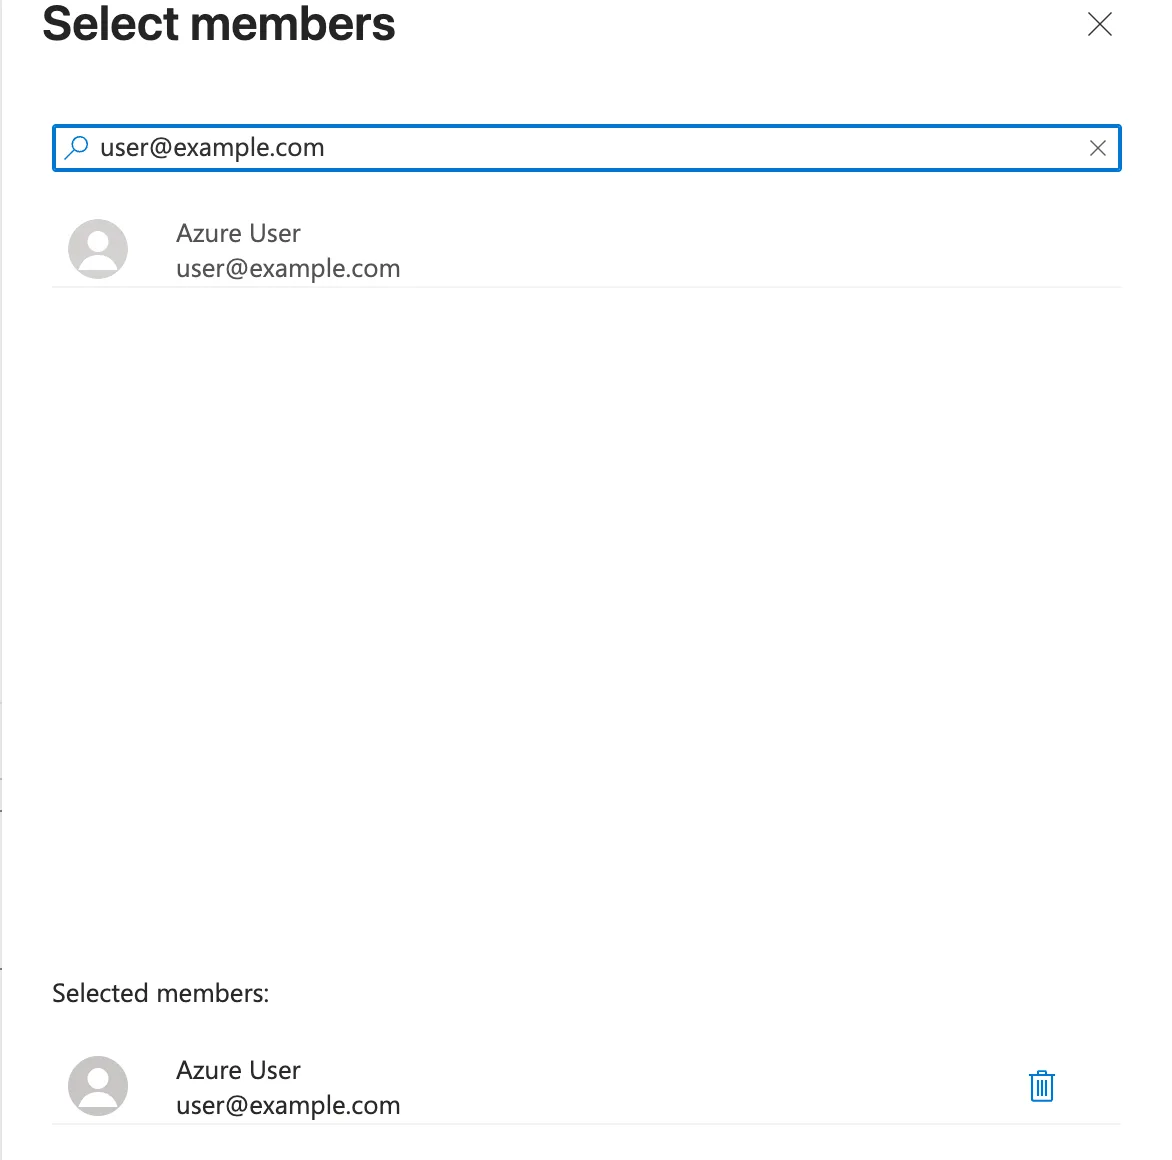
Type an address that is not in your directory and the panel offers to invite it as a guest user. Do not click that unless you really mean to add someone from outside your organization — check the spelling instead.
Back on the Members tab, the person now appears in the table with their object ID and type:
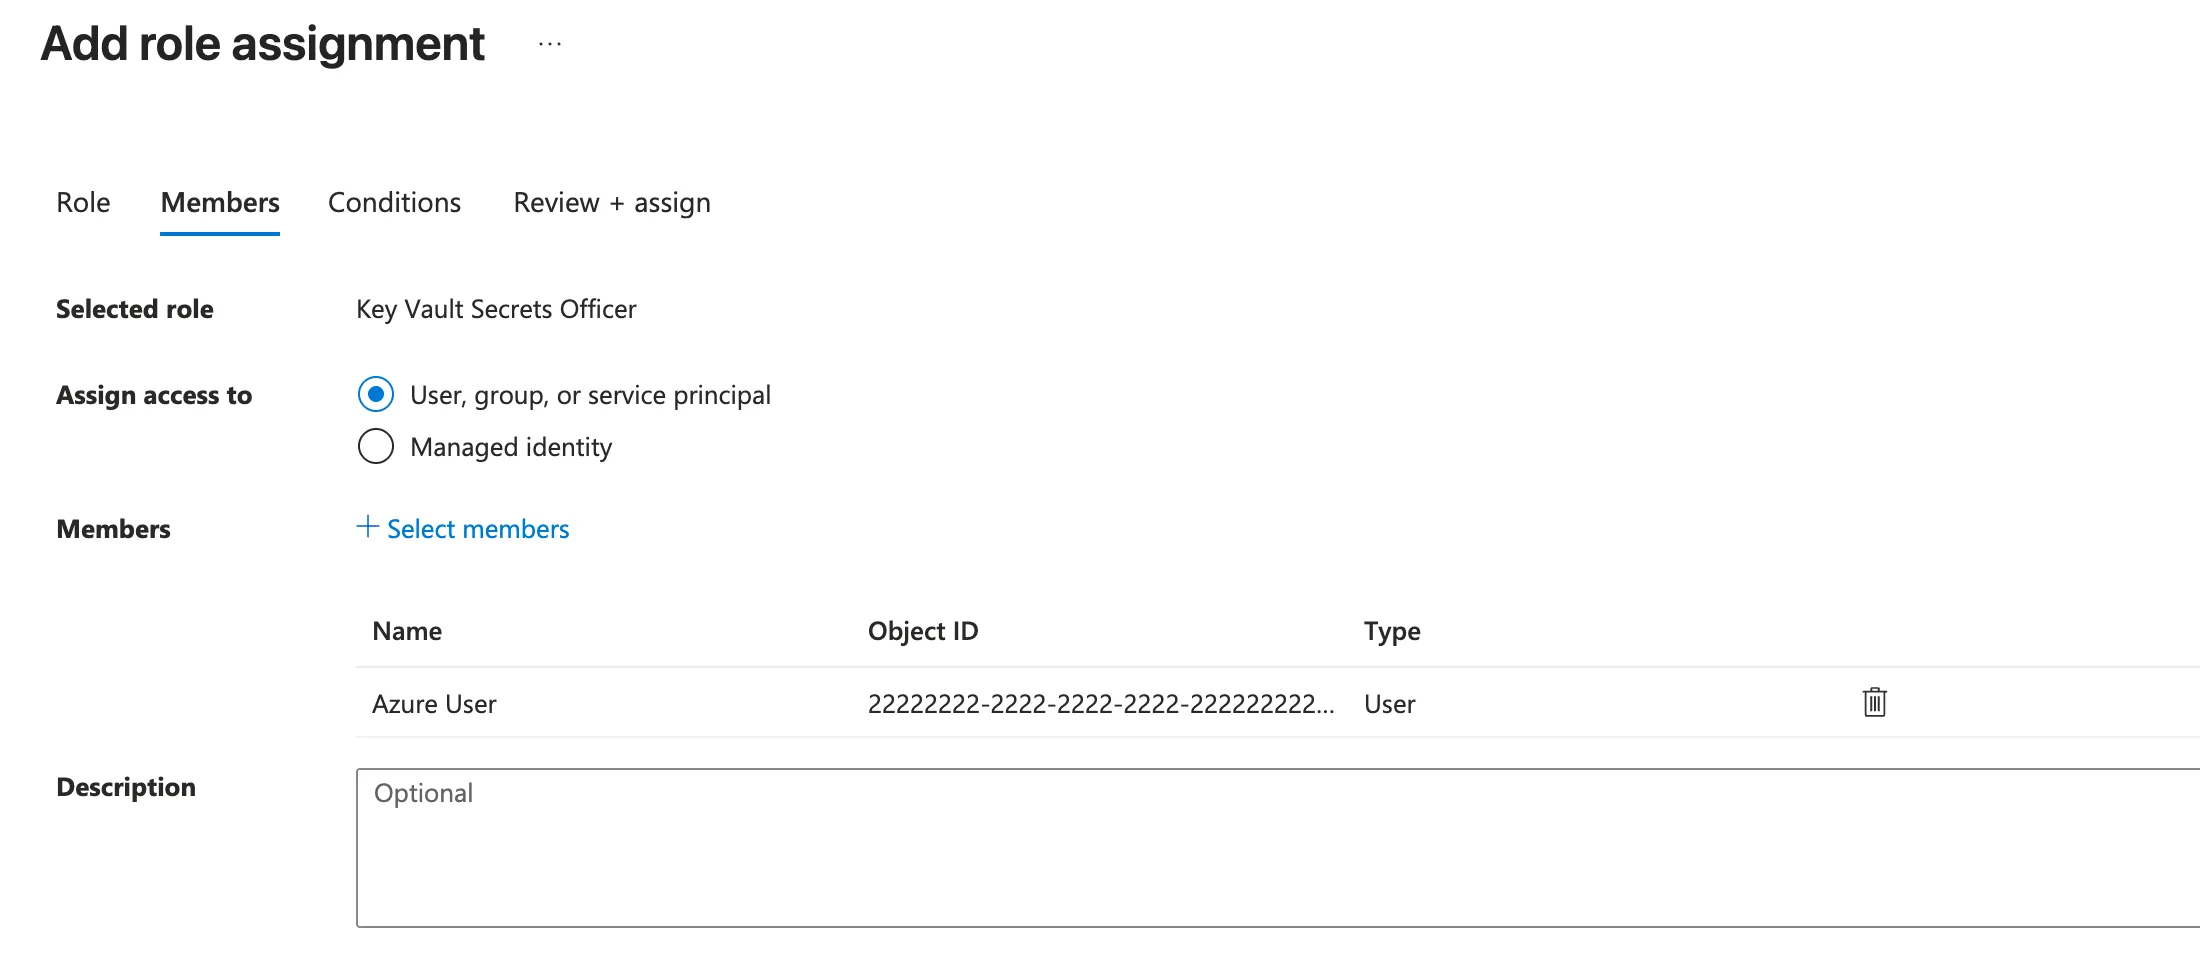
The Description box is optional, but a short note such as "Local development access for the service desk project" helps whoever reviews access later.
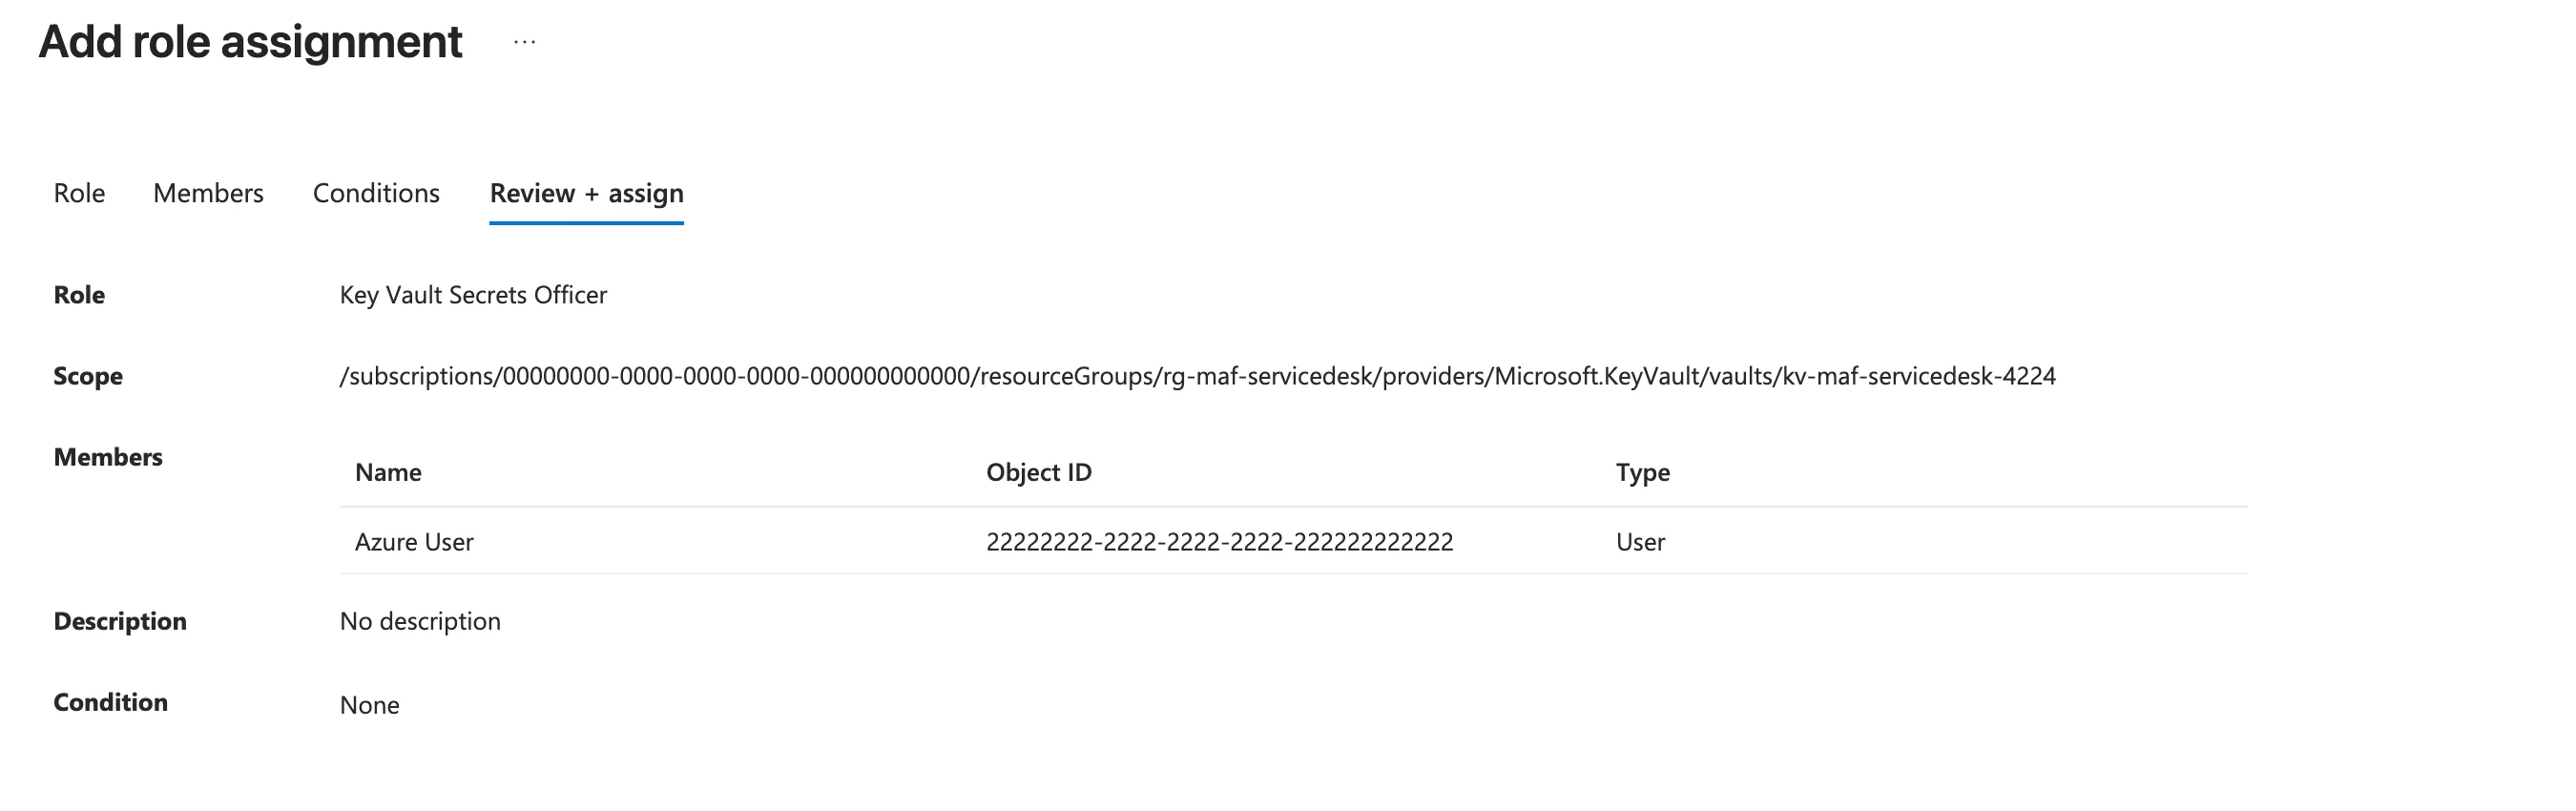
Step 4: Review and Assign
- Select the Review + assign tab. You can skip Conditions — most roles do not use them.
- Check the three parts one last time: Role, Scope and Members.
- Select Review + assign at the bottom of the page.
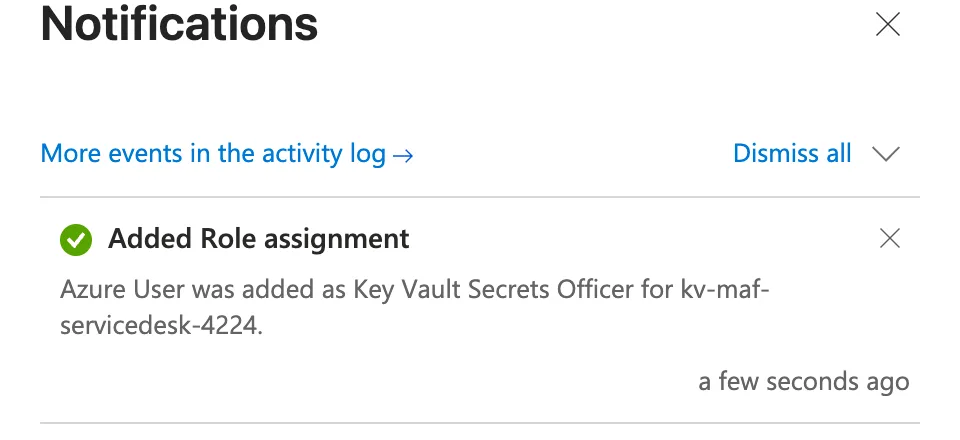
A notification confirms the assignment. If you miss it, it stays under the bell icon in the top bar:
Step 5: Verify the Assignment
- On the resource's Access control (IAM) page, open the Role assignments tab.
- Change the scope filter from All scopes to This resource.
Now only assignments made directly on this resource are listed. Roles inherited from the subscription are hidden, so the new assignment is easy to spot:

Then prove it from the data plane. The command that failed at the top of this guide now works:
az keyvault secret list --vault-name kv-maf-servicedesk-4224
[]
An empty list is exactly right. The vault has no secrets yet — but you are now allowed to ask.
Do It with the Azure CLI
The portal steps above are one command in the Azure CLI. First, get the resource ID of the resource — that long path is the scope:
az keyvault show --name kv-maf-servicedesk-4224 --query id --output tsv
/subscriptions/00000000-0000-0000-0000-000000000000/resourceGroups/rg-maf-servicedesk/providers/Microsoft.KeyVault/vaults/kv-maf-servicedesk-4224
For any other resource type, az resource show --name <name> --resource-group <group> --resource-type <type> --query id --output tsv gives you the same kind of ID.
Now create the assignment. Replace the email and the scope with your own:
az role assignment create \
  --assignee "user@example.com" \
  --role "Key Vault Secrets Officer" \
  --scope "/subscriptions/00000000-0000-0000-0000-000000000000/resourceGroups/rg-maf-servicedesk/providers/Microsoft.KeyVault/vaults/kv-maf-servicedesk-4224"
| Flag | What it means |
|---|---|
--assignee | Who — an email address, a group name or an object ID |
--role | What — the role's name (or its ID) |
--scope | Where — the resource ID from the previous command |
{
  "createdBy": "22222222-2222-2222-2222-222222222222",
  "createdOn": "2026-10-03T15:54:44.737877+00:00",
  "id": "/subscriptions/00000000-0000-0000-0000-000000000000/resourceGroups/rg-maf-servicedesk/providers/Microsoft.KeyVault/vaults/kv-maf-servicedesk-4224/providers/Microsoft.Authorization/roleAssignments/33333333-3333-3333-3333-333333333333",
  "name": "33333333-3333-3333-3333-333333333333",
  "principalId": "22222222-2222-2222-2222-222222222222",
  "principalName": "user@example.com",
  "principalType": "User",
  "resourceGroup": "rg-maf-servicedesk",
  "roleDefinitionId": "/subscriptions/00000000-0000-0000-0000-000000000000/providers/Microsoft.Authorization/roleDefinitions/b86a8fe4-44ce-4948-aee5-eccb2c155cd7",
  "roleDefinitionName": "Key Vault Secrets Officer",
  "scope": "/subscriptions/00000000-0000-0000-0000-000000000000/resourceGroups/rg-maf-servicedesk/providers/Microsoft.KeyVault/vaults/kv-maf-servicedesk-4224",
  "type": "Microsoft.Authorization/roleAssignments",
  "updatedBy": "22222222-2222-2222-2222-222222222222",
  "updatedOn": "2026-10-03T15:54:44.737877+00:00"
}
Running the same command twice is safe. The Azure CLI returns the existing assignment instead of creating a duplicate. The output above came from running it after I had already assigned the role in the portal — which is why createdOn shows the time of the portal assignment.
On Windows PowerShell, the trailing \ does not continue a line. Either put the whole command on one line, or end each line with a backtick (`) instead.
Verify with the CLI
az role assignment list \
  --assignee "user@example.com" \
  --scope "/subscriptions/00000000-0000-0000-0000-000000000000/resourceGroups/rg-maf-servicedesk/providers/Microsoft.KeyVault/vaults/kv-maf-servicedesk-4224" \
  --query "[].{Role:roleDefinitionName, PrincipalType:principalType, Scope:scope}" \
  --output table
Role                       PrincipalType    Scope
-------------------------  ---------------  -------------------------------------------------------------------------------------------------------------------------------------------------
Key Vault Secrets Officer  User             /subscriptions/00000000-0000-0000-0000-000000000000/resourceGroups/rg-maf-servicedesk/providers/Microsoft.KeyVault/vaults/kv-maf-servicedesk-4224
Assigning a Role to a Managed Identity
Apps should not use a person's account. In Azure they run as a managed identity, and you grant it roles the same way — but pass the identity's object (principal) ID and say what kind of principal it is:
az role assignment create \
  --assignee-object-id "<principal-id-of-the-managed-identity>" \
  --assignee-principal-type ServicePrincipal \
  --role "Key Vault Secrets User" \
  --scope "<resource-id>"
--assignee-object-id with --assignee-principal-type skips a directory lookup, so it works even seconds after the identity was created, when a name lookup can still fail. Key Vault Secrets User (read-only) is the right role for an app that only needs to read secrets.
Wait for Propagation
Role assignments usually take effect within a minute or two, but Microsoft documents that they can take up to 10 minutes. If you still get ForbiddenByRbac right after assigning a role, wait and try again. If it persists, sign out and back in (az logout, then az login) to drop any cached token.
In the example above, the az keyvault secret list check succeeded on the first try a few minutes after the assignment.
Roles You Will Use Most
| Role | Plane | What it allows | Typical member |
|---|---|---|---|
| Reader | Control | View resources, change nothing | Auditors, support staff |
| Contributor | Control | Create and manage resources, but not grant access (privileged) | Engineers |
| Owner | Control | Everything, including granting access (privileged) | A small number of admins |
| User Access Administrator | Control | Manage role assignments only (privileged) | Access administrators |
| Key Vault Secrets Officer | Data | Read, write and delete secrets | Developers who manage secrets |
| Key Vault Secrets User | Data | Read secret values | Apps and their managed identities |
| Foundry User | Data | Use Microsoft Foundry projects and call deployed models | Developers and apps calling AI models |
| AcrPull | Data | Pull images from a container registry | Container Apps, AKS |
| Storage Blob Data Reader | Data | Read blobs | Apps that read files |
Foundry User is the newer name of the role previously called Azure AI User. Its ID did not change (53ca6127-db72-4b80-b1b0-d745d6d5456d), which is why scripts often use the ID instead of the name.
A Least-Privilege Checklist
- Smallest scope that works — a single resource beats a resource group, which beats a subscription.
- Data roles, not Owner. If someone only needs to read secrets, give them Key Vault Secrets User, not Owner.
- Groups for people, managed identities for apps. Assign roles to an Entra group and manage membership there, instead of assigning to individuals one by one.
- Write a description on every assignment so the next reviewer knows why it exists.
- Remove access you no longer need.
Remove a Role Assignment
When the access is no longer needed, delete the assignment. In the portal, open Access control (IAM) → Role assignments, tick the assignment and select Delete. With the CLI:
az role assignment delete \
  --assignee "user@example.com" \
  --role "Key Vault Secrets Officer" \
  --scope "<resource-id>"
Remove assignments before you delete the person or identity they belong to. Microsoft documents that deleting a user, group, service principal or managed identity does not remove its role assignments — they stay behind and show up as Identity not found with an Unknown type until someone deletes them.
Common Mistakes
| Mistake | What happens | Fix |
|---|---|---|
| Assuming Owner can read data | ForbiddenByRbac on secrets, blobs or model calls | Add a data role such as Key Vault Secrets Officer |
| Picking the wrong row after a fuzzy search | You grant a different, often more powerful, role | Check the Name column before selecting Next |
| Assigning at the subscription "to be safe" | The person can reach every resource in the subscription | Open Access control (IAM) on the resource itself |
| Clicking the "Invited user" suggestion | A guest invitation goes out to an outside address | Fix the spelling; pick an existing directory user |
| Testing immediately after assigning | Still forbidden for a few minutes | Wait up to 10 minutes, then sign in again |
Using --assignee with a just-created managed identity | The name lookup fails | Use --assignee-object-id and --assignee-principal-type ServicePrincipal |
| Trying to assign roles as Contributor | Add role assignment is unavailable or the CLI is denied | Ask an Owner, User Access Administrator or RBAC Administrator |
Troubleshooting
| Symptom | Cause | Fix |
|---|---|---|
ForbiddenByRbac right after assigning | Propagation delay or a cached token | Wait, then az logout and az login |
ForbiddenByRbac and the role is listed | Role assigned at the wrong scope, or to the wrong account | Filter Role assignments by This resource and check the member |
| Add role assignment is greyed out | You lack permission to assign roles at this scope | Ask an Owner or User Access Administrator |
| The user is not found in Select members | Typo, or the user is in a different tenant | Search the full email address; check you are in the right directory |
| The vault still refuses access with the right role | The vault uses the legacy Vault access policy model | Check Access configuration on the vault, or follow Fix - Azure Key Vault Secrets - The operation is not allowed by RBAC |
Frequently Asked Questions
What is the difference between a role and a role assignment?
A role (role definition) is a named list of allowed actions, such as Key Vault Secrets Officer. A role assignment attaches that role to a specific principal at a specific scope. The same role can be assigned many times, to different people, at different scopes.
Why can't the subscription Owner read Key Vault secrets?
Owner is a control-plane role: it manages resources and access, but it does not include data actions such as reading secrets. In a vault that uses the Azure RBAC permission model, you need a data-plane role such as Key Vault Secrets Officer or Key Vault Secrets User. An Owner can, however, give themselves that role — which is exactly what this guide does.
Is running az role assignment create twice a problem?
No. When the same principal already has the same role at the same scope, the Azure CLI returns the existing assignment instead of creating a duplicate.
How long does a new role assignment take to work?
Usually a minute or two. Microsoft documents that it can take up to 10 minutes. Signing out and back in refreshes cached tokens.
Does a role assignment cost anything?
No. Role assignments are free. Each subscription has a limit on how many it can hold — the Role assignments tab shows your count against the limit (5,000 on the subscription used for this guide).
Should I give roles to people or to groups?
Groups, wherever possible. Assign the role once to an Entra group, then add or remove people from the group. It is easier to review and harder to forget.
Conclusion
Every Azure permission is a role assignment: a who, a what and a where. In the portal that is five screens on the resource's Access control (IAM) page; with the CLI it is one az role assignment create command. Keep the scope small, prefer data roles over Owner, and verify from the data plane — an empty [] that used to be a ForbiddenByRbac is the best proof there is.
If you are creating the Key Vault from scratch, start with Creating Key Vault in Microsoft Azure Portal for Secret Management, then add your first secrets with Adding Secrets in Azure Key Vault: Step-by-Step Portal and Coding Guide.
Additional Resources
- Assign Azure roles using the Azure portal — Microsoft's full walkthrough of the same screens.
- Assign Azure roles using Azure CLI — every
az role assignment createoption, including managed identities. - Azure built-in roles — the complete catalogue of roles and their IDs.
- Provide access to Key Vault keys, certificates, and secrets with Azure RBAC — the Key Vault data roles in detail.
- Troubleshoot Azure RBAC — propagation delays, limits and common errors.
- Fix - Azure Key Vault Secrets - The operation is not allowed by RBAC — the companion fix for the error at the top of this guide.
