Deploy a .NET App to Azure Container Apps — Part 3: Resource Group and Container Registry

Your container image is stuck on your laptop, and Azure can't reach your laptop. In this part you'll create the two Azure resources that fix that: a resource group to hold everything, and a container registry to store the image.
This is Part 3 of a 6-part series.
- Part 1: Build the App
- Part 2: Containerize It with Docker
- Part 3: Resource Group and Container Registry (you are here)
- Part 4: Push Your Image to the Registry
- Part 5: Deploy to Azure Container Apps
- Part 6: Logs, Scaling, Cost and Cleanup
What you need before starting
The image you built in Part 2, and an Azure account. If you don't have one, create a free account — it includes credit for the first 30 days.
Then sign in at portal.azure.com.
What this part costs
Let's be straight about this up front, because a lot of tutorials aren't.
| Resource | Cost |
|---|---|
| Resource group | Free. It's just a folder. |
| Container Registry (Basic) | About $0.167 per day (~$5/month). There is no free tier. |
So if you follow this series and delete everything the same day, the registry costs you around 17 cents. That's the honest number. Part 6 covers deleting it.
Unlike the compute you'll use in Part 5 — which has a genuinely free monthly allowance — ACR bills from the moment you create it until you delete it. The meter runs whether or not you push anything.
If you'd rather not pay anything at all, a public repository on Docker Hub or GitHub Container Registry is free and Container Apps can pull from either. This series uses ACR because it's the normal choice for real Azure work, and because keeping your images private is usually what you want.
Step 1: Create a resource group
A resource group is a folder for Azure resources. Everything you create in this series goes into one, which makes cleanup a single action later instead of a hunt.
In the portal search bar at the top, type resource groups and select it, then click + Create.
Fill in the Basics tab:
| Setting | Value |
|---|---|
| Subscription | Whichever one you want billed |
| Resource group name | rg-dotnet-container-demo |
| Region | Pick the one nearest you — this guide uses (Asia Pacific) Central India |
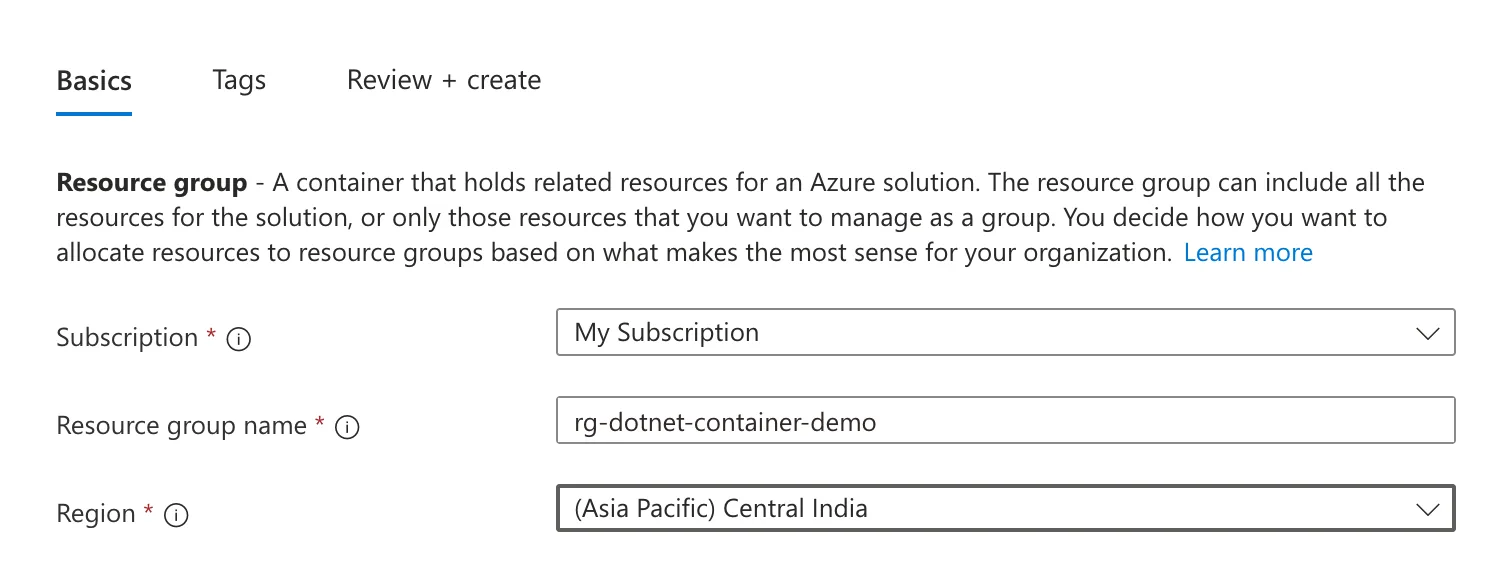
Click Review + create, then Create. It takes a couple of seconds.
rg-dotnet-container-demo isn't decoration. A widely used Azure convention is <type>-<workload>-<environment>:
rg-resource groupacrcontainer registry (no hyphens allowed — see below)cae-Container Apps environmentca-container app
You'll see all four by the end of this series. Once you have more than a handful of resources, being able to tell what something is from its name alone saves real time.
Choose the one physically closest to your users — it's the biggest lever on latency. It can also matter legally, since data residency rules often require data to stay in a particular country.
Keep everything in this series in the same region. Cross-region traffic is slower and, for some services, chargeable.
Once it deploys, open it. The Overview confirms what you created:

It's empty. Let's fix that.
Step 2: Create the container registry
A container registry is a private store for container images. You push images to it; Azure pulls them from it.
In the portal search bar, type container registries, select it, then click + Create.
Basics tab
| Setting | Value | Why |
|---|---|---|
| Subscription | Same as before | Keeps billing in one place |
| Resource group | rg-dotnet-container-demo | Select the one you just made |
| Registry name | acrdotnetdemo2026 | Must be globally unique — see below |
| Location | Central India | Same region as the resource group |
| Domain name label scope | Unsecure | The default; gives the simple <name>.azurecr.io address |
| Pricing plan | Basic | The cheapest tier, and plenty for this |
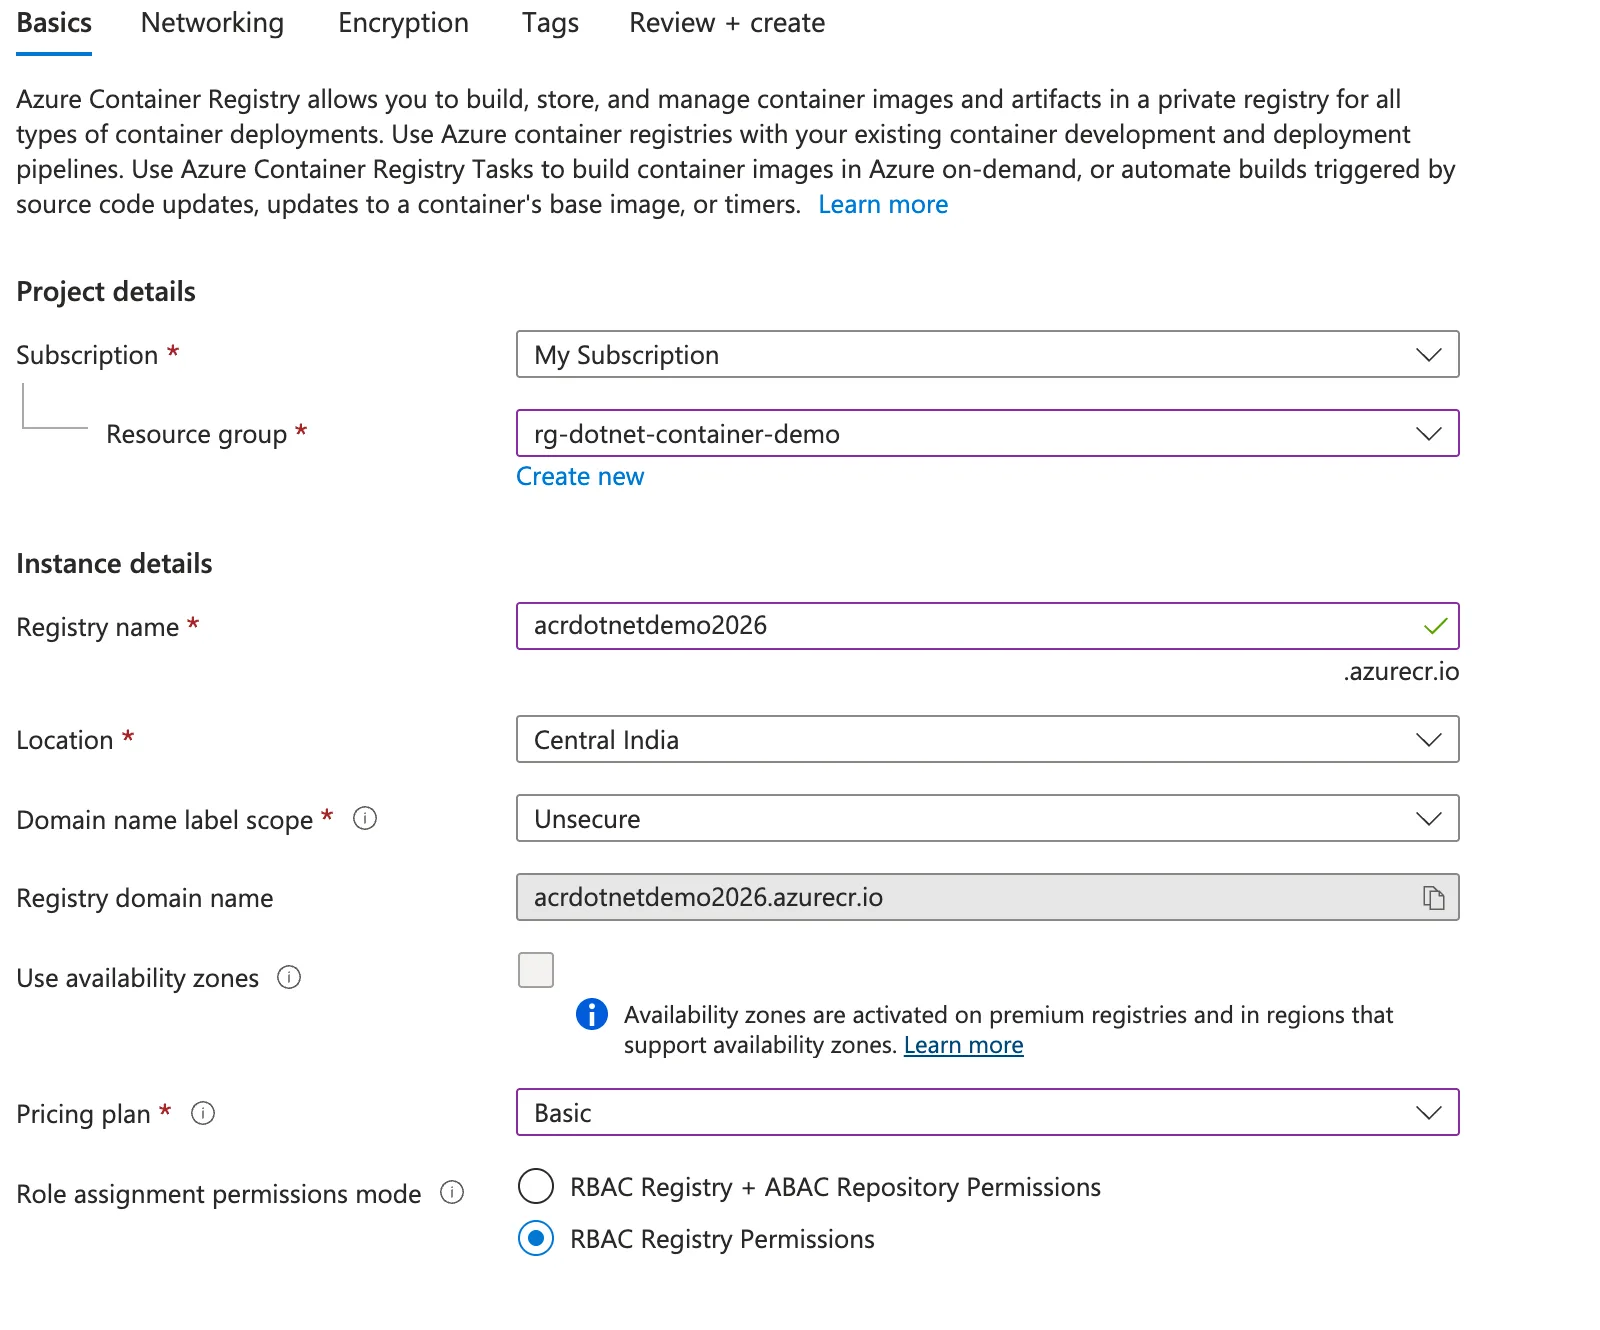
About the registry name. It becomes a public internet address — acrdotnetdemo2026.azurecr.io — so it has to be unique across all of Azure, worldwide. The rules:
- Letters and numbers only. No hyphens, no underscores.
- 5 to 50 characters.
- Lowercase in practice.
acrdotnetdemo2026 is very likely taken by the time you read this. Add something of your own — your initials, a date — until the green tick appears. If you don't get a tick, the name is taken.
About the pricing plan. Basic, Standard, and Premium differ mainly in included storage, throughput, and advanced features like geo-replication. Basic includes 10 GB. Your image is 262 MB. Basic is the right choice.
Click Review + create, then Create. This takes 30–60 seconds.
Step 3: Find your login server
Open the registry once it's deployed. The Overview page has the detail you need for Part 4:

Login server: acrdotnetdemo2026.azurecr.io
Write yours down. That's the address you'll push your image to.
A note on the admin user
If you go to Settings → Access keys in your new registry, you'll find an Admin user toggle, and it is off. Leave it off.
The admin user is a single username and password that grants full access to the whole registry. It's convenient, which is exactly why it shows up in a lot of tutorials.
Admin credentials are a shared secret. They don't identify who used them, they don't expire, they can't be scoped down to "read-only", and once pasted into a config file or a chat message they're extremely hard to rotate confidently.
Azure's recommended approach — which this series uses — is:
- You authenticate with your own Azure identity via
az acr login(Part 4). - Azure Container Apps authenticates with a managed identity — an identity Azure creates, rotates, and destroys automatically, with no password anywhere (Part 5).
Both are set up for you. The secure path here genuinely isn't harder, which is the best kind of security advice.
Do It with the Azure CLI
The same two resources, if you prefer the terminal:
# Create the resource group
az group create \
  --name rg-dotnet-container-demo \
  --location centralindia

# Check your registry name is available first
az acr check-name --name acrdotnetdemo2026

# Create the registry
az acr create \
  --name acrdotnetdemo2026 \
  --resource-group rg-dotnet-container-demo \
  --sku Basic \
  --location centralindia
Common Mistakes
| Mistake | What you'll see | Fix |
|---|---|---|
| Hyphens in the registry name | Validation error | Letters and numbers only |
| Name already taken | No green tick | Add initials or a suffix until it's unique |
| Registry in a different region to everything else | Slower pulls, possible egress charges | Keep the whole series in one region |
| Choosing Standard or Premium | A larger bill for no benefit here | Basic is enough |
| Enabling the admin user "to keep it simple" | A long-lived shared password | Leave it off; Parts 4 and 5 don't need it |
Troubleshooting
| Problem | Cause | Fix |
|---|---|---|
| No subscription in the dropdown | Account has no active subscription | Create one, or ask your admin for access |
The subscription is not registered to use namespace 'Microsoft.ContainerRegistry' | Provider not registered | Run az provider register --namespace Microsoft.ContainerRegistry |
| Can't create in your chosen region | Regional restriction on the subscription | Pick another nearby region and stay consistent |
| Deployment fails with a policy error | Org policy blocks the config | Check with whoever administers the subscription |
FAQ
What's the difference between a resource group and a registry? The resource group is an empty folder for organising and deleting things together. The registry is an actual service that stores images and costs money.
Can I put this in an existing resource group? You can, but a dedicated one makes cleanup a single safe action. Deleting a resource group deletes everything inside it.
Is my image public? No. ACR is private by default. Only identities you authorise can pull from it.
Can I use Docker Hub instead? Yes, and it's free for public repositories. Container Apps can pull from Docker Hub. The trade-off is that a free Docker Hub repo is publicly readable, and anonymous pulls are rate-limited.
Why did the region default to somewhere I didn't expect? The portal remembers previous choices and sometimes defaults to a different subscription than you expect. Always check the Subscription and Region fields before clicking Create.
What's Next
You have an empty registry with an address. In Part 4 you'll sign in to it and push your image — and hit the single most common trap in this whole workflow, which has nothing to do with Azure and everything to do with the chip in your laptop.
Previous: ← Part 2: Containerize It with Docker Next: Part 4: Push Your Image to the Registry →
